
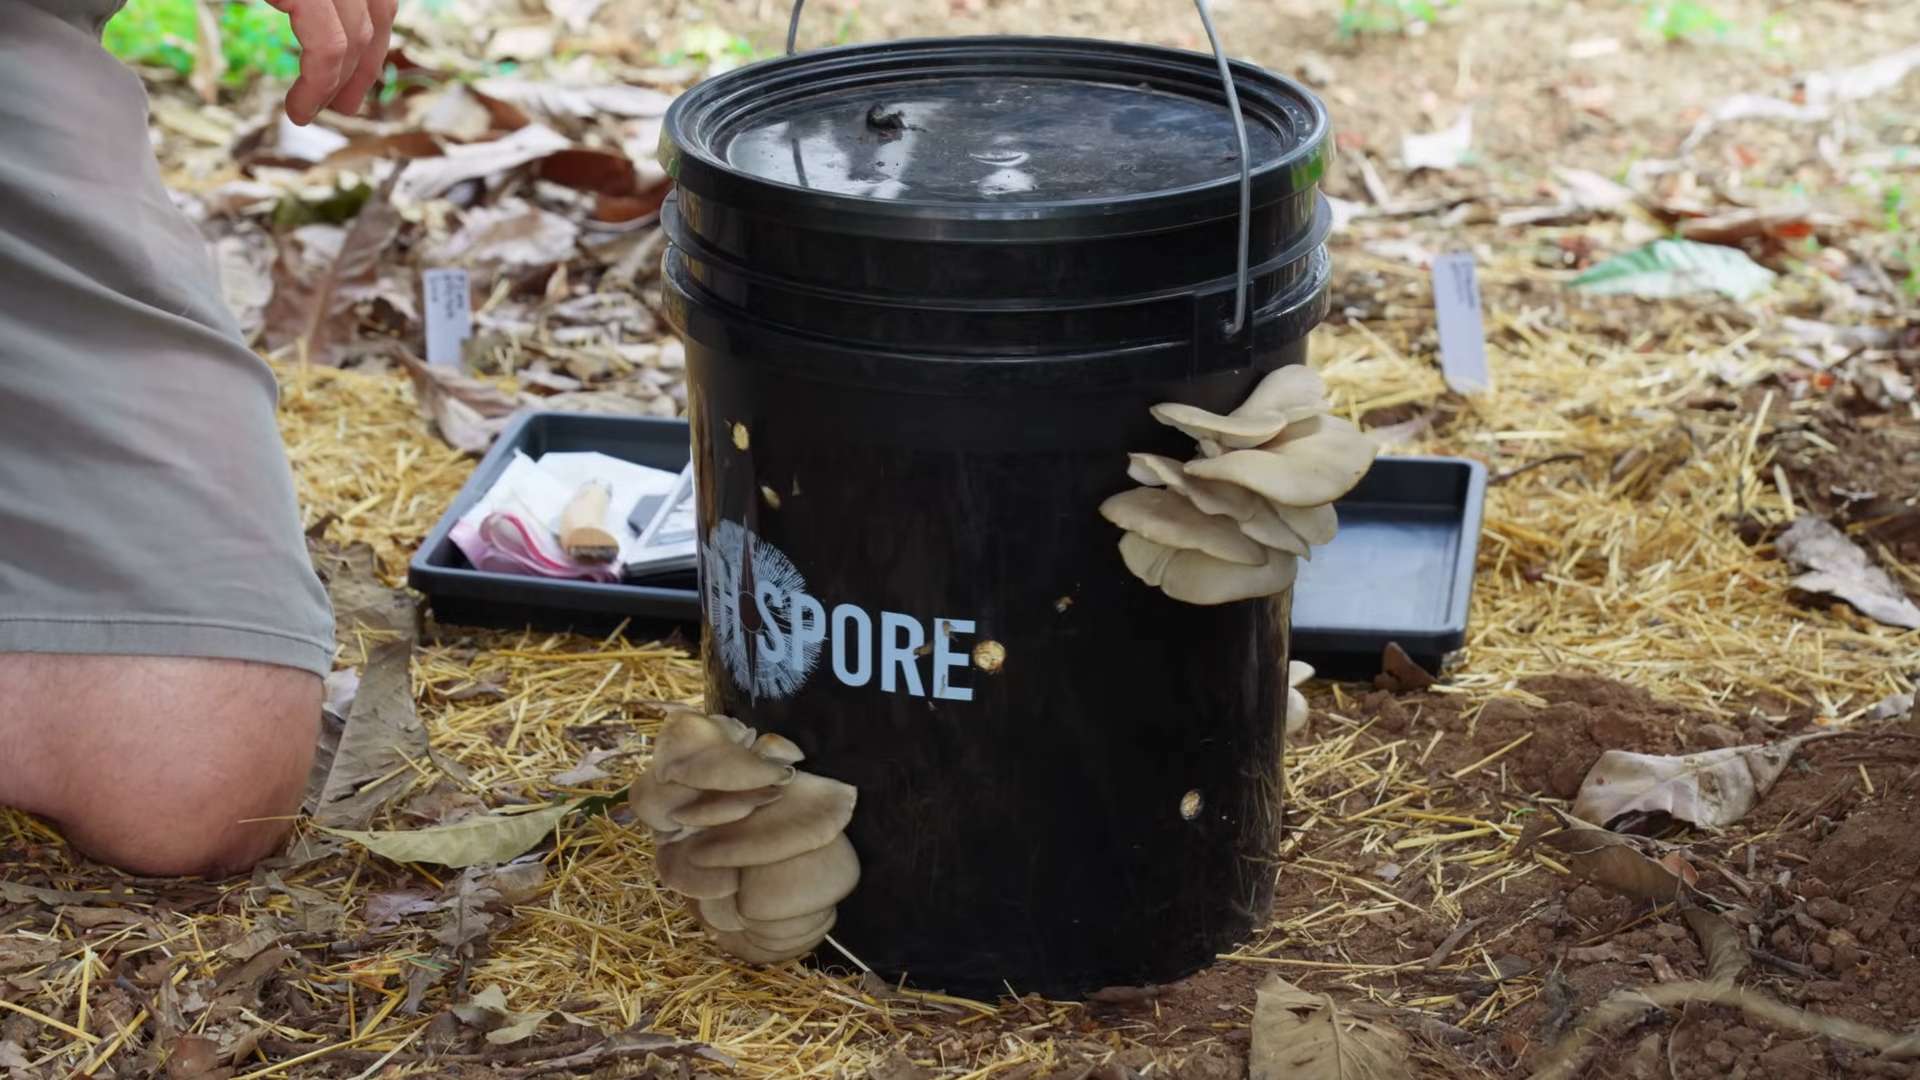
Bucket mushroom growing might sound like something out of a science fiction movie, but trust me, it’s a surprisingly simple and rewarding DIY project you can tackle right in your own backyard! Forget expensive kits and complicated setups. I’m going to show you how to cultivate delicious, fresh mushrooms using something you probably already have lying around: a humble bucket.
Mushrooms have been revered for centuries across various cultures, not just for their culinary uses but also for their medicinal properties. From ancient Egyptians considering them a symbol of immortality to traditional Chinese medicine utilizing them for healing, mushrooms hold a special place in human history. Now, you can tap into that rich history and bring the magic of mushroom cultivation into your own home.
Why should you try bucket mushroom growing? Well, imagine the satisfaction of harvesting your own gourmet mushrooms, knowing exactly where they came from and what went into growing them. Plus, it’s a fantastic way to recycle those old buckets and turn them into something productive. In a world where sustainability is increasingly important, this DIY project offers a small but meaningful step towards a greener lifestyle. Not only that, but you’ll save money on groceries and impress your friends with your newfound gardening skills. Let’s get started!
Grow Your Own Gourmet Mushrooms: A Bucket Tek Guide
Hey there, fellow fungi fanatics! Ever dreamt of having a constant supply of delicious, homegrown mushrooms right at your fingertips? Well, I’m here to tell you it’s easier than you think! Forget foraging in the woods (unless you’re really into that!), because today, we’re diving into the wonderful world of bucket mushroom cultivation. This method is perfect for beginners, relatively low-maintenance, and yields a fantastic harvest. Let’s get started!
What You’ll Need
Before we get our hands dirty, let’s gather our supplies. This is crucial for a smooth and successful grow.
* A 5-Gallon Bucket: A clean, food-grade bucket is essential. You can often find these at hardware stores or even repurpose one you already have. Make sure it’s thoroughly cleaned and sanitized.
* Mushroom Spawn: This is the “seed” of your mushrooms. Oyster mushrooms are a great choice for beginners due to their resilience and fast growth. You can purchase spawn online or from a local mushroom supplier. Make sure to choose a reputable source to ensure quality spawn.
* Substrate: This is the food source for your mushrooms. Straw is a popular and readily available option. You can also use hardwood sawdust, but straw is generally easier to work with for beginners.
* Lime (Hydrated Lime or Garden Lime): This is used to pasteurize the straw, killing off competing organisms and giving your mushroom spawn a head start.
* Large Pot or Tub: You’ll need something big enough to submerge your straw in water for pasteurization.
* Drill with a 1/4-inch Drill Bit: This is for creating drainage and fruiting holes in your bucket.
* Gloves: Protect your hands and prevent contamination.
* Spray Bottle: For misting your mushrooms as they grow.
* Thermometer: To monitor the temperature of the water during pasteurization.
* Optional: A scale for measuring lime and spawn accurately.
Preparing the Bucket
First things first, we need to get our bucket ready for its new role as a mushroom farm!
1. Drill Drainage Holes: Using your drill and 1/4-inch drill bit, drill about 10-15 drainage holes in the bottom of the bucket. These holes are crucial for preventing water from pooling and creating a soggy environment that can lead to mold.
2. Drill Fruiting Holes: Now, drill fruiting holes around the sides of the bucket. Space them about 4-6 inches apart, in a staggered pattern. These holes are where your mushrooms will eventually emerge. I usually drill about 20-30 holes in total.
3. Clean the Bucket: Give the bucket a good scrub with soap and water to remove any dirt or debris. Rinse it thoroughly and let it dry completely.
Pasteurizing the Straw
This is a critical step in the process. Pasteurization eliminates competing organisms that could hinder mushroom growth.
1. Chop the Straw: Cut the straw into smaller pieces, about 2-4 inches long. This makes it easier to pack into the bucket and allows the mushroom mycelium to colonize it more efficiently.
2. Prepare the Lime Water: In your large pot or tub, mix water with lime. The ratio is typically 1 tablespoon of lime per gallon of water. Stir well to dissolve the lime. The water should be slightly alkaline.
3. Submerge the Straw: Add the chopped straw to the lime water, making sure it’s completely submerged. You might need to weigh it down with a brick or a heavy object to keep it from floating.
4. Heat the Water: Heat the water to around 160-180°F (71-82°C). Maintain this temperature for about 1-2 hours. Use your thermometer to monitor the temperature. This process kills off unwanted bacteria and fungi without completely sterilizing the straw, leaving it ready for the mushroom spawn.
5. Drain and Cool: After pasteurization, carefully drain the hot water from the straw. Let the straw cool down to room temperature before proceeding. This is important because hot straw can kill the mushroom spawn. You can spread the straw out on a clean surface to speed up the cooling process. The straw should be moist but not dripping wet. Squeeze a handful of straw – if water pours out, it’s too wet.
Inoculating the Bucket
Now for the fun part – introducing the mushroom spawn to its new home!
1. Layering the Substrate and Spawn: This is where we create the perfect environment for the mycelium to thrive. Start by placing a layer of pasteurized straw at the bottom of the bucket, about 2-3 inches thick.
2. Add Spawn: Sprinkle a layer of mushroom spawn over the straw. Use about 1/4 of your total spawn for this first layer.
3. Repeat Layers: Continue layering straw and spawn, alternating between the two. Each layer of straw should be about 2-3 inches thick, and each layer of spawn should be evenly distributed.
4. Top Layer: Finish with a layer of straw on top.
5. Gently Press Down: Gently press down on the straw to compact it slightly. This helps to create good contact between the straw and the spawn.
Incubation
This is the waiting game! The mycelium needs time to colonize the straw.
1. Find a Suitable Location: Place the inoculated bucket in a dark, humid location with a temperature between 65-75°F (18-24°C). A basement, closet, or garage often works well.
2. Maintain Humidity: Keep the humidity high by misting the inside of the bucket with water every day or two. You can also cover the bucket with a damp towel or plastic bag to help retain moisture. Just make sure there’s some airflow to prevent mold growth.
3. Monitor Colonization: Check the bucket regularly for signs of colonization. You should start to see white, fuzzy mycelium spreading throughout the straw. This process typically takes 2-3 weeks.
Fruiting
The moment we’ve been waiting for – mushroom time!
1. Introduce Light and Fresh Air: Once the straw is fully colonized (it will look mostly white), it’s time to introduce light and fresh air. Move the bucket to a location with indirect light and good ventilation. A shaded area outdoors or a well-lit room indoors works well.
2. Maintain Humidity: Continue to mist the bucket regularly to maintain high humidity. You can also mist the mushrooms directly as they start to form.
3. Harvesting: Your mushrooms should start to appear within a week or two. Harvest them when the caps are fully developed but before they start to drop spores. To harvest, gently twist and pull the mushrooms from the fruiting holes.
4. Subsequent Flushes: After harvesting, the bucket will often produce multiple flushes of mushrooms. To encourage subsequent flushes, soak the bucket in water for 24 hours and then return it to its fruiting location.
Troubleshooting
Even with the best planning, things can sometimes go wrong. Here are a few common issues and how to address them:
* Mold Growth: If you see mold growing in your bucket, it’s usually a sign of contamination. Remove the affected area and try to improve ventilation. If the mold is widespread, you may need to discard the entire bucket and start over.
* Slow Colonization: Slow colonization can be caused by low temperatures, low humidity, or poor-quality spawn. Make sure the temperature and humidity are within the optimal range, and consider using a different source of spawn.
* No Mushroom Production: If your bucket is fully colonized but not producing mushrooms, it could be due to lack of light, fresh air, or humidity. Make sure the bucket is in a suitable location and that you’re misting it regularly.
* Small Mushrooms: Small mushrooms can be a sign of nutrient deficiency. You can try adding a small amount of nutrient-rich material to the bucket, such as coffee grounds or bran.
Tips for Success
Here are a few extra tips to help you maximize your mushroom harvest:
* Use High-Quality Spawn: The quality of your spawn is crucial for success. Choose a reputable supplier and make sure the spawn is fresh.
* Maintain Proper Hygiene: Cleanliness is essential to prevent contamination. Wash your hands thoroughly before handling the spawn and substrate, and sanitize your bucket and tools.
* Monitor Temperature and Humidity: Temperature and humidity are critical factors for mushroom growth. Use a thermometer and hygrometer to monitor these conditions and adjust them as needed.
* Experiment with Different Substrates: While straw is a good starting point, you can experiment with other substrates, such as hardwood sawdust, coffee grounds, or cardboard.
* Be Patient: Mushroom growing takes time and patience. Don’t get

Conclusion
So, there you have it! Growing your own mushrooms in a bucket isn’t just a fun project; it’s a gateway to fresh, delicious, and sustainable food right in your own home. We’ve walked through the process, highlighting the simplicity and affordability of this method. Forget expensive kits and complicated setups. With a bucket, some substrate, and a little patience, you can cultivate a thriving mushroom colony.
Why is this DIY trick a must-try? Because it empowers you to take control of your food source. You know exactly what goes into your mushrooms – no pesticides, no hidden ingredients, just pure, homegrown goodness. Plus, it’s incredibly rewarding to watch those little pins emerge and develop into flavorful fungi. It’s a fantastic learning experience for all ages, connecting you to the natural world in a tangible way.
But the benefits don’t stop there. Bucket mushroom growing is also a fantastic way to recycle organic waste. Coffee grounds, straw, and cardboard scraps that would otherwise end up in the landfill can be transformed into a nutrient-rich substrate for your mushrooms. It’s a win-win for your taste buds and the environment.
Looking for variations? Absolutely! Experiment with different mushroom species. Oyster mushrooms are a great starting point, but once you’ve mastered the basics, you can explore shiitake, lion’s mane, or even wine cap mushrooms. Each variety offers a unique flavor profile and texture, adding exciting diversity to your culinary creations. You can also adjust the substrate mix to suit your specific needs and resources. Try adding different ratios of coffee grounds, straw, and wood chips to see what works best for your chosen mushroom species. Consider adding a small amount of gypsum to the substrate mix to help regulate pH levels and improve nutrient availability.
Another variation involves the bucket itself. While a standard 5-gallon bucket is ideal, you can use larger or smaller containers depending on your space and desired yield. Just be sure to adjust the amount of substrate and spawn accordingly. You can even get creative with the design of your fruiting holes, experimenting with different sizes and placements to optimize air circulation and mushroom growth.
Don’t be afraid to experiment and adapt the process to your specific environment and resources. The beauty of DIY is that it allows you to tailor the project to your own needs and preferences.
We encourage you to give this DIY mushroom growing trick a try. It’s easier than you think, and the rewards are well worth the effort. Imagine the satisfaction of harvesting your own fresh mushrooms and incorporating them into your favorite dishes. From savory stir-fries to hearty soups, the possibilities are endless.
Once you’ve embarked on your mushroom growing adventure, we’d love to hear about your experience. Share your photos, tips, and challenges in the comments below. Let’s build a community of mushroom enthusiasts and learn from each other. Together, we can unlock the secrets of the fungal kingdom and enjoy the delicious bounty of our own homegrown mushrooms. So grab a bucket, gather your supplies, and get ready to grow! This method of bucket mushroom growing is a game changer.
Frequently Asked Questions (FAQ)
What type of mushrooms grow best in a bucket?
Oyster mushrooms (Pleurotus species) are generally considered the easiest and most forgiving for beginners. They are fast-growing, relatively tolerant of variations in temperature and humidity, and produce a generous yield. Other suitable options include shiitake (Lentinula edodes), which require a bit more patience and specific substrate, and wine cap mushrooms (Stropharia rugosoannulata), which thrive in wood chip-based substrates. Lion’s mane (Hericium erinaceus) can also be grown in buckets, but may require more specialized techniques. Ultimately, the best type of mushroom for you will depend on your experience level, available resources, and desired flavor profile.
What kind of bucket should I use?
A standard 5-gallon plastic bucket is ideal for bucket mushroom growing. Ensure the bucket is clean and food-grade, meaning it’s safe for contact with food. Avoid using buckets that have previously contained harsh chemicals or pesticides, as these could contaminate your mushrooms. You can purchase new buckets from hardware stores or repurpose used buckets, as long as they are thoroughly cleaned and sanitized. Dark-colored buckets are preferable as they help to block light, which can inhibit mushroom growth. Drill holes around the bucket for drainage and fruiting.
What is the best substrate for bucket mushroom growing?
The ideal substrate depends on the type of mushroom you’re growing. Oyster mushrooms thrive on a variety of substrates, including straw, coffee grounds, cardboard, and wood chips. A common mix is pasteurized straw supplemented with coffee grounds. Shiitake mushrooms prefer hardwood sawdust or wood chips. Wine cap mushrooms do well in a mixture of wood chips, straw, and compost. Pasteurization is crucial to eliminate competing organisms and create a favorable environment for your mushroom spawn. You can pasteurize your substrate by soaking it in hot water (around 160-180°F) for an hour or steaming it.
How do I pasteurize the substrate?
Pasteurizing the substrate is a critical step to eliminate competing molds and bacteria that can hinder mushroom growth. There are several methods you can use:
* Hot Water Pasteurization: This is the most common method. Soak the substrate in a container filled with hot water (around 160-180°F or 71-82°C) for at least one hour. You can use a large pot on a stove or a heat source to maintain the water temperature. After an hour, drain the excess water and allow the substrate to cool to room temperature before mixing it with the spawn.
* Steaming: Place the substrate in a heat-resistant container and steam it for 1-2 hours. This method is effective for larger quantities of substrate.
* Lime Bath: Soak the substrate in a solution of hydrated lime (calcium hydroxide) for 12-24 hours. This method raises the pH of the substrate, making it less hospitable to competing organisms. However, it’s important to rinse the substrate thoroughly after the lime bath to remove excess lime, which can inhibit mushroom growth.
How much spawn do I need?
A general rule of thumb is to use about 5-10% spawn by weight of the substrate. For a 5-gallon bucket, this typically translates to about 1-2 pounds of spawn. Using more spawn can speed up the colonization process and reduce the risk of contamination, but it’s not always necessary. Distribute the spawn evenly throughout the substrate as you layer it into the bucket.
How long does it take for mushrooms to grow in a bucket?
The time it takes for mushrooms to grow depends on several factors, including the mushroom species, substrate, temperature, and humidity. Oyster mushrooms typically begin to fruit within 2-3 weeks of inoculation, while shiitake mushrooms may take several months. Maintain a humid environment by misting the bucket regularly and covering it with a plastic bag or humidity dome. Provide adequate ventilation to prevent the buildup of carbon dioxide.
How do I know when the mushrooms are ready to harvest?
Mushrooms are typically ready to harvest when the caps have fully expanded but before they begin to drop spores. Oyster mushrooms should be harvested when the edges of the caps are still slightly curled downwards. Shiitake mushrooms should be harvested when the caps have flattened out and the gills are visible. Gently twist or cut the mushrooms from the substrate, being careful not to damage the surrounding mycelium.
How do I store harvested mushrooms?
Freshly harvested mushrooms should be stored in the refrigerator in a paper bag or loosely wrapped in a damp cloth. They will typically last for up to a week. You can also dry or freeze mushrooms for longer-term storage. To dry mushrooms, slice them thinly and dehydrate them in a food dehydrator or oven at a low temperature. To freeze mushrooms, blanch them briefly in boiling water and then freeze them in a single layer on a baking sheet before transferring them to a freezer bag.
What if my bucket gets contaminated?
Contamination is a common issue in mushroom growing. If you notice mold or other unwanted growth in your bucket, it’s important to take action quickly. Small areas of contamination can sometimes be removed by carefully scooping out the affected area. However, if the contamination is widespread, it’s best to discard the entire bucket to prevent the spread of contamination to other areas. To minimize the risk of contamination, use sterile techniques when preparing and inoculating your substrate, and maintain a clean growing environment.
Can I reuse the substrate after harvesting mushrooms?
Yes, you can often get multiple flushes (harvests) from a single bucket of substrate. After harvesting the first flush, soak the substrate in water for 24 hours to rehydrate it. Then, drain the excess water and return the bucket to its growing environment. You may need to add a small amount of fresh spawn to stimulate further growth. The number of flushes you can get will depend on the mushroom species and the quality of the substrate. Eventually, the substrate will become depleted of nutrients and will no longer produce mushrooms. At this point, you can compost the spent substrate and use it to enrich your garden soil.
Leave a Comment