
Cantaloupe growing bag tip: Ever dreamt of biting into a juicy, homegrown cantaloupe, bursting with flavor that store-bought melons just can’t match? I know I have! But the reality of sprawling vines and limited garden space can often squash those dreams. That’s where this game-changing DIY trick comes in – a simple, effective way to cultivate delicious cantaloupes, even if you’re short on space.
For centuries, cantaloupes have been cherished for their sweetness and refreshing qualities. Originating in Africa and India, these melons made their way across the globe, becoming a symbol of summer abundance. But traditionally, growing them required ample room for their sprawling vines. Not anymore!
This DIY cantaloupe growing bag tip is a total game-changer because it tackles a common problem: space constraints. Many of us are eager to grow our own food, but lack the sprawling gardens our grandparents might have had. This method allows you to maximize your yield in a small area, whether it’s a balcony, patio, or even a sunny corner of your yard. Plus, it’s a fantastic way to control the growing environment, leading to healthier plants and sweeter, more flavorful cantaloupes. So, get ready to ditch the store-bought melons and embrace the joy of homegrown goodness with this easy and effective cantaloupe growing bag tip!
DIY Cantaloupe Growing Bag: Sweet Success in Small Spaces!
Hey there, fellow gardening enthusiasts! Are you dreaming of juicy, homegrown cantaloupe but think you don’t have the space? Well, I’m here to tell you that you absolutely can grow these delicious melons, even if you’re short on garden real estate. The secret? A DIY cantaloupe growing bag! This project is perfect for balconies, patios, or any small sunny spot. I’ve been using this method for a few years now, and I’m always amazed at the results. Let’s get started!
What You’ll Need
Before we dive in, let’s gather our supplies. This is a relatively inexpensive project, and you might already have some of these items on hand.
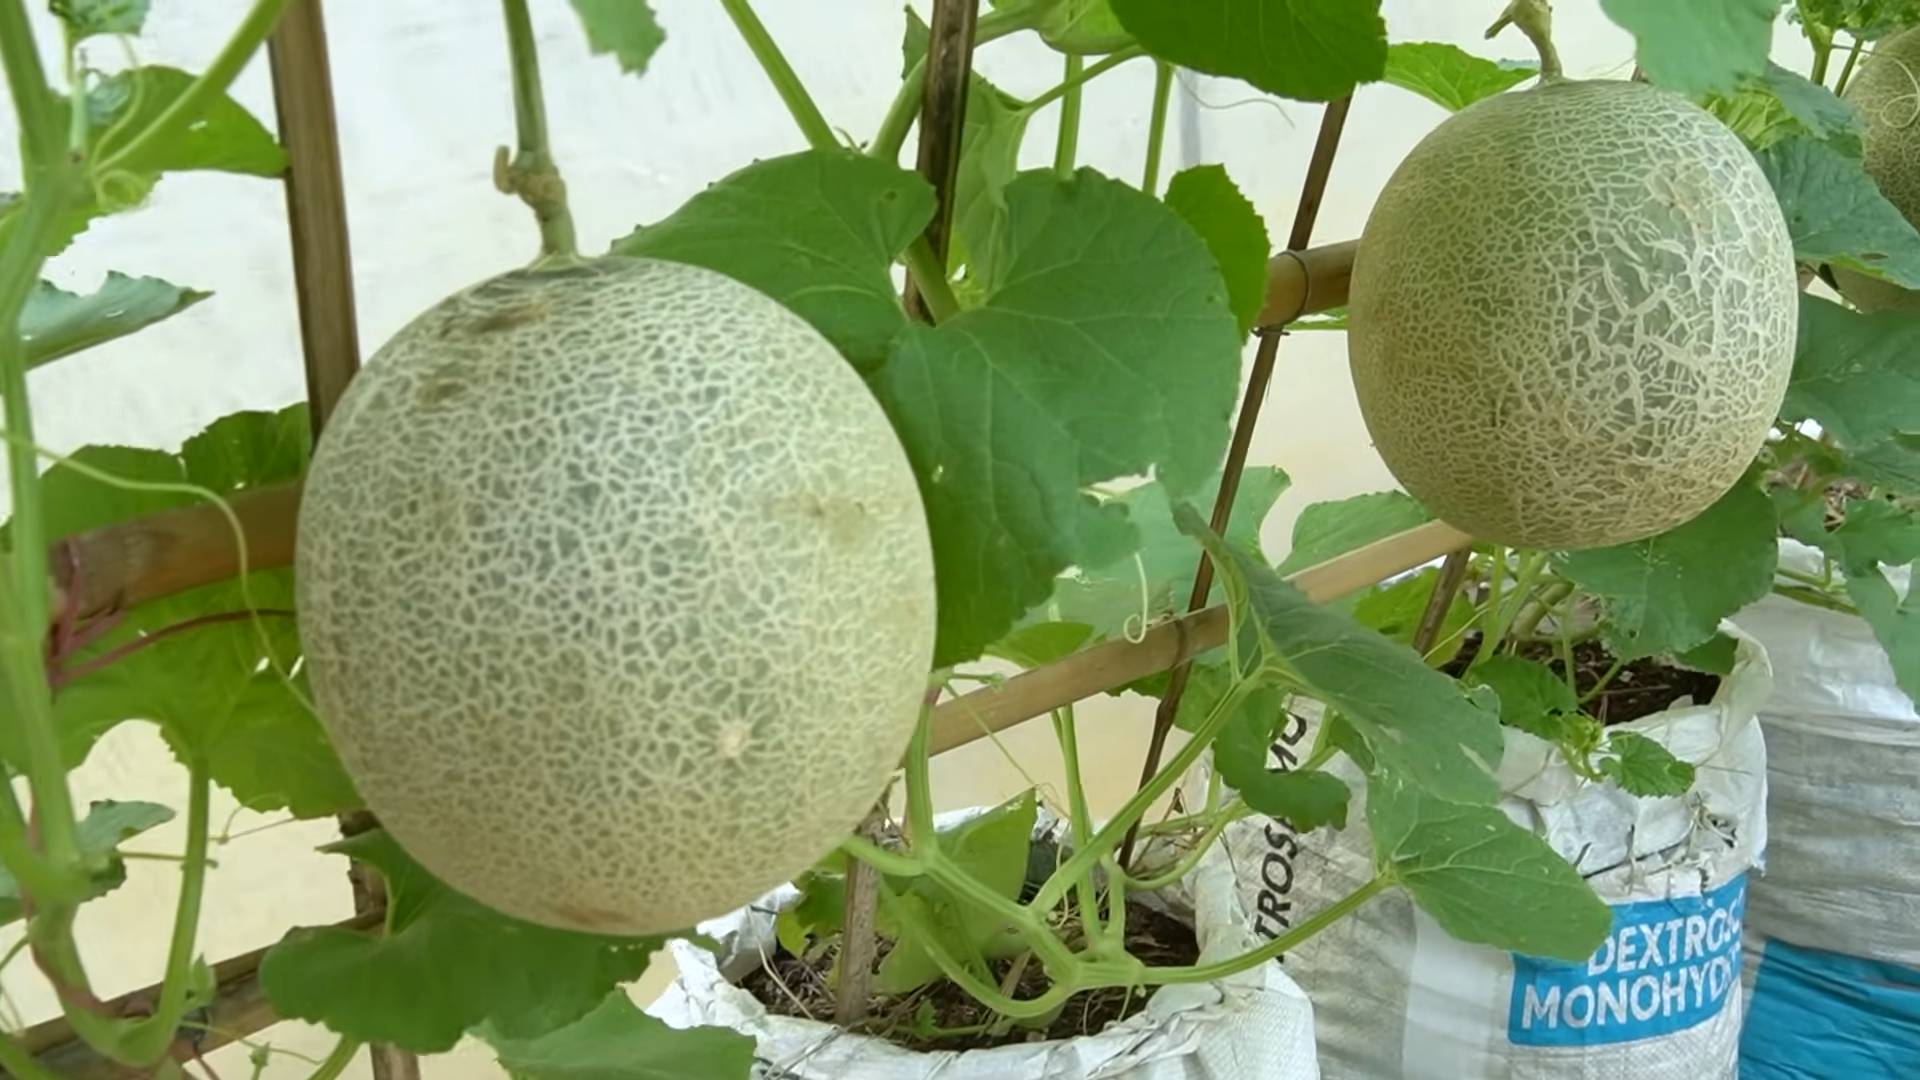
* A large, sturdy bag: I recommend a heavy-duty garden bag, burlap sack, or even a repurposed feed bag. Aim for a bag that’s at least 24 inches in diameter and 24 inches deep. The bigger, the better, as cantaloupes need room for their roots to spread.
* Potting mix: This is crucial! Don’t use garden soil directly in the bag. A high-quality potting mix that drains well is essential for healthy cantaloupe growth. I like to use a mix that includes compost, peat moss, and perlite.
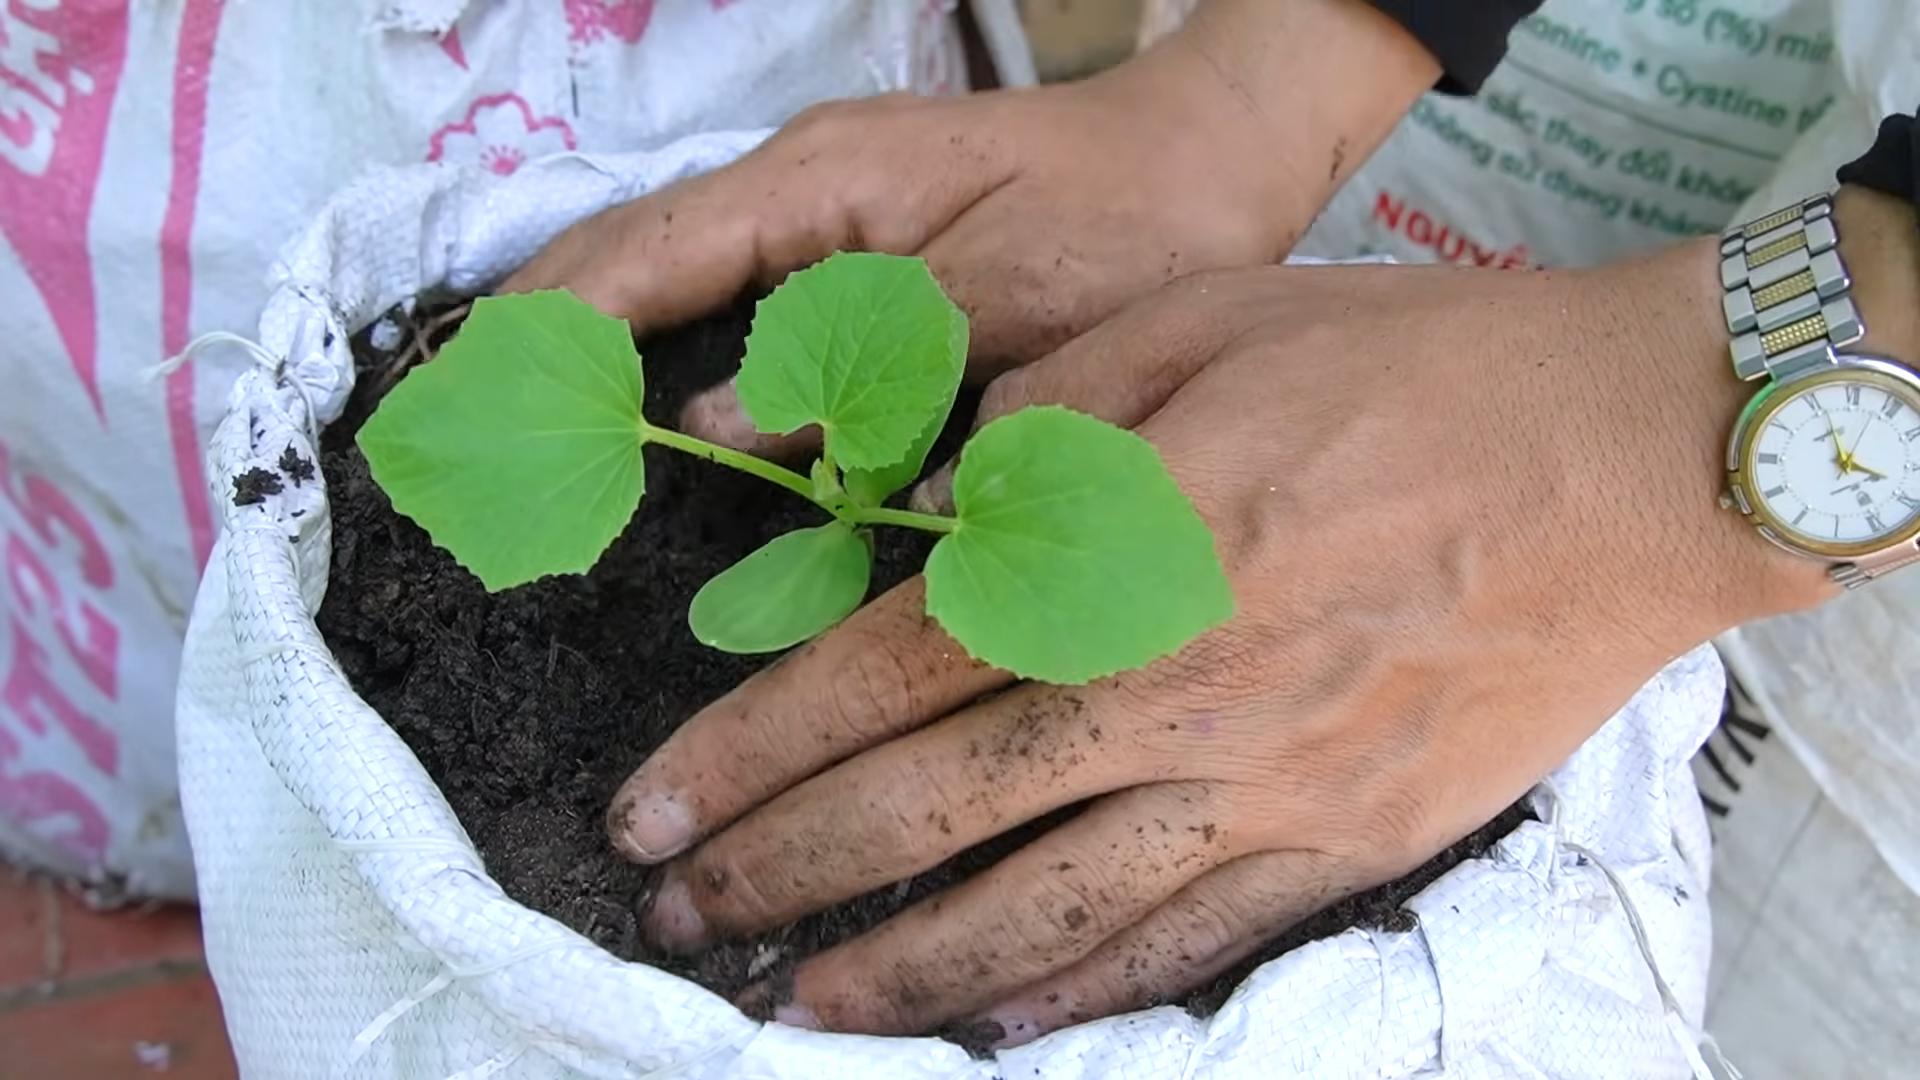
* Cantaloupe seeds or seedlings: You can start your cantaloupes from seed indoors a few weeks before your last frost, or you can purchase seedlings from a local nursery. Choose a variety that’s well-suited to your climate and growing conditions. Bush varieties tend to do well in containers.
* Slow-release fertilizer: Cantaloupes are heavy feeders, so a slow-release fertilizer will provide them with the nutrients they need throughout the growing season. Look for a fertilizer that’s specifically formulated for vegetables or fruits.
* Trellis or support system: As the cantaloupe vines grow, they’ll need something to climb on. A trellis, tomato cage, or even sturdy stakes will work well. This helps to keep the fruit off the ground and prevents rot.
* Watering can or hose: Regular watering is essential for cantaloupe growth.
* Gloves: To protect your hands.
* Scissors or a knife: For cutting the bag if needed.
* Optional: Landscape fabric or weed barrier to line the bag. This helps to prevent soil from washing out.
Step-by-Step Instructions: Building Your Cantaloupe Growing Bag
Okay, let’s get our hands dirty! Here’s how to build your very own cantaloupe growing bag:
1. Prepare the Bag: If you’re using a burlap sack or feed bag, make sure it’s clean and free of any debris. If you’re using a plastic garden bag, you might want to poke a few drainage holes in the bottom. This will prevent the soil from becoming waterlogged. If you’re using landscape fabric, cut a piece that’s slightly larger than the inside of the bag and line the bag with it. This will help to keep the soil in place and prevent weeds from growing.
2. Add Potting Mix: Now it’s time to fill the bag with potting mix. Fill it about three-quarters of the way full, leaving some space at the top for watering. Gently pat down the soil to remove any air pockets.
3. Incorporate Fertilizer: Sprinkle the slow-release fertilizer evenly over the surface of the potting mix. Follow the instructions on the fertilizer package for the correct amount to use. Gently mix the fertilizer into the top few inches of the soil.
4. Plant Your Cantaloupe: If you’re starting from seed, sow the seeds directly into the potting mix, following the instructions on the seed packet. If you’re using seedlings, gently remove them from their containers and plant them in the bag, spacing them according to the variety’s recommendations. I usually plant 2-3 seedlings in a bag this size. Make sure the top of the root ball is level with the surface of the soil.
5. Water Thoroughly: After planting, water the bag thoroughly until the water drains out of the bottom. This will help to settle the soil and ensure that the roots are well-hydrated.
6. Install the Trellis: Now it’s time to set up your trellis or support system. Position it behind the bag, making sure it’s sturdy and can support the weight of the growing vines and fruit. If you’re using stakes, insert them into the soil near the plants.
Caring for Your Cantaloupe Plants
Now that your cantaloupe growing bag is set up, it’s time to focus on providing your plants with the care they need to thrive.
1. Watering: Cantaloupes need consistent moisture, especially during hot weather. Water deeply whenever the top inch of soil feels dry to the touch. Avoid overhead watering, as this can lead to fungal diseases. Instead, water at the base of the plant.
2. Fertilizing: Cantaloupes are heavy feeders, so you’ll need to supplement the slow-release fertilizer with regular feedings of a liquid fertilizer. I like to use a balanced fertilizer every two weeks. Follow the instructions on the fertilizer package for the correct amount to use.
3. Pruning: As the cantaloupe vines grow, you may need to prune them to encourage fruit production. Pinch off any side shoots that are growing from the main stem. This will help to direct the plant’s energy towards producing fruit.
4. Training: As the vines grow, gently train them to climb the trellis or support system. Use plant ties or clips to secure the vines to the trellis.
5. Pollination: Cantaloupes require pollination to produce fruit. If you’re growing your cantaloupes indoors or in an area with limited bee activity, you may need to hand-pollinate the flowers. To do this, use a small paintbrush to transfer pollen from the male flowers to the female flowers. The female flowers have a small fruit developing behind the flower.
6. Pest and Disease Control: Keep an eye out for pests and diseases. Common cantaloupe pests include aphids, squash bugs, and cucumber beetles. Common diseases include powdery mildew and fusarium wilt. If you notice any problems, take action immediately. You can use organic pesticides or fungicides to control pests and diseases.
Harvesting Your Cantaloupes
The most rewarding part of growing cantaloupes is, of course, harvesting the delicious fruit! Here’s how to tell when your cantaloupes are ripe:
1. Check the Color: The skin of the cantaloupe should turn from green to a tan or yellowish color.
2. Smell the Aroma: A ripe cantaloupe will have a sweet, musky aroma.
3. Feel the Stem: The stem of a ripe cantaloupe will easily slip from the vine with a gentle tug. This is known as the “slip test.”
4. Tap the Melon: A ripe cantaloupe will sound hollow when you tap it.
Once your cantaloupe is ripe, carefully cut it from the vine with a sharp knife. Enjoy your homegrown cantaloupe fresh, or use it in your favorite recipes.
Troubleshooting Tips
Even with the best care, you might encounter some challenges when growing cantaloupes in a bag. Here are a few common problems and how to solve them:
* Yellowing Leaves: This could be a sign of overwatering, underwatering, or nutrient deficiency. Check the soil moisture and adjust your watering accordingly. If the soil is dry, water deeply. If the soil is soggy, allow it to dry out before watering again. If the leaves are yellowing all over, it could be a sign of nutrient deficiency. Fertilize with a balanced fertilizer.
* Lack of Fruit: This could be due to poor pollination, lack of sunlight, or nutrient deficiency. Make sure your plants are getting at least six hours of sunlight per day. If you’re growing your cantaloupes indoors, you may need to hand-pollinate the flowers. Fertilize with a fertilizer that’s high in phosphorus.
* Fruit Rot: This is usually caused by fungal diseases. Make sure your plants have good air circulation. Avoid overhead watering. Remove any infected fruit immediately.
* Pests: Inspect your plants regularly for pests. If you find any pests, take action immediately. You can use organic pesticides to control pests.
Choosing the Right Cantaloupe Variety
Selecting the right cantaloupe variety is crucial for success, especially when growing in containers. Here are a few varieties that tend to perform well in bags:
* Minnesota Midget: This is a compact variety that produces small, sweet cantaloupes. It’s perfect for small spaces.
* Bush Star: As the name suggests, this is a bush-type cantaloupe that doesn’t require a lot of space. It produces medium-sized fruits.
*
Conclusion
So, there you have it! The cantaloupe growing bag tip – a simple yet revolutionary method to elevate your melon game. We’ve explored how this DIY approach can transform your cantaloupe cultivation, leading to sweeter, healthier, and more abundant harvests. It’s not just about growing cantaloupes; it’s about maximizing their potential and enjoying the fruits (literally!) of your labor.
Why is this a must-try? Because it addresses several key challenges faced by cantaloupe growers. It provides crucial support, preventing ground contact that can lead to rot and pest infestations. It optimizes sunlight exposure, ensuring even ripening and enhanced sweetness. And, perhaps most importantly, it simplifies the growing process, making it accessible to gardeners of all skill levels.
But the beauty of this DIY trick lies in its adaptability. Feel free to experiment with different materials for your growing bags. Burlap, breathable landscape fabric, or even repurposed netting can all work wonders. Consider adding a layer of mulch at the bottom of the bag to retain moisture and suppress weeds. You can also adjust the size of the bag to accommodate different cantaloupe varieties or growing spaces. For smaller gardens, a hanging basket variation might be ideal, while larger gardens could benefit from sturdier, ground-supported bags.
Don’t be afraid to get creative with your support system as well. Instead of relying solely on the bag, you can use stakes or trellises to provide additional stability, especially as the cantaloupes grow larger and heavier. This is particularly important for vining varieties that tend to sprawl.
The key is to observe your plants closely and adjust your approach as needed. Pay attention to their growth patterns, the amount of sunlight they receive, and the moisture levels in the soil. By fine-tuning your cantaloupe growing bag setup, you can create the perfect environment for your melons to thrive.
We are confident that this cantaloupe growing bag tip will make a significant difference in your gardening endeavors. It’s a cost-effective, eco-friendly, and highly effective way to improve the quality and yield of your cantaloupe crop.
Now, it’s your turn! We encourage you to try this DIY trick and experience the magic for yourself. Whether you’re a seasoned gardener or a complete beginner, we believe that you’ll be amazed by the results. And, most importantly, we want to hear about your experiences. Share your photos, tips, and stories with us in the comments below. Let’s build a community of cantaloupe enthusiasts and learn from each other’s successes and challenges. Together, we can unlock the full potential of this delicious and nutritious fruit. Happy growing!
Frequently Asked Questions (FAQ)
What type of material is best for making a cantaloupe growing bag?
The best material for a cantaloupe growing bag is one that is breathable, durable, and allows for good drainage. Burlap is a popular choice because it’s natural, biodegradable, and provides excellent airflow. Landscape fabric is another good option, as it’s strong, weather-resistant, and readily available. You can also repurpose old netting or mesh bags, as long as they are clean and sturdy. Avoid using plastic bags, as they can trap moisture and lead to fungal diseases. The key is to choose a material that will support the weight of the cantaloupe as it grows and allows for proper air circulation to prevent rot.
How big should the cantaloupe growing bag be?
The size of the growing bag depends on the variety of cantaloupe you’re growing and the size of the mature fruit. As a general guideline, a bag that is approximately 12-18 inches in diameter and 12-18 inches deep should be sufficient for most cantaloupe varieties. For larger varieties, you may need a bigger bag. It’s important to ensure that the bag is large enough to accommodate the root system of the plant and provide enough space for the cantaloupe to develop fully. If you’re growing multiple cantaloupes on a single vine, you may need to use multiple bags or a larger container to support the weight.
How do I support the cantaloupe growing bag?
Supporting the growing bag is crucial to prevent the cantaloupe from falling and getting damaged. There are several ways to provide support. You can hang the bag from a sturdy structure, such as a trellis, fence, or pergola. Make sure the structure is strong enough to support the weight of the bag and the cantaloupe. Alternatively, you can place the bag on a raised platform or use stakes to provide additional support. For vining varieties, you can train the vines to grow up a trellis or fence, which will help to distribute the weight and prevent the cantaloupe from dragging on the ground. Regularly inspect the support system to ensure it’s strong and secure.
How often should I water cantaloupes growing in bags?
Cantaloupes growing in bags require regular watering, especially during hot and dry weather. The frequency of watering depends on several factors, including the weather, the type of soil, and the size of the bag. As a general rule, water deeply whenever the top inch of soil feels dry to the touch. Avoid overwatering, as this can lead to root rot. It’s best to water in the morning to allow the foliage to dry before nightfall, which can help to prevent fungal diseases. You can also use a moisture meter to monitor the moisture levels in the soil and adjust your watering schedule accordingly.
What kind of fertilizer should I use for cantaloupes in growing bags?
Cantaloupes benefit from regular fertilization to support healthy growth and fruit production. Use a balanced fertilizer with equal amounts of nitrogen, phosphorus, and potassium (e.g., 10-10-10) early in the growing season to promote vegetative growth. Once the plants start to flower and set fruit, switch to a fertilizer with a higher phosphorus and potassium content (e.g., 5-10-10) to encourage fruit development and sweetness. You can also supplement with organic fertilizers, such as compost tea or fish emulsion, to provide additional nutrients and beneficial microbes. Apply fertilizer according to the package instructions, and avoid over-fertilizing, as this can damage the plants.
How do I protect cantaloupes in growing bags from pests and diseases?
Protecting cantaloupes from pests and diseases is essential for a successful harvest. Regularly inspect your plants for signs of pests, such as aphids, squash bugs, and cucumber beetles. You can use insecticidal soap or neem oil to control these pests. To prevent fungal diseases, such as powdery mildew and downy mildew, ensure good air circulation around the plants and avoid overhead watering. You can also apply a fungicide if necessary. Consider using companion planting to deter pests and attract beneficial insects. For example, planting marigolds near your cantaloupes can help to repel nematodes and other soil pests.
When is the best time to harvest cantaloupes grown in bags?
Knowing when to harvest cantaloupes is crucial for enjoying their optimal flavor and sweetness. Cantaloupes are typically ready to harvest when they slip easily from the vine with a gentle tug. Other signs of ripeness include a change in color from green to tan or yellow, a sweet aroma, and a softening of the blossom end. Avoid harvesting cantaloupes that are still hard or green, as they will not ripen properly off the vine. Once harvested, cantaloupes can be stored in the refrigerator for up to a week.
Can I reuse the cantaloupe growing bags?
Yes, you can reuse the cantaloupe growing bags, but it’s important to clean and disinfect them thoroughly before using them again. Remove any remaining soil and plant debris, and wash the bags with soap and water. You can also soak them in a solution of bleach and water (1 part bleach to 9 parts water) to kill any pathogens. Rinse the bags thoroughly and allow them to dry completely before storing them. Inspect the bags for any damage, such as tears or holes, and repair them if necessary. Proper cleaning and maintenance will help to extend the lifespan of your growing bags and prevent the spread of diseases.
What are some variations of the cantaloupe growing bag tip?
There are several variations of the cantaloupe growing bag tip that you can try. One variation is to use a hanging basket instead of a bag, which can be a good option for smaller gardens or balconies. Another variation is to create a support system using a trellis or fence, which can help to distribute the weight of the cantaloupe and prevent it from falling. You can also experiment with different materials for the growing bag, such as burlap, landscape fabric, or repurposed netting. Consider adding a layer of mulch at the bottom of the bag to retain moisture and suppress weeds. The key is to adapt the technique to your specific growing conditions and preferences.
What if my cantaloupe growing bag tip doesn’t work?
If your cantaloupe growing bag tip doesn’t work as expected, don’t be discouraged! Gardening is often a process of trial and error. First, review your setup and make sure you’ve followed the instructions correctly. Check the drainage of your bag, ensure adequate sunlight exposure, and adjust your watering and fertilization schedule as needed. Consider the specific variety of cantaloupe you’re growing and whether it’s well-suited to your climate. If you’re still

Leave a Comment