
Container chili peppers: the fiery jewels of your edible garden, ready to spice up your life, one pot at a time! Have you ever dreamed of harvesting a vibrant array of chili peppers right from your balcony or patio? Imagine the satisfaction of adding a dash of homegrown heat to your favorite dishes, knowing exactly where your ingredients came from. Well, stop dreaming and start doing! This DIY guide is packed with simple, effective tricks to help you cultivate a thriving container chili pepper garden, even if you’re a complete beginner.
Growing chili peppers in containers isn’t just a modern trend; it’s a practice with roots stretching back centuries. From ancient civilizations in South America, where chili peppers originated, to modern-day urban gardeners, people have long appreciated the versatility and beauty of these plants. But let’s face it, sometimes growing them can be a little tricky. That’s where these DIY hacks come in!
Let’s be honest, store-bought chili peppers can be expensive and sometimes lack that fresh, vibrant flavor we crave. Plus, who knows what kind of chemicals they’ve been exposed to? With these easy-to-follow tips, you’ll learn how to choose the right containers, select the perfect soil, and provide your chili peppers with the optimal conditions for growth. I’m excited to share these secrets with you, so you can enjoy a bountiful harvest of delicious, homegrown container chili peppers. Get ready to unleash your inner gardener and add some serious spice to your life!

Growing Chili Peppers in Containers: A Spicy DIY Guide
Hey there, fellow chili enthusiast! Ever dreamt of having a constant supply of fresh, fiery peppers right at your fingertips? Well, you’re in the right place! Growing chili peppers in containers is surprisingly easy and rewarding, even if you don’t have a sprawling garden. I’m going to walk you through everything you need to know, from choosing the right peppers to harvesting your spicy bounty. Let’s get started!
Choosing Your Chili Peppers
First things first, you need to decide what kind of heat you’re after. Chili peppers come in a dazzling array of shapes, sizes, and Scoville Heat Units (SHU), which measure their spiciness. Here’s a quick rundown of some popular choices for container gardening:
* Jalapeños: A classic choice, offering a mild to medium heat. They’re versatile and great for stuffing, pickling, or adding to salsas.
* Serranos: A step up in heat from jalapeños, with a bright, fresh flavor. Perfect for adding a kick to Mexican dishes.
* Cayenne Peppers: These slender red peppers pack a punch! They’re often dried and ground into powder, but also delicious fresh.
* Habaneros: Proceed with caution! Habaneros are seriously hot, with a fruity, almost floral flavor. Use them sparingly.
* Thai Chili Peppers: Small but mighty, these peppers are commonly used in Southeast Asian cuisine. They deliver a sharp, intense heat.
* Bell Peppers: Okay, okay, bell peppers aren’t spicy, but they’re still peppers! And they’re super easy to grow in containers, adding color and sweetness to your dishes.
When choosing your peppers, consider your heat tolerance, the size of your containers, and the climate you live in. Some peppers thrive in hotter conditions, while others prefer cooler temperatures.
Gathering Your Supplies
Before you start planting, you’ll need to gather a few essential supplies:
* Containers: Choose pots that are at least 12 inches in diameter and depth. Larger containers are generally better, as they provide more room for the roots to grow and hold moisture. Make sure your containers have drainage holes!
* Potting Mix: Use a high-quality potting mix that’s well-draining and contains plenty of organic matter. Avoid using garden soil, as it can become compacted in containers and restrict root growth.
* Chili Pepper Seeds or Seedlings: You can start your peppers from seed or purchase seedlings from a nursery. Starting from seed is more economical, but it requires more time and effort.
* Fertilizer: Chili peppers are heavy feeders, so you’ll need to fertilize them regularly. Use a balanced fertilizer or one specifically formulated for tomatoes and peppers.
* Watering Can or Hose: You’ll need a way to water your plants regularly.
* Gardening Gloves: Protect your hands from dirt and potential irritants.
* Optional: Stakes or cages to support your plants as they grow.
Planting Your Chili Peppers
Now for the fun part! Here’s how to plant your chili peppers in containers:
1. Prepare Your Containers: Fill your containers with potting mix, leaving about an inch of space at the top.
2. Plant Your Seeds or Seedlings:
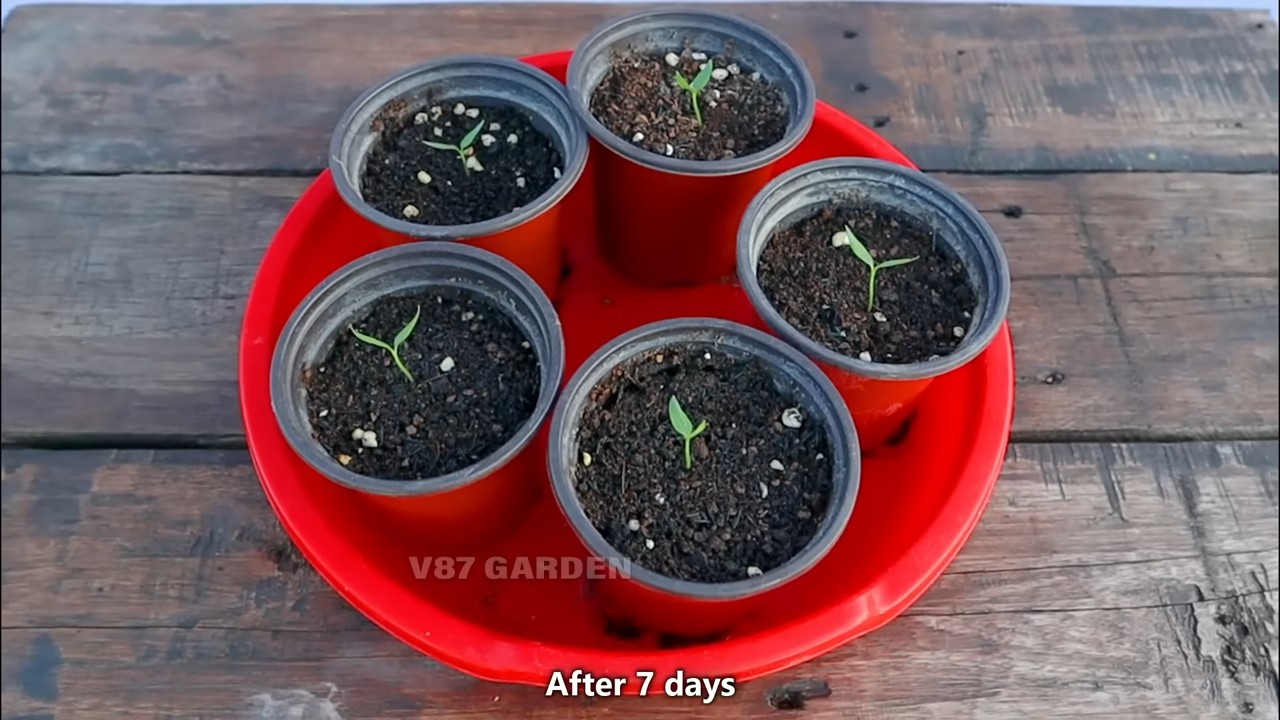
* From Seed: Sow your seeds about ¼ inch deep and water gently. Keep the soil moist but not soggy. It can take anywhere from one to three weeks for the seeds to germinate.
* From Seedlings: Gently remove the seedlings from their nursery pots and loosen the roots. Dig a hole in the potting mix that’s large enough to accommodate the root ball. Place the seedling in the hole and backfill with potting mix. Water thoroughly.
3. Space Your Plants: If you’re planting multiple peppers in the same container, space them at least 12 inches apart.
4. Add Support (Optional): If you’re growing taller varieties of chili peppers, you may want to add stakes or cages to support them as they grow.
5. Label Your Plants: It’s easy to forget which pepper is which, so label your plants with their names and planting dates.
Caring for Your Chili Peppers
Once your chili peppers are planted, it’s important to provide them with the right care to ensure a bountiful harvest.
1. Watering: Water your chili peppers regularly, especially during hot, dry weather. The soil should be consistently moist, but not waterlogged. Check the soil moisture by sticking your finger into the soil. If the top inch feels dry, it’s time to water.
2. Fertilizing: Fertilize your chili peppers every two to three weeks with a balanced fertilizer or one specifically formulated for tomatoes and peppers. Follow the instructions on the fertilizer label.
3. Sunlight: Chili peppers need at least six to eight hours of sunlight per day. Place your containers in a sunny location, such as a patio, balcony, or windowsill.
4. Temperature: Chili peppers thrive in warm temperatures, between 70°F and 85°F. Protect your plants from frost and extreme heat.
5. Pruning: Pruning can help to improve air circulation and encourage bushier growth. Remove any yellowing or dead leaves. You can also pinch off the tips of the branches to promote branching.
6. Pest and Disease Control: Keep an eye out for pests and diseases, such as aphids, spider mites, and blossom end rot. Treat any problems promptly with organic pest control methods or fungicides.
7. Pollination: Chili peppers are self-pollinating, but you can help them along by gently shaking the plants or using a small paintbrush to transfer pollen from one flower to another. This is especially important if you’re growing your peppers indoors.
Harvesting Your Chili Peppers
The moment you’ve been waiting for! Here’s how to harvest your chili peppers:
1. Timing: The time it takes for chili peppers to mature depends on the variety. Generally, they’re ready to harvest when they’ve reached their mature size and color.
2. Harvesting: Use a sharp knife or scissors to cut the peppers from the plant. Be careful not to damage the plant.
3. Handling: Wear gloves when handling hot peppers, as the capsaicin (the compound that makes them spicy) can irritate your skin.
4. Storage: Fresh chili peppers can be stored in the refrigerator for up to a week. You can also dry, freeze, or pickle them for longer storage.
Troubleshooting Common Problems
Even with the best care, you may encounter some problems when growing chili peppers in containers. Here are some common issues and how to address them:
* Blossom End Rot: This is a condition where the bottom of the pepper turns black and leathery. It’s caused by a calcium deficiency. To prevent blossom end rot, make sure your soil is well-draining and that you’re watering your plants consistently. You can also add calcium to the soil by using bone meal or eggshells.
* Aphids: These tiny insects suck the sap from plants, causing them to weaken and yellow. You can control aphids by spraying them with a strong stream of water or using insecticidal soap.
* Spider Mites: These tiny pests create webs on plants and cause the leaves to become speckled and yellow. You can control spider mites by spraying them with a strong stream of water or using insecticidal soap.
Hey there, fellow chili enthusiast! Ever dreamt of having a constant supply of fresh, fiery peppers right at your fingertips? Well, you’re in the right place! Growing chili peppers in containers is surprisingly easy and rewarding, even if you don’t have a sprawling garden. I’m going to walk you through everything you need to know, from choosing the right peppers to harvesting your spicy bounty. Let’s get started!
Choosing Your Chili Peppers
First things first, you need to decide what kind of heat you’re after. Chili peppers come in a dazzling array of shapes, sizes, and Scoville Heat Units (SHU), which measure their spiciness. Here’s a quick rundown of some popular choices for container gardening:
* Jalapeños: A classic choice, offering a mild to medium heat. They’re versatile and great for stuffing, pickling, or adding to salsas.
* Serranos: A step up in heat from jalapeños, with a bright, fresh flavor. Perfect for adding a kick to Mexican dishes.
* Cayenne Peppers: These slender red peppers pack a punch! They’re often dried and ground into powder, but also delicious fresh.
* Habaneros: Proceed with caution! Habaneros are seriously hot, with a fruity, almost floral flavor. Use them sparingly.
* Thai Chili Peppers: Small but mighty, these peppers are commonly used in Southeast Asian cuisine. They deliver a sharp, intense heat.
* Bell Peppers: Okay, okay, bell peppers aren’t spicy, but they’re still peppers! And they’re super easy to grow in containers, adding color and sweetness to your dishes.
When choosing your peppers, consider your heat tolerance, the size of your containers, and the climate you live in. Some peppers thrive in hotter conditions, while others prefer cooler temperatures.
Gathering Your Supplies
Before you start planting, you’ll need to gather a few essential supplies:
* Containers: Choose pots that are at least 12 inches in diameter and depth. Larger containers are generally better, as they provide more room for the roots to grow and hold moisture. Make sure your containers have drainage holes!
* Potting Mix: Use a high-quality potting mix that’s well-draining and contains plenty of organic matter. Avoid using garden soil, as it can become compacted in containers and restrict root growth.
* Chili Pepper Seeds or Seedlings: You can start your peppers from seed or purchase seedlings from a nursery. Starting from seed is more economical, but it requires more time and effort.
* Fertilizer: Chili peppers are heavy feeders, so you’ll need to fertilize them regularly. Use a balanced fertilizer or one specifically formulated for tomatoes and peppers.
* Watering Can or Hose: You’ll need a way to water your plants regularly.
* Gardening Gloves: Protect your hands from dirt and potential irritants.
* Optional: Stakes or cages to support your plants as they grow.
Planting Your Chili Peppers
Now for the fun part! Here’s how to plant your chili peppers in containers:
1. Prepare Your Containers: Fill your containers with potting mix, leaving about an inch of space at the top.
2. Plant Your Seeds or Seedlings:
* From Seed: Sow your seeds about ¼ inch deep and water gently. Keep the soil moist but not soggy. It can take anywhere from one to three weeks for the seeds to germinate.
* From Seedlings: Gently remove the seedlings from their nursery pots and loosen the roots. Dig a hole in the potting mix that’s large enough to accommodate the root ball. Place the seedling in the hole and backfill with potting mix. Water thoroughly.
3. Space Your Plants: If you’re planting multiple peppers in the same container, space them at least 12 inches apart.
4. Add Support (Optional): If you’re growing taller varieties of chili peppers, you may want to add stakes or cages to support them as they grow.
5. Label Your Plants: It’s easy to forget which pepper is which, so label your plants with their names and planting dates.
Caring for Your Chili Peppers
Once your chili peppers are planted, it’s important to provide them with the right care to ensure a bountiful harvest.
1. Watering: Water your chili peppers regularly, especially during hot, dry weather. The soil should be consistently moist, but not waterlogged. Check the soil moisture by sticking your finger into the soil. If the top inch feels dry, it’s time to water.
2. Fertilizing: Fertilize your chili peppers every two to three weeks with a balanced fertilizer or one specifically formulated for tomatoes and peppers. Follow the instructions on the fertilizer label.
3. Sunlight: Chili peppers need at least six to eight hours of sunlight per day. Place your containers in a sunny location, such as a patio, balcony, or windowsill.
4. Temperature: Chili peppers thrive in warm temperatures, between 70°F and 85°F. Protect your plants from frost and extreme heat.
5. Pruning: Pruning can help to improve air circulation and encourage bushier growth. Remove any yellowing or dead leaves. You can also pinch off the tips of the branches to promote branching.
6. Pest and Disease Control: Keep an eye out for pests and diseases, such as aphids, spider mites, and blossom end rot. Treat any problems promptly with organic pest control methods or fungicides.
7. Pollination: Chili peppers are self-pollinating, but you can help them along by gently shaking the plants or using a small paintbrush to transfer pollen from one flower to another. This is especially important if you’re growing your peppers indoors.
Harvesting Your Chili Peppers
The moment you’ve been waiting for! Here’s how to harvest your chili peppers:
1. Timing: The time it takes for chili peppers to mature depends on the variety. Generally, they’re ready to harvest when they’ve reached their mature size and color.
2. Harvesting: Use a sharp knife or scissors to cut the peppers from the plant. Be careful not to damage the plant.
3. Handling: Wear gloves when handling hot peppers, as the capsaicin (the compound that makes them spicy) can irritate your skin.
4. Storage: Fresh chili peppers can be stored in the refrigerator for up to a week. You can also dry, freeze, or pickle them for longer storage.
Troubleshooting Common Problems
Even with the best care, you may encounter some problems when growing chili peppers in containers. Here are some common issues and how to address them:
* Blossom End Rot: This is a condition where the bottom of the pepper turns black and leathery. It’s caused by a calcium deficiency. To prevent blossom end rot, make sure your soil is well-draining and that you’re watering your plants consistently. You can also add calcium to the soil by using bone meal or eggshells.
* Aphids: These tiny insects suck the sap from plants, causing them to weaken and yellow. You can control aphids by spraying them with a strong stream of water or using insecticidal soap.
* Spider Mites: These tiny pests create webs on plants and cause the leaves to become speckled and yellow. You can control spider mites by spraying them with a strong stream of water or using insecticidal soap.
* Lack of Fruit: If your chili peppers aren’t producing fruit, it could be due to a lack of pollination, insufficient sunlight, or over-fertilizing. Make sure your plants are getting enough sunlight and that you’re not over-fertilizing them. You can also try hand-pollinating the flowers.
* Yellowing Leaves: Yellowing leaves can be a sign of overwatering, underwatering, nutrient deficiency, or pest infestation. Check the soil moisture and adjust your watering accordingly. Fertilize your plants regularly and inspect them for pests.
Tips for Success
Here are a few extra tips to help you succeed in growing chili peppers in containers:
* Choose the Right Container: As I mentioned earlier, make sure your containers are large enough and have drainage holes.
* Use High-Quality Potting Mix: Don’t skimp on the potting mix! A good potting mix will provide your plants with the nutrients and drainage they need to thrive.
* Water Regularly: Consistent watering is key to success.
* Fertilize Regularly: Chili peppers are heavy feeders, so don’t forget to fertilize them.
* Provide Plenty of Sunlight: Chili peppers need at least six to eight hours of sunlight per day.
* Protect Your Plants from Frost: Chili peppers are sensitive to frost, so protect them from cold temperatures.
* Be Patient: It takes time for chili peppers to mature, so be
Conclusion
So, there you have it! Transforming your gardening game with this simple yet incredibly effective DIY trick for growing vibrant, bountiful container chili peppers. We’ve walked you through the process, highlighting the benefits of creating the perfect environment for your chili plants to thrive, even in limited spaces. This isn’t just about growing peppers; it’s about unlocking a deeper connection with your food, experiencing the satisfaction of nurturing life, and adding a touch of fiery flavor to your culinary creations.
Why is this a must-try? Because it empowers you to take control of your chili pepper cultivation, regardless of your gardening experience or the size of your outdoor area. You’re no longer limited by the constraints of traditional gardening. Container gardening, especially with this enhanced method, offers unparalleled flexibility, allowing you to move your plants to optimize sunlight exposure, protect them from harsh weather, and even bring them indoors during colder months. Plus, you’ll be amazed at the increased yield and overall health of your plants when they’re grown in a carefully crafted, nutrient-rich environment.
But the beauty of this DIY approach lies in its adaptability. Feel free to experiment with different chili pepper varieties to find your perfect heat level and flavor profile. From the mild sweetness of bell peppers to the scorching intensity of habaneros, the possibilities are endless. Consider adding companion plants like basil or marigolds to your containers to deter pests and further enhance the growth of your chili peppers. You can also adjust the soil composition based on the specific needs of your chosen pepper variety. Some peppers prefer slightly acidic soil, while others thrive in a more neutral environment. Don’t be afraid to get your hands dirty and tailor the process to your unique preferences and growing conditions.
This DIY trick for container chili peppers is more than just a gardening hack; it’s an invitation to embark on a flavorful adventure. It’s a chance to connect with nature, learn new skills, and enjoy the fruits (or rather, peppers) of your labor. Imagine the satisfaction of harvesting your own homegrown chili peppers and using them to spice up your favorite dishes. Picture yourself sharing your bounty with friends and family, knowing that you cultivated those peppers with your own two hands.
We wholeheartedly encourage you to give this DIY trick a try. The initial investment of time and effort will be richly rewarded with a vibrant, productive chili pepper garden that will bring you joy and flavor for months to come.
And most importantly, we want to hear about your experience! Share your successes, your challenges, and your creative variations with us. Post photos of your thriving container chili peppers on social media using [Your Hashtag Here]. Let’s build a community of passionate chili pepper gardeners and inspire others to discover the joys of growing their own food.
So, grab your containers, gather your supplies, and get ready to unleash your inner gardener. Your journey to a bountiful harvest of delicious, homegrown chili peppers starts now! Happy growing!
Frequently Asked Questions (FAQ)
What type of container is best for growing chili peppers?
The ideal container size depends on the chili pepper variety you’re growing. Smaller varieties like ornamental peppers can thrive in 1-2 gallon containers, while larger varieties like bell peppers or jalapeños will need at least 5-gallon containers, and preferably 7-10 gallon containers for optimal growth. Ensure the container has adequate drainage holes to prevent waterlogging, which can lead to root rot. Terracotta pots are a good choice as they allow for good air circulation, but plastic containers are lighter and retain moisture better, which can be beneficial in hot, dry climates. Ultimately, choose a container that suits your space, budget, and the specific needs of your chosen chili pepper variety.
What kind of soil should I use for container chili peppers?
Avoid using garden soil directly in containers, as it tends to compact and doesn’t drain well. Instead, opt for a high-quality potting mix specifically formulated for container gardening. A good potting mix should be lightweight, well-draining, and rich in organic matter. You can also create your own potting mix by combining equal parts of peat moss (or coconut coir), perlite, and compost. Consider adding slow-release fertilizer to the mix to provide your chili peppers with a steady supply of nutrients throughout the growing season. The ideal pH for chili peppers is between 6.0 and 7.0.
How often should I water my container chili peppers?
Watering frequency depends on several factors, including the weather, the size of the container, and the type of potting mix you’re using. As a general rule, water your chili peppers when the top inch of soil feels dry to the touch. Avoid overwatering, as this can lead to root rot. During hot, dry weather, you may need to water your plants daily, while during cooler, wetter weather, you may only need to water them every few days. Water deeply, ensuring that the water drains out of the drainage holes. Morning is the best time to water, as it allows the foliage to dry before nightfall, reducing the risk of fungal diseases.
How much sunlight do container chili peppers need?
Chili peppers thrive in full sun, meaning they need at least 6-8 hours of direct sunlight per day. If you’re growing your chili peppers indoors, place them near a sunny window or use grow lights to supplement natural light. Insufficient sunlight can lead to leggy growth, reduced flowering, and smaller peppers. If you live in a particularly hot climate, you may need to provide some afternoon shade to prevent the plants from overheating.
What kind of fertilizer should I use for container chili peppers?
Chili peppers are heavy feeders and benefit from regular fertilization. Use a balanced fertilizer with an NPK ratio of 10-10-10 or 14-14-14 during the early stages of growth to promote healthy foliage development. Once the plants start to flower and produce fruit, switch to a fertilizer with a higher phosphorus content (e.g., 5-10-5) to encourage fruit production. You can use either a granular slow-release fertilizer or a liquid fertilizer. If using a liquid fertilizer, apply it every 2-3 weeks according to the package instructions. Avoid over-fertilizing, as this can burn the roots and damage the plants.
How do I protect my container chili peppers from pests and diseases?
Regularly inspect your chili pepper plants for signs of pests or diseases. Common pests include aphids, spider mites, and whiteflies. You can control these pests by spraying the plants with insecticidal soap or neem oil. Diseases such as powdery mildew and fungal leaf spots can be prevented by ensuring good air circulation and avoiding overwatering. If you notice any signs of disease, remove the affected leaves and treat the plants with a fungicide. Consider using companion plants like basil or marigolds to deter pests naturally.
Can I overwinter my container chili peppers?
Yes, you can overwinter your container chili peppers to enjoy them for multiple seasons. Before the first frost, prune the plants back to about 6-8 inches tall and move them indoors to a cool, bright location. Reduce watering and fertilization during the winter months. In the spring, gradually acclimate the plants back to outdoor conditions before transplanting them into larger containers or back into the garden. Overwintering is more successful with perennial chili pepper varieties.
How long does it take for container chili peppers to produce fruit?
The time it takes for container chili peppers to produce fruit depends on the variety and growing conditions. Generally, it takes about 60-90 days from transplanting seedlings to harvesting mature peppers. Some varieties, like bell peppers, may take longer, while others, like jalapeños, may mature more quickly. Provide your plants with optimal growing conditions, including plenty of sunlight, water, and fertilizer, to encourage faster fruit production.
How do I know when my container chili peppers are ripe?
The color of the chili pepper is a good indicator of ripeness, but it varies depending on the variety. Most chili peppers will turn from green to red, yellow, orange, or brown when they are ripe. The peppers should also feel firm and slightly glossy. You can also taste a small piece of the pepper to determine its ripeness. If it has reached its full flavor and heat level, it’s ready to harvest.
Can I grow different varieties of chili peppers in the same container?
While it’s possible to grow different varieties of chili peppers in the same container, it’s generally not recommended, especially for beginners. Different varieties may have different growth habits, watering needs, and nutrient requirements, making it challenging to provide them with optimal care. Additionally, cross-pollination can occur, resulting in unexpected and potentially undesirable traits in the offspring. It’s best to grow each variety in its own container to ensure that they receive the specific care they need to thrive.
Leave a Comment