
Corn growing in pots might sound like a whimsical dream reserved for sprawling farms, but I’m here to tell you it’s absolutely achievable, even if your “farm” is a sunny balcony or a cozy patio! Forget the image of endless fields; we’re bringing the sweet taste of summer right to your doorstep with this fun and rewarding DIY project.
For centuries, corn has been a staple crop, deeply woven into the cultures of the Americas. From ancient civilizations to modern-day barbecues, its golden kernels have nourished and delighted generations. But who says you need acres of land to partake in this agricultural heritage?
In today’s fast-paced world, connecting with nature can feel like a luxury. That’s where this DIY trick comes in. Corn growing in pots offers a tangible way to slow down, get your hands dirty, and witness the miracle of growth firsthand. Plus, imagine the satisfaction of serving up freshly picked, homegrown corn on the cob – a guaranteed conversation starter and a delicious reward for your efforts. So, ditch the store-bought stuff and let’s embark on this exciting gardening adventure together! I’m excited to show you how easy and rewarding it can be.
Growing Corn in Pots: A Bountiful Harvest on Your Patio!
Hey there, fellow gardening enthusiasts! Ever thought about growing corn, that quintessential summer staple, right on your patio or balcony? It might sound a little crazy, but trust me, it’s totally doable, and incredibly rewarding. I’ve been experimenting with container gardening for years, and growing corn in pots has become one of my favorite projects. It’s a fun challenge, and the taste of homegrown corn, picked fresh from your own little “farm,” is simply unbeatable.
So, if you’re ready to ditch the grocery store corn and embrace the joy of homegrown goodness, let’s dive into this step-by-step guide!
Choosing the Right Corn Variety
First things first, not all corn varieties are created equal when it comes to container gardening. You’ll want to choose a shorter, more compact variety that won’t grow too tall and become unwieldy in a pot. Here are a few of my personal favorites:
* ‘On Deck’: This is a super-sweet variety specifically bred for container growing. It matures quickly and produces smaller ears, perfect for pots.
* ‘Golden Bantam’: A classic heirloom variety that’s relatively short and sturdy. It has a delicious, old-fashioned corn flavor.
* ‘Trinity’: Another excellent choice for containers, ‘Trinity’ is known for its early maturity and good yields.
* ‘Tom Thumb’: This is a dwarf variety that only grows to about 4 feet tall, making it ideal for smaller spaces.
Important Note: Avoid tall, field corn varieties like ‘Silver Queen’ or ‘Country Gentleman’ as they will likely outgrow your containers and won’t produce well.
Gathering Your Supplies
Okay, now that we’ve got our corn variety sorted, let’s gather everything we need to get started. Here’s a checklist:
* Large Pots: This is crucial! You’ll need pots that are at least 12-18 inches in diameter and depth. Corn plants have extensive root systems, and they need plenty of room to grow. I prefer using plastic pots because they’re lightweight and retain moisture well, but terracotta pots will also work, just be prepared to water more frequently.
* High-Quality Potting Mix: Don’t skimp on the potting mix! Use a well-draining mix that’s rich in organic matter. I like to use a mix of compost, peat moss, and perlite. Avoid using garden soil, as it can become compacted in containers and doesn’t drain well.
* Corn Seeds: Obviously! Make sure you’re using fresh, viable seeds. You can purchase seeds from your local garden center or online.
* Slow-Release Fertilizer: Corn is a heavy feeder, so you’ll need to provide it with plenty of nutrients. A slow-release fertilizer will gradually release nutrients over time, ensuring that your plants stay healthy and productive.
* Watering Can or Hose: You’ll need a way to water your corn plants regularly.
* Optional:
* Stakes or Trellis: If you live in a windy area, you may want to provide your corn plants with some support.
* Bird Netting: Birds love to feast on corn seedlings, so you may want to protect your plants with bird netting.
Planting Your Corn Seeds
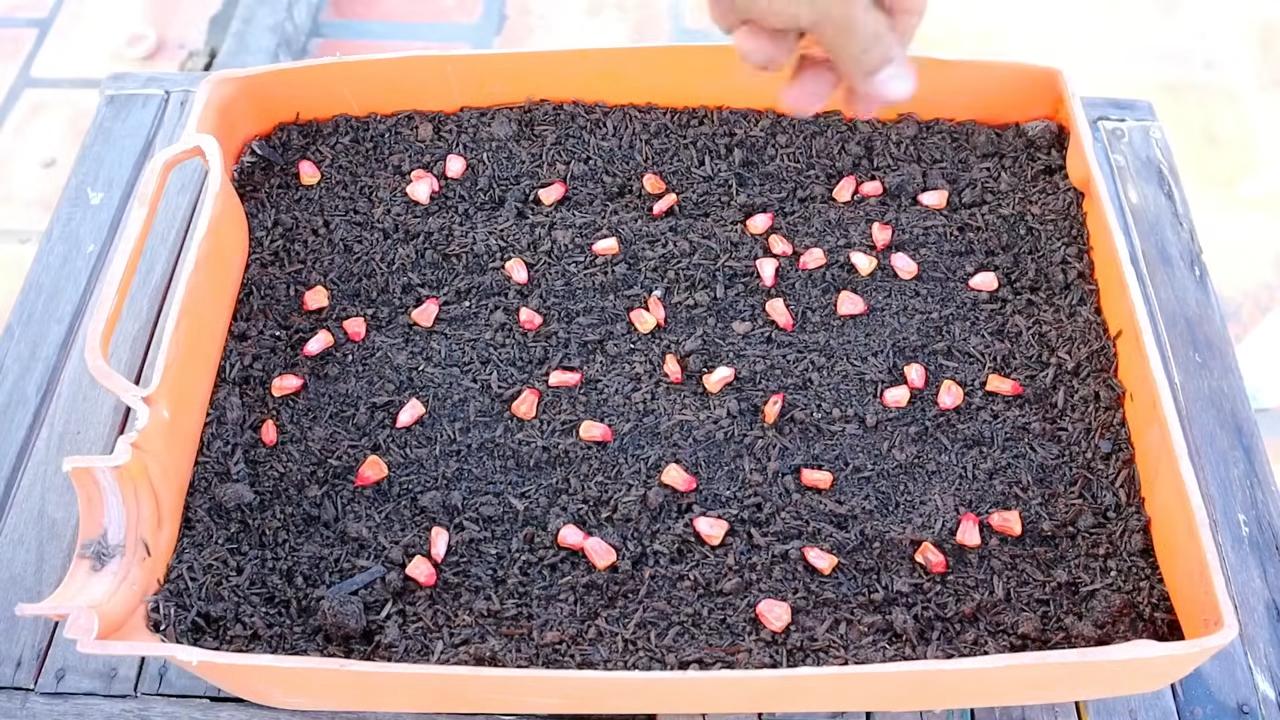
Alright, let’s get our hands dirty! Here’s how to plant your corn seeds:
1. Fill Your Pots: Fill your pots with the high-quality potting mix, leaving about an inch or two of space at the top.
2. Sow the Seeds: Plant the corn seeds about 1-2 inches deep and 4-6 inches apart. I usually plant 3-4 seeds per pot, just to ensure that at least one or two will germinate.
3. Water Thoroughly: Water the pots thoroughly after planting, making sure the soil is evenly moist.
4. Provide Sunlight: Place the pots in a location that receives at least 6-8 hours of direct sunlight per day. Corn needs plenty of sun to thrive.
5. Thin Seedlings (If Necessary): Once the seedlings emerge (usually within 7-10 days), thin them out, leaving only the strongest one or two plants per pot.
Important Tip: Corn is wind-pollinated, so you’ll need to plant at least 3-4 plants close together to ensure good pollination. If you only have space for one pot, you can hand-pollinate the corn by gently shaking the tassels (the male flowers at the top of the plant) over the silks (the female flowers that emerge from the ears).
Caring for Your Corn Plants
Now that your corn plants are growing, it’s important to provide them with proper care. Here’s what you need to do:
1. Water Regularly: Corn plants need consistent moisture, especially during hot weather. Water deeply whenever the top inch of soil feels dry to the touch. Avoid overwatering, as this can lead to root rot.
2. Fertilize Regularly: As I mentioned earlier, corn is a heavy feeder. Apply a slow-release fertilizer according to the package directions. You can also supplement with a liquid fertilizer every few weeks.
3. Weed Regularly: Keep the pots free of weeds, as they can compete with the corn plants for nutrients and water.
4. Provide Support (If Necessary): If your corn plants start to get tall and wobbly, provide them with some support by staking them or using a trellis.
5. Watch Out for Pests and Diseases: Keep an eye out for common corn pests like corn earworms and aphids. You can control these pests with insecticidal soap or neem oil. Also, watch out for diseases like corn smut and rust. If you notice any signs of disease, remove the affected leaves and treat the plants with a fungicide.
Pollination Assistance
As I mentioned before, corn relies on wind for pollination. In a container setting, especially if you only have a few plants, you might need to lend a hand to ensure those ears fill out properly.
1. Identify the Tassels and Silks: The tassels are the male flowers at the top of the plant, and they produce pollen. The silks are the female flowers that emerge from the developing ears of corn. Each silk strand is connected to a kernel on the cob.
2. Hand-Pollination Technique: Once the tassels are shedding pollen (you’ll see a fine, yellow powder), gently shake them over the silks. You can also collect the pollen in a small container and then use a paintbrush to apply it to the silks.
3. Timing is Key: Pollination is most effective when the silks are fresh and receptive. They’ll be sticky and light in color. As they age, they’ll turn brown and dry.
4. Repeat as Needed: Repeat the hand-pollination process every day or two for about a week to ensure that all the silks are pollinated.
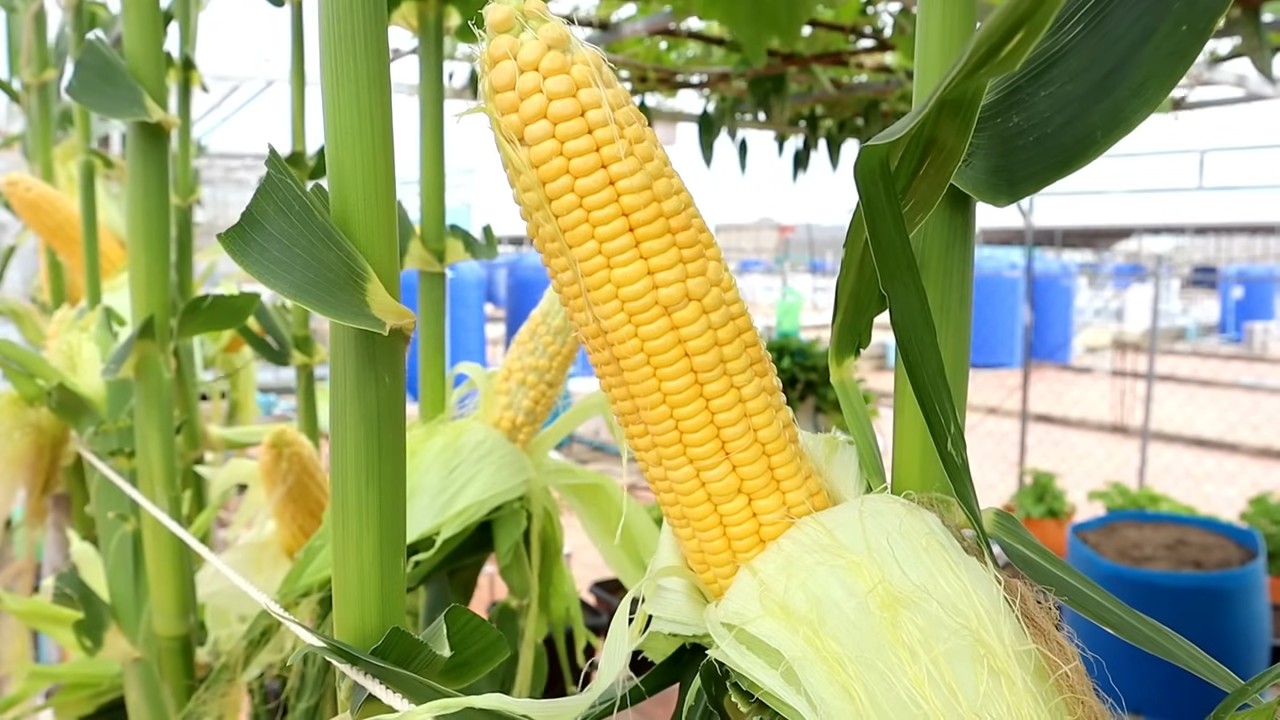
Harvesting Your Corn
The moment we’ve all been waiting for! Harvesting your homegrown corn is one of the most satisfying experiences a gardener can have. Here’s how to know when your corn is ready to pick:
1. Check the Silks: The silks should be dry and brown.
2. Feel the Ears: The ears should feel plump and full.
3. Peel Back the Husk: Gently peel back a portion of the husk and puncture a kernel with your fingernail. If the liquid that comes out is milky, the corn is ready to harvest. If it’s clear, the corn needs more time to mature.
4. Harvest Carefully: To harvest the corn, grasp the ear firmly and twist it downward. It should snap off easily from the stalk.
Important Tip: Corn is best eaten fresh, so try to harvest it just before you plan to cook it. The sugars in the corn will start to convert to starch soon after it’s picked, so the sooner you eat it, the sweeter it will be.
Enjoying Your Homegrown Corn
Congratulations! You’ve successfully grown corn in pots! Now it’s time to enjoy the fruits (or rather, vegetables) of your labor. There are countless ways to prepare fresh corn, but here are a few of my favorites:
* Grilled Corn on the Cob: Simply grill the corn on the cob until it’s tender and slightly charred. Serve with butter, salt, and pepper.
* Creamed Corn: A classic comfort food that’s perfect for a chilly evening.
* Corn Salad: A refreshing and flavorful salad that’s perfect for summer barbecues.
* Corn Chowder: A hearty and delicious soup that’s perfect for a cold day.
Growing corn in pots is a fun and rewarding experience that anyone can enjoy. With a little bit of planning and effort, you can have a bountiful harvest of fresh, homegrown corn right on your patio or balcony. So, what are you waiting for
Conclusion
So, there you have it! Growing corn in pots might seem like a whimsical idea, but it’s a surprisingly rewarding and practical way to enjoy fresh, homegrown corn, even without a sprawling farm. We’ve walked you through the process, from selecting the right variety to nurturing your plants to a bountiful harvest.
But why is this DIY trick a must-try? Beyond the sheer satisfaction of growing your own food, consider the benefits:
* Space Saving: Perfect for balconies, patios, or small gardens, container corn allows you to maximize your growing potential in limited spaces.
* Control Over Growing Conditions: You have complete control over the soil quality, watering schedule, and pest management, leading to healthier and more productive plants.
* Educational Opportunity: Growing corn in pots is a fantastic learning experience for both adults and children, teaching valuable lessons about plant life cycles and sustainable food practices.
* Fresh, Delicious Corn: There’s simply no comparison to the taste of freshly picked, homegrown corn. The sweetness and flavor are unparalleled.
Ready to take your container corn growing to the next level? Here are a few suggestions and variations to experiment with:
* Succession Planting: Plant new seeds every few weeks to ensure a continuous harvest throughout the growing season.
* Companion Planting: Plant beans or squash around the base of your corn stalks to create a symbiotic relationship. The beans will fix nitrogen in the soil, benefiting the corn, while the squash will provide ground cover, suppressing weeds and retaining moisture.
* Fertilizer Variations: Experiment with different types of organic fertilizers, such as compost tea or fish emulsion, to see which yields the best results for your specific growing conditions.
* Variety Selection: While we’ve recommended some suitable varieties, don’t be afraid to try others! Look for dwarf or compact varieties specifically bred for container growing.
* Pollination Assistance: If you’re growing multiple corn plants in a confined space, you may need to hand-pollinate them to ensure proper kernel development. Simply collect pollen from the tassels and gently brush it onto the silks.
Ultimately, the best way to discover the joys of growing corn in pots is to simply dive in and give it a try. Don’t be afraid to experiment, learn from your mistakes, and adapt your approach as needed.
We’re confident that you’ll be amazed by the results. Imagine the satisfaction of serving up a plate of sweet, juicy corn that you grew yourself, right on your own patio. It’s a truly rewarding experience that connects you to the natural world and provides a delicious and healthy food source.
So, grab some seeds, a few pots, and get ready to embark on your container corn growing adventure! And most importantly, we want to hear about your experience. Share your photos, tips, and challenges with us in the comments below. Let’s create a community of container corn enthusiasts and learn from each other’s successes and failures. Happy growing!
Frequently Asked Questions (FAQ)
What is the best type of corn to grow in pots?
Choosing the right corn variety is crucial for success when growing corn in pots. Look for dwarf or compact varieties specifically bred for container growing. These varieties typically reach a shorter height and produce smaller ears, making them well-suited for limited spaces. Some popular choices include ‘On Deck’, ‘Golden Bantam’, ‘Trinity’, and ‘Sweet Painted Mountain’. These varieties are known for their relatively small size, early maturity, and good flavor. Avoid tall, field corn varieties, as they require more space and may not thrive in containers. Always check the seed packet for information on plant height and suitability for container growing.
How big of a pot do I need for growing corn?
The size of the pot is a critical factor in the success of your container corn. Corn plants have extensive root systems and require ample space to develop properly. A minimum pot size of 12 inches in diameter and 12 inches deep is recommended for each plant. However, larger pots, such as 15-20 gallons, are even better, as they provide more room for root growth and help retain moisture. If you’re planting multiple corn plants in the same pot, ensure that the pot is large enough to accommodate all of them without overcrowding. Overcrowding can lead to stunted growth and reduced yields.
What type of soil should I use for growing corn in pots?
Corn plants require well-draining, nutrient-rich soil to thrive. A good potting mix should be light and airy, allowing for proper root aeration and drainage. Avoid using garden soil, as it can be too heavy and compact, hindering root growth. A mixture of equal parts potting soil, compost, and perlite or vermiculite is ideal. Compost provides essential nutrients, while perlite or vermiculite improves drainage and aeration. You can also add a slow-release fertilizer to the potting mix to provide a steady supply of nutrients throughout the growing season.
How often should I water my container corn?
Watering is crucial for the success of your container corn. Corn plants require consistent moisture, especially during hot weather. Water deeply and regularly, ensuring that the soil is evenly moist but not waterlogged. Check the soil moisture level daily by sticking your finger into the soil. If the top inch of soil feels dry, it’s time to water. Water more frequently during hot, dry weather and less frequently during cooler, wetter weather. Avoid overhead watering, as it can lead to fungal diseases. Instead, water at the base of the plant, directing the water towards the roots.
How much sunlight does container corn need?
Corn plants require at least 6-8 hours of direct sunlight per day to thrive. Choose a location for your container corn that receives plenty of sunlight throughout the day. If you live in a particularly hot climate, you may need to provide some afternoon shade to prevent the plants from overheating. If you’re growing corn indoors, use grow lights to supplement natural sunlight. Rotate the pots regularly to ensure that all sides of the plants receive equal sunlight.
How do I pollinate corn grown in pots?
Corn is wind-pollinated, meaning that the pollen from the tassels (male flowers) needs to reach the silks (female flowers) for fertilization to occur. In a container setting, natural wind pollination may not be sufficient, especially if you’re growing only a few plants. To ensure proper pollination, you may need to hand-pollinate your corn plants. To do this, gently shake the tassels over the silks, or collect pollen from the tassels with a small brush and apply it to the silks. Repeat this process every day for several days to ensure that all the silks are pollinated. You’ll know that pollination has been successful when the silks turn brown and dry.
How do I fertilize corn grown in pots?
Corn plants are heavy feeders and require regular fertilization to produce a good harvest. Start by incorporating a slow-release fertilizer into the potting mix at planting time. Then, supplement with liquid fertilizer every 2-3 weeks throughout the growing season. Use a balanced fertilizer with a ratio of 10-10-10 or 14-14-14. You can also use organic fertilizers, such as compost tea or fish emulsion. Follow the instructions on the fertilizer label carefully to avoid over-fertilizing, which can damage the plants.
How do I deal with pests and diseases on container corn?
Container corn is generally less susceptible to pests and diseases than corn grown in the ground. However, it’s still important to monitor your plants regularly for any signs of problems. Common pests that may affect container corn include aphids, spider mites, and corn earworms. Control these pests with insecticidal soap, neem oil, or Bacillus thuringiensis (Bt). Common diseases that may affect container corn include fungal diseases, such as rust and leaf spot. Prevent these diseases by providing good air circulation, avoiding overhead watering, and applying a fungicide if necessary.
When is corn ready to harvest?
Corn is typically ready to harvest about 60-100 days after planting, depending on the variety. The silks will turn brown and dry, and the ears will feel plump and full. To check for ripeness, peel back a portion of the husk and puncture a kernel with your fingernail. If the liquid that comes out is milky, the corn is ready to harvest. If the liquid is clear, the corn is not yet ripe. If the liquid is doughy, the corn is overripe. Harvest the corn by twisting the ear off the stalk. Enjoy your fresh, homegrown corn immediately for the best flavor.
Leave a Comment