
DIY Bottle Garden Cabbage: Ever dreamed of harvesting fresh, crisp cabbage right from your windowsill, even if you don’t have a sprawling garden? I’m here to tell you it’s absolutely possible, and surprisingly easy, with a clever upcycling project! For centuries, resourceful gardeners have sought innovative ways to cultivate food in limited spaces. From ancient rooftop gardens to modern-day vertical farms, the desire to grow our own food is deeply ingrained in our history.
But let’s face it, not everyone has the space or resources for a traditional garden. That’s where this DIY bottle garden cabbage trick comes in! Imagine the satisfaction of snipping off fresh cabbage leaves for your salad, knowing you grew them yourself in a recycled plastic bottle. This method is not only eco-friendly but also incredibly space-saving, making it perfect for apartment dwellers, balcony gardeners, or anyone looking to add a touch of green to their indoor space. Plus, it’s a fantastic way to teach kids about gardening and sustainability.
This DIY bottle garden cabbage project is a game-changer for anyone who wants to enjoy fresh produce without the hassle of a large garden. So, grab a plastic bottle, some soil, and let’s get growing! I’ll guide you through each step, ensuring you have a thriving mini-cabbage patch in no time. Get ready to impress your friends and family with your green thumb and enjoy the delicious rewards of your labor!
DIY Bottle Garden: Growing Cabbage in a Recycled Container
Hey there, fellow gardening enthusiasts! Ever thought about turning your empty plastic bottles into mini cabbage patches? It’s a fun, eco-friendly way to grow your own veggies, even if you’re short on space. I’m going to walk you through creating your very own bottle garden for growing cabbage. Get ready to get your hands dirty (in a good way!).
Materials You’ll Need
Before we dive in, let’s gather our supplies. This is a pretty low-cost project, which is always a win!
* Plastic Bottle: A large soda or water bottle (2-liter or bigger) works best. Make sure it’s clean!
* Cabbage Seeds: Choose your favorite cabbage variety. I personally love ‘Golden Acre’ for its compact size.
* Potting Soil: A good quality potting mix is crucial for healthy cabbage growth.
* Scissors or Utility Knife: For cutting the plastic bottle. Be careful!
* Drill or Nail: To create drainage holes.
* Watering Can or Spray Bottle: For watering your cabbage seedlings.
* Optional: Small Pebbles or Gravel: For drainage at the bottom of the bottle.
* Optional: Plant Labels: To keep track of your cabbage variety.
Preparing the Bottle Container
This is where we transform that discarded bottle into a cozy home for our cabbage.
1. Clean the Bottle: Thoroughly wash the plastic bottle with soap and water to remove any residue. Rinse it well and let it dry completely. This is important to prevent any contamination that could harm your cabbage seedlings.
2. Cut the Bottle: Decide how you want to cut the bottle. There are a couple of options:
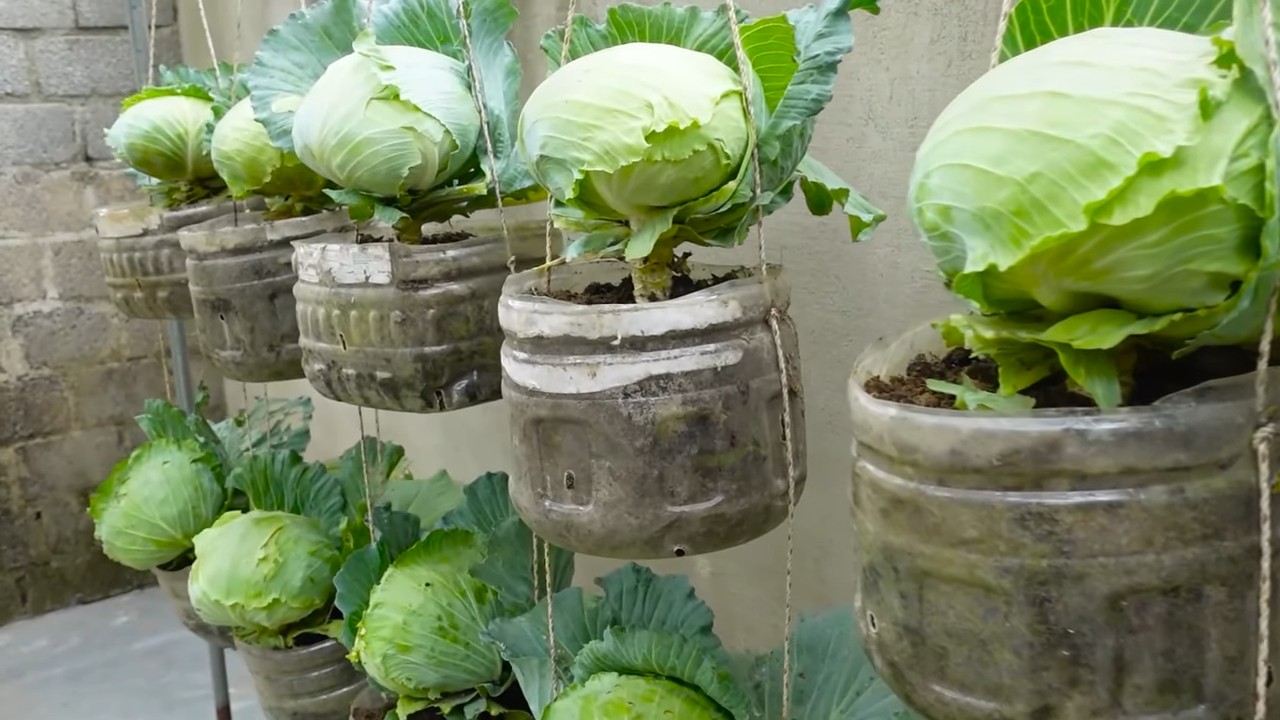
* Option 1 (Hanging Garden): Cut the bottle horizontally about two-thirds of the way up from the bottom. Invert the top portion (the bottle neck) and place it inside the bottom portion, creating a self-watering system. You’ll need to create a hole in the bottle cap to allow the soil to wick up water.
* Option 2 (Simple Container): Cut the bottle in half horizontally. You’ll use the bottom half as your container. This is the simpler option, especially if you’re a beginner.
I usually go with Option 2 for simplicity, but Option 1 is great if you want a self-watering setup.
3. Create Drainage Holes: This is absolutely essential! Cabbage plants don’t like sitting in soggy soil. Use a drill or carefully poke holes in the bottom of the bottle with a nail. I usually make about 5-6 holes, evenly spaced.
4. Add Drainage Layer (Optional): If you have some small pebbles or gravel, add a layer to the bottom of the bottle. This will further improve drainage and prevent the soil from becoming waterlogged.
Sowing the Cabbage Seeds
Now for the exciting part – planting the seeds!
1. Fill the Container with Potting Soil: Fill the prepared bottle container with potting soil, leaving about an inch of space at the top. Gently pat down the soil to remove any air pockets.
2. Sow the Seeds: Sprinkle the cabbage seeds evenly over the surface of the soil. Don’t plant them too deep; about ¼ inch is perfect. You can also make small indentations with your finger and place 2-3 seeds in each indentation.
3. Cover the Seeds: Lightly cover the seeds with a thin layer of potting soil.
4. Water Gently: Use a watering can or spray bottle to gently water the soil. Be careful not to wash away the seeds. The soil should be moist but not waterlogged.
5. Label Your Container (Optional): If you’re growing multiple varieties of cabbage, label your container with the cabbage type and the date you planted the seeds. This will help you keep track of everything.
Caring for Your Cabbage Seedlings
This is where patience comes in! It takes a little time for the seeds to germinate and grow into seedlings.
1. Provide Adequate Light: Place your bottle garden in a sunny location that receives at least 6 hours of direct sunlight per day. If you don’t have enough natural light, you can use a grow light.
2. Keep the Soil Moist: Check the soil moisture regularly. Water when the top inch of soil feels dry to the touch. Avoid overwatering, as this can lead to root rot.
3. Thin the Seedlings: Once the seedlings have developed a few true leaves (the leaves that look like miniature cabbage leaves), thin them out, leaving only the strongest seedling in each spot (if you planted multiple seeds per spot). This gives the remaining seedlings enough space to grow. To thin, gently snip off the unwanted seedlings at the soil line with small scissors. Don’t pull them out, as this can disturb the roots of the seedling you want to keep.
4. Fertilize (Optional): Once the seedlings are a few weeks old, you can start fertilizing them with a diluted liquid fertilizer. Follow the instructions on the fertilizer package. I like to use a balanced fertilizer (e.g., 10-10-10) diluted to half strength.
Transplanting (If Necessary)
If your cabbage seedlings outgrow their bottle container, you may need to transplant them into a larger pot or directly into your garden.
1. Prepare the New Container or Garden Bed: If transplanting to a larger pot, choose a pot that is at least 6 inches in diameter. If transplanting to your garden, prepare the soil by loosening it and adding compost or other organic matter.
2. Carefully Remove the Seedling: Gently loosen the soil around the seedling and carefully lift it out of the bottle container. Be careful not to damage the roots.
3. Transplant the Seedling: Plant the seedling in the new container or garden bed, making sure the top of the root ball is level with the surrounding soil.
4. Water Thoroughly: Water the seedling thoroughly after transplanting.
Ongoing Care for Your Cabbage Plants
Now that your cabbage plants are growing, here’s how to keep them happy and healthy.
1. Water Regularly: Cabbage plants need consistent moisture, especially during hot weather. Water deeply whenever the top inch of soil feels dry.
2. Fertilize Regularly: Continue to fertilize your cabbage plants every few weeks with a diluted liquid fertilizer.
3. Protect from Pests: Cabbage plants are susceptible to several pests, including cabbage worms, aphids, and flea beetles. Inspect your plants regularly for signs of pests. You can handpick pests off the plants, use insecticidal soap, or cover the plants with row covers to prevent pests from reaching them.
4. Provide Support (If Necessary): Some cabbage varieties can get quite large and may need support to prevent them from falling over. You can use stakes or cages to support the plants.
5. Harvesting: Your cabbage will be ready to harvest when the head is firm and the desired size. The time to harvest depends on the variety of cabbage you’re growing. To harvest, cut the head off the plant with a sharp knife. Leave the roots in the ground, as they may produce smaller side shoots that you can harvest later.
Troubleshooting
Even with the best care, you might encounter some problems. Here are a few common issues and how to address them:
* Yellowing Leaves: This could be a sign of overwatering, underwatering, or nutrient deficiency. Check the soil moisture and adjust your watering accordingly. If the soil is consistently moist, let it dry out a bit before watering again. If the soil is dry, water more frequently. You can also try fertilizing with a balanced fertilizer.
* Stunted Growth: This could be due to lack of sunlight, poor soil, or pests. Make sure your cabbage plants are getting enough sunlight. If the soil is poor, amend it with compost or other organic matter. Inspect your plants for pests and take appropriate action.
* Cabbage Worms: These green caterpillars can quickly devour your cabbage plants. Handpick them off the plants or use Bacillus thuringiensis (Bt), a natural insecticide that is safe for humans and pets.
* Aphids: These small, sap-sucking insects can weaken your cabbage plants. Spray them off with a strong stream of water or use insecticidal soap.
Enjoy Your Homegrown Cabbage!
Growing cabbage in a bottle garden is a rewarding experience. Not only are you recycling and reducing waste, but you’re also growing your own fresh, delicious vegetables. I hope this guide has inspired you to give it a try. Happy gardening!

Conclusion
So, there you have it! Transforming a humble plastic bottle and a leftover cabbage stump into a thriving bottle garden is not just a fun project; it’s a testament to the power of resourcefulness and a fantastic way to bring a touch of green into your home, regardless of the season. This DIY bottle garden cabbage project is more than just a craft; it’s a miniature ecosystem you can nurture and watch flourish.
Why is this a must-try? Because it’s incredibly simple, cost-effective, and yields surprisingly beautiful results. You’re not just throwing away a plastic bottle; you’re giving it a new life. You’re not just composting a cabbage stump; you’re unlocking its potential for regrowth. And you’re not just creating a decoration; you’re fostering a connection with nature, even within the confines of your apartment.
Beyond the basic method, there are endless possibilities for customization. Experiment with different types of soil to see which your cabbage prefers. Add a layer of activated charcoal to the bottom of your bottle garden to help filter the water and keep things fresh. Introduce other small plants, like herbs or succulents, to create a miniature mixed garden. You could even paint the outside of the bottle to match your décor or add decorative stones around the base of the cabbage.
Consider using different types of bottles – larger bottles for a more substantial garden, or smaller bottles for a collection of mini-gardens. You could even create a hanging bottle garden by suspending your creation with twine or wire. The only limit is your imagination!
The beauty of this project lies in its adaptability. It’s perfect for beginners who are just starting to explore the world of gardening, and it’s equally appealing to experienced gardeners who are looking for a creative and sustainable way to reuse materials. It’s a fantastic project to do with kids, teaching them about plant life cycles and the importance of recycling.
But the real magic happens when you see those first tiny green shoots emerge from the cabbage stump. It’s a reminder that even in the most unexpected places, life can find a way. It’s a tangible demonstration of the resilience of nature and the potential for growth that exists all around us.
We wholeheartedly encourage you to give this DIY bottle garden cabbage project a try. It’s a rewarding experience that will bring joy and a touch of nature into your life. Don’t be afraid to experiment, to get your hands dirty, and to embrace the unexpected.
And most importantly, we want to hear about your experiences! Share your photos, your tips, and your stories with us. Let us know what worked for you, what challenges you faced, and what creative variations you came up with. Together, we can inspire others to embrace sustainable living and discover the simple joys of gardening. So go ahead, grab a bottle, find a cabbage stump, and let the magic begin! Let’s all cultivate a little bit of green in our lives, one bottle garden at a time. This simple **DIY bottle garden cabbage** project is a game changer.
Frequently Asked Questions (FAQ)
What kind of cabbage works best for a bottle garden?
Any type of cabbage can technically work, but varieties with a denser, more compact head, like green cabbage or red cabbage, tend to hold up better and provide a more stable base for regrowth. Savoy cabbage, with its crinkled leaves, can also be interesting aesthetically. The key is to choose a cabbage that is relatively fresh and hasn’t started to rot. The fresher the stump, the better the chances of successful regrowth.
How much of the cabbage stump should I use?
You’ll want to use the bottom portion of the cabbage head, about 2-3 inches from the base. This section contains the root node and the potential for new growth. Make sure to remove any loose or decaying outer leaves before placing it in the bottle.
What kind of soil should I use?
A well-draining potting mix is ideal. You can use a standard potting mix that you would use for houseplants. Avoid using garden soil, as it can be too dense and may contain pests or diseases. You can also add a small amount of compost to the potting mix to provide extra nutrients.
How often should I water my bottle garden cabbage?
Water sparingly, just enough to keep the soil moist but not soggy. Overwatering can lead to rot. Check the soil moisture regularly by sticking your finger into the soil. If it feels dry to the touch, it’s time to water. In general, you’ll probably need to water every few days, depending on the humidity and temperature.
How much sunlight does my bottle garden cabbage need?
Cabbage needs bright, indirect sunlight. Avoid placing it in direct sunlight, as this can scorch the leaves. A spot near a window that receives morning sun or filtered afternoon sun is ideal. If you don’t have access to enough natural light, you can supplement with a grow light.
How long will it take for the cabbage to start growing?
You should start to see new growth within a week or two, depending on the conditions. Be patient, and make sure to keep the soil moist and provide adequate light. The first signs of growth will be small green shoots emerging from the top of the stump.
What if my cabbage starts to rot?
If you notice any signs of rot, such as a foul odor or mushy texture, remove the affected areas immediately. You can try to salvage the remaining healthy portion of the stump by cutting away the rot and replanting it in fresh soil. However, if the rot is extensive, it’s best to start with a new cabbage stump.
Can I add fertilizer to my bottle garden cabbage?
Yes, you can add a diluted liquid fertilizer every few weeks to provide extra nutrients. Use a balanced fertilizer that is formulated for vegetables or houseplants. Be careful not to over-fertilize, as this can damage the plant.
How long will my bottle garden cabbage last?
The lifespan of your bottle garden cabbage will depend on the conditions and how well you care for it. With proper care, it can last for several weeks or even months. Eventually, the cabbage will exhaust its resources and stop growing. However, you can always start a new bottle garden with a fresh cabbage stump.
Can I transplant the cabbage into a larger pot?
Yes, you can transplant the cabbage into a larger pot if you want to give it more room to grow. Choose a pot that is at least 6 inches in diameter and fill it with well-draining potting mix. Gently remove the cabbage from the bottle and plant it in the new pot. Water thoroughly and provide adequate light.
What other plants can I grow in a bottle garden?
Many small plants can thrive in a bottle garden, including herbs like mint, thyme, and oregano; succulents like echeveria and sedum; and small flowering plants like African violets and impatiens. Just make sure to choose plants that have similar light and water requirements.
Is this project suitable for children?
Yes, this is a great project to do with children. It’s a fun and educational way to teach them about plant life cycles, recycling, and sustainable living. Just make sure to supervise them when they are using sharp objects, such as scissors or knives.
How do I prevent mold growth in my bottle garden?
Good ventilation is key to preventing mold growth. Make sure to leave the bottle open for a few hours each day to allow air to circulate. You can also add a layer of activated charcoal to the bottom of the bottle to help filter the air and water. Avoid overwatering, as this can create a humid environment that is conducive to mold growth.
What do I do with the bottle garden cabbage when it stops growing?
Once the cabbage has exhausted its resources and stops growing, you can compost it or discard it in the trash. The soil can be reused for other plants, but it’s best to sterilize it first by baking it in the oven at 200 degrees Fahrenheit for 30 minutes. This will kill any harmful bacteria or fungi.
Leave a Comment