
DIY coriander plastic bottles: who knew growing your own fresh herbs could be so easy and eco-friendly? I’m so excited to share this simple yet ingenious method for cultivating vibrant coriander right in your own home, using nothing more than recycled plastic bottles! Forget those expensive supermarket bunches that wilt within days. Imagine having a constant supply of fragrant coriander, ready to add a burst of flavor to your favorite dishes, all thanks to a clever upcycling project.
Growing herbs at home has a rich history, dating back to ancient civilizations where herbs were valued not only for culinary purposes but also for their medicinal and aromatic properties. In many cultures, tending a home garden was a symbol of self-sufficiency and connection to nature. Today, that connection is more important than ever. With concerns about food miles and the environmental impact of commercial farming, growing your own herbs is a small but significant step towards a more sustainable lifestyle.
Let’s be honest, sometimes life gets busy, and remembering to buy fresh herbs at the store is just another thing on the to-do list. Plus, pre-packaged herbs can be surprisingly expensive! This DIY coriander plastic bottles hack solves both problems. It’s a cost-effective and convenient way to ensure you always have fresh coriander on hand. I’ll guide you through each step, from preparing the bottles to nurturing your coriander plants, so you can enjoy the satisfaction of harvesting your own homegrown goodness. Get ready to transform those discarded plastic bottles into a thriving herb garden!
DIY Koriander Anzucht in Plastikflaschen: Ein einfacher Leitfaden
Hallo liebe Gartenfreunde! Habt ihr auch manchmal das Problem, dass euer Koriander im Garten einfach nicht so richtig wachsen will? Oder dass er viel zu schnell in Blüte geht? Keine Sorge, ich habe da eine super einfache und kostengünstige Lösung für euch: Koriander Anzucht in Plastikflaschen! Das ist nicht nur nachhaltig, weil wir Plastikmüll recyceln, sondern auch super praktisch, weil wir die Bedingungen für den Koriander optimal gestalten können. Los geht’s!
Was du brauchst:
* Leere Plastikflaschen (am besten 1,5 oder 2 Liter)
* Ein scharfes Messer oder eine Schere
* Erde (am besten Anzuchterde oder Kräutererde)
* Koriandersamen
* Wasser
* Optional: Sprühflasche
* Optional: Kleine Steine oder Kies für die Drainage
Vorbereitung der Plastikflaschen
Bevor wir mit dem eigentlichen Anpflanzen beginnen, müssen wir die Plastikflaschen vorbereiten. Das ist aber wirklich kinderleicht!
1. Flasche reinigen: Zuerst spülen wir die Plastikflaschen gründlich mit Wasser aus. Es sollten keine Rückstände von Getränken oder anderen Flüssigkeiten mehr vorhanden sein.
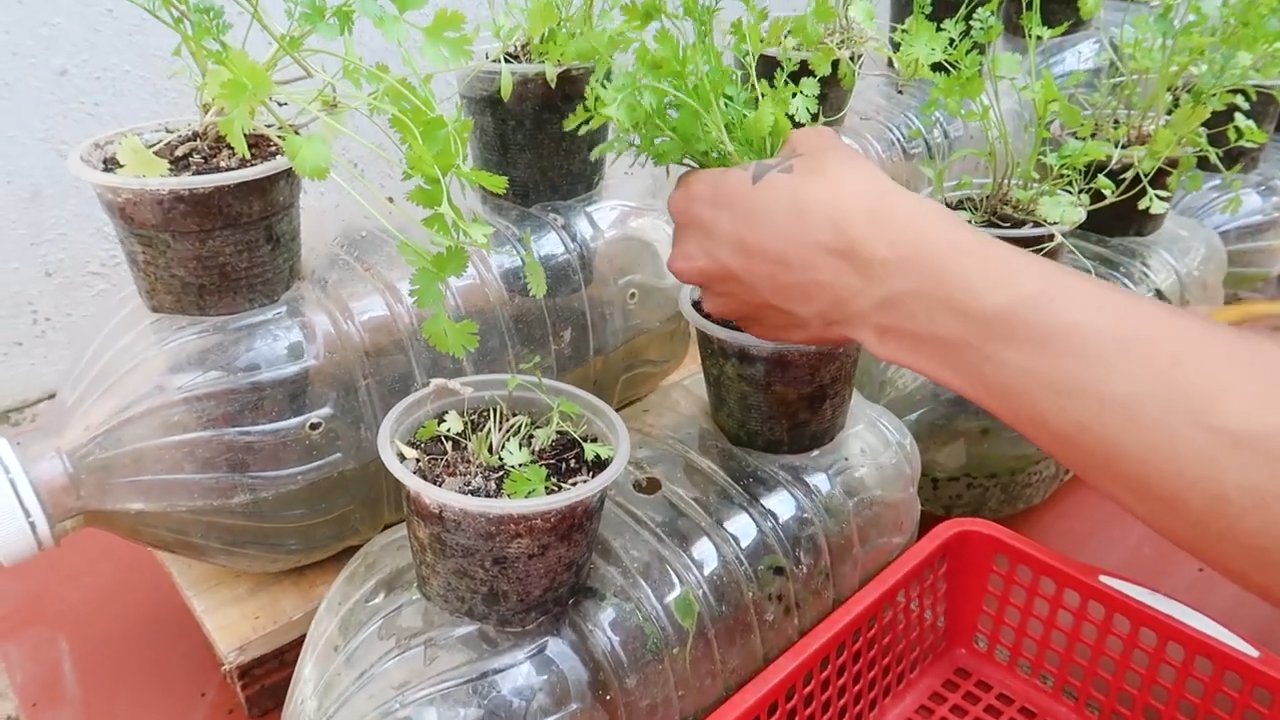
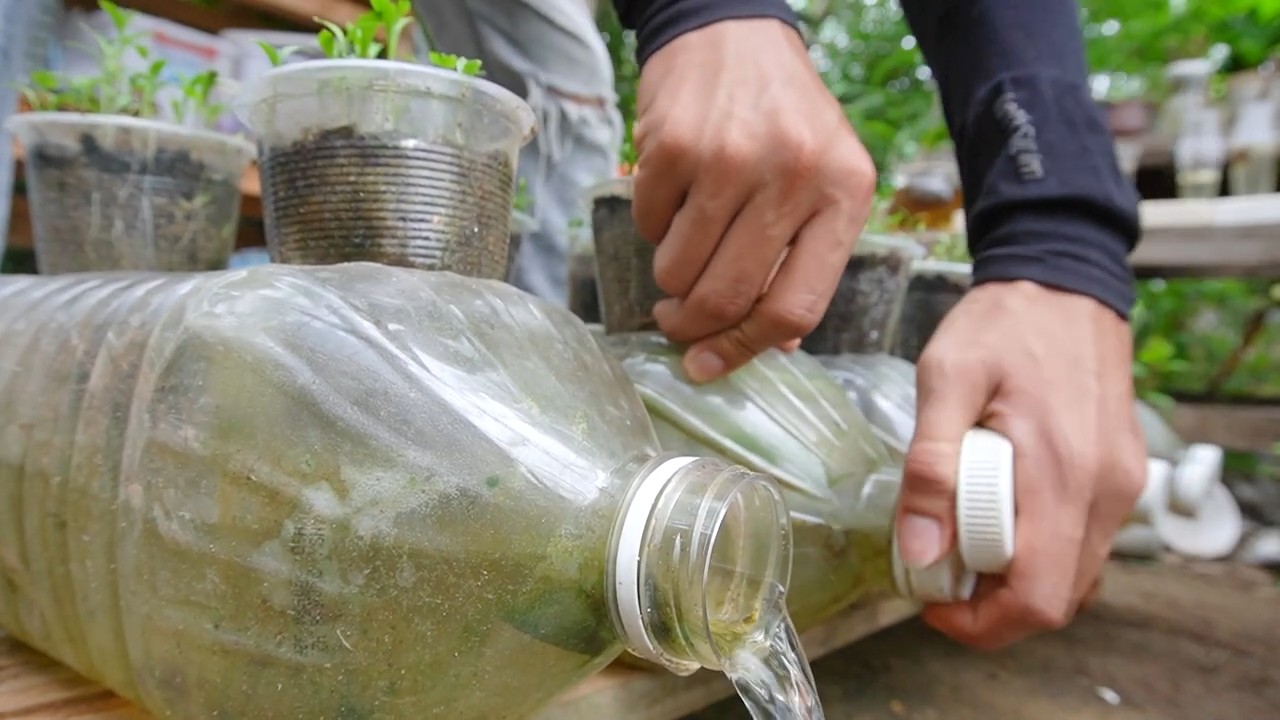
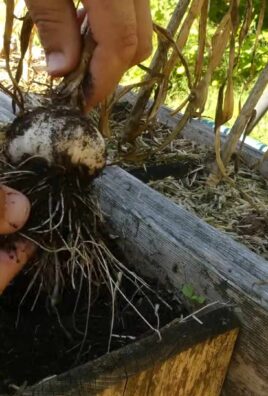
2. Flasche zuschneiden: Jetzt kommt der etwas kniffligere Teil. Wir schneiden die Flasche in zwei Teile. Am besten schneidet man die Flasche etwa 5-10 cm unterhalb des Flaschenhalses durch. So erhalten wir einen oberen Teil mit dem Flaschenhals und einen unteren Teil, der als Wasserreservoir dienen wird.
3. Drainagelöcher bohren (optional): Wenn du sicherstellen möchtest, dass das Wasser gut abfließen kann und keine Staunässe entsteht, kannst du in den unteren Teil der Flasche (den, der als Wasserreservoir dient) ein paar kleine Löcher bohren. Das ist aber nicht unbedingt notwendig, solange du darauf achtest, nicht zu viel zu gießen.
4. Flaschenhals vorbereiten: Der obere Teil der Flasche, der den Flaschenhals enthält, wird später in den unteren Teil gesteckt. Damit das Wasser gut nach oben transportiert werden kann, kannst du ein Stück Stoff (z.B. ein altes T-Shirt) oder ein Stück Küchenpapier durch den Flaschenhals ziehen, sodass es unten in das Wasserreservoir hineinragt. Das dient als Docht und sorgt dafür, dass die Erde immer ausreichend feucht ist.
Koriander säen und pflegen
Jetzt kommt der spannende Teil: Wir säen den Koriander!
1. Erde einfüllen: Fülle den oberen Teil der Flasche (den mit dem Flaschenhals) mit Erde. Achte darauf, dass die Erde locker und luftig ist. Anzuchterde oder Kräutererde sind ideal, da sie die jungen Pflanzen optimal mit Nährstoffen versorgen. Fülle die Erde bis etwa 2-3 cm unter den Rand der Flasche.
2. Samen aussäen: Verteile die Koriandersamen gleichmäßig auf der Erde. Du kannst ruhig etwas mehr Samen verwenden, da nicht alle keimen werden. Drücke die Samen leicht in die Erde.
3. Mit Erde bedecken: Bedecke die Samen mit einer dünnen Schicht Erde (ca. 0,5 cm).
4. Angießen: Gieße die Erde vorsichtig an. Am besten verwendest du dafür eine Sprühflasche, damit die Samen nicht weggespült werden. Die Erde sollte gut durchfeuchtet sein, aber nicht triefend nass.
5. Flaschen zusammenfügen: Stecke den oberen Teil der Flasche (den mit der Erde und den Samen) in den unteren Teil (das Wasserreservoir). Achte darauf, dass der Docht (das Stück Stoff oder Küchenpapier) in das Wasser hineinragt.
6. Wasserreservoir befüllen: Fülle das Wasserreservoir mit Wasser. Achte darauf, dass der Docht immer ausreichend mit Wasser versorgt ist.
7. Standort wählen: Stelle die Plastikflaschen an einen hellen und warmen Ort. Koriander liebt die Sonne, aber direkte Mittagssonne kann die jungen Pflanzen verbrennen. Ein halbschattiger Standort ist ideal.
8. Feuchtigkeit kontrollieren: Überprüfe regelmäßig die Feuchtigkeit der Erde. Sie sollte immer leicht feucht sein, aber nicht nass. Wenn die Erde zu trocken ist, fülle das Wasserreservoir nach. Wenn die Erde zu nass ist, lass sie etwas abtrocknen.
9. Lüften: Um Schimmelbildung zu vermeiden, solltest du die Flaschen regelmäßig lüften. Du kannst den oberen Teil der Flasche einfach kurz abnehmen oder den Deckel abschrauben.
10. Düngen (optional): Wenn die Pflanzen etwas größer sind, kannst du sie gelegentlich mit einem milden Kräuterdünger düngen. Achte aber darauf, nicht zu viel zu düngen, da Koriander nicht viele Nährstoffe benötigt.
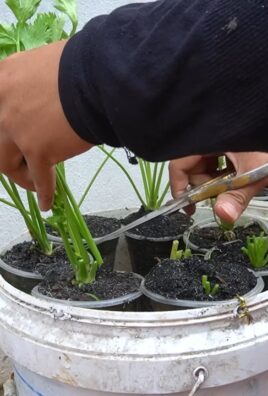
11. Ernten: Nach einigen Wochen kannst du den Koriander ernten. Schneide die Blätter einfach mit einer Schere ab. Am besten erntest du die äußeren Blätter, damit die inneren Blätter weiterwachsen können.
Häufige Probleme und Lösungen
Auch bei der Koriander Anzucht in Plastikflaschen können Probleme auftreten. Hier sind einige häufige Probleme und wie du sie lösen kannst:
* Schimmelbildung: Schimmelbildung kann auftreten, wenn die Luftfeuchtigkeit zu hoch ist und die Belüftung nicht ausreichend ist. Um Schimmelbildung zu vermeiden, solltest du die Flaschen regelmäßig lüften und darauf achten, dass die Erde nicht zu nass ist. Wenn bereits Schimmel entstanden ist, kannst du die befallene Erde vorsichtig entfernen und die Flasche mit einem Fungizid behandeln.
* Gelbe Blätter: Gelbe Blätter können ein Zeichen für Nährstoffmangel oder Überwässerung sein. Wenn die Blätter gelb werden, solltest du die Erde überprüfen und gegebenenfalls düngen oder weniger gießen.
* Koriander geht schnell in Blüte: Koriander geht schnell in Blüte, wenn er zu viel Stress ausgesetzt ist. Das kann durch zu viel Hitze, Trockenheit oder Nährstoffmangel verursacht werden. Um zu verhindern, dass der Koriander zu schnell in Blüte geht, solltest du ihn an einen kühlen und halbschattigen Ort stellen und regelmäßig gießen und düngen.
* Keine Keimung: Wenn die Samen nicht keimen, kann das verschiedene Ursachen haben. Möglicherweise sind die Samen zu alt, die Erde zu trocken oder zu nass, oder die Temperatur zu niedrig. Um die Keimung zu verbessern, solltest du frische Samen verwenden, die Erde gleichmäßig feucht halten und die Flaschen an einen warmen Ort stellen.
Weitere Tipps und Tricks
* Verschiedene Sorten ausprobieren: Es gibt verschiedene Koriandersorten, die sich in Geschmack und Wachstum unterscheiden. Probiere verschiedene Sorten aus, um herauszufinden, welche dir am besten gefällt.
* Regelmäßig ernten: Durch regelmäßiges Ernten förderst du das Wachstum des Korianders und verhinderst, dass er zu schnell in Blüte geht.
* Koriander einfrieren: Wenn du zu viel Koriander geerntet hast, kannst du ihn einfrieren. Wasche den Koriander gründlich, hacke ihn fein und friere ihn in kleinen Portionen ein. So hast du immer frischen Koriander zur Hand.
* Koriander trocknen: Du kannst Koriander auch trocknen. Binde die Korianderstiele zu kleinen Bündeln zusammen und hänge sie an einem trockenen und luftigen Ort auf. Wenn der Koriander vollständig getrocknet ist, kannst du ihn in einem luftdichten Behälter aufbewahren.
* Koriander im Winter anbauen: Mit der Plastikflaschen-Methode kannst du Koriander auch im Winter anbauen. Stelle die Flaschen einfach an einen hellen und warmen Ort, z.B. auf die Fensterbank.
Ich hoffe, dieser Leitfaden hilft dir dabei, deinen eigenen Koriander in Plastikflaschen anzubauen. Es ist wirklich eine einfache und lohnende Methode, um frischen Koriander zu Hause zu haben. Viel Spaß beim Gärtnern!
Conclusion
So, there you have it! Transforming humble plastic bottles into a thriving coriander garden is not just a fun project; it’s a sustainable, space-saving, and incredibly rewarding way to enjoy fresh herbs right at your fingertips. We’ve walked you through the simple steps, highlighting how easy it is to repurpose those discarded bottles and create a miniature oasis of flavor.
Why is this DIY coriander plastic bottles trick a must-try? Because it addresses so many common gardening challenges. Limited space? No problem! This vertical gardening solution is perfect for balconies, patios, or even a sunny windowsill. Worried about soil quality? You have complete control over the growing medium, ensuring your coriander gets the nutrients it needs. Tired of constantly buying coriander from the store, only for it to wilt away in your fridge? Grow your own and harvest only what you need, when you need it.
But the benefits don’t stop there. This project is also a fantastic way to teach children about sustainability and the importance of reducing waste. It’s a hands-on learning experience that connects them to the food they eat and encourages them to be more environmentally conscious. Plus, it’s just plain fun!
Looking for variations? Absolutely! You can experiment with different types of plastic bottles – larger bottles for bigger yields, or smaller bottles for a more compact display. Consider painting the bottles to add a splash of color to your garden, or decorating them with twine or burlap for a rustic look. You can also adapt this method to grow other herbs like parsley, basil, or mint. Just be sure to research the specific needs of each herb to ensure optimal growth.
Another variation is to create a self-watering system by adding a wick made of cotton rope or felt that draws water from a reservoir at the bottom of the bottle. This is especially helpful if you tend to forget to water your plants regularly. You could also try using different types of growing mediums, such as coco coir or perlite, to see which works best for your coriander.
We’re confident that once you try this DIY coriander plastic bottles method, you’ll be hooked. It’s a simple, effective, and eco-friendly way to enjoy fresh, flavorful coriander all year round.
So, what are you waiting for? Gather your plastic bottles, grab some potting soil, and get ready to embark on your own coriander-growing adventure. We can’t wait to see your creations!
Don’t forget to share your experiences with us! Post photos of your DIY coriander gardens on social media using #DIYCorianderBottles and tag us so we can admire your green thumbs. We’re eager to hear your tips, tricks, and any variations you’ve come up with. Let’s inspire each other to create a more sustainable and flavorful world, one plastic bottle at a time. Happy gardening!
Frequently Asked Questions (FAQ)
What kind of plastic bottles are best for growing coriander?
Ideally, you should use food-grade plastic bottles, such as those that have contained water, juice, or soda. These are generally considered safe for growing edible plants. Avoid using bottles that have contained harsh chemicals or cleaning products, as these could contaminate the soil and your coriander. PET (Polyethylene Terephthalate) bottles, commonly used for water and soda, are a good choice. Make sure to thoroughly clean the bottles with soap and water before using them.
How much sunlight does coriander need when grown in plastic bottles?
Coriander thrives in full sun, which means it needs at least 6 hours of direct sunlight per day. However, it can also tolerate partial shade, especially in hotter climates. If you’re growing your coriander indoors, place the bottles near a sunny window or use a grow light to supplement natural light. Rotate the bottles regularly to ensure even growth on all sides. If you notice the leaves are pale or leggy, it’s a sign that your coriander isn’t getting enough light.
What type of soil should I use for growing coriander in plastic bottles?
Use a well-draining potting mix that is rich in organic matter. A good mix would be a combination of potting soil, compost, and p
So, there you have it! Transforming humble plastic bottles into a thriving coriander garden is not just a fun project; it’s a sustainable, space-saving, and incredibly rewarding way to enjoy fresh herbs right at your fingertips. We’ve walked you through the simple steps, highlighting how easy it is to repurpose those discarded bottles and create a miniature oasis of flavor.
Why is this DIY coriander plastic bottles trick a must-try? Because it addresses so many common gardening challenges. Limited space? No problem! This vertical gardening solution is perfect for balconies, patios, or even a sunny windowsill. Worried about soil quality? You have complete control over the growing medium, ensuring your coriander gets the nutrients it needs. Tired of constantly buying coriander from the store, only for it to wilt away in your fridge? Grow your own and harvest only what you need, when you need it.
But the benefits don’t stop there. This project is also a fantastic way to teach children about sustainability and the importance of reducing waste. It’s a hands-on learning experience that connects them to the food they eat and encourages them to be more environmentally conscious. Plus, it’s just plain fun!
Looking for variations? Absolutely! You can experiment with different types of plastic bottles – larger bottles for bigger yields, or smaller bottles for a more compact display. Consider painting the bottles to add a splash of color to your garden, or decorating them with twine or burlap for a rustic look. You can also adapt this method to grow other herbs like parsley, basil, or mint. Just be sure to research the specific needs of each herb to ensure optimal growth.
Another variation is to create a self-watering system by adding a wick made of cotton rope or felt that draws water from a reservoir at the bottom of the bottle. This is especially helpful if you tend to forget to water your plants regularly. You could also try using different types of growing mediums, such as coco coir or perlite, to see which works best for your coriander.
We’re confident that once you try this DIY coriander plastic bottles method, you’ll be hooked. It’s a simple, effective, and eco-friendly way to enjoy fresh, flavorful coriander all year round.
So, what are you waiting for? Gather your plastic bottles, grab some potting soil, and get ready to embark on your own coriander-growing adventure. We can’t wait to see your creations!
Don’t forget to share your experiences with us! Post photos of your DIY coriander gardens on social media using #DIYCorianderBottles and tag us so we can admire your green thumbs. We’re eager to hear your tips, tricks, and any variations you’ve come up with. Let’s inspire each other to create a more sustainable and flavorful world, one plastic bottle at a time. Happy gardening!
Frequently Asked Questions (FAQ)
What kind of plastic bottles are best for growing coriander?
Ideally, you should use food-grade plastic bottles, such as those that have contained water, juice, or soda. These are generally considered safe for growing edible plants. Avoid using bottles that have contained harsh chemicals or cleaning products, as these could contaminate the soil and your coriander. PET (Polyethylene Terephthalate) bottles, commonly used for water and soda, are a good choice. Make sure to thoroughly clean the bottles with soap and water before using them.
How much sunlight does coriander need when grown in plastic bottles?
Coriander thrives in full sun, which means it needs at least 6 hours of direct sunlight per day. However, it can also tolerate partial shade, especially in hotter climates. If you’re growing your coriander indoors, place the bottles near a sunny window or use a grow light to supplement natural light. Rotate the bottles regularly to ensure even growth on all sides. If you notice the leaves are pale or leggy, it’s a sign that your coriander isn’t getting enough light.
What type of soil should I use for growing coriander in plastic bottles?
Use a well-draining potting mix that is rich in organic matter. A good mix would be a combination of potting soil, compost, and perlite or vermiculite. The compost provides nutrients, while the perlite or vermiculite improves drainage and aeration. Avoid using garden soil, as it can be too heavy and compact, which can lead to root rot. You can also add a slow-release fertilizer to the soil to provide a steady supply of nutrients to your coriander plants.
How often should I water my coriander plants in plastic bottles?
Water your coriander plants when the top inch of soil feels dry to the touch. Avoid overwatering, as this can lead to root rot. The frequency of watering will depend on the weather, the size of the bottle, and the type of soil you’re using. In general, you’ll need to water more frequently during hot, dry weather and less frequently during cool, cloudy weather. Make sure the bottles have drainage holes to allow excess water to escape.
How do I harvest coriander from my plastic bottle garden?
You can start harvesting coriander leaves when the plants are about 6 inches tall. Simply snip off the leaves with scissors or your fingers, being careful not to damage the main stem. Harvest the outer leaves first, as this will encourage the plant to produce more new growth. You can harvest coriander leaves continuously throughout the growing season. If you want to harvest coriander seeds, allow the plants to flower and then collect the seeds when they turn brown and dry.
Can I grow coriander from seed directly in the plastic bottles?
Yes, you can directly sow coriander seeds into the plastic bottles. Sow the seeds about 1/4 inch deep and keep the soil moist until they germinate. Germination typically takes about 7-14 days. Once the seedlings emerge, thin them out so that there are only a few plants per bottle. You can also start coriander seeds indoors in seed trays and then transplant the seedlings into the plastic bottles once they are large enough to handle.
How do I prevent pests and diseases from affecting my coriander plants?
Regularly inspect your coriander plants for signs of pests or diseases. Common pests that can affect coriander include aphids, spider mites, and whiteflies. You can control these pests by spraying the plants with insecticidal soap or neem oil. Diseases that can affect coriander include powdery mildew and fungal leaf spots. To prevent these diseases, ensure good air circulation around the plants and avoid overwatering. You can also use a fungicide if necessary.
How long will my coriander plants last in the plastic bottles?
Coriander is an annual plant, which means it completes its life cycle in one growing season. However, you can extend the life of your coriander plants by regularly harvesting the leaves and preventing them from flowering. Once the plants start to flower, they will produce seeds and then die. You can also succession sow coriander seeds every few weeks to ensure a continuous supply of fresh leaves.
What are some other herbs I can grow in plastic bottles using this method?
This method is suitable for growing a variety of herbs, including basil, parsley, mint, chives, oregano, and thyme. Just be sure to research the specific needs of each herb to ensure optimal growth. Some herbs, like mint, can be invasive, so it’s best to grow them in separate containers to prevent them from spreading.
How do I deal with root rot in my coriander plants grown in plastic bottles?
Root rot is a common problem in container gardening, especially if the soil is not well-draining or if the plants are overwatered. If you suspect root rot, carefully remove the affected plant from the bottle and inspect the roots. Healthy roots are firm and white, while rotted roots are mushy and brown. Trim away any rotted roots with clean scissors and repot the plant in fresh, well-draining soil. Avoid overwatering in the future and ensure that the bottle has adequate drainage holes. You can also add a fungicide to the soil to help prevent further root rot.
Leave a Comment