
DIY Mushroom Bottle Garden: Ever dreamed of having a miniature, enchanting forest right on your windowsill? I know I have! Forget sprawling acres – we’re talking about bringing the magic of the mycelium kingdom into your home with a simple, upcycled bottle. This isn’t just a gardening project; it’s a journey into the fascinating world of fungi, a touch of sustainable living, and a dash of pure, unadulterated fun!
For centuries, mushrooms have held a special place in various cultures, from being revered for their medicinal properties in traditional Chinese medicine to being celebrated as culinary delicacies in European cuisine. But beyond their practical uses, they’ve always held an air of mystery and wonder. Now, you can cultivate that wonder yourself!
Why do you need this DIY Mushroom Bottle Garden trick in your life? Well, for starters, it’s incredibly rewarding to watch these fascinating organisms sprout and flourish. Plus, it’s a fantastic way to recycle those empty bottles lying around. But more importantly, in our increasingly urbanized world, connecting with nature, even on a small scale, is crucial for our well-being. This project offers a tangible way to bring a little bit of the outdoors in, fostering a sense of calm and connection. So, let’s get our hands dirty (well, maybe just a little!) and create our own miniature mushroom paradise!
Verwandle eine alte Flasche in einen bezaubernden Pilz-Flaschengarten
Hallo liebe DIY-Enthusiasten! Habt ihr euch jemals gefragt, was ihr mit diesen leeren Weinflaschen anfangen sollt? Anstatt sie wegzuwerfen, lasst uns ihnen neues Leben einhauchen und einen magischen Pilz-Flaschengarten erschaffen! Dieses Projekt ist nicht nur umweltfreundlich, sondern auch eine wunderbare Möglichkeit, ein Stück Natur in euer Zuhause zu bringen. Und das Beste daran? Es ist einfacher, als ihr denkt!
Was ihr für euren Pilz-Flaschengarten braucht
Bevor wir loslegen, hier eine Liste aller Materialien, die ihr benötigt. Keine Sorge, die meisten davon habt ihr wahrscheinlich schon zu Hause!
* Eine leere Glasflasche (Wein-, Saft- oder Limonadenflasche eignen sich hervorragend)
* Korken (entweder ein großer Korken, der in den Flaschenhals passt, oder mehrere kleinere, die zusammenpassen)
* Pilzbrut (Austernpilze, Shiitake oder andere Sorten, die für die Kultivierung auf Holz geeignet sind)
* Holzspäne oder Sägemehl (vorzugsweise Hartholz wie Buche oder Eiche)
* Wasserstoffperoxid (3% Lösung)
* Sprühflasche
* Bohrmaschine mit Holzbohrer (verschiedene Größen)
* Heißklebepistole (optional)
* Handschuhe
* Gesichtsmaske (zum Schutz vor Staub)
* Alufolie
* Gummibänder
* Optional: Dekorative Elemente wie Moos, kleine Steine, Miniaturfiguren
Vorbereitung ist alles: Die Basis für euren Pilzgarten schaffen
Ein erfolgreicher Pilz-Flaschengarten beginnt mit einer guten Vorbereitung. Hier sind die Schritte, die ihr befolgen müsst:
1. Flasche reinigen: Zuerst müsst ihr die Glasflasche gründlich reinigen. Entfernt alle Etiketten und spült sie mit heißem Seifenwasser aus. Stellt sicher, dass keine Rückstände vorhanden sind, da diese das Wachstum der Pilze beeinträchtigen könnten. Lasst die Flasche vollständig trocknen, bevor ihr fortfahrt.
2. Korken vorbereiten: Der Korken dient als Basis für eure Pilze. Wenn ihr einen großen Korken habt, der in den Flaschenhals passt, ist das ideal. Andernfalls könnt ihr auch mehrere kleinere Korken zusammenkleben, um einen größeren zu formen.
* Korken bohren: Mit der Bohrmaschine bohrt ihr Löcher in den Korken. Die Anzahl und Größe der Löcher hängt davon ab, wie viele Pilze ihr züchten möchtet. Ich empfehle, mit 3-5 Löchern zu beginnen. Achtet darauf, dass die Löcher nicht zu groß sind, damit die Pilzbrut nicht herausfällt.
* Korken desinfizieren: Um sicherzustellen, dass keine unerwünschten Mikroorganismen das Wachstum eurer Pilze beeinträchtigen, solltet ihr den Korken desinfizieren. Sprüht ihn dazu mit Wasserstoffperoxid (3% Lösung) ein und lasst ihn trocknen.
3. Substrat vorbereiten: Das Substrat ist die Nahrungsgrundlage für eure Pilze. Holzspäne oder Sägemehl sind dafür ideal.
* Substrat pasteurisieren: Um das Substrat zu pasteurisieren, gebt ihr es in einen Topf und übergießt es mit kochendem Wasser. Lasst es etwa eine Stunde ziehen. Dadurch werden unerwünschte Mikroorganismen abgetötet.
* Substrat abkühlen und abtropfen lassen: Nach dem Pasteurisieren lasst ihr das Substrat abkühlen und drückt überschüssiges Wasser aus. Es sollte feucht, aber nicht nass sein.
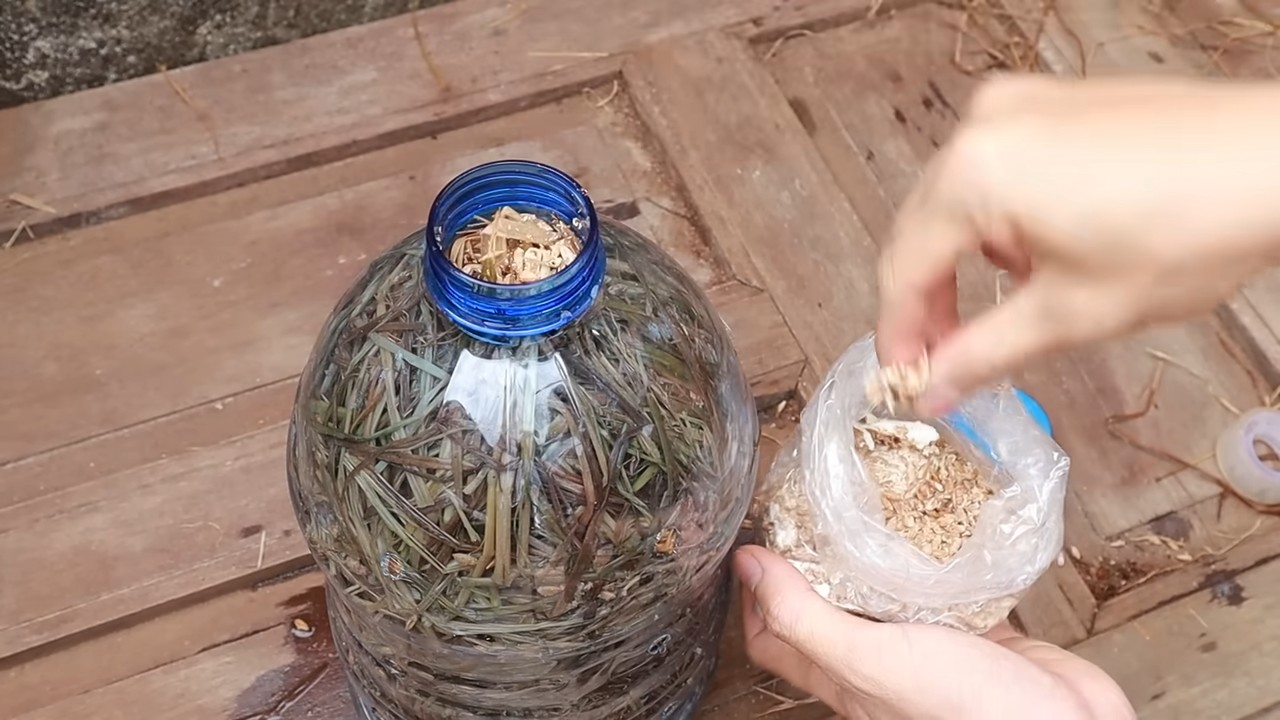
Die Pilzbrut einbringen: Der Startschuss für euer Pilzwachstum
Jetzt kommt der spannende Teil: die Pilzbrut einbringen!
1. Handschuhe und Maske tragen: Um Kontaminationen zu vermeiden, solltet ihr bei diesem Schritt Handschuhe und eine Gesichtsmaske tragen.
2. Substrat mit Pilzbrut vermischen: Vermischt das pasteurisierte Substrat gründlich mit der Pilzbrut. Das Verhältnis sollte etwa 1:10 betragen (1 Teil Pilzbrut auf 10 Teile Substrat).
3. Korken befüllen: Füllt die Löcher im Korken mit dem Substrat-Pilzbrut-Gemisch. Drückt es leicht an, damit es nicht herausfällt.
4. Korken in die Flasche einsetzen: Setzt den Korken vorsichtig in den Flaschenhals ein. Achtet darauf, dass er fest sitzt, aber nicht zu fest, damit die Pilze später noch herauswachsen können.
Die Inkubationsphase: Geduld ist gefragt
Die Inkubationsphase ist entscheidend für das Wachstum eurer Pilze. Hier sind die Bedingungen, die ihr schaffen müsst:
1. Dunkelheit und hohe Luftfeuchtigkeit: Stellt die Flasche an einen dunklen und kühlen Ort mit hoher Luftfeuchtigkeit. Ein Keller oder ein Schrank sind ideal.
2. Luftfeuchtigkeit erhöhen: Um die Luftfeuchtigkeit zu erhöhen, könnt ihr die Flasche mit Alufolie abdecken und mit Gummibändern befestigen. Lasst jedoch etwas Luftzirkulation zu, indem ihr kleine Löcher in die Folie stecht.
3. Regelmäßig befeuchten: Besprüht das Substrat im Korken regelmäßig mit Wasser, um es feucht zu halten. Achtet darauf, dass es nicht zu nass wird.
4. Geduld haben: Die Inkubationsphase kann einige Wochen dauern. Habt Geduld und beobachtet das Wachstum eurer Pilze.
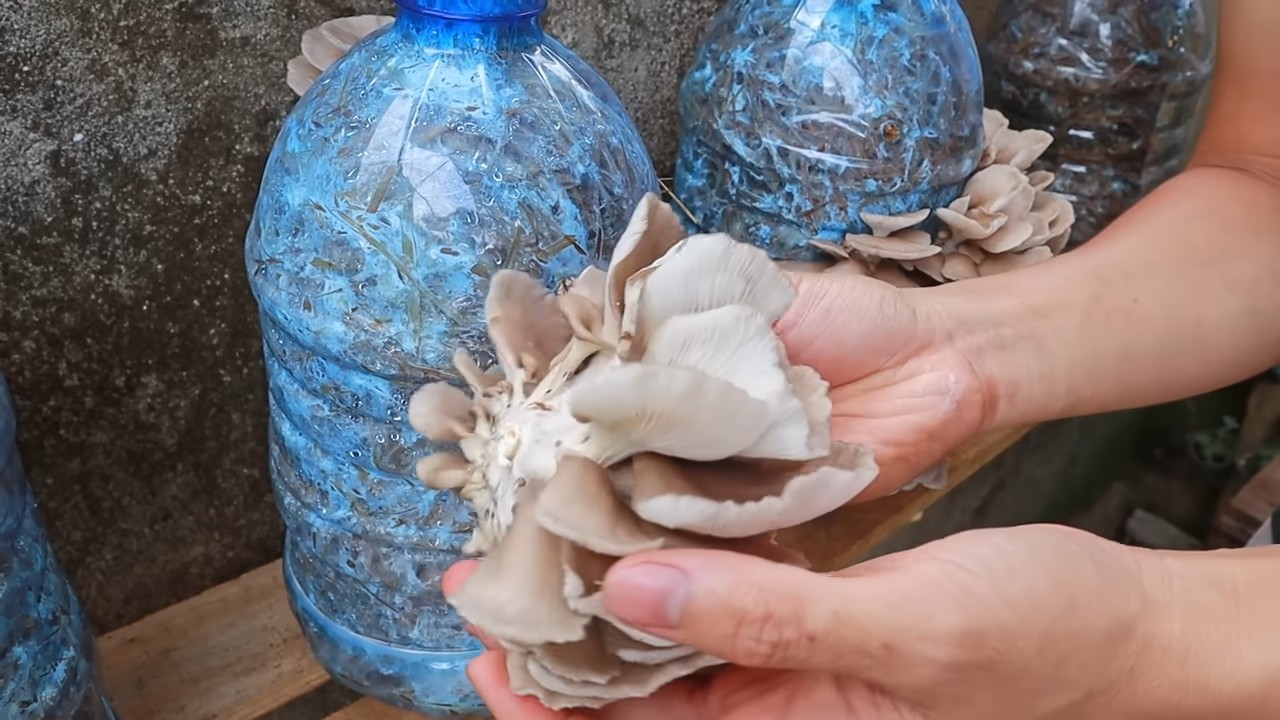
Die Fruchtungsphase: Erntezeit!
Nach einigen Wochen solltet ihr die ersten Pilze sehen. Jetzt beginnt die Fruchtungsphase:
1. Licht und Belüftung: Stellt die Flasche an einen helleren Ort, aber vermeidet direkte Sonneneinstrahlung. Entfernt die Alufolie, um die Belüftung zu verbessern.
2. Regelmäßig befeuchten: Besprüht die Pilze regelmäßig mit Wasser, um sie feucht zu halten.
3. Ernten: Wenn die Pilze ausgewachsen sind, könnt ihr sie ernten. Schneidet sie vorsichtig mit einem scharfen Messer ab.
Dekoration und Pflege: Euren Pilz-Flaschengarten verschönern
Um euren Pilz-Flaschengarten noch schöner zu gestalten, könnt ihr ihn mit Moos, kleinen Steinen oder Miniaturfiguren dekorieren. Achtet darauf, dass die Dekoration das Wachstum der Pilze nicht behindert.
* Moos: Moos sorgt für eine natürliche und feuchte Umgebung.
* Steine: Kleine Steine können als Drainage dienen und das Substrat vor Staunässe schützen.
* Miniaturfiguren: Miniaturfiguren verleihen eurem Pilz-Flaschengarten eine persönliche Note.
Pflegehinweise
* Regelmäßig befeuchten: Besprüht die Pilze und das Substrat regelmäßig mit Wasser, um sie feucht zu halten.
* Belüftung: Sorgt für eine gute Belüftung, um Schimmelbildung zu vermeiden.
* Ernten: Erntet die Pilze, sobald sie ausgewachsen sind, um die Produktion neuer Pilze anzuregen.
* Substrat erneuern: Nach einigen Ernten ist das Substrat erschöpft. Erneuert es, um die Pilzproduktion aufrechtzuerhalten.
Häufige Probleme und Lösungen
Auch beim Pilzzüchten können Probleme auftreten. Hier sind einige häufige Probleme und ihre Lösungen:
* Schimmelbildung: Wenn sich Schimmel bildet, entfernt die betroffenen Stellen und besprüht das Substrat mit Wasserstoffperoxid. Sorgt für eine bessere Belüftung.
* Kein Wachstum: Wenn die Pilze nicht wachsen, kann das an zu wenig Feuchtigkeit, zu wenig Licht oder zu wenig Nährstoffen liegen. Passt die Bedingungen entsprechend an.
* Schädlinge: Schädlinge können das Wachstum der Pilze beeinträchtigen. Entfernt sie manuell oder verwendet natürliche Schädlingsbekämpfungsmittel.
Fazit: Ein magischer Garten im Glas
Mit diesem DIY-Projekt könnt ihr nicht nur eure leeren Flaschen recyceln, sondern auch einen bezaubernden Pilz-Flaschengarten
Conclusion
So, there you have it! Creating your own DIY Mushroom Bottle Garden is not just a fun project; it’s a miniature ecosystem you can cultivate right in your home. It’s a fantastic way to bring a touch of the forest indoors, learn about the fascinating world of fungi, and even potentially harvest your own delicious mushrooms.
Why is this a must-try? Because it’s incredibly rewarding. Unlike many DIY projects that end up gathering dust, a mushroom bottle garden is a living, breathing entity that evolves over time. You’ll witness the mycelium spreading, the pins forming, and the mushrooms fruiting – a truly captivating process. Plus, it’s a sustainable way to recycle glass bottles and turn them into something beautiful and productive.
Beyond the basic method, there are countless ways to personalize your mushroom bottle garden. Experiment with different types of mushrooms! Oyster mushrooms are a popular choice for beginners due to their ease of cultivation and rapid growth, but you could also try shiitake, lion’s mane, or even wine cap mushrooms, depending on your climate and the availability of spawn. Consider adding other elements to your garden to create a more visually appealing and diverse environment. Small pieces of wood, moss, or even decorative stones can enhance the aesthetic and provide additional microhabitats for beneficial organisms. You can also play around with the substrate mix. While coffee grounds are a great base, adding other organic materials like straw, sawdust, or even shredded cardboard can provide different nutrients and textures that may benefit certain mushroom species.
Don’t be afraid to experiment! The beauty of this project lies in its adaptability. There’s no one “right” way to create a mushroom bottle garden. The most important thing is to provide the right conditions for your chosen mushroom species – moisture, darkness, and a suitable substrate.
We strongly encourage you to give this DIY Mushroom Bottle Garden a try. It’s a project that’s both educational and enjoyable, and the results are truly magical. Once you’ve created your own miniature fungal paradise, we’d love to hear about your experience! Share your photos, tips, and any challenges you encountered in the comments below. Let’s build a community of mushroom enthusiasts and learn from each other’s successes and failures. Happy growing!
Frequently Asked Questions (FAQ)
What kind of mushrooms are best for a bottle garden?
Oyster mushrooms are generally considered the best choice for beginners due to their rapid growth, tolerance of various conditions, and delicious flavor. They are also relatively easy to obtain as spawn. Other good options include shiitake, lion’s mane, and wine cap mushrooms, but these may require more specific conditions and may not be as readily available. Research the specific needs of each mushroom species before you begin.
Where can I get mushroom spawn?
Mushroom spawn can be purchased online from reputable mushroom suppliers. You can also find it at some garden centers or specialty stores. Make sure to choose a supplier that offers high-quality spawn and provides clear instructions for cultivation. Look for reviews and testimonials to ensure the supplier is reliable.
What kind of bottle should I use?
Any clear glass bottle can be used, but wider-mouthed bottles are generally easier to work with. Wine bottles, large pickle jars, or even repurposed juice bottles are all good options. Make sure the bottle is thoroughly cleaned and sanitized before use to prevent contamination. You can sterilize the bottle by boiling it in water for 10-15 minutes or by using a diluted bleach solution.
How do I maintain the humidity in the bottle?
Maintaining adequate humidity is crucial for mushroom growth. You can mist the inside of the bottle with water regularly, especially when you see the substrate drying out. Covering the opening of the bottle with plastic wrap or a lid can also help to trap moisture. However, make sure to provide some ventilation to prevent the buildup of harmful gases. A small hole in the plastic wrap or lid will suffice.
How much light do mushrooms need?
Mushrooms don’t need a lot of light, especially during the colonization phase. In fact, darkness is often preferred. Once the mushrooms start to fruit, they will need some indirect light to develop properly. Avoid direct sunlight, which can dry out the substrate and damage the mushrooms. A location near a window with filtered light is ideal.
How long does it take for mushrooms to grow?
The time it takes for mushrooms to grow depends on the species, the environmental conditions, and the quality of the spawn. Oyster mushrooms can often fruit within a week or two of inoculation, while other species may take longer. Be patient and monitor the bottle regularly for signs of growth.
What if my bottle garden gets moldy?
Mold is a common problem in mushroom cultivation. If you see mold growing in your bottle garden, it’s important to address it quickly. Remove any visible mold with a clean spoon or tweezers. You can also try spraying the affected area with a diluted hydrogen peroxide solution. Ensure proper ventilation to prevent further mold growth. If the mold infestation is severe, you may need to discard the entire project and start over.
Can I eat the mushrooms that grow in my bottle garden?
Yes, if you have used edible mushroom spawn and have properly identified the mushrooms, you can eat them. However, it’s crucial to be absolutely certain of the mushroom species before consuming them. If you are unsure, it’s best to err on the side of caution and discard them. Never eat wild mushrooms unless you are an experienced mushroom forager.
What do I do with the spent substrate after the mushrooms have finished fruiting?
The spent substrate is a valuable resource that can be used in your garden. It’s rich in nutrients and beneficial microbes that can improve soil health. You can add it to your compost pile, use it as mulch around plants, or even mix it into potting soil.
My mushrooms are growing but they look strange. What could be wrong?
Deformed or unusual-looking mushrooms can be caused by a variety of factors, including insufficient humidity, poor ventilation, or contamination. Ensure that your bottle garden is properly humidified and ventilated. If you suspect contamination, remove any affected areas and monitor the situation closely. If the problem persists, you may need to start over with fresh spawn and a clean bottle.
Can I grow different types of mushrooms in the same bottle?
It’s generally not recommended to grow different types of mushrooms in the same bottle, as they may compete for resources and inhibit each other’s growth. Each mushroom species has specific environmental requirements, and it’s difficult to create a single environment that is optimal for multiple species.
How often should I water my mushroom bottle garden?
The frequency of watering depends on the humidity levels in your environment and the type of substrate you are using. Check the substrate regularly and mist it with water when it feels dry to the touch. Avoid overwatering, which can lead to mold growth.
Is a DIY Mushroom Bottle Garden safe for pets and children?
While the mushrooms themselves are generally safe, it’s important to keep the bottle garden out of reach of pets and small children. The glass bottle can be a hazard if broken, and some pets may be tempted to eat the substrate or mushrooms, which could cause digestive upset. Supervise children closely when they are near the bottle garden.

Leave a Comment