
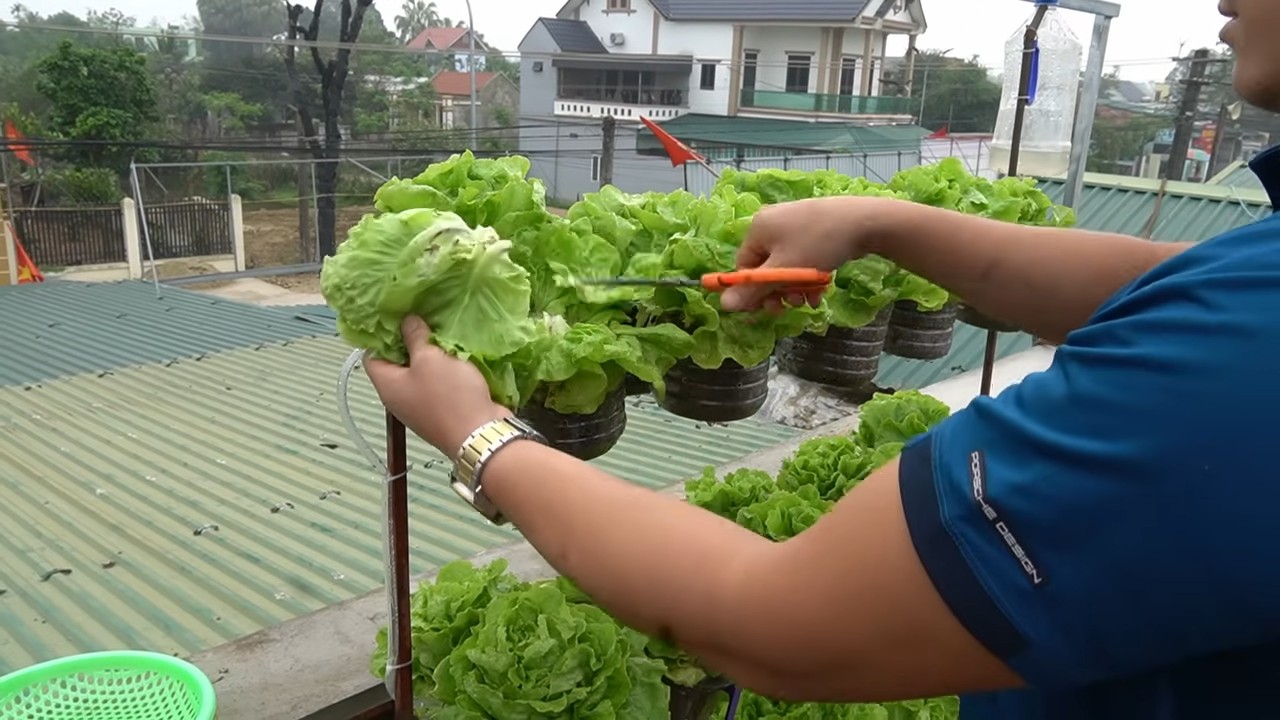
DIY Vertical Lettuce Garden: Imagine stepping outside your door and harvesting fresh, crisp lettuce for your salad, sandwich, or side dish – all grown in a space-saving, visually appealing vertical garden! For centuries, humans have cultivated lettuce, with evidence suggesting its consumption dates back to ancient Egypt. But let’s face it, not everyone has the luxury of a sprawling backyard to dedicate to traditional gardening. That’s where the magic of a DIY vertical lettuce garden comes in!
I’m so excited to share this project with you because it’s a game-changer for anyone who wants to enjoy homegrown goodness, regardless of their living situation. Whether you have a tiny balcony, a sunny patio, or just a small corner in your yard, you can create a thriving vertical lettuce garden. This isn’t just about growing lettuce; it’s about reclaiming your food source, reducing your carbon footprint, and adding a touch of green beauty to your surroundings. Plus, it’s incredibly rewarding to nurture your own food from seed to table.
This DIY project is perfect for beginners and seasoned gardeners alike. I’ll guide you through each step, from choosing the right materials to planting and caring for your lettuce. Get ready to transform your space and enjoy the freshest, most delicious lettuce you’ve ever tasted with your very own DIY Vertical Lettuce Garden!
DIY Vertikaler Salatgarten: Frischer Salat direkt von der Wand!
Hallo liebe Gartenfreunde! Habt ihr auch wenig Platz, aber trotzdem Lust auf frischen Salat aus dem eigenen Anbau? Dann habe ich hier genau das Richtige für euch: einen vertikalen Salatgarten! Das ist nicht nur platzsparend, sondern auch ein echter Hingucker auf dem Balkon, der Terrasse oder sogar in der Küche. Ich zeige euch, wie ihr diesen Salat-Himmel ganz einfach selber bauen könnt. Los geht’s!
Was du brauchst: Die Materialliste
Bevor wir loslegen, hier eine Liste aller Materialien und Werkzeuge, die du für deinen vertikalen Salatgarten benötigst:
* Holzpalette: Am besten eine Europalette, die unbehandelt und sauber ist. Achte darauf, dass sie keine scharfen Kanten oder Splitter hat.
* Geotextil oder Unkrautvlies: Das verhindert, dass die Erde aus den Zwischenräumen der Palette rieselt.
* Tacker und ausreichend Tackerklammern: Um das Geotextil sicher an der Palette zu befestigen.
* Schere oder Cuttermesser: Zum Zuschneiden des Geotextils.
* Erde: Hochwertige Pflanzerde, am besten Bio-Qualität, damit dein Salat gut wächst.
* Salatsetzlinge: Verschiedene Sorten Salat, je nach Geschmack. Ich empfehle Pflücksalat, Römersalat, Feldsalat oder auch Radieschen.
* Handschuhe: Zum Schutz deiner Hände beim Pflanzen.
* Gießkanne oder Gartenschlauch: Zum Bewässern deines Salatgartens.
* Optional: Holzschutzlasur oder Farbe: Um die Palette wetterfest zu machen und ihr einen individuellen Look zu verleihen.
* Optional: Schleifpapier: Um die Palette vor dem Anstrich anzuschleifen.
* Optional: Winkel und Schrauben: Zur zusätzlichen Stabilisierung der Palette, falls nötig.
Schritt-für-Schritt-Anleitung: So baust du deinen vertikalen Salatgarten
1. Palette vorbereiten:
* Zuerst solltest du die Palette gründlich reinigen. Entferne Staub, Schmutz und eventuelle lose Holzsplitter.
* Wenn du möchtest, kannst du die Palette mit Schleifpapier anschleifen, um eine glatte Oberfläche zu erhalten. Das ist besonders wichtig, wenn du sie später anstreichen möchtest.
* Optional: Wenn du die Palette wetterfest machen möchtest, trage eine Holzschutzlasur oder Farbe auf. Lass die Lasur oder Farbe gut trocknen, bevor du mit dem nächsten Schritt fortfährst. Achte darauf, eine Lasur oder Farbe zu verwenden, die für den Außenbereich geeignet ist.
2. Geotextil anbringen:
* Schneide das Geotextil in passende Stücke zu, die die Zwischenräume der Palette auskleiden. Die Stücke sollten etwas größer sein als die Zwischenräume, damit du sie gut festtackern kannst.
* Lege das Geotextil in die Zwischenräume und tackere es sorgfältig fest. Achte darauf, dass keine Lücken entstehen, durch die Erde herausfallen könnte. Besonders wichtig ist es, den Boden der Zwischenräume gut abzudecken.
* Überlappende Stücke Geotextil sollten ebenfalls gut festgetackert werden, um eine stabile “Tasche” für die Erde zu bilden.
3. Erde einfüllen:
* Fülle die mit Geotextil ausgekleideten Zwischenräume mit Erde. Drücke die Erde leicht an, damit sie sich setzt.
* Lass oben einen kleinen Rand frei, damit beim Gießen keine Erde überläuft.
4. Salat pflanzen:
* Nimm die Salatsetzlinge vorsichtig aus ihren Töpfen. Lockere die Wurzeln etwas auf, bevor du sie in die Erde pflanzt.
* Setze die Salatsetzlinge in die Erde und drücke sie leicht an. Achte darauf, dass die Setzlinge genügend Platz haben, um zu wachsen.
* Gieße die Setzlinge nach dem Pflanzen gründlich an.
5. Standort wählen und aufstellen:
* Wähle einen sonnigen Standort für deinen vertikalen Salatgarten. Salat benötigt mindestens 6 Stunden Sonnenlicht pro Tag.
* Stelle die Palette an den gewählten Standort. Achte darauf, dass sie stabil steht und nicht umkippen kann.
* Optional: Wenn du die Palette zusätzlich stabilisieren möchtest, kannst du sie mit Winkeln und Schrauben an einer Wand oder einem Zaun befestigen.
Bewässerung und Pflege: Damit dein Salat prächtig gedeiht
* Bewässerung: Gieße deinen Salatgarten regelmäßig, besonders an heißen Tagen. Die Erde sollte immer leicht feucht sein, aber nicht nass. Am besten gießt du morgens oder abends, um Verbrennungen der Blätter durch die Sonne zu vermeiden.
* Düngung: Dünge deinen Salatgarten regelmäßig mit einem organischen Dünger. Das sorgt für ein gesundes Wachstum und eine reiche Ernte.
* Schutz vor Schädlingen: Kontrolliere deinen Salatgarten regelmäßig auf Schädlinge wie Schnecken oder Blattläuse. Bei Bedarf kannst du natürliche Schädlingsbekämpfungsmittel einsetzen.
* Ernte: Ernte deinen Salat, sobald er groß genug ist. Pflücksalat kannst du nach und nach ernten, indem du die äußeren Blätter abpflückst. Römersalat und andere Salatsorten erntest du, wenn sie ausgewachsen sind.
* Nachpflanzen: Wenn du eine Sorte Salat abgeerntet hast, kannst du die leeren Zwischenräume mit neuen Setzlingen bepflanzen. So hast du immer frischen Salat zur Verfügung.
Extra-Tipps für deinen vertikalen Salatgarten
* Verschiedene Salatsorten: Probiere verschiedene Salatsorten aus, um deinen Salatgarten abwechslungsreich zu gestalten.
* Kräuter: Du kannst auch Kräuter wie Petersilie, Schnittlauch oder Basilikum in deinen vertikalen Garten pflanzen.
* Erdbeeren: Auch Erdbeeren fühlen sich in einem vertikalen Garten wohl.
* Beleuchtung: Wenn du deinen Salatgarten in der Wohnung aufstellen möchtest, benötigst du möglicherweise eine zusätzliche Pflanzenlampe, um ausreichend Licht zu gewährleisten.
* Drainage: Achte darauf, dass das Wasser gut ablaufen kann, um Staunässe zu vermeiden. Du kannst eine Schicht Kies oder Blähton unter die Erde geben, um die Drainage zu verbessern.
* Anpassung an den Standort: Je nach Standort musst du die Bewässerung und Düngung anpassen. An einem sonnigen Standort benötigt dein Salatgarten mehr Wasser als an einem schattigen Standort.
* Upcycling: Anstatt einer Europalette kannst du auch andere Materialien wie alte Holzkisten oder Plastikflaschen für deinen vertikalen Garten verwenden. Sei kreativ!
H3: Die richtige Erde für deinen Salat
Die Wahl der richtigen Erde ist entscheidend für den Erfolg deines vertikalen Salatgartens. Ich empfehle dir, hochwertige Pflanzerde zu verwenden, am besten in Bio-Qualität. Diese Erde enthält alle wichtigen Nährstoffe, die dein Salat für ein gesundes Wachstum benötigt.
* Bio-Erde: Bio-Erde ist frei von chemischen Zusätzen und schont die Umwelt.
* Pflanzerde: Pflanzerde ist speziell für den Anbau von Gemüse und Kräutern entwickelt und enthält eine ausgewogene Nährstoffmischung.
* Kokoserde: Kokoserde ist eine umweltfreundliche Alternative zu herkömmlicher Pflanzerde. Sie speichert gut Wasser und ist leicht.
* Anzuchterde: Für die Anzucht von Salatsetzlingen ist Anzuchterde ideal. Sie ist besonders fein und nährstoffarm, was das Wurzelwachstum fördert.
H3: Die besten Salatsorten für deinen vertikalen Garten
Nicht alle Salatsorten eignen sich gleich gut für den Anbau in einem vertikalen Garten. Ich habe hier eine Liste mit Sorten zusammengestellt, die besonders gut geeignet sind:
* Pflücksalat: Pflücksalat ist besonders einfach anzubauen und kann nach und nach geerntet werden. Es gibt ihn in verschiedenen Farben und Formen.
* Römersalat: Römersalat ist robust und wächst auch bei kühleren Temperaturen gut.
* Feldsalat: Fel

Conclusion
So, there you have it! Creating your own DIY Vertical Lettuce Garden isn’t just a fun weekend project; it’s a gateway to fresher, healthier salads, a more sustainable lifestyle, and a visually appealing addition to your home. We’ve walked you through the steps, highlighted the benefits, and hopefully, inspired you to ditch the store-bought lettuce and embrace the joy of homegrown goodness.
But why is this DIY trick a must-try? Beyond the obvious cost savings and reduced environmental impact, a vertical lettuce garden offers unparalleled convenience. Imagine stepping outside your kitchen door and harvesting crisp, vibrant lettuce leaves just moments before you need them. No more wilted greens languishing in the refrigerator! The freshness and flavor are simply unmatched. Plus, the vertical design is perfect for those with limited space, allowing you to maximize your growing potential even on a small balcony or patio.
Furthermore, this project is incredibly customizable. Feel free to experiment with different container types. Instead of PVC pipes, you could use repurposed plastic bottles, stacked terracotta pots, or even hanging baskets. The possibilities are endless! Consider adding companion plants like marigolds or basil to deter pests and enhance the flavor of your lettuce. You can also tailor the lettuce varieties to your personal preferences. From crisp romaine to buttery butter lettuce, the choice is yours.
Don’t be afraid to get creative with the design and aesthetics of your vertical garden. Paint the containers in vibrant colors, add decorative elements, or even incorporate a small irrigation system for automated watering. The goal is to create a functional and beautiful space that reflects your personal style.
We understand that embarking on a DIY project can sometimes feel daunting, but we assure you that this one is relatively simple and incredibly rewarding. The satisfaction of harvesting your own lettuce and knowing exactly where it came from is truly unparalleled. It’s a small step towards a more sustainable and self-sufficient lifestyle.
We wholeheartedly encourage you to give this DIY Vertical Lettuce Garden a try. Don’t be afraid to experiment, adapt the instructions to your specific needs, and most importantly, have fun! Once you’ve built your garden and started harvesting your own lettuce, we’d love to hear about your experience. Share your photos, tips, and challenges in the comments section below. Let’s create a community of vertical gardening enthusiasts and inspire others to embrace the joy of homegrown goodness. We are confident that you will find this project to be a worthwhile investment of your time and effort, yielding delicious and healthy rewards for months to come. So, grab your tools, gather your materials, and get ready to transform your space into a thriving vertical lettuce oasis!
Frequently Asked Questions (FAQ)
What type of lettuce grows best in a vertical garden?
Almost any type of lettuce can thrive in a vertical garden, but some varieties are particularly well-suited. Loose-leaf lettuces like Black Seeded Simpson, Salad Bowl, and Red Sails are excellent choices because they are easy to harvest and continue to produce new leaves throughout the growing season. Butterhead lettuces like Buttercrunch and Tom Thumb are also good options, offering a tender and flavorful addition to your salads. Romaine lettuce can also be grown vertically, but it may require slightly more space and support. Experiment with different varieties to find your favorites and see what grows best in your specific climate and conditions. Remember to choose varieties that are resistant to bolting (going to seed) in warmer weather.
How often should I water my vertical lettuce garden?
Watering frequency depends on several factors, including the type of container you’re using, the weather conditions, and the type of potting mix. In general, you should aim to keep the soil consistently moist but not waterlogged. Check the soil moisture level daily by sticking your finger about an inch into the soil. If it feels dry, it’s time to water. During hot and dry weather, you may need to water your lettuce garden daily, or even twice a day. In cooler weather, you may only need to water every few days. Consider using a soaker hose or drip irrigation system to provide consistent and efficient watering. Avoid overhead watering, as this can lead to fungal diseases.
What type of soil should I use for my vertical lettuce garden?
Lettuce prefers well-draining soil that is rich in organic matter. A good potting mix for a vertical lettuce garden should be lightweight, retain moisture, and provide adequate drainage. You can purchase a pre-made potting mix specifically designed for vegetables, or you can create your own by mixing equal parts of compost, peat moss (or coconut coir), and perlite or vermiculite. Avoid using garden soil, as it can be too heavy and compact, which can hinder drainage and root growth. Adding a slow-release fertilizer to the potting mix at planting time can provide your lettuce with the nutrients it needs to thrive.
How much sunlight does my vertical lettuce garden need?
Lettuce thrives in full sun, but it can also tolerate partial shade, especially in hot climates. Aim for at least 6 hours of direct sunlight per day. If you live in a hot climate, providing some afternoon shade can help prevent the lettuce from bolting. If you don’t have access to enough natural sunlight, you can supplement with grow lights. Place the grow lights about 6-12 inches above the lettuce plants and keep them on for 12-14 hours per day. Monitor your lettuce plants closely and adjust the amount of sunlight or artificial light as needed.
How do I prevent pests and diseases in my vertical lettuce garden?
Prevention is key when it comes to pests and diseases in your vertical lettuce garden. Start by using healthy, disease-free seedlings or seeds. Choose lettuce varieties that are resistant to common diseases. Keep your garden clean and free of debris. Remove any dead or dying leaves promptly. Water your lettuce plants in the morning to allow the foliage to dry out during the day. Avoid overcrowding the plants, as this can create a humid environment that is conducive to fungal diseases. Companion planting with herbs like basil, mint, or chives can help deter pests. If you do encounter pests, try using organic pest control methods such as insecticidal soap or neem oil.
How do I harvest lettuce from my vertical garden?
Harvesting lettuce from your vertical garden is easy and rewarding. For loose-leaf lettuces, you can simply snip off the outer leaves as needed, leaving the inner leaves to continue growing. This is known as the “cut-and-come-again” method. For head lettuces, you can harvest the entire head when it is mature and firm. To harvest, simply cut the head at the base of the plant. Avoid harvesting lettuce during the hottest part of the day, as this can cause the leaves to wilt. Wash the lettuce leaves thoroughly before eating.
Can I grow other vegetables in my vertical garden besides lettuce?
Absolutely! While this article focuses on lettuce, vertical gardens are incredibly versatile and can be used to grow a wide variety of other vegetables, herbs, and even flowers. Some popular choices for vertical gardens include strawberries, spinach, kale, chard, herbs like basil, parsley, and mint, and even small fruiting vegetables like cherry tomatoes and peppers. When choosing what to grow in your vertical garden, consider the size and growth habits of the plants, as well as their sunlight and water requirements.
How do I overwinter my vertical lettuce garden?
Whether you can overwinter your vertical lettuce garden depends on your climate. In mild climates, you may be able to keep your lettuce growing throughout the winter with minimal protection. In colder climates, you will need to provide some form of protection, such as a cold frame, greenhouse, or row covers. You can also move your vertical garden indoors to a sunny location or under grow lights. Choose lettuce varieties that are cold-hardy and can tolerate frost. Reduce watering during the winter months, as the plants will not be growing as actively.
What are some creative variations for my DIY Vertical Lettuce Garden?
Beyond the basic PVC pipe or pallet garden, there are countless ways to get creative with your DIY Vertical Lettuce Garden. Consider using repurposed materials like old gutters, plastic bottles, or even shoe organizers. You can also build a living wall by attaching planters to a vertical surface and covering it with greenery. Another fun idea is to create a tiered vertical garden using stacked pots or planters. Get creative with the design and aesthetics of your garden by painting the containers in vibrant colors, adding decorative elements, or even incorporating a small water feature. The possibilities are endless!
How do I fertilize my vertical lettuce garden?
Lettuce is a relatively light feeder, but it still benefits from regular fertilization. You can use a balanced liquid fertilizer diluted to half strength every 2-3 weeks. Alternatively, you can add a slow-release fertilizer to the potting mix at planting time. Avoid over-fertilizing, as this can lead to excessive leaf growth and reduced flavor. Monitor your lettuce plants closely and adjust the fertilization schedule as needed. Look for signs of nutrient deficiencies, such as yellowing leaves or stunted growth.

Leave a Comment