
Easy Kailan Growing Method: Unlock the secrets to a thriving home garden and enjoy fresh, delicious greens right at your fingertips! Have you ever dreamt of stepping outside and harvesting your own vibrant, leafy kailan for a stir-fry or a healthy smoothie? It’s more achievable than you think, and this DIY guide will show you how.
Kailan, also known as Chinese kale, has been a staple in Asian cuisine for centuries, prized not only for its nutritional value but also for its versatility in cooking. From stir-fries to steamed dishes, this leafy green adds a delightful crunch and earthy flavor to any meal. But beyond its culinary appeal, growing your own kailan connects you to a rich agricultural heritage.
In today’s fast-paced world, knowing where your food comes from is more important than ever. Store-bought vegetables can be expensive and may lack the freshness and flavor of homegrown produce. That’s where this easy kailan growing method comes in! I’m going to share simple, step-by-step instructions and clever hacks that will empower you to cultivate your own kailan patch, even if you have limited space or gardening experience. Imagine the satisfaction of nurturing your plants from seed to harvest, knowing you’re providing your family with healthy, organic food. Let’s get started and transform your garden into a kailan haven!
Grow Your Own Delicious Kailan: A Simple DIY Guide
Hey there, fellow gardening enthusiasts! I’m so excited to share my foolproof method for growing kailan (also known as Chinese kale) right in your own backyard or even in containers. Kailan is a nutritional powerhouse, packed with vitamins and minerals, and it’s incredibly versatile in the kitchen. Plus, growing your own means you get the freshest, most delicious kailan possible! Let’s dive in!
Choosing Your Kailan Variety
Before we get our hands dirty, let’s talk about kailan varieties. While most kailan looks pretty similar, there are subtle differences in leaf shape, size, and stem thickness. Don’t worry too much about getting a specific variety; any kailan seeds you find at your local garden center will likely do just fine. I usually just grab whatever’s available and have had great success.
Getting Started: Seeds vs. Seedlings
You have two main options for starting your kailan journey: seeds or seedlings.
* Seeds: Starting from seeds is more economical and gives you more control over the entire growing process. However, it requires a bit more patience and attention.
* Seedlings: Buying seedlings from a nursery is quicker and easier, especially if you’re short on time or new to gardening.
I personally prefer starting from seeds because I enjoy watching them sprout and grow, but both methods work perfectly well. For this guide, I’ll focus on starting from seeds, but I’ll also give you tips for working with seedlings.
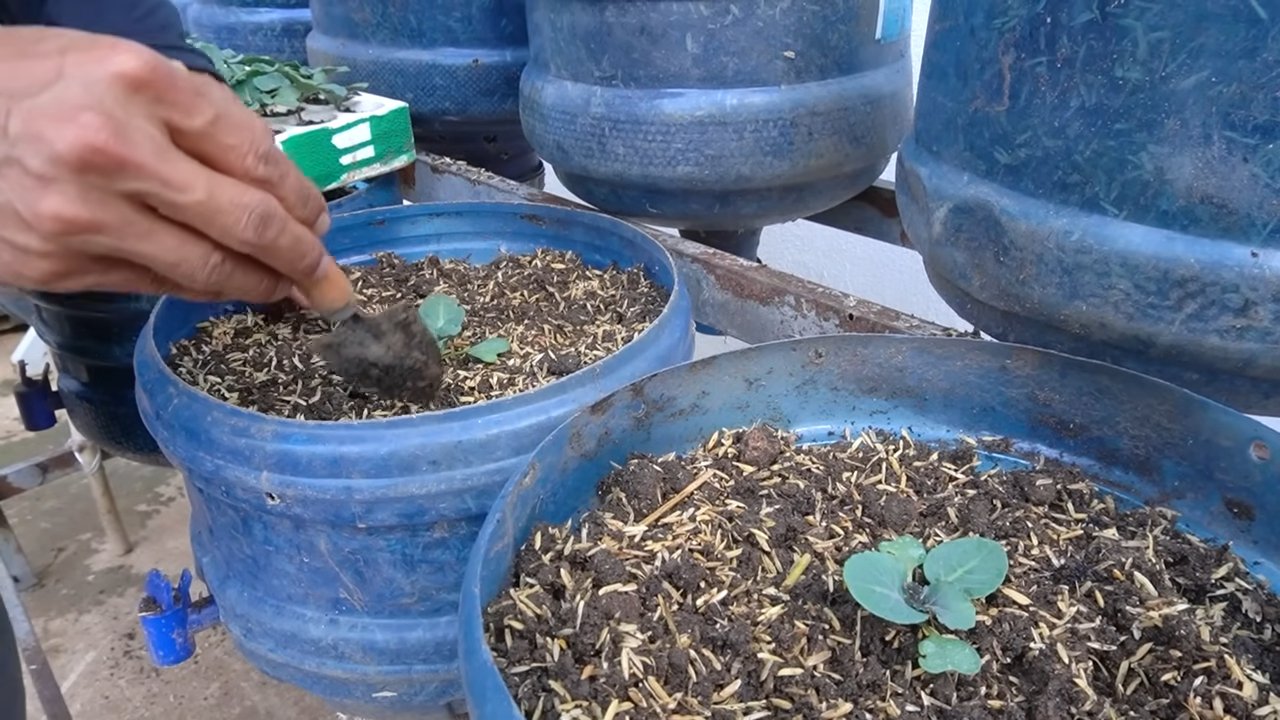
Preparing Your Soil
Kailan thrives in rich, well-drained soil. Here’s how I prepare my soil for optimal growth:
* Choose the Right Location: Kailan needs at least 6 hours of sunlight per day. Pick a spot in your garden that gets plenty of sunshine. If you’re growing in containers, make sure you can move them to a sunny location.
* Amend the Soil: If your soil is heavy clay or sandy, you’ll need to amend it with organic matter. I like to use compost, well-rotted manure, or peat moss. These materials improve drainage, aeration, and nutrient content.
* Test the pH: Kailan prefers a slightly acidic to neutral soil pH (around 6.0 to 7.0). You can test your soil pH with a simple soil testing kit from your local garden center. If your soil is too acidic, add lime to raise the pH. If it’s too alkaline, add sulfur to lower the pH.
* Loosen the Soil: Use a garden fork or tiller to loosen the soil to a depth of at least 12 inches. This will allow the kailan roots to grow easily.
* Remove Rocks and Debris: Clear the area of any rocks, weeds, or other debris that could hinder growth.
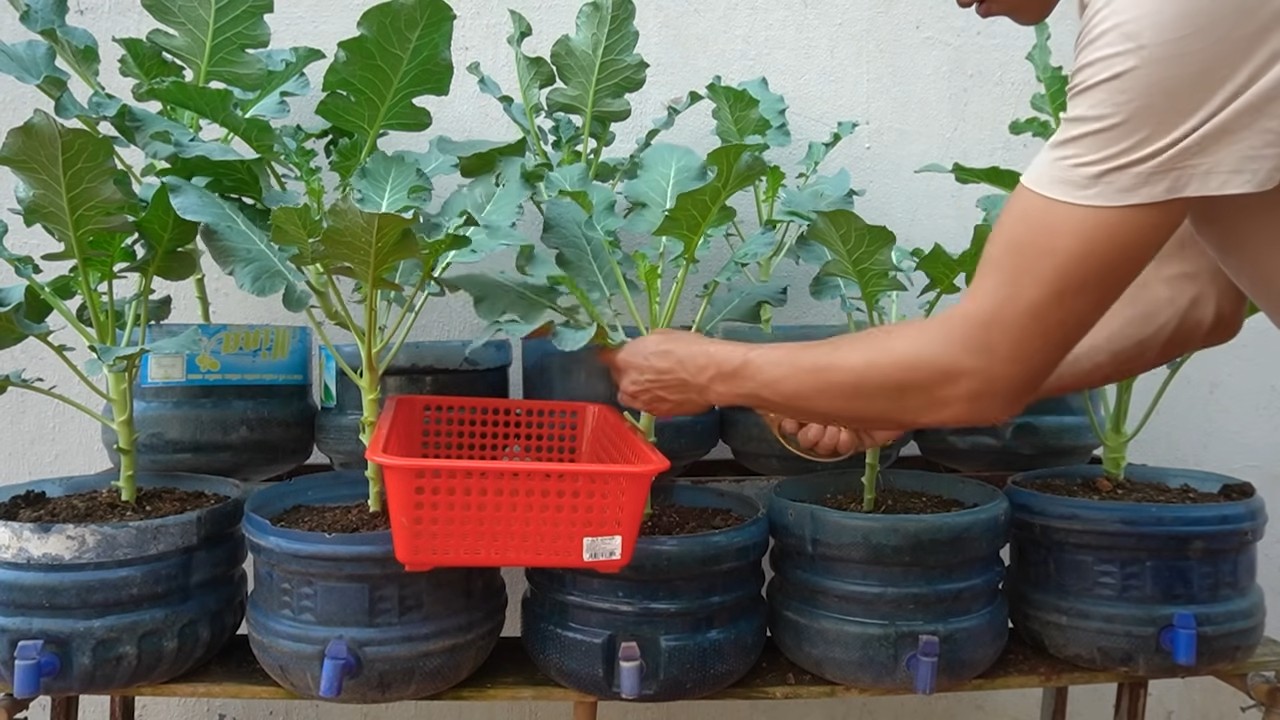
Planting Your Kailan
Now for the fun part – planting!
Planting from Seeds:
1. Sow Seeds Indoors (Optional): If you live in a colder climate with a short growing season, you can start your kailan seeds indoors 4-6 weeks before the last expected frost. Sow the seeds about 1/4 inch deep in seed-starting trays or small pots filled with seed-starting mix. Keep the soil moist and warm (around 70-75°F). Once the seedlings have a few true leaves, you can transplant them outdoors.
2. Direct Sow Seeds Outdoors: If you live in a warmer climate or have already started your seeds indoors, you can direct sow the seeds outdoors. Wait until the soil has warmed up to at least 60°F.
3. Prepare the Planting Area: Create shallow furrows or holes about 1/2 inch deep and 12-18 inches apart.
4. Sow the Seeds: Sow 2-3 seeds in each furrow or hole.
5. Cover the Seeds: Gently cover the seeds with soil and water thoroughly.
6. Thin the Seedlings: Once the seedlings emerge and have a few true leaves, thin them to one plant per hole or furrow, spacing them 12-18 inches apart. Choose the strongest, healthiest-looking seedling to keep.
Planting Seedlings:
1. Harden Off Seedlings: If you purchased seedlings from a nursery, you’ll need to harden them off before planting them in your garden. This means gradually exposing them to outdoor conditions over a period of 7-10 days. Start by placing them in a sheltered location for a few hours each day, gradually increasing the amount of time they spend outdoors.
2. Prepare the Planting Holes: Dig holes that are slightly larger than the root balls of the seedlings, spacing them 12-18 inches apart.
3. Remove Seedlings from Pots: Gently remove the seedlings from their pots, being careful not to damage the roots.
4. Plant the Seedlings: Place the seedlings in the holes and backfill with soil, gently firming it around the base of the plants.
5. Water Thoroughly: Water the seedlings thoroughly after planting.
Caring for Your Kailan
Once your kailan is planted, it’s important to provide it with the proper care to ensure healthy growth.
* Watering: Kailan needs consistent moisture, especially during hot, dry weather. Water deeply whenever the top inch of soil feels dry to the touch. Avoid overwatering, as this can lead to root rot. I usually water my kailan every 2-3 days, depending on the weather.
* Fertilizing: Kailan is a heavy feeder, so it benefits from regular fertilization. I like to use a balanced organic fertilizer, such as fish emulsion or compost tea, every 2-3 weeks. Follow the instructions on the fertilizer label.
* Weeding: Keep the area around your kailan plants free of weeds. Weeds compete with kailan for water, nutrients, and sunlight. Hand-pull weeds regularly or use a hoe to cultivate the soil.
* Mulching: Apply a layer of mulch around your kailan plants to help retain moisture, suppress weeds, and regulate soil temperature. I like to use straw, wood chips, or shredded leaves.
* Pest Control: Kailan can be susceptible to certain pests, such as aphids, cabbage worms, and flea beetles. Inspect your plants regularly for signs of infestation. If you find pests, you can try hand-picking them off, spraying them with insecticidal soap, or using a biological control agent like Bacillus thuringiensis (Bt) for cabbage worms.
* Disease Control: Kailan can also be susceptible to certain diseases, such as downy mildew and black rot. To prevent diseases, make sure your plants have good air circulation, avoid overwatering, and remove any infected leaves promptly.
Harvesting Your Kailan
The best part of growing your own kailan is, of course, harvesting it!
* When to Harvest: You can start harvesting kailan leaves when they are about 6-8 inches long. The leaves should be dark green and tender.
* How to Harvest: Use a sharp knife or scissors to cut the leaves from the plant, starting with the outer leaves. Leave the inner leaves to continue growing. You can harvest kailan leaves continuously throughout the growing season.
* Storage: Freshly harvested kailan leaves can be stored in the refrigerator for up to a week. Wrap them in a damp paper towel and place them in a plastic bag.
Troubleshooting
Even with the best care, you might encounter some problems while growing kailan. Here are a few common issues and how to address them:
* Yellowing Leaves: Yellowing leaves can be a sign of nutrient deficiency, overwatering, or underwatering. Check the soil moisture and nutrient levels and adjust your watering and fertilizing accordingly.
* Stunted Growth: Stunted growth can be caused by poor soil, lack of sunlight, or pest infestation. Make sure your soil is well-drained and amended with organic matter, and that your plants are getting enough sunlight. Inspect your plants for pests and take appropriate action.
* Holes in Leaves: Holes in leaves are often caused by cabbage worms or flea beetles. Hand-pick the pests off the plants or use insecticidal soap or Bt to control them.
Enjoying Your Homegrown Kailan
Now that you’ve harvested your delicious homegrown kailan, it’s time to enjoy it! Kailan is incredibly versatile and can be used in a variety of dishes. Here are a few of my favorite ways to prepare it:
* Stir-fries: Kailan is a classic ingredient in stir-fries. Simply chop it up and add it to your favorite stir-fry recipe.
* Steaming: Steaming kailan is a quick and easy way to cook it. Steam it for a few minutes until it’s tender-crisp.
* Boiling: Boiling kailan is another simple cooking
Conclusion
So, there you have it! This simple, yet effective, DIY trick for growing kailan is more than just a gardening hack; it’s a gateway to fresh, delicious, and nutritious greens right at your fingertips. We’ve walked you through the process, highlighting the ease and accessibility of this method, even for those with limited space or gardening experience.
Why is this a must-try? Because it empowers you to control the quality of your food, reduce your reliance on store-bought vegetables (often laden with pesticides), and connect with nature in a tangible way. Imagine the satisfaction of harvesting your own vibrant, leafy kailan, knowing exactly where it came from and how it was grown. This method is also incredibly cost-effective, especially compared to the rising prices of fresh produce. You’ll be amazed at how much you can save by cultivating your own kailan patch.
But the benefits don’t stop there. This DIY approach is also environmentally friendly. By growing your own kailan, you’re reducing your carbon footprint associated with transportation and packaging. Plus, you’re contributing to a healthier ecosystem by avoiding the use of harmful chemicals.
Looking for variations? Absolutely! You can adapt this method to suit your specific needs and preferences. For instance, if you live in a colder climate, consider starting your kailan seeds indoors before transplanting them outdoors. You can also experiment with different types of containers, from repurposed plastic bottles to raised garden beds. Another exciting variation is to try companion planting. Planting herbs like basil or rosemary alongside your kailan can help deter pests and enhance the flavor of your greens. You can also try different varieties of kailan, such as Chinese kale or Portuguese kale, to add variety to your diet.
We encourage you to embrace this DIY kailan growing method and experience the joy of homegrown goodness. Don’t be afraid to experiment and adapt the technique to your unique circumstances. The most important thing is to get started and learn along the way.
We are confident that you’ll be thrilled with the results. The taste of freshly harvested kailan is simply unmatched. Whether you’re stir-frying it with garlic, adding it to soups, or enjoying it in a salad, you’ll appreciate the crisp texture and slightly sweet flavor of your homegrown greens.
So, grab your seeds, gather your supplies, and get ready to embark on a rewarding gardening adventure. We can’t wait to hear about your experiences! Share your photos, tips, and challenges with us in the comments section below. Let’s create a community of kailan enthusiasts and inspire others to grow their own food. Remember, every little bit helps in creating a more sustainable and healthier future. Happy gardening!
Frequently Asked Questions (FAQ)
What kind of soil is best for growing kailan using this DIY method?
Kailan thrives in well-draining, fertile soil that is rich in organic matter. A good starting point is a mix of equal parts garden soil, compost, and perlite or vermiculite. The compost provides essential nutrients, while the perlite or vermiculite improves drainage and aeration. You can also amend your soil with aged manure or other organic fertilizers to boost its fertility. Before planting, test the soil pH to ensure it’s slightly acidic to neutral (around 6.0 to 7.0). If your soil is too acidic, you can add lime to raise the pH. If it’s too alkaline, you can add sulfur to lower the pH. Regular soil testing is recommended to maintain optimal growing conditions.
How often should I water my kailan plants?
Watering frequency depends on several factors, including the weather, soil type, and container size. As a general rule, water your kailan plants deeply whenever the top inch of soil feels dry to the touch. Avoid overwatering, as this can lead to root rot. During hot, dry weather, you may need to water your plants daily. In cooler, wetter weather, you may only need to water them every few days. When watering, aim to saturate the soil evenly, allowing excess water to drain out of the bottom of the container. Mulching around the base of the plants can help retain moisture and reduce the need for frequent watering.
What are some common pests and diseases that affect kailan, and how can I prevent them?
Kailan can be susceptible to various pests and diseases, including aphids, cabbage worms, flea beetles, and fungal infections. To prevent these problems, start by choosing disease-resistant varieties of kailan. Practice good garden hygiene by removing any dead or diseased leaves and debris from around the plants. Regularly inspect your plants for signs of pests or diseases, and take action promptly if you spot any problems. You can use organic pest control methods, such as insecticidal soap or neem oil, to control aphids, cabbage worms, and flea beetles. To prevent fungal infections, ensure good air circulation around your plants and avoid overhead watering. If you notice any signs of disease, remove the affected leaves and treat the plants with a fungicide.
How much sunlight does kailan need to grow well?
Kailan requires at least 6 hours of direct sunlight per day to thrive. If you’re growing kailan indoors, place it near a sunny window or use grow lights to supplement natural light. Insufficient sunlight can lead to leggy growth and reduced yields. If you live in a hot climate, provide some afternoon shade to protect your kailan plants from scorching.
When is the best time to harvest kailan?
You can start harvesting kailan leaves when they are about 6-8 inches long. Harvest the outer leaves first, leaving the inner leaves to continue growing. Regular harvesting encourages the plant to produce more leaves. The best time to harvest is in the morning, when the leaves are crisp and hydrated. Avoid harvesting during the hottest part of the day, as the leaves may be wilted.
Can I grow kailan in containers? What size container is recommended?
Yes, kailan grows very well in containers, making it an ideal choice for gardeners with limited space. Choose a container that is at least 12 inches deep and 12 inches wide to provide enough room for the roots to grow. Make sure the container has drainage holes to prevent waterlogging. You can grow one kailan plant per container, or you can plant several smaller plants together in a larger container.
How can I encourage my kailan plants to produce more leaves?
Regular harvesting is the key to encouraging kailan plants to produce more leaves. As you harvest the outer leaves, the plant will be stimulated to produce new growth from the center. Fertilizing your kailan plants regularly with a balanced fertilizer can also help promote leaf production. Avoid over-fertilizing, as this can lead to excessive vegetative growth at the expense of leaf development.
Is kailan a cut-and-come-again vegetable?
Yes, kailan is a cut-and-come-again vegetable, meaning you can harvest the leaves multiple times over a period of several weeks or months. This makes it a very productive and rewarding vegetable to grow in your garden.
How do I store harvested kailan leaves?
To store harvested kailan leaves, wash them thoroughly and pat them dry. Wrap the leaves in a damp paper towel and store them in a plastic bag in the refrigerator. They should stay fresh for up to a week.
Can I save seeds from my kailan plants?
Yes, you can save seeds from your kailan plants, but it requires allowing the plant to bolt (flower and produce seeds). This typically happens in the second year of growth. Allow the seed pods to dry on the plant before harvesting them. Once the seed pods are dry, you can break them open and collect the seeds. Store the seeds in a cool, dry place until you’re ready to plant them. Keep in mind that kailan can cross-pollinate with other members of the Brassica family, so if you’re growing other Brassicas in your garden, the seeds may not be true to type.

Leave a Comment