
Grow baby carrots at home? Absolutely! Imagine plucking sweet, miniature carrots straight from your own garden, ready to be enjoyed as a healthy snack or a vibrant addition to your salads. Forget the grocery store – with a few simple tricks and a little bit of effort, you can cultivate these delightful root vegetables right in your backyard or even on your balcony.
For centuries, home gardening has been a source of sustenance and joy. From ancient civilizations cultivating herbs and vegetables in their courtyards to modern-day urban farmers transforming rooftops into edible landscapes, the desire to connect with nature and grow our own food is deeply ingrained in the human spirit. Baby carrots, though a relatively modern invention, tap into this same desire for fresh, healthy, and accessible produce.
But why should you bother learning to grow baby carrots at home? Well, for starters, homegrown carrots taste infinitely better than their store-bought counterparts. Plus, you have complete control over what goes into your garden, ensuring that your baby carrots are free from harmful pesticides and chemicals. And let’s be honest, there’s something incredibly satisfying about nurturing a plant from seed to harvest. In this article, I’m going to share some easy-to-follow DIY tricks and hacks that will help you achieve a bountiful harvest of delicious baby carrots, no matter your gardening experience. Let’s get started!
Baby Karotten selber ziehen: Ein kinderleichtes DIY-Projekt für den Garten oder Balkon
Hallo liebe Gartenfreunde! Habt ihr Lust, euch an einem super einfachen und lohnenden DIY-Projekt zu versuchen? Heute zeige ich euch, wie ihr zu Hause, egal ob im Garten oder auf dem Balkon, eure eigenen knackigen, süßen Baby Karotten ziehen könnt. Es ist wirklich einfacher als ihr denkt und macht riesig Spaß, besonders mit Kindern!
Was ihr für euer Baby Karotten Projekt braucht:
* Karottensamen: Wählt am besten eine Sorte, die für Baby Karotten geeignet ist. Es gibt spezielle Sorten, die kleiner bleiben und schneller reifen. Ich empfehle euch “Parisienne” oder “Amsterdam Forcing”.
* Geeignete Erde: Karotten lieben lockere, sandige Erde. Vermeidet steinige oder klumpige Erde, da dies das Wachstum der Wurzeln behindern kann. Ihr könnt spezielle Gemüseerde kaufen oder eure eigene Mischung aus Gartenerde, Sand und Kompost herstellen.
* Behälter (optional): Wenn ihr keinen Garten habt, könnt ihr Baby Karotten auch in Töpfen, Balkonkästen oder anderen Behältern ziehen. Achtet darauf, dass der Behälter mindestens 20 cm tief ist, damit die Karotten genug Platz zum Wachsen haben.
* Gießkanne oder Sprühflasche: Für die Bewässerung.
* Geduld: Karotten brauchen etwas Zeit, um zu wachsen. Aber die Belohnung ist es wert!
Schritt-für-Schritt Anleitung: Baby Karotten säen und pflegen
1. Die Vorbereitung ist alles:
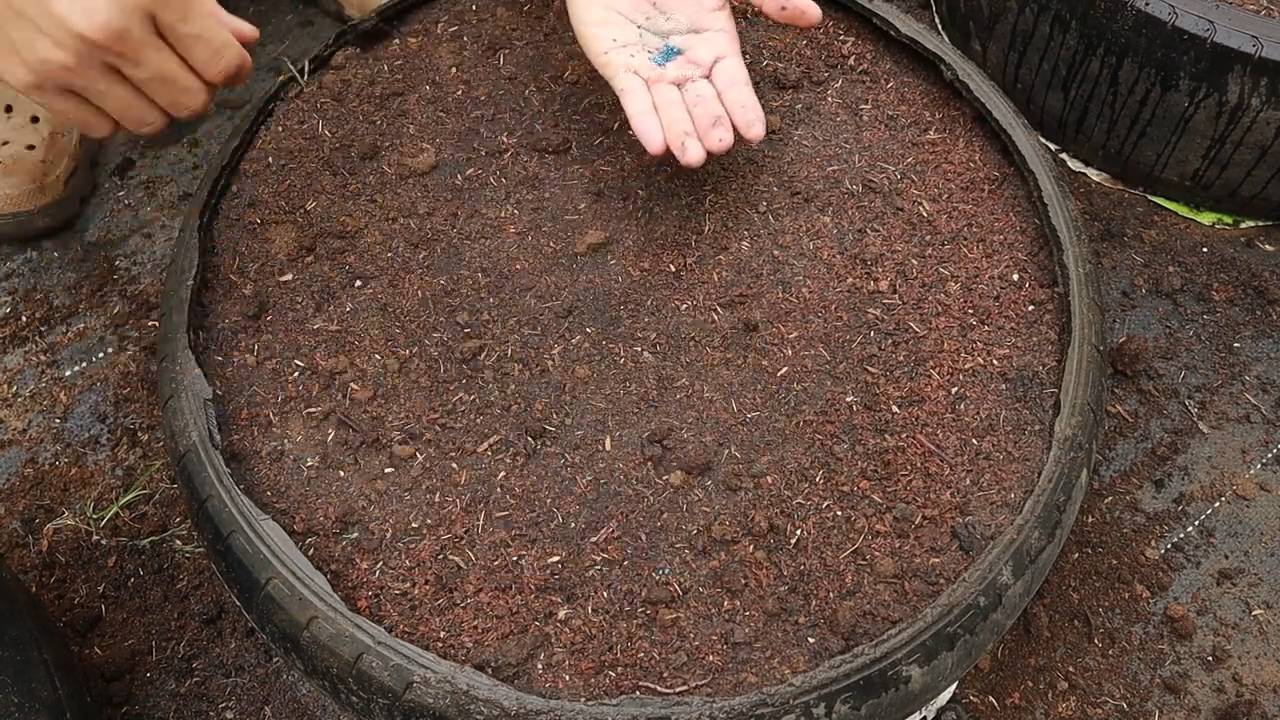
* Erd vorbereiten: Egal ob im Garten oder im Topf, lockert die Erde gründlich auf und entfernt Steine und Unkraut. Wenn ihr einen Topf verwendet, füllt ihn mit der vorbereiteten Erde. Lasst oben etwa 2-3 cm Platz.
* Boden ebnen: Glättet die Oberfläche der Erde, damit die Samen gleichmäßig verteilt werden können.
2. Aussaat der Karottensamen:
* Saatrillen ziehen: Zieht mit dem Finger oder einem kleinen Werkzeug flache Rillen in die Erde. Die Rillen sollten etwa 1 cm tief sein und einen Abstand von 5-7 cm zueinander haben.
* Samen ausbringen: Verteilt die Karottensamen vorsichtig in den Rillen. Karottensamen sind sehr klein, daher ist es wichtig, sie nicht zu dicht auszusäen. Ihr könnt die Samen auch mit etwas Sand vermischen, um sie besser verteilen zu können.
* Samen bedecken: Bedeckt die Samen mit einer dünnen Schicht Erde (ca. 0,5 cm) und drückt sie leicht an.
* Angießen: Gießt die Erde vorsichtig mit einer Gießkanne oder Sprühflasche an. Achtet darauf, die Samen nicht wegzuschwemmen. Die Erde sollte feucht, aber nicht nass sein.
3. Die Pflege der kleinen Karottenpflanzen:
* Feuchtigkeit halten: Die Erde sollte während der Keimung und des Wachstums immer feucht gehalten werden. Gießt regelmäßig, besonders bei trockenem Wetter. Vermeidet Staunässe, da dies zu Wurzelfäule führen kann.
* Unkraut entfernen: Haltet das Beet oder den Topf unkrautfrei. Unkraut konkurriert mit den Karotten um Nährstoffe und Wasser.
* Vereinzeln (pikieren): Wenn die Karottenpflanzen etwa 2-3 cm groß sind, müsst ihr sie eventuell vereinzeln. Das bedeutet, dass ihr die zu dicht stehenden Pflanzen entfernt, damit die verbleibenden Pflanzen genug Platz zum Wachsen haben. Lasst zwischen den Pflanzen etwa 2-3 cm Platz. Das ist besonders wichtig, wenn ihr keine spezielle Baby Karotten Sorte verwendet.
* Düngen (optional): Wenn die Karottenpflanzen gut wachsen, müsst ihr sie nicht unbedingt düngen. Wenn ihr jedoch feststellt, dass sie blass aussehen oder langsam wachsen, könnt ihr sie mit einem organischen Gemüsedünger düngen. Achtet darauf, die Anweisungen auf der Verpackung zu befolgen.
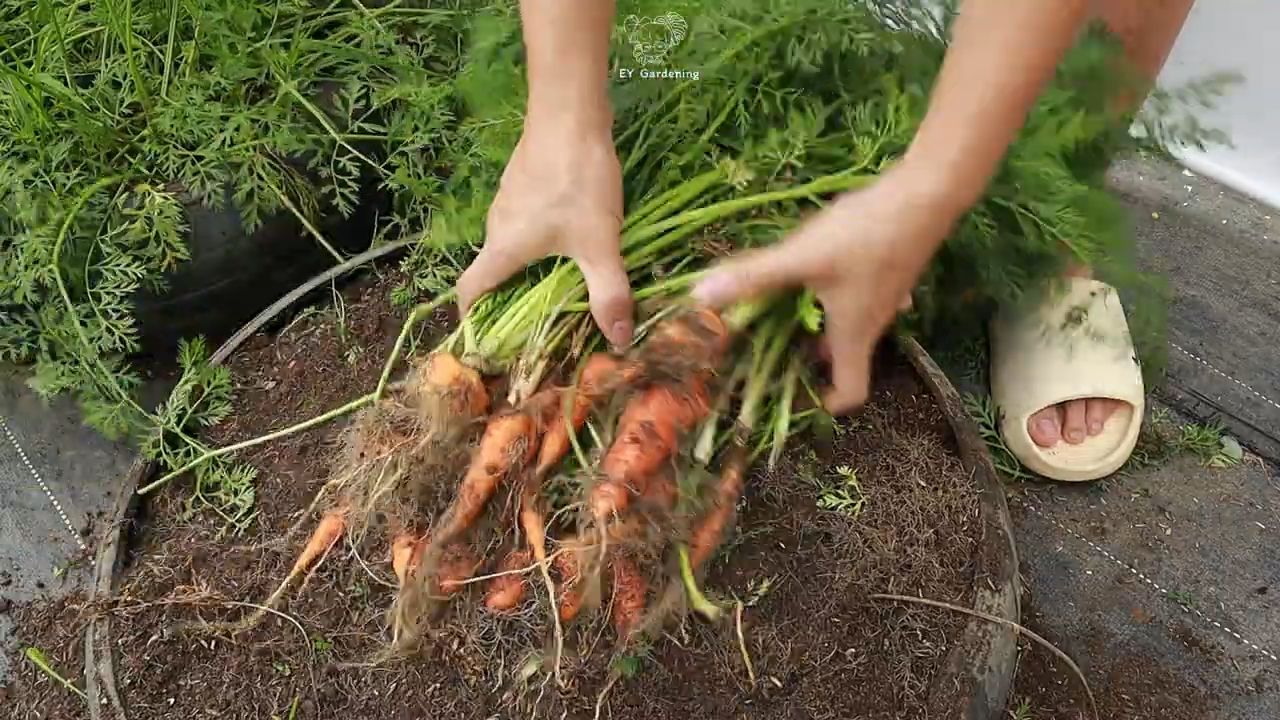
4. Die Ernte:
* Erntezeitpunkt: Baby Karotten können geerntet werden, sobald sie die gewünschte Größe erreicht haben. Das ist normalerweise nach etwa 50-60 Tagen der Fall. Ihr könnt die Karotten vorsichtig aus der Erde ziehen oder mit einer kleinen Schaufel ausgraben.
* Ernte genießen: Wascht die geernteten Karotten gründlich und genießt sie frisch aus dem Garten oder vom Balkon! Sie schmecken roh als Snack, im Salat oder als Beilage zu verschiedenen Gerichten.
Zusätzliche Tipps und Tricks für eure Baby Karotten:
* Sonniger Standort: Karotten lieben die Sonne! Wählt einen sonnigen Standort für euer Beet oder eure Töpfe.
* Fruchtfolge beachten: Baut Karotten nicht jedes Jahr am selben Standort an. Eine Fruchtfolge hilft, Krankheiten und Schädlinge zu vermeiden.
* Schutz vor Schädlingen: Karotten können von verschiedenen Schädlingen befallen werden, z.B. der Möhrenfliege. Ihr könnt eure Karotten mit einem Insektenschutznetz schützen.
* Regelmäßig gießen: Besonders während der Keimung und des Wachstums ist eine regelmäßige Bewässerung wichtig.
* Nicht zu dicht säen: Karottensamen sind sehr klein, daher ist es wichtig, sie nicht zu dicht auszusäen. Sonst müsst ihr später viel vereinzeln.
* Geduld haben: Karotten brauchen etwas Zeit, um zu wachsen. Aber die Belohnung ist es wert!
Häufige Probleme und Lösungen:
* Schlechte Keimung: Wenn die Samen nicht keimen, kann das verschiedene Ursachen haben. Möglicherweise waren die Samen zu alt, die Erde zu trocken oder zu kalt. Achtet darauf, frische Samen zu verwenden, die Erde feucht zu halten und die Samen bei einer Temperatur von mindestens 10°C auszusäen.
* Krumme Karotten: Krumme Karotten entstehen oft durch steinige oder klumpige Erde. Achtet darauf, die Erde vor der Aussaat gründlich aufzulockern und Steine zu entfernen.
* Kleine Karotten: Wenn die Karotten klein bleiben, kann das verschiedene Ursachen haben. Möglicherweise wurden sie zu dicht gesät, die Erde ist zu nährstoffarm oder sie haben nicht genug Sonne bekommen. Achtet darauf, die Pflanzen zu vereinzeln, die Erde zu düngen und einen sonnigen Standort zu wählen.
* Befall durch Schädlinge: Karotten können von verschiedenen Schädlingen befallen werden, z.B. der Möhrenfliege. Ihr könnt eure Karotten mit einem Insektenschutznetz schützen oder natürliche Schädlingsbekämpfungsmittel verwenden.
Baby Karotten im Topf ziehen: So geht’s!
Wenn ihr keinen Garten habt, ist das kein Problem! Baby Karotten lassen sich auch wunderbar im Topf oder Balkonkasten ziehen. Hier sind ein paar Tipps, die ihr beachten solltet:
* Topfgröße: Wählt einen Topf, der mindestens 20 cm tief ist. Je größer der Topf, desto besser können sich die Karotten entwickeln.
* Erde: Verwendet eine lockere, sandige Erde, die gut wasserdurchlässig ist. Ihr könnt spezielle Gemüseerde kaufen oder eure eigene Mischung aus Gartenerde, Sand und Kompost herstellen.
* Drainage: Achtet darauf, dass der Topf Löcher im Boden hat, damit überschüssiges Wasser abfließen kann.
* Standort: Stellt den Topf an einen sonnigen Standort.
* Bewässerung: Gießt die Erde regelmäßig, aber vermeidet Staunässe.
* Düngung: Düngt die Karottenpflanzen regelmäßig mit einem organischen Gemüsedünger.
Fazit:
Baby Karotten selber zu ziehen ist ein tolles DIY-Projekt, das Spaß macht und mit leckeren, frischen Karotten belohnt wird. Mit dieser Anleitung und ein bisschen Geduld könnt ihr eure eigenen Baby Karotten im Garten oder auf dem Balkon ziehen. Probiert es aus und lasst es euch schmecken! Viel Spaß beim Gärtnern!
Conclusion
So, there you have it! Growing baby carrots at home is not only achievable but also incredibly rewarding. Forget the pre-packaged, often bland, baby carrots from the supermarket. With a little planning and effort, you can cultivate your own batch of sweet, tender, and perfectly sized baby carrots right in your backyard or even in containers on your balcony.
This DIY trick is a must-try for several reasons. First and foremost, you have complete control over the growing process. You can choose organic seeds, avoid harmful pesticides, and ensure your carrots are grown in nutrient-rich soil. This translates to a healthier and tastier final product. Imagine the satisfaction of knowing exactly where your food comes from and that it’s free from unwanted chemicals.
Secondly, growing baby carrots at home is a fantastic way to connect with nature and learn about the food you eat. It’s a great project for families, teaching children about gardening, patience, and the importance of healthy eating. Plus, it’s a fun and engaging activity that can be enjoyed by people of all ages.
Thirdly, the taste difference is undeniable. Homegrown baby carrots are noticeably sweeter and more flavorful than their store-bought counterparts. This is because they are harvested at their peak ripeness and haven’t been sitting in storage for weeks. The freshness alone makes this DIY project worthwhile.
But the benefits don’t stop there. Growing your own baby carrots can also be a cost-effective way to enjoy this healthy snack. While the initial investment in seeds and soil may seem like a lot, you’ll likely find that you save money in the long run, especially if you grow multiple batches throughout the growing season.
Ready to take your baby carrot game to the next level? Consider these variations:
* Rainbow Carrots: Plant a mix of different colored carrot seeds (purple, yellow, orange, white) for a visually stunning and nutritious harvest.
* Container Gardening: If you don’t have a garden, don’t worry! Baby carrots thrive in containers. Just make sure to choose a pot that’s at least 12 inches deep and use a well-draining potting mix.
* Succession Planting: Plant a new batch of seeds every few weeks to ensure a continuous supply of baby carrots throughout the growing season.
* Companion Planting: Plant your carrots alongside other beneficial plants like onions, garlic, or rosemary to deter pests and improve growth.
Don’t be intimidated if you’re new to gardening. Growing baby carrots is a relatively easy and forgiving process. With a little bit of research and attention, you’ll be harvesting your own delicious baby carrots in no time.
So, what are you waiting for? Grab some seeds, prepare your soil, and get ready to experience the joy of growing your own baby carrots at home. We’re confident that you’ll be amazed by the results.
We encourage you to try this DIY trick and share your experience with us. Post photos of your homegrown baby carrots on social media using #HomegrownBabyCarrots and let us know how it went. We can’t wait to see your success! Happy gardening!
Frequently Asked Questions (FAQ)
What is the best time of year to plant baby carrots?
The best time to plant baby carrots depends on your climate. In general, you can plant them in early spring or late summer for a fall harvest. Carrots prefer cooler temperatures, so avoid planting them during the hottest months of the year. For spring planting, start seeds about 2-3 weeks before the last expected frost. For fall planting, start seeds about 10-12 weeks before the first expected frost. Check your local weather forecast for accurate frost dates.
What kind of soil is best for growing baby carrots?
Baby carrots need loose, well-draining soil that is free of rocks and clumps. Rocky soil can cause the carrots to fork or become misshapen. Amend your soil with compost or other organic matter to improve drainage and fertility. A slightly acidic soil pH of 6.0 to 6.8 is ideal. Avoid using heavy clay soil, as it can restrict root growth. If you have clay soil, consider growing your baby carrots in raised beds or containers.
How much sunlight do baby carrots need?
Baby carrots need at least 6 hours of sunlight per day. Choose a location in your garden that receives full sun for optimal growth. If you’re growing them in containers, make sure to place the containers in a sunny spot. Insufficient sunlight can result in stunted growth and smaller carrots.
How often should I water my baby carrots?
Water your baby carrots regularly, especially during dry periods. Keep the soil consistently moist, but avoid overwatering, which can lead to root rot. Water deeply and less frequently, rather than shallowly and more often. A good rule of thumb is to water when the top inch of soil feels dry to the touch. Use a soaker hose or drip irrigation to deliver water directly to the roots.
How long does it take for baby carrots to grow?
Baby carrots typically take 50-70 days to mature, depending on the variety and growing conditions. Check the seed packet for specific information on the maturity time for your chosen variety. You can start harvesting them when they reach the desired size, usually around 3-4 inches long.
How do I prevent pests from attacking my baby carrots?
Several pests can attack baby carrots, including carrot rust flies, aphids, and nematodes. To prevent pest problems, practice good garden hygiene, such as removing weeds and debris that can harbor pests. Use row covers to protect your carrots from flying insects. Companion planting with onions or garlic can also help deter pests. If you have a severe infestation, consider using organic pesticides, such as insecticidal soap or neem oil.
How do I harvest baby carrots?
Harvest baby carrots when they reach the desired size, usually around 3-4 inches long. Gently loosen the soil around the carrots with a garden fork or trowel. Grasp the carrot tops near the base and pull them straight up. If the soil is dry, water it before harvesting to make it easier to pull the carrots.
Can I grow baby carrots in containers?
Yes, baby carrots grow very well in containers. Choose a pot that is at least 12 inches deep and has drainage holes. Use a well-draining potting mix and water regularly. Place the container in a sunny spot that receives at least 6 hours of sunlight per day.
What are some common problems when growing baby carrots?
Some common problems when growing baby carrots include forked roots, stunted growth, and pest infestations. Forked roots can be caused by rocky soil or compacted soil. Stunted growth can be caused by insufficient sunlight, poor soil fertility, or lack of water. Pest infestations can be prevented by practicing good garden hygiene and using row covers.
How do I store baby carrots after harvesting?
After harvesting, wash the baby carrots and trim off the tops, leaving about an inch of green. Store them in a plastic bag or container in the refrigerator. They will keep for several weeks. You can also freeze baby carrots for longer storage. Blanch them in boiling water for 2-3 minutes, then cool them in ice water before freezing.
Leave a Comment