
Grow Bean Sprouts at Home – and unlock a world of fresh, crunchy goodness right on your kitchen counter! Forget those limp, flavorless sprouts from the grocery store. I’m going to show you how incredibly easy and rewarding it is to cultivate your own vibrant bean sprouts, bursting with nutrients and ready to add a delightful crunch to your salads, sandwiches, and stir-fries.
Sprouting, in general, has a rich history, dating back thousands of years. Ancient cultures recognized the power of sprouting seeds to unlock their nutritional potential, making them a valuable food source, especially during times of scarcity. Think of it as a miniature, edible garden, bringing life and vitality into your home.
Why should you learn to grow bean sprouts at home? Well, for starters, it’s incredibly cost-effective! A small bag of dried beans can yield a surprising amount of sprouts. Plus, you have complete control over the growing process, ensuring they’re free from pesticides and other unwanted chemicals. In today’s world, where healthy eating is a priority, knowing exactly where your food comes from is a huge advantage. More than that, it’s a fun and educational project for the whole family. So, let’s dive in and discover the simple secrets to successful home sprouting!

Bohnensprossen selber ziehen: Ein kinderleichtes DIY-Projekt für frische Vitamine!
Hey Leute! Habt ihr Lust auf knackige, frische Bohnensprossen, aber keine Lust, sie im Supermarkt zu kaufen? Dann seid ihr hier genau richtig! Ich zeige euch, wie ihr ganz einfach zu Hause eure eigenen Bohnensprossen ziehen könnt – ein super einfaches und lohnendes DIY-Projekt, das euch mit einer Extraportion Vitamine und Mineralstoffe versorgt. Und das Beste daran? Es ist wirklich kinderleicht!
Was ihr für euer Sprossen-Abenteuer braucht:
* Bohnen: Am besten eignen sich Mungbohnen, aber auch Adzukibohnen, Linsen oder Kichererbsen funktionieren super. Achtet darauf, dass die Bohnen unbehandelt und für den Verzehr geeignet sind. Bio-Qualität ist natürlich immer eine gute Wahl!
* Ein Sprossenglas oder ein anderes geeignetes Gefäß: Ein Sprossenglas mit einem feinmaschigen Deckel ist ideal, aber ihr könnt auch ein normales Einmachglas mit einem Stück Mulltuch oder einem feinmaschigen Sieb und einem Gummiband verwenden.
* Sauberes Wasser: Am besten gefiltertes Wasser oder abgekochtes, abgekühltes Wasser.
* Ein dunkler, kühler Ort: Ein Küchenschrank oder eine dunkle Ecke in der Küche sind perfekt.
* Geduld: Bohnensprossen brauchen ein paar Tage, um zu wachsen. Aber keine Sorge, es geht schneller als ihr denkt!
Schritt-für-Schritt-Anleitung: So gelingen eure Bohnensprossen garantiert!
1. Die Bohnen vorbereiten:
* Zuerst solltet ihr die Bohnen gründlich verlesen und beschädigte oder verfärbte Bohnen aussortieren.
* Gebt die Bohnen in euer Sprossenglas oder das gewählte Gefäß.
* Füllt das Glas mit reichlich kaltem Wasser, sodass die Bohnen gut bedeckt sind.
* Lasst die Bohnen für 8-12 Stunden (oder über Nacht) einweichen. Dieser Schritt ist wichtig, damit die Bohnen aufquellen und keimen können.
2. Das erste Spülen:
* Nach dem Einweichen gießt ihr das Wasser ab. Achtet darauf, dass alle Bohnen im Glas bleiben.
* Spült die Bohnen gründlich mit frischem, kaltem Wasser durch. Dreht und schwenkt das Glas dabei, damit alle Bohnen gut benetzt werden.
* Lasst das Wasser vollständig ablaufen. Das ist wichtig, damit die Bohnen nicht faulen.
3. Der dunkle Ort:
* Stellt das Sprossenglas an einen dunklen, kühlen Ort. Direkte Sonneneinstrahlung solltet ihr unbedingt vermeiden, da sie die Sprossen bitter machen kann.
* Stellt das Glas schräg, sodass überschüssiges Wasser ablaufen kann und die Bohnen nicht im Wasser liegen.
4. Das tägliche Spülritual:
* Ab jetzt ist es wichtig, die Bohnen 2-3 Mal täglich zu spülen. Geht dabei genauso vor wie beim ersten Spülen: Wasser einfüllen, gut durchspülen und das Wasser vollständig ablaufen lassen.
* Das regelmäßige Spülen verhindert, dass sich Bakterien bilden und die Sprossen verderben.
5. Geduld und Beobachtung:
* Nach ein paar Tagen (in der Regel 3-5 Tage, je nach Bohnensorte und Temperatur) beginnen die Bohnen zu keimen und kleine Sprossen zu bilden.
* Beobachtet eure Sprossen genau. Sie sollten frisch und knackig aussehen und angenehm riechen. Wenn sie schleimig sind oder unangenehm riechen, sind sie verdorben und sollten entsorgt werden.
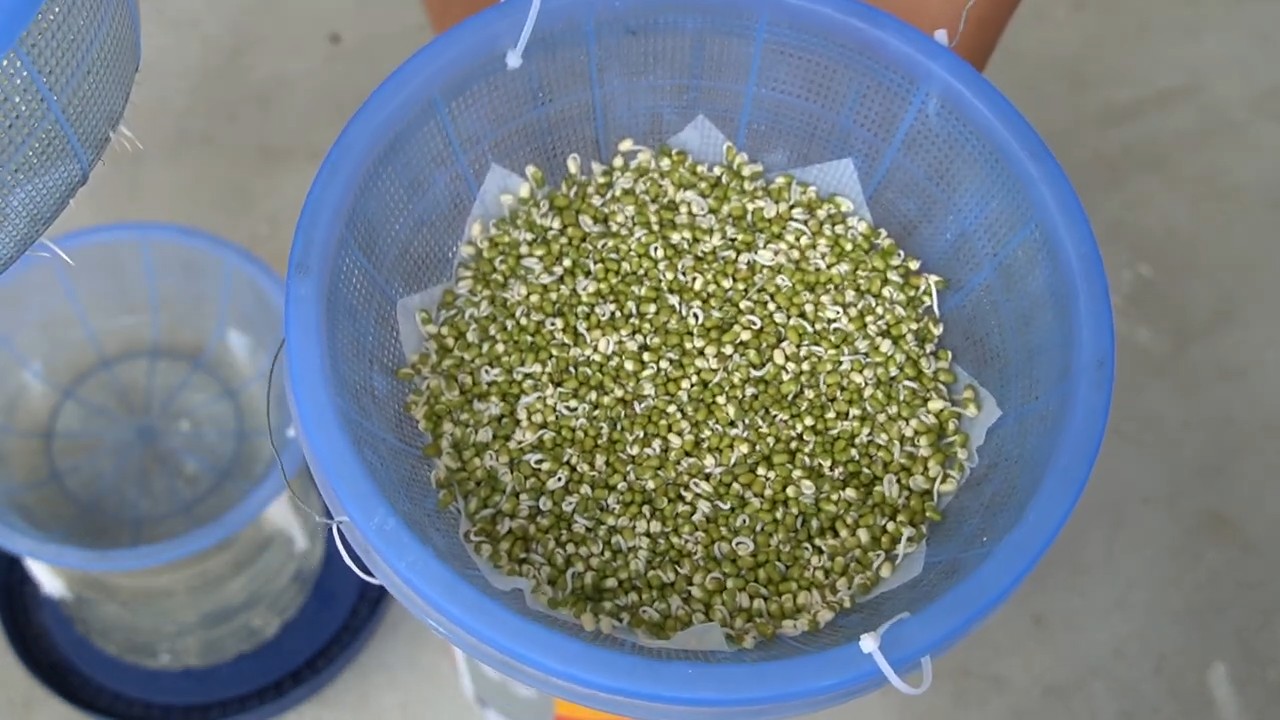
6. Die Ernte:
* Sobald die Sprossen die gewünschte Länge erreicht haben (meistens sind sie 2-3 cm lang), sind sie erntebereit.
* Spült die Sprossen noch einmal gründlich mit kaltem Wasser ab.
* Entfernt die grünen Schalen der Mungbohnen, wenn ihr möchtet. Das ist aber kein Muss.
7. Die Lagerung:
* Bewahrt die geernteten Sprossen im Kühlschrank auf. Am besten in einem luftdichten Behälter oder einem sauberen Glas.
* Sie halten sich im Kühlschrank etwa 3-5 Tage.
Häufige Fehler und wie ihr sie vermeidet:
* Zu wenig Spülen: Das ist der häufigste Fehler. Regelmäßiges Spülen ist essentiell, um Bakterienbildung zu verhindern.
* Zu viel Wasser: Die Bohnen dürfen nicht im Wasser liegen, da sie sonst faulen. Achtet darauf, dass das Wasser nach dem Spülen vollständig abläuft.
* Direkte Sonneneinstrahlung: Vermeidet direkte Sonneneinstrahlung, da sie die Sprossen bitter macht.
* Unsaubere Gefäße: Verwendet nur saubere Gefäße, um die Bildung von Bakterien zu vermeiden.
Tipps und Tricks für noch bessere Bohnensprossen:
* Die richtige Bohnensorte: Mungbohnen sind am einfachsten zu ziehen und haben einen milden Geschmack. Aber probiert auch andere Sorten aus, um euren Favoriten zu finden!
* Die Temperatur: Die ideale Temperatur für die Sprossenzucht liegt zwischen 18 und 22 Grad Celsius.
* Die Luftfeuchtigkeit: Eine hohe Luftfeuchtigkeit ist ideal für die Sprossenzucht. Ihr könnt die Luftfeuchtigkeit erhöhen, indem ihr das Sprossenglas mit einem feuchten Tuch abdeckt.
* Abwechslung: Mischt verschiedene Bohnensorten für einen interessanten Geschmacksmix.
* Sprossen ziehen im Keimgerät: Wenn ihr regelmäßig Sprossen ziehen möchtet, lohnt sich die Anschaffung eines Keimgeräts. Diese Geräte erleichtern die Sprossenzucht und sorgen für optimale Bedingungen.
Verwendungsmöglichkeiten für eure selbstgezogenen Bohnensprossen:
Bohnensprossen sind unglaublich vielseitig und können in vielen verschiedenen Gerichten verwendet werden. Hier sind ein paar Ideen:
* Salate: Bohnensprossen sind eine tolle Ergänzung zu Salaten. Sie verleihen ihnen eine knackige Textur und einen frischen Geschmack.
* Suppen: Bohnensprossen können in Suppen als Einlage verwendet werden. Sie sind besonders lecker in asiatischen Suppen wie Pho oder Ramen.
* Wok-Gerichte: Bohnensprossen sind ein Muss in vielen Wok-Gerichten. Sie werden kurz vor dem Servieren hinzugefügt und verleihen dem Gericht eine knackige Textur.
* Frühlingsrollen: Bohnensprossen sind eine beliebte Zutat in Frühlingsrollen.
* Sandwiches und Wraps: Bohnensprossen können auch in Sandwiches und Wraps verwendet werden.
* Pur als Snack: Einfach so, als gesunder Snack zwischendurch.
Warum ihr eure Bohnensprossen selber ziehen solltet:
* Frische: Selbstgezogene Bohnensprossen sind viel frischer als gekaufte.
* Geschmack: Sie schmecken intensiver und aromatischer.
* Gesundheit: Sie sind reich an Vitaminen, Mineralstoffen und Enzymen.
* Nachhaltigkeit: Ihr spart Verpackungsmüll und unterstützt eine nachhaltige Lebensweise.
* Spaß: Es macht einfach Spaß, seine eigenen Lebensmittel anzubauen!
Also, worauf wartet ihr noch? Legt los und zieht eure eigenen Bohnensprossen! Es ist ein super einfaches und lohnendes DIY-Projekt, das euch mit frischen, gesunden und leckeren Sprossen versorgt. Viel Spaß dabei!
Conclusion
So, there you have it! Growing your own bean sprouts at home is not only surprisingly simple, but it’s also incredibly rewarding. Forget those limp, flavorless sprouts from the grocery store. With just a few basic supplies and a little patience, you can cultivate a vibrant, crunchy, and nutritious addition to your meals. This DIY trick transforms humble beans into a powerhouse of vitamins and minerals, all within the comfort of your own kitchen.
Why is this a must-try? Because you’re taking control of your food source. You know exactly what’s going into your sprouts – no hidden chemicals or preservatives. Plus, the freshness is unparalleled. Imagine the satisfaction of snipping off a handful of sprouts just minutes before adding them to your salad, stir-fry, or sandwich. The flavor difference alone is worth the effort.
But the benefits extend beyond taste and nutrition. Growing bean sprouts at home is also an incredibly economical way to add fresh greens to your diet. A small bag of beans can yield a surprisingly large quantity of sprouts, making it a budget-friendly alternative to buying them pre-packaged. It’s also a sustainable choice, reducing your reliance on commercially grown produce and minimizing your carbon footprint.
Looking for variations? Experiment with different types of beans! Mung beans are the most common choice, but you can also try adzuki beans, lentils, or even chickpeas. Each variety will offer a slightly different flavor and texture, allowing you to customize your sprouts to your liking. You can also play around with the sprouting time. Shorter sprouting times will result in smaller, more delicate sprouts, while longer times will produce larger, more robust sprouts. Just be sure to monitor them closely to prevent them from becoming bitter or slimy.
Consider adding a touch of flavor during the rinsing process. A splash of lemon juice or a pinch of sea salt can enhance the taste of your sprouts. You can even try adding a few drops of hot sauce for a spicy kick. Get creative and find what works best for your palate.
Ultimately, the best way to discover the magic of home-grown bean sprouts is to simply give it a try. Don’t be intimidated by the process. It’s far easier than you might think. And once you’ve tasted the difference between store-bought and home-grown, you’ll never go back.
We encourage you to embark on this sprouting adventure and share your experiences with us! Let us know what types of beans you tried, what variations you experimented with, and what delicious dishes you created with your home-grown bounty. Share your photos and tips in the comments below. We can’t wait to hear about your success stories and learn from your insights. Happy sprouting! This simple method to grow bean sprouts at home will change the way you think about fresh produce.
Frequently Asked Questions (FAQ)
What types of beans are best for sprouting?
Mung beans are the most popular and readily available choice for sprouting. They are known for their mild flavor and reliable sprouting rate. However, you can also experiment with other types of beans, such as adzuki beans, lentils, chickpeas, and even soybeans. Keep in mind that different beans may require slightly different sprouting times and techniques. For example, adzuki beans tend to sprout a bit slower than mung beans. Always ensure that the beans you choose are intended for sprouting and are not treated with any chemicals or preservatives. Organic beans are generally the best option.
How long does it take to grow bean sprouts?
The sprouting time can vary depending on the type of bean, the temperature, and the humidity. Generally, mung beans will sprout in about 3-5 days. Adzuki beans may take a day or two longer. Lentils tend to sprout a bit faster, often within 2-4 days. It’s important to monitor your sprouts closely and adjust the sprouting time accordingly. You’ll know they’re ready when they have developed small roots and shoots. Avoid letting them sprout for too long, as they can become bitter or slimy.
What is the best way to prevent mold growth?
Mold growth is a common concern when sprouting beans. To prevent it, ensure that you are rinsing your sprouts thoroughly at least twice a day with fresh, cool water. This helps to remove any bacteria or mold spores that may be present. Proper drainage is also crucial. Make sure your sprouting container has adequate drainage holes to prevent water from pooling at the bottom. Avoid overcrowding the container, as this can restrict airflow and create a favorable environment for mold growth. If you notice any signs of mold, discard the entire batch of sprouts immediately.
How do I store bean sprouts?
Once your bean sprouts have reached the desired size, you can store them in the refrigerator for up to a week. To do so, rinse them thoroughly and pat them dry with a clean towel. Place them in a clean, airtight container lined with a paper towel. The paper towel will help to absorb any excess moisture and prevent them from becoming soggy. Change the paper towel every day or two to keep them fresh. Avoid storing them in a sealed plastic bag, as this can trap moisture and promote spoilage.
Are there any health concerns associated with eating bean sprouts?
While bean sprouts are generally safe to eat, there is a small risk of foodborne illness, particularly from bacteria like Salmonella or E. coli. This is because the warm, moist environment required for sprouting can also be conducive to bacterial growth. To minimize this risk, always purchase your beans from a reputable source and wash them thoroughly before sprouting. Rinse your sprouts frequently during the sprouting process and cook them thoroughly before eating, especially if you are pregnant, elderly, or have a weakened immune system. Cooking the sprouts will kill any harmful bacteria that may be present.
Can I grow bean sprouts without a special sprouting container?
Yes, you can absolutely grow bean sprouts without a special sprouting container. A simple mason jar with a cheesecloth or mesh lid secured with a rubber band works perfectly well. You can also use a colander lined with cheesecloth or a clean kitchen towel. The key is to ensure that the container provides adequate drainage and airflow. Avoid using containers that are too deep or that don’t have drainage holes, as this can lead to water pooling and mold growth.
What do I do if my bean sprouts turn bitter?
Bitterness in bean sprouts can be caused by several factors, including over-sprouting, exposure to light, or the use of old or poor-quality beans. To prevent bitterness, avoid sprouting your beans for too long. Once they have reached the desired size, harvest them immediately. Keep your sprouts in a dark, cool place during the sprouting process to prevent them from being exposed to light. And always use fresh, high-quality beans that are specifically intended for sprouting. If your sprouts do turn bitter, you can try soaking them in cold water for a few hours before eating them. This may help to reduce the bitterness.
Can I eat the bean sprout roots?
Yes, the roots of bean sprouts are perfectly edible and are often considered to be the most nutritious part of the sprout. They have a slightly nutty flavor and a crunchy texture. You can eat them raw or cooked, depending on your preference. Some people prefer to trim the roots before eating them, but this is not necessary.
How can I use my home-grown bean sprouts?
The possibilities are endless! Bean sprouts are a versatile ingredient that can be used in a wide variety of dishes. They are a popular addition to salads, stir-fries, sandwiches, and soups. You can also use them to make spring rolls, wraps, or even smoothies. They add a crunchy texture and a fresh, slightly nutty flavor to any dish. Experiment with different recipes and find your favorite ways to enjoy your home-grown bean sprouts.

Leave a Comment