
Grow Beets at Home and unlock a world of vibrant color and earthy sweetness right in your backyard! Have you ever imagined pulling a ruby-red beet straight from the soil, knowing you nurtured it from seed to table? It’s an incredibly rewarding experience, and trust me, it’s easier than you think. For centuries, beets have been cultivated, not just for their delicious roots, but also for their nutritious greens. The ancient Romans even believed beets possessed aphrodisiac properties!
But beyond the historical lore, growing your own beets offers a fantastic way to enjoy fresh, organic produce without breaking the bank. Store-bought beets often lack the vibrant flavor of homegrown varieties, and let’s be honest, who knows what kind of chemicals they’ve been exposed to? Plus, learning how to grow beets at home is a fantastic way to connect with nature, reduce your carbon footprint, and impress your friends with your green thumb.
This DIY guide is packed with simple, effective tricks and hacks to help you cultivate a thriving beet patch, even if you’re a complete beginner. We’ll cover everything from choosing the right variety and preparing your soil to troubleshooting common problems and harvesting your bounty. So, grab your gardening gloves, and let’s get started on this exciting journey of growing your own delicious and nutritious beets!
Growing Beets Yourself: Your Comprehensive DIY Guide
Hello garden friends! I love harvesting fresh vegetables directly from my garden, and beets are no exception. They are not only super healthy but also relatively easy to grow, even if you don’t have a huge garden. In this article, I’ll show you step-by-step how to successfully grow beets at home. Let’s get started!
What You’ll Need for Growing Beets
Before we get started, let’s make sure you have everything you need. Here is a list of the most important things:
- Beet seeds: Choose a variety you like! There are red, yellow, striped, and even white beets.
- Garden soil: Good, loose soil is crucial. You can also use special vegetable soil.
- Compost or organic fertilizer: For a good start and healthy plants.
- Watering can or garden hose: To water the beets regularly.
- Garden tools: A small trowel or planting scoop, a rake, and possibly a weeder.
- Planters (optional): If you don’t have a garden, you can also grow beets in pots or containers.
- Mulch (optional): To retain moisture in the soil and suppress weeds.
The Right Location for Your Beets
Beets love the sun! Choose a location that gets at least 6 hours of sunlight per day. The soil should be well-draining to prevent waterlogging. If you are growing beets in pots, make sure the pots have drainage holes.
Sowing Beets: Step by Step
Now for the exciting part: sowing the beet seeds!
- Soil preparation: Loosen the soil with a rake and remove stones and weeds. Mix in compost or organic fertilizer to enrich the soil with nutrients.
- Sowing: Beets can be sown directly outdoors as soon as the soil temperature is at least 7°C (45°F). This is usually the case from April or May onwards. Use a trowel or a stick to make furrows about 2-3 cm (1 inch) deep in the soil.
- Distribute the seeds: Place the beet seeds in the furrows at a distance of about 5-8 cm (2-3 inches). Beets are what’s known as “cluster seeds,” meaning several plants can emerge from one seed. Don’t worry, we’ll thin them out later.
- Cover with soil: Cover the seeds with soil and press down lightly.
- Water: Water the soil gently so the seeds are not washed away.
- Be patient: It takes about 1-2 weeks for the seeds to germinate. Keep the soil moist during this time.
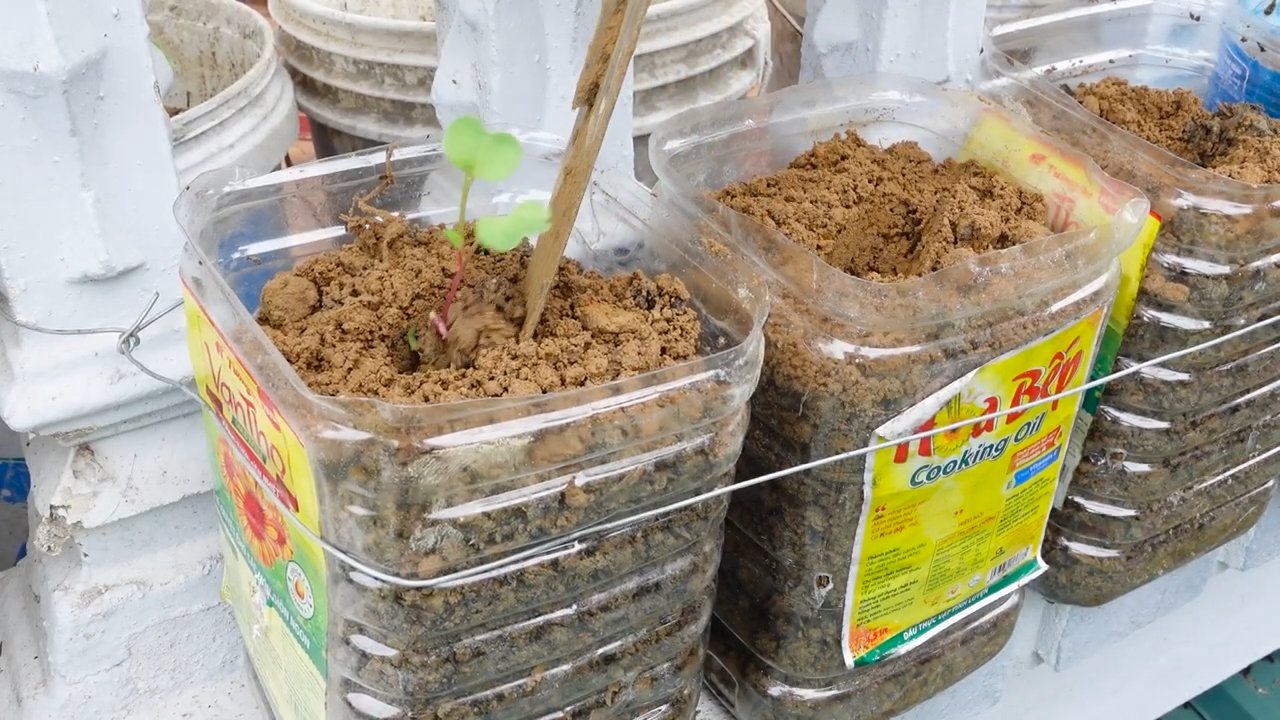
Growing Beets in Pots
If you don’t have a garden, that’s no problem! Beets can also be grown wonderfully in pots or containers.
- Choose a pot: Select a pot with a diameter of at least 20 cm (8 inches) and a depth of at least 20 cm (8 inches). Make sure the pot has drainage holes.
- Prepare the soil: Fill the pot with good vegetable soil. You can also mix in some compost or organic fertilizer.
- Sowing: Sow the beet seeds in the pot as described above.
- Care: Place the pot in a sunny location and water the beets regularly.
Caring for Your Beet Plants
Once the beets have germinated, it’s important to care for them well so they grow splendidly.
- Thinning: When the beet plants are about 5 cm (2 inches) high, you should thin them out. This means removing the weakest plants so the remaining ones have enough space to grow. The distance between the plants should be about 8-10 cm (3-4 inches).
- Watering: Water the beets regularly, especially during dry periods. Make sure the soil is always slightly moist, but not wet.
- Weeding: Keep the bed or pot weed-free. Weeds compete with the beets for nutrients and water.
- Fertilizing: Fertilize the beets every few weeks with an organic fertilizer or compost tea.
- Pest protection: Beets can be attacked by various pests, such as aphids or flea beetles. Check the plants regularly and combat pests with natural remedies if necessary.
Harvest Time!
The harvest time for beets depends on the variety and growing conditions. As a rule, you can harvest beets about 8-10 weeks after sowing.
- Check the size: The beets should be about the size of a tennis ball. However, you can also harvest smaller beets if you prefer them.
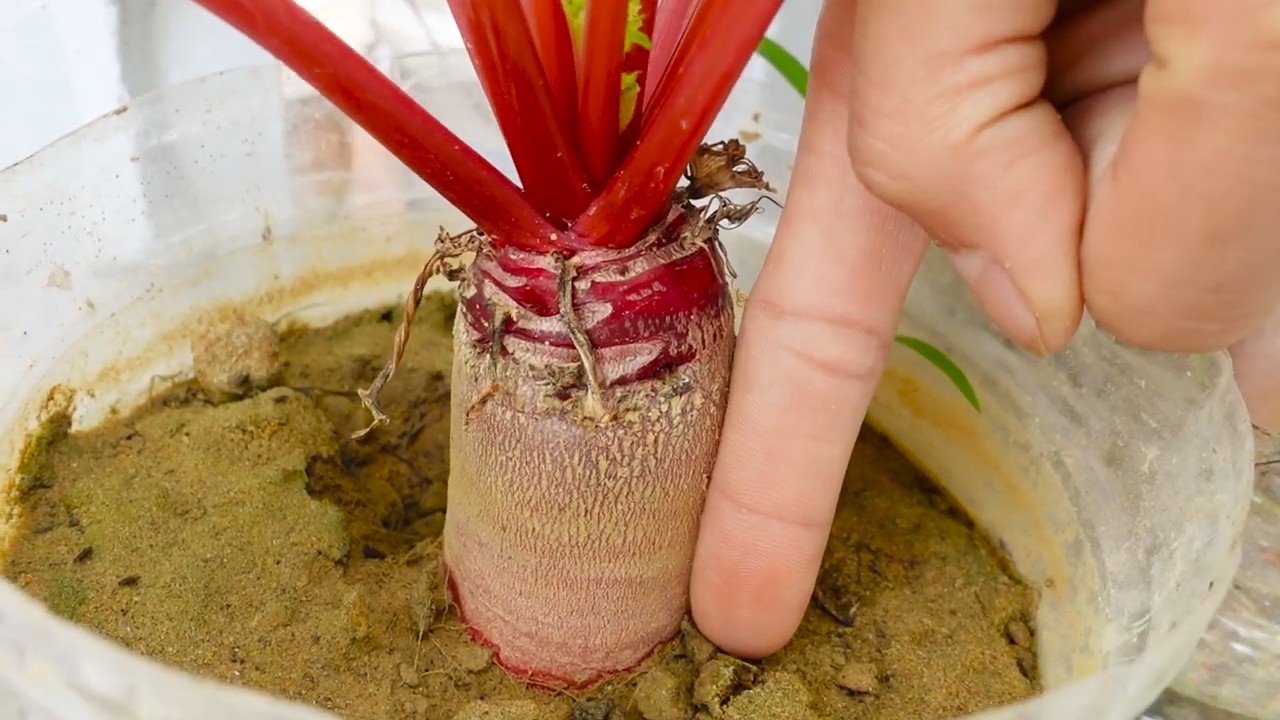
- Harvesting: Gently pull the beets out of the ground. You can also use a digging fork to loosen the soil around the beets.
- Remove the leaves: Remove the leaves of the beets, but leave about 2-3 cm (1 inch) of the stem. By the way, the leaves are also edible! You can prepare them like spinach.
- Storing: Store the beets in a cool, dark place. They will keep in the refrigerator for about 1-2 weeks.
Common Problems in Beet Cultivation and How to Solve Them
Problems can also arise when growing beets. Here are some of the most common issues and how you can solve them:
- Poor germination: If the seeds don’t germinate, it can have various causes. The soil could be too dry or too wet, the seeds could be too old, or the soil temperature could be too low. Make sure the soil is moist, use fresh seeds, and wait until the soil temperature is at least 7°C (45°F).
- Yellow leaves: Yellow leaves can be a sign of a nutrient deficiency. Fertilize the beets with an organic fertilizer or compost tea.
- Holes in the leaves: Holes in the leaves can be caused by pests. Check the plants regularly and combat pests with natural remedies if necessary.
- Root collar rot: Root collar rot is a fungal disease caused by soil that is too wet. Make sure the soil is well-draining and do not water the beets too much.
Beet Variety: Discover the Different Types
There is a huge variety of beet types that differ in color, shape, and taste. Here are some of my favorite varieties:
- Red Beet ‘Detroit’: A classic, round, red beet with a sweet taste.
- Golden Beet ‘Golden’: A yellow beet with a mild, sweet taste.
- Striped Beet ‘Chioggia’: A red-and-white striped beet with a mild, slightly earthy taste.
- White Beet ‘Albina Vereduna’: A white beet with a mild, sweet taste.
- Sugar Beet: Mainly grown for sugar production, but can also be eaten.
Beets in the Kitchen: Delicious Recipe Ideas
Beets are incredibly versatile in the kitchen. You can eat them raw, cooked, roasted, grilled, or pickled. Here are a few of my favorite recipes:
Beet Salad: Slice raw or cooked beets and serve with goat cheese, walnuts, and a balsamic dressing.
Conclusion
So, there you have it! Growing beets at home is not only achievable, but it’s also a deeply rewarding experience. From the vibrant colors that burst forth from the soil to the earthy sweetness that graces your plate, homegrown beets offer a flavor and freshness that you simply can’t find in store-bought varieties. We’ve walked you through the essential steps, from selecting the right seeds and preparing your garden bed to nurturing your seedlings and harvesting your bounty.
But why is this DIY trick a must-try? Beyond the superior taste and freshness, growing your own beets allows you to control every aspect of the process. You can choose organic seeds, avoid harmful pesticides, and tailor the growing conditions to your specific climate and soil. This means you’re not only getting delicious beets, but you’re also contributing to a healthier environment and a more sustainable food system. Plus, let’s be honest, there’s a certain satisfaction that comes from nurturing a plant from seed to table. It’s a connection to nature that’s both grounding and inspiring.
And don’t think you’re limited to just one type of beet! Experiment with different varieties to discover your favorites. Golden beets offer a milder, sweeter flavor and won’t stain your hands. Chioggia beets boast beautiful concentric rings of red and white. And don’t forget about the beet greens! They’re packed with nutrients and can be cooked like spinach or added to salads. Consider pickling some of your harvest for a tangy treat that will last for months. Roasting beets with herbs and a drizzle of balsamic vinegar is another fantastic way to showcase their natural sweetness. You can even juice them for a healthy and vibrant beverage.
We encourage you to embrace the challenge and embark on your own beet-growing adventure. Whether you have a sprawling garden or a small balcony, there’s a way to incorporate these versatile vegetables into your life. Don’t be afraid to experiment, learn from your mistakes, and most importantly, have fun!
We’re confident that you’ll be amazed by the results. Imagine serving a salad made with freshly harvested beets, grown with your own two hands. The taste, the texture, the pride – it’s an experience that’s truly unmatched.
So, grab your seeds, prepare your soil, and get ready to experience the joy of growing beets at home. We can’t wait to hear about your successes (and your challenges!). Share your experiences, tips, and photos in the comments below. Let’s create a community of beet-loving gardeners! Happy growing!
Frequently Asked Questions (FAQ)
What is the best time of year to plant beets?
The best time to plant beets depends on your climate. Beets are a cool-season crop, so they thrive in temperatures between 60°F and 70°F (15°C and 21°C). In most regions, you can plant beets in early spring, about 2-4 weeks before the last expected frost. You can also plant a second crop in late summer for a fall harvest. In warmer climates, you can grow beets throughout the winter. Check your local frost dates and adjust your planting schedule accordingly.
How much sunlight do beets need?
Beets need at least 6 hours of sunlight per day to thrive. Choose a location in your garden that receives full sun for the majority of the day. If you live in a particularly hot climate, some afternoon shade can be beneficial to prevent the beets from bolting (going to seed prematurely).
What kind of soil is best for growing beets?
Beets prefer well-drained, loose soil that is rich in organic matter. Amend your soil with compost or aged manure before planting to improve its fertility and drainage. Beets also prefer a slightly acidic to neutral soil pH, between 6.0 and 7.0. You can test your soil pH with a home testing kit and adjust it accordingly with lime (to raise the pH) or sulfur (to lower the pH). Avoid rocky or compacted soil, as this can hinder root development and result in misshapen beets.
How often should I water my beets?
Beets need consistent moisture to grow properly. Water deeply and regularly, especially during dry periods. Aim to keep the soil consistently moist, but not waterlogged. Overwatering can lead to root rot. A good rule of thumb is to water when the top inch of soil feels dry to the touch. Mulching around your beet plants can help to retain moisture and suppress weeds.
How far apart should I plant beet seeds?
Beet seeds should be planted about 1 inch deep and 1-2 inches apart. Once the seedlings emerge, thin them to about 3-4 inches apart to allow the beets to develop properly. You can eat the thinned seedlings as microgreens.
When are beets ready to harvest?
Beets are typically ready to harvest 50-70 days after planting. You can harvest them at any size, but they are generally best when they are about 2-3 inches in diameter. To harvest, gently loosen the soil around the beet and pull it out of the ground. You can also use a garden fork to lift the beets.
Why are my beet greens growing, but not the beets themselves?
This can be due to a few factors. First, ensure your beets are getting enough sunlight (at least 6 hours a day). Insufficient sunlight can lead to leafy growth at the expense of root development. Second, check your soil fertility. Beets need adequate phosphorus and potassium for root growth. Consider adding a fertilizer that is specifically formulated for root vegetables. Finally, make sure you are not over-fertilizing with nitrogen, as this can promote leafy growth.
What are some common pests and diseases that affect beets?
Some common pests that affect beets include aphids, flea beetles, and leaf miners. You can control these pests with insecticidal soap or neem oil. Common diseases that affect beets include leaf spot and root rot. To prevent these diseases, ensure good air circulation around your plants and avoid overwatering. If you notice signs of disease, remove the affected leaves or plants immediately.
Can I eat beet greens?
Yes, beet greens are delicious and nutritious! They can be cooked like spinach or added to salads. Harvest the outer leaves as needed, leaving the inner leaves to continue growing.
How do I store beets after harvesting?
To store beets, cut off the greens, leaving about an inch of stem attached. Gently brush off any excess soil, but do not wash the beets. Store them in a cool, dark, and humid place, such as a refrigerator or root cellar. Beets can be stored for several months under the right conditions.
My beets are bolting (going to seed). What can I do?
Bolting is often triggered by stress, such as extreme temperature fluctuations or lack of water. Once a beet bolts, the root becomes tough and less palatable. To prevent bolting, choose bolt-resistant varieties, provide consistent moisture, and protect your plants from extreme temperatures. If your beets do bolt, you can still harvest the greens and use them in salads or cooked dishes.
Can I grow beets in containers?
Yes, beets can be grown in containers. Choose a container that is at least 12 inches deep and wide to allow the roots to develop properly. Use a well-draining potting mix and provide consistent moisture. Container-grown beets may need to be fertilized more frequently than those grown in the ground.
What are some good companion plants for beets?
Good companion plants for beets include onions, garlic, lettuce, and cabbage. These plants can help to deter pests and improve soil health. Avoid planting beets near beans, as they can inhibit each other’s growth.

Leave a Comment