
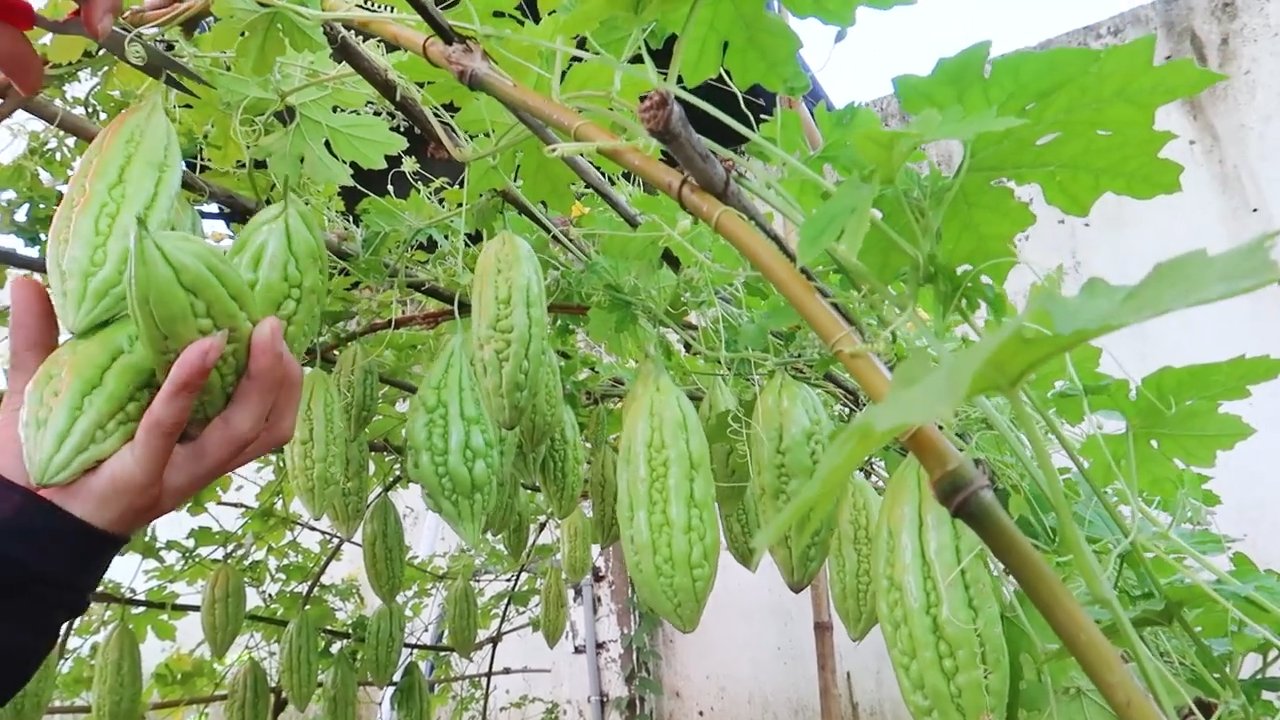
Grow bitter melon in sacks? Absolutely! I know what you’re thinking: “Bitter melon? In a sack? Is that even possible?” Well, my friend, prepare to have your gardening world turned upside down! For centuries, bitter melon, also known as bitter gourd, has been a staple in Asian cuisine and traditional medicine, prized for its unique flavor and health benefits. But let’s be honest, growing it can sometimes be a challenge, especially if you’re short on space or dealing with less-than-ideal soil conditions.
That’s where this ingenious DIY trick comes in. Imagine harvesting a bountiful crop of these nutritious gourds right from your patio, balcony, or even a sunny windowsill! Growing bitter melon in sacks offers a fantastic solution for urban gardeners, renters, or anyone looking for a creative and efficient way to cultivate this amazing vegetable. Not only does it save space, but it also allows for better drainage and soil control, leading to healthier and more productive plants.
In this article, I’m going to walk you through the entire process, step-by-step, showing you exactly how to grow bitter melon in sacks. From choosing the right sack and soil to providing the perfect support and care, I’ll share all my secrets to ensure you have a thriving bitter melon harvest. Get ready to ditch the traditional garden bed and embrace this innovative and rewarding gardening technique!
Bittermelon im Sack anbauen: Eine einfache DIY-Anleitung
Hallo Gartenfreunde! Habt ihr wenig Platz, aber Lust auf frische, selbst angebaute Bittermelonen? Dann ist diese DIY-Anleitung genau das Richtige für euch! Ich zeige euch, wie ihr Bittermelonen ganz einfach in Säcken anbauen könnt – platzsparend, effektiv und mit einer ordentlichen Ernte. Los geht’s!
Was ihr für den Anbau von Bittermelonen im Sack benötigt:
* Samen: Bittermelonensamen (am besten eine Sorte, die für den Anbau in Containern geeignet ist).
* Säcke: Stabile Säcke aus Jute, Polypropylen oder ähnlichem Material (ca. 50-70 Liter Fassungsvermögen). Ihr könnt auch alte Reissäcke oder Kartoffelsäcke verwenden. Achtet darauf, dass sie sauber sind.
* Erde: Hochwertige Blumenerde oder eine Mischung aus Gartenerde, Kompost und Sand.
* Kompost: Reifer Kompost zur Anreicherung der Erde mit Nährstoffen.
* Sand: Grobkörniger Sand zur Verbesserung der Drainage.
* Dünger: Organischer Dünger (z.B. Hornspäne, Komposttee) oder ein Langzeitdünger für Gemüse.
* Rankhilfe: Bambusstäbe, Drahtgitter oder ein anderes stabiles Gerüst, an dem die Bittermelonen ranken können.
* Gießkanne oder Schlauch: Zum Bewässern der Pflanzen.
* Schere oder Messer: Zum Zuschneiden der Säcke (falls nötig).
* Handschuhe: Zum Schutz eurer Hände.
* Optional: Vorkultivierungsschalen oder -töpfe, Anzuchterde.
Schritt-für-Schritt-Anleitung: Bittermelonen im Sack anbauen
1. Vorbereitung der Samen (optional)
Ich empfehle, die Bittermelonensamen vorzusäen, um die Keimung zu beschleunigen und die Pflanzen zu stärken.
1. Einweichen: Legt die Samen für 24 Stunden in lauwarmes Wasser. Das hilft, die harte Samenschale aufzuweichen und die Keimung zu fördern.
2. Aussaat: Füllt kleine Anzuchtschalen oder -töpfe mit Anzuchterde. Steckt die Samen ca. 1-2 cm tief in die Erde.
3. Bewässerung: Gießt die Erde vorsichtig an, sodass sie feucht, aber nicht nass ist.
4. Standort: Stellt die Schalen oder Töpfe an einen warmen, hellen Ort (z.B. auf eine Fensterbank). Die ideale Keimtemperatur liegt bei 25-30°C.
5. Keimung: Die Samen keimen in der Regel innerhalb von 7-14 Tagen. Haltet die Erde während dieser Zeit feucht.
2. Vorbereitung der Säcke
1. Reinigung: Falls ihr gebrauchte Säcke verwendet, reinigt sie gründlich mit Wasser und Seife, um eventuelle Krankheitserreger oder Schädlinge zu entfernen.
2. Drainage: Schneidet am Boden der Säcke mehrere kleine Löcher (ca. 1 cm Durchmesser) ein, um eine gute Drainage zu gewährleisten. Das verhindert Staunässe, die zu Wurzelfäule führen kann.
3. Befüllung: Mischt die Erde mit Kompost und Sand im Verhältnis 2:1:1. Das sorgt für eine gute Nährstoffversorgung und Drainage. Füllt die Säcke zu etwa 3/4 mit der Erdmischung.
4. Standort: Stellt die befüllten Säcke an einen sonnigen und windgeschützten Ort. Bittermelonen lieben die Sonne!
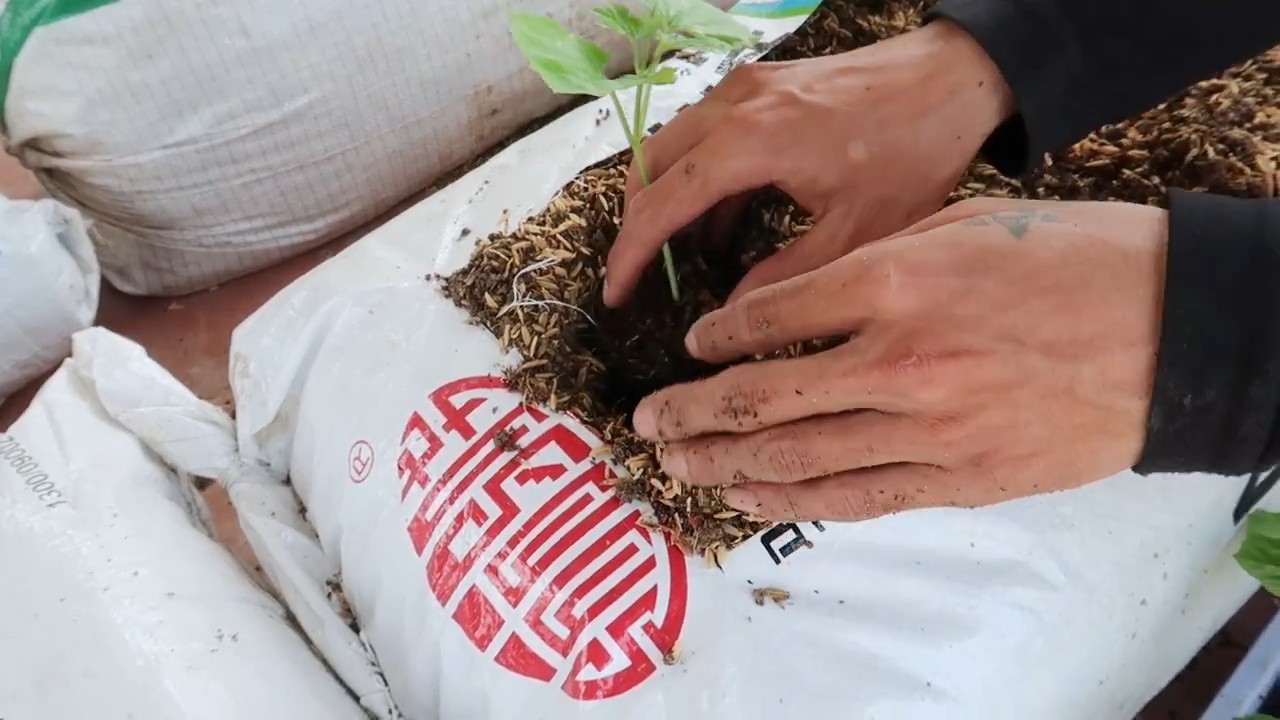
3. Pflanzung der Bittermelonen
1. Pflanzlöcher: Macht in jede Sackerde 2-3 Pflanzlöcher, je nachdem wie viele Pflanzen ihr pro Sack ziehen wollt. Die Löcher sollten etwas größer sein als die Wurzelballen der Jungpflanzen (falls ihr vorgezogen habt) oder ca. 2-3 cm tief (falls ihr direkt aussät).
2. Pflanzung: Setzt die Jungpflanzen vorsichtig in die Pflanzlöcher. Achtet darauf, die Wurzeln nicht zu beschädigen. Füllt die Löcher mit Erde auf und drückt sie leicht an. Falls ihr direkt aussät, legt 2-3 Samen pro Pflanzloch und bedeckt sie mit Erde.
3. Bewässerung: Gießt die Pflanzen nach dem Einpflanzen gründlich an.
4. Anbringen der Rankhilfe
Bittermelonen sind Kletterpflanzen und benötigen eine Rankhilfe, um sich daran festzuhalten und nach oben zu wachsen.
1. Auswahl: Wählt eine Rankhilfe, die stabil genug ist, um das Gewicht der Pflanzen und Früchte zu tragen. Bambusstäbe, Drahtgitter oder ein Spalier sind gute Optionen.
2. Installation: Steckt die Rankhilfe in die Erde neben den Pflanzen. Achtet darauf, dass sie fest im Boden verankert ist.
3. Anleitung: Leitet die Triebe der Bittermelonen vorsichtig an der Rankhilfe entlang. Ihr könnt sie mit Pflanzenbindern oder weichen Schnüren befestigen.
5. Pflege der Bittermelonen
1. Bewässerung: Bittermelonen benötigen regelmäßige Bewässerung, besonders während der heißen Sommermonate. Gießt die Pflanzen, sobald die oberste Erdschicht trocken ist. Vermeidet Staunässe.
2. Düngung: Düngt die Pflanzen alle 2-3 Wochen mit organischem Dünger oder einem Langzeitdünger für Gemüse. Komposttee ist eine tolle natürliche Düngeralternative.
3. Ausgeizen: Entfernt regelmäßig Seitentriebe, die aus den Blattachseln wachsen. Das fördert das Wachstum der Haupttriebe und die Fruchtbildung.
4. Schutz vor Schädlingen und Krankheiten: Kontrolliert die Pflanzen regelmäßig auf Schädlinge wie Blattläuse oder Spinnmilben. Bei Bedarf könnt ihr natürliche Schädlingsbekämpfungsmittel einsetzen. Achtet auch auf Anzeichen von Krankheiten wie Mehltau oder Wurzelfäule.
5. Bestäubung: Bittermelonen sind einhäusig, das heißt, sie haben männliche und weibliche Blüten auf derselben Pflanze. Die Bestäubung erfolgt in der Regel durch Insekten. Wenn ihr sicherstellen wollt, dass die Früchte gut ausreifen, könnt ihr die Blüten auch von Hand bestäuben. Übertragt dazu mit einem Pinsel Pollen von den männlichen auf die weiblichen Blüten.
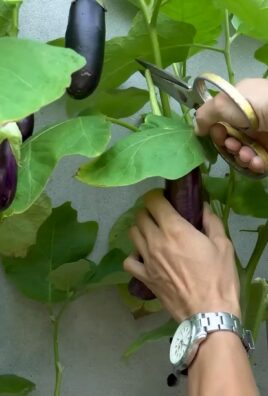
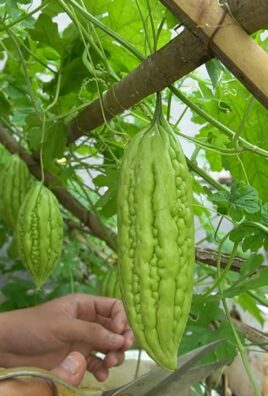
6. Ernte der Bittermelonen
1. Zeitpunkt: Bittermelonen sind erntereif, wenn sie ihre typische Form und Farbe erreicht haben und sich leicht vom Stiel lösen lassen. Die genaue Erntezeit hängt von der Sorte ab.
2. Ernte: Schneidet die Bittermelonen mit einem scharfen Messer oder einer Schere vom Stiel ab.
3. Lagerung: Bittermelonen sind nicht lange haltbar. Lagert sie im Kühlschrank und verbraucht sie innerhalb weniger Tage.
Zusätzliche Tipps für den erfolgreichen Anbau von Bittermelonen im Sack:
* Wählt den richtigen Standort: Bittermelonen benötigen mindestens 6 Stunden Sonne pro Tag.
* Verwendet hochwertige Erde: Eine gute Erde ist die Grundlage für gesundes Wachstum und eine reiche Ernte.
* Achtet auf eine gute Drainage: Staunässe kann zu Wurzelfäule führen.
* Gießt regelmäßig: Bittermelonen benötigen ausreichend Wasser, besonders während der heißen Sommermonate.
* Düngt regelmäßig: Eine gute Nährstoffversorgung ist wichtig für die Fruchtbildung.
* Schützt die Pflanzen vor Schädlingen und Krankheiten: Kontrolliert die Pflanzen regelmäßig und ergreift bei Bedarf Maßnahmen.
* Seid geduldig: Es kann einige Zeit dauern, bis die Bittermelonen Früchte tragen.
Ich hoffe, diese Anleitung hilft euch dabei, eure eigenen Bittermelonen im Sack anzubauen. Viel Spaß beim Gärtnern und eine reiche Ernte! Lasst es mich wissen, wenn ihr Fragen habt oder eure Erfahrungen teilen möchtet. Ich freue mich darauf, von euch zu hören!
Conclusion
So, there you have it! Growing bitter melon in sacks is not just a gardening trend; it’s a game-changer for anyone looking to maximize their yield, minimize space, and enjoy a healthier, more vibrant harvest. We’ve walked you through the process, highlighting the benefits and addressing potential challenges. Now, it’s time to put those green thumbs to work!
This method offers a unique advantage, especially for those with limited garden space or challenging soil conditions. Imagine the satisfaction of harvesting plump, healthy bitter melons from your patio, balcony, or even a sunny corner of your yard. The controlled environment of the sack allows you to tailor the growing conditions to the specific needs of your bitter melon plants, resulting in a more robust and productive crop.
But the benefits extend beyond mere convenience. Growing bitter melon in sacks also promotes better air circulation around the plants, reducing the risk of fungal diseases that can plague traditional garden beds. The elevated position of the sacks also helps to deter pests, making it easier to maintain a healthy and thriving garden.
Don’t be afraid to experiment with variations! Try different sack sizes to accommodate varying plant sizes. Consider adding companion plants like marigolds or basil to your sacks to further deter pests and attract beneficial insects. You can also adjust the soil mix to suit your specific climate and growing conditions. For example, if you live in a particularly hot and dry climate, you might want to add more water-retentive materials like coco coir or vermiculite to your soil mix.
And remember, the key to success with any gardening endeavor is observation and adaptation. Keep a close eye on your bitter melon plants, paying attention to their watering needs, nutrient levels, and overall health. Adjust your care routine as needed to ensure that your plants are thriving.
We are confident that you’ll find growing bitter melon in sacks to be a rewarding and enjoyable experience. It’s a simple, effective, and sustainable way to enjoy fresh, homegrown produce, even if you don’t have a traditional garden.
So, what are you waiting for? Grab some sacks, gather your supplies, and get ready to embark on a bitter melon growing adventure! We encourage you to try this DIY trick and share your experiences with us. Let us know what works best for you, what challenges you encounter, and what delicious recipes you create with your homegrown bitter melons. Share your photos and stories on social media using #BitterMelonSackGarden, and let’s inspire others to join the fun! Happy gardening!
Frequently Asked Questions (FAQ)
What type of sack is best for growing bitter melon?
The ideal sack for growing bitter melon should be durable, breathable, and large enough to accommodate the plant’s root system. Fabric grow bags, made from materials like felt or non-woven geotextile, are excellent choices. These bags allow for good drainage and aeration, preventing root rot and promoting healthy growth. Avoid using plastic bags, as they can trap moisture and heat, creating an unfavorable environment for your plants. The size of the sack depends on the variety of bitter melon you’re growing, but a 10-15 gallon sack is generally sufficient.
What kind of soil should I use in the sacks?
A well-draining, nutrient-rich soil mix is essential for growing healthy bitter melon plants in sacks. A good starting point is a mix of equal parts potting soil, compost, and perlite or vermiculite. The potting soil provides a base for the mix, while the compost adds essential nutrients and improves water retention. Perlite or vermiculite helps to improve drainage and aeration, preventing the soil from becoming waterlogged. You can also add a slow-release fertilizer to the mix to provide a steady supply of nutrients throughout the growing season. Consider adding some bone meal to the mix, as bitter melon plants benefit from phosphorus.
How often should I water my bitter melon plants in sacks?
Watering frequency depends on several factors, including the climate, the size of the sack, and the stage of growth of the plant. Generally, you should water your bitter melon plants whenever the top inch of soil feels dry to the touch. During hot, dry weather, you may need to water them daily, while during cooler, wetter weather, you may only need to water them every few days. Be sure to water thoroughly, allowing the water to drain out of the bottom of the sack. Avoid overwatering, as this can lead to root rot. A good rule of thumb is to water deeply and less frequently, rather than shallowly and more often.
How much sunlight do bitter melon plants need?
Bitter melon plants thrive in full sun, requiring at least 6-8 hours of direct sunlight per day. Choose a location for your sacks that receives plenty of sunlight throughout the day. If you live in a particularly hot climate, you may want to provide some afternoon shade to prevent the plants from overheating. If you are growing your bitter melon plants indoors, you will need to supplement with artificial light, such as grow lights.
Do I need to fertilize my bitter melon plants in sacks?
Yes, bitter melon plants are heavy feeders and require regular fertilization to produce a bountiful harvest. Start by incorporating a slow-release fertilizer into the soil mix when you plant your seedlings. Then, supplement with a liquid fertilizer every 2-3 weeks throughout the growing season. Choose a fertilizer that is high in phosphorus and potassium, as these nutrients are essential for fruit development. You can also use organic fertilizers, such as compost tea or fish emulsion.
How do I support the vines of my bitter melon plants in sacks?
Bitter melon plants are vines and require support to climb. You can use a trellis, stakes, or even a nearby fence to provide support. Insert the trellis or stakes into the sack when you plant your seedlings, and gently train the vines to climb up the support structure. You can also use twine or zip ties to secure the vines to the support.
What are some common pests and diseases that affect bitter melon plants?
Common pests that affect bitter melon plants include aphids, spider mites, and squash bugs. You can control these pests by spraying the plants with insecticidal soap or neem oil. Common diseases that affect bitter melon plants include powdery mildew and fungal leaf spots. You can prevent these diseases by ensuring good air circulation around the plants and avoiding overwatering. If you notice signs of disease, treat the plants with a fungicide.
When is the best time to harvest bitter melon?
Bitter melon is typically harvested when the fruits are still green and firm, before they begin to turn yellow or orange. The exact timing will depend on the variety of bitter melon you are growing, but generally, you should harvest the fruits about 8-10 weeks after planting. Use a sharp knife or pruning shears to cut the fruits from the vine, leaving a small stem attached.
Can I grow different varieties of bitter melon in sacks?
Absolutely! Growing bitter melon in sacks allows you to experiment with different varieties and find the ones that you enjoy the most. Some popular varieties include the Chinese bitter melon, which is long and slender, and the Indian bitter melon, which is shorter and more bumpy. Be sure to choose varieties that are well-suited to your climate and growing conditions.
How can I improve the flavor of my homegrown bitter melon?
Bitter melon is known for its bitter taste, but there are several ways to reduce the bitterness. One method is to soak the sliced bitter melon in salted water for 30 minutes before cooking. Another method is to blanch the bitter melon in boiling water for a few minutes. You can also add acidic ingredients, such as vinegar or lemon juice, to your recipes to help balance the bitterness.
Leave a Comment