
Grow black corn at home? Absolutely! Imagine the look on your friends’ faces when you serve up vibrant, almost gothic, corn on the cob at your next barbecue. It’s not just a conversation starter; it’s a delicious and nutritious addition to your garden and table. For centuries, corn has been a staple crop, deeply woven into the cultures of the Americas. While yellow and white corn are familiar sights, black corn, with its striking color and slightly sweeter flavor, offers a unique twist on this classic grain.
But why should you bother with this particular DIY project? Well, beyond the sheer novelty, growing your own black corn allows you to control the entire process, from seed to table. You’ll know exactly what’s going into your food, avoiding harmful pesticides and ensuring the freshest possible flavor. Plus, it’s incredibly rewarding to nurture a plant from seed to harvest, especially one as visually stunning as black corn. In this article, I’m going to share some simple, yet effective, DIY tricks and hacks to help you successfully grow black corn at home, even if you’re a complete beginner. Get ready to impress your neighbors and enjoy the unique taste of homegrown black corn!
Schwarzer Maisanbau für Zuhause: Ein umfassender DIY-Leitfaden
Hallo liebe Gartenfreunde! Habt ihr schon mal von schwarzem Mais gehört? Er ist nicht nur optisch ein Hingucker, sondern auch reich an Antioxidantien und eine tolle Ergänzung für eure Küche. Ich zeige euch, wie ihr diesen besonderen Mais ganz einfach zu Hause anbauen könnt. Keine Angst, es ist gar nicht so schwer, wie es klingt!
Was du für den Anbau von schwarzem Mais brauchst
Bevor wir loslegen, hier eine Liste mit allen Materialien und Werkzeugen, die du benötigst:
* Schwarze Maissamen: Diese sind online oder in gut sortierten Gartencentern erhältlich. Achtet auf eine gute Qualität!
* Geeigneter Boden: Mais bevorzugt einen gut durchlässigen, fruchtbaren Boden.
* Kompost oder organischer Dünger: Für eine optimale Nährstoffversorgung.
* Gartengeräte: Spaten, Harke, Gießkanne oder Gartenschlauch.
* Pflanzgefäße (optional): Wenn du den Mais in Töpfen anbauen möchtest.
* Sonnenlicht: Mais braucht viel Sonne, mindestens 6-8 Stunden täglich.
* Geduld: Der Anbau braucht Zeit und Pflege.
Vorbereitung ist alles: Der richtige Standort und Boden
Der Erfolg deines Maisanbaus hängt maßgeblich von der richtigen Vorbereitung ab. Hier sind die wichtigsten Punkte:
* Standortwahl: Wähle einen sonnigen Standort in deinem Garten. Mais braucht viel Licht, um optimal zu wachsen. Achte darauf, dass der Standort vor starkem Wind geschützt ist, da hohe Maispflanzen leicht umknicken können.
* Bodenbearbeitung: Lockere den Boden gründlich auf. Entferne Steine, Wurzeln und Unkraut. Mais bevorzugt einen gut durchlässigen Boden, der reich an Nährstoffen ist.
* Bodenverbesserung: Arbeite Kompost oder organischen Dünger in den Boden ein. Das verbessert die Bodenstruktur und versorgt die Pflanzen mit wichtigen Nährstoffen. Ein pH-Wert zwischen 6,0 und 7,0 ist ideal für Mais. Du kannst den pH-Wert mit einem Bodentest überprüfen und gegebenenfalls anpassen.
Aussaat: Der Start in ein farbenfrohes Maisfeld
Jetzt geht es ans Eingemachte! Die Aussaat ist ein wichtiger Schritt, um den Grundstein für eine erfolgreiche Ernte zu legen.
1. Der richtige Zeitpunkt: Schwarzer Mais ist frostempfindlich. Warte mit der Aussaat, bis keine Frostgefahr mehr besteht. In der Regel ist das ab Mitte Mai der Fall. Die Bodentemperatur sollte mindestens 10°C betragen.
2. Aussaat im Freiland: Ziehe mit einer Harke flache Rillen in den vorbereiteten Boden. Die Rillen sollten etwa 2-3 cm tief sein.
3. Samenabstand: Lege die Maissamen in einem Abstand von etwa 20-25 cm in die Rillen. Zwischen den Reihen sollte ein Abstand von etwa 60-70 cm sein. Das gibt den Pflanzen genügend Platz zum Wachsen.
4. Bedecken und Angießen: Bedecke die Samen mit Erde und drücke sie leicht an. Gieße die Erde anschließend vorsichtig an. Achte darauf, dass die Erde feucht, aber nicht nass ist.
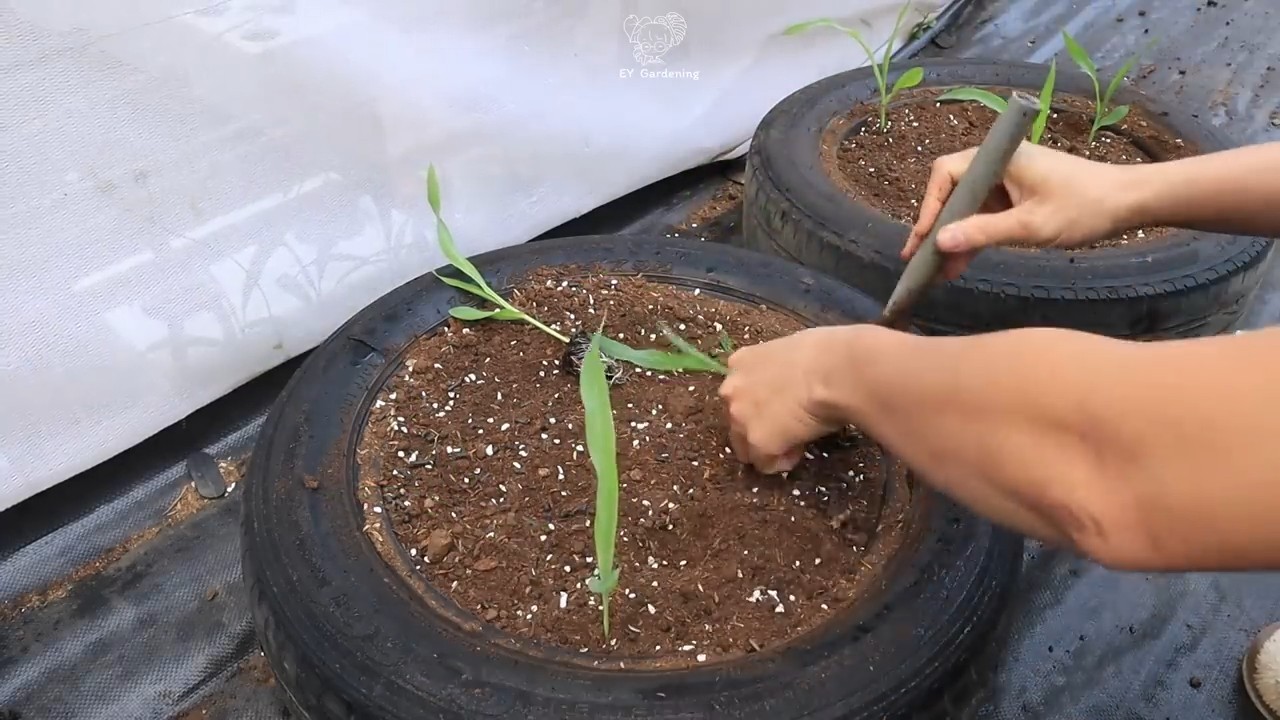
5. Aussaat in Töpfen (optional): Wenn du den Mais in Töpfen vorziehen möchtest, verwende Töpfe mit einem Durchmesser von mindestens 15 cm. Fülle die Töpfe mit Anzuchterde und lege 2-3 Samen pro Topf hinein. Bedecke die Samen mit Erde und gieße sie an. Stelle die Töpfe an einen warmen und hellen Ort.
Pflege: Damit dein Mais prächtig gedeiht
Nach der Aussaat ist es wichtig, den Mais regelmäßig zu pflegen, damit er gesund und kräftig wächst.
1. Gießen: Gieße den Mais regelmäßig, besonders während trockener Perioden. Achte darauf, dass die Erde immer leicht feucht ist. Vermeide Staunässe, da dies zu Wurzelfäule führen kann.
2. Unkrautbekämpfung: Entferne regelmäßig Unkraut, das um die Nährstoffe konkurriert. Du kannst das Unkraut von Hand jäten oder einen Unkrautstecher verwenden.
3. Düngen: Dünge den Mais regelmäßig mit einem organischen Dünger oder Kompost. Das versorgt die Pflanzen mit wichtigen Nährstoffen und fördert das Wachstum. Dünge das erste Mal, wenn die Pflanzen etwa 15 cm hoch sind, und dann alle 2-3 Wochen.
4. Häufeln: Häufle die Maispflanzen an, sobald sie etwa 30 cm hoch sind. Das stabilisiert die Pflanzen und fördert die Wurzelbildung.
5. Schutz vor Schädlingen: Achte auf Schädlinge wie Maiszünsler oder Blattläuse. Bei Bedarf kannst du biologische Schädlingsbekämpfungsmittel einsetzen.
Bestäubung: Der Schlüssel zur Maiskolbenbildung
Mais ist einhäusig getrenntgeschlechtig, das bedeutet, dass männliche und weibliche Blüten auf derselben Pflanze vorkommen. Die männlichen Blüten befinden sich am oberen Ende der Pflanze (Fahne), die weiblichen Blüten bilden die Maiskolben.
1. Natürliche Bestäubung: Der Wind trägt den Pollen von den männlichen Blüten zu den weiblichen Blüten. Um eine gute Bestäubung zu gewährleisten, solltest du den Mais in Gruppen anpflanzen.
2. Manuelle Bestäubung (optional): Wenn du sicherstellen möchtest, dass alle Maiskolben gut bestäubt werden, kannst du die Bestäubung manuell unterstützen. Schüttle dazu die männlichen Blüten vorsichtig, um den Pollen freizusetzen. Sammle den Pollen in einem Behälter und streiche ihn dann vorsichtig auf die weiblichen Blüten (die Seidenfäden, die aus den Maiskolben herausragen).
Ernte: Der Lohn deiner Mühe
Nach etwa 80-120 Tagen, je nach Sorte und Witterung, ist es endlich so weit: Die Ernte steht vor der Tür!
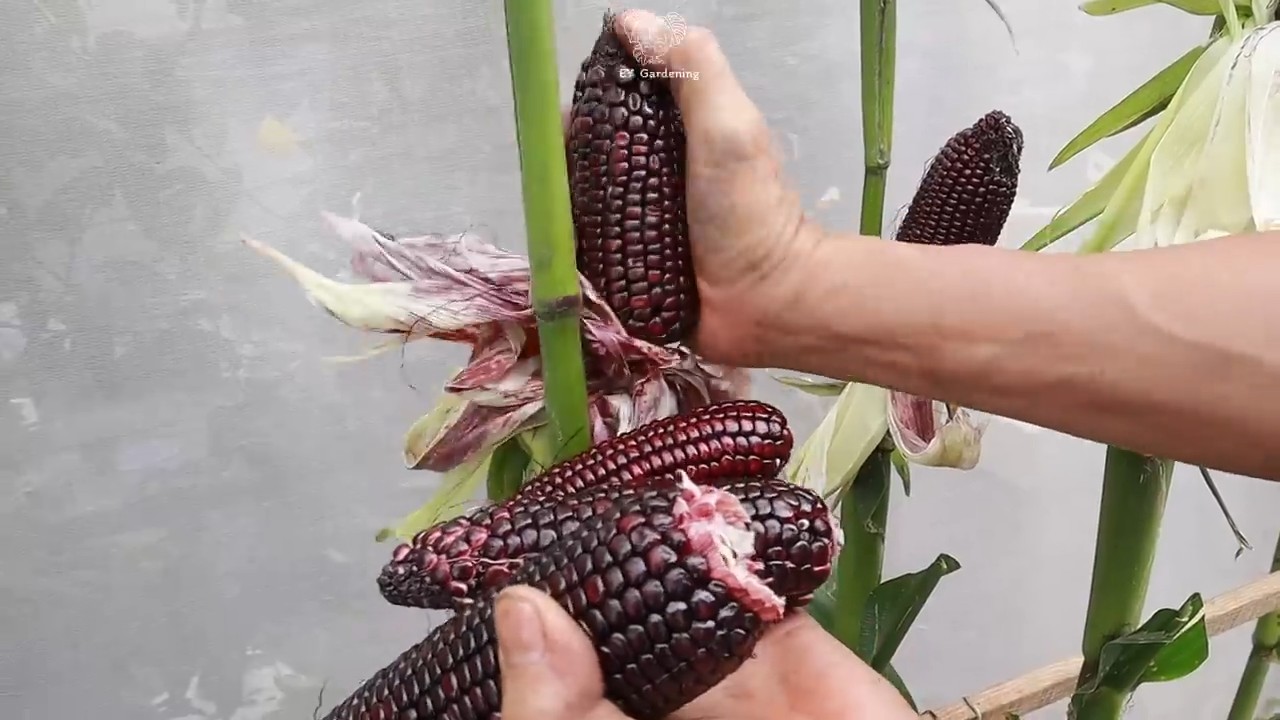
1. Reifezeichen: Die Maiskolben sind reif, wenn die Seidenfäden braun und trocken sind und die Kolben sich fest anfühlen. Die Körner sollten prall und saftig sein.
2. Erntevorgang: Breche die Maiskolben vorsichtig von der Pflanze ab. Drehe die Kolben dabei leicht, um sie leichter zu lösen.
3. Lagerung: Du kannst die Maiskolben sofort verzehren oder sie für später lagern. Um die Maiskolben zu lagern, entferne die Blätter und lagere sie im Kühlschrank. Du kannst die Maiskörner auch einfrieren oder trocknen.
Verwendung: Vielfältige Möglichkeiten in der Küche
Schwarzer Mais ist nicht nur ein Hingucker, sondern auch vielseitig in der Küche einsetzbar.
* Gekocht: Du kannst die Maiskolben kochen und als Beilage servieren.
* Gegrillt: Gegrillter schwarzer Mais ist ein besonderer Genuss.
* Maismehl: Du kannst die Maiskörner zu Maismehl verarbeiten und daraus Tortillas, Polenta oder andere Gerichte zubereiten.
* Popcorn: Einige Sorten von schwarzem Mais eignen sich auch zur Herstellung von Popcorn.
Zusätzliche Tipps für den erfolgreichen Anbau
* Fruchtfolge: Baue Mais nicht jedes Jahr am selben Standort an. Wechsle die Kulturen, um den Boden nicht einseitig auszulaugen und Krankheiten vorzubeugen.
* Sortenwahl: Informiere dich über verschiedene Sorten von schwarzem Mais und wähle die Sorte, die am besten zu deinem Klima und deinen Bedürfnissen passt.
* Beobachtung: Beobachte deine Maispflanzen regelmäßig, um Probleme frühzeitig zu erkennen und zu beheben.
Ich hoffe, dieser Leitfaden hilft dir dabei, deinen eigenen schwarzen Mais erfolgreich anzubauen. Viel Spaß beim Gärtnern und guten Appetit!
Conclusion
So, there you have it! Growing black corn at home isn’t just a gardening project; it’s an adventure into the vibrant world of heirloom varieties and a chance to cultivate something truly unique. We’ve walked through the process, from selecting the right seeds to harvesting those stunning, almost-black kernels. But why should you actually take the plunge and dedicate your time and garden space to this endeavor?
Firstly, the sheer novelty of black corn is undeniable. Imagine the looks of surprise and delight when you present a cob of this striking grain at your next barbecue. It’s a conversation starter, a culinary curiosity, and a testament to your gardening prowess. Beyond the aesthetic appeal, black corn boasts a richer, slightly sweeter flavor than its yellow counterpart. This makes it a fantastic addition to your culinary repertoire, lending a unique depth to everything from cornbread and tortillas to salads and side dishes.
Secondly, growing your own black corn allows you to control the entire process, ensuring that your produce is free from harmful pesticides and herbicides. You know exactly what goes into your food, from the soil it’s grown in to the water it receives. This is a significant advantage for those who prioritize organic and sustainable practices. Plus, the satisfaction of harvesting something you’ve nurtured from seed to maturity is incredibly rewarding. It connects you to the earth and provides a tangible sense of accomplishment.
But the benefits don’t stop there. Black corn is also packed with anthocyanins, powerful antioxidants that contribute to its dark color and offer a range of health benefits. These compounds have been linked to improved heart health, reduced inflammation, and even cancer prevention. So, by growing your own black corn, you’re not just adding a unique ingredient to your diet; you’re also boosting your overall well-being.
Now, let’s talk about variations. While we’ve focused on growing black corn for its kernels, you can also experiment with using the stalks and leaves as fodder for livestock or as a natural mulch for your garden. The dried husks can even be used for crafting projects, adding a rustic touch to your home decor. Consider companion planting with beans or squash to create a mutually beneficial ecosystem in your garden. These plants can help fix nitrogen in the soil and provide shade, respectively, enhancing the growth of your black corn.
Don’t be afraid to experiment with different varieties of black corn. Some are better suited for specific climates or purposes. Research your options and choose the one that best fits your needs and preferences. You might even discover a new favorite!
We understand that growing something new can be daunting, but we encourage you to embrace the challenge. The rewards are well worth the effort. Start small, learn as you go, and don’t be afraid to ask for help. There are countless online resources and gardening communities that can provide guidance and support.
So, what are you waiting for? Grab some black corn seeds, prepare your garden, and embark on this exciting journey. We’re confident that you’ll be amazed by the results. And once you’ve harvested your first crop, be sure to share your experience with us! We’d love to hear about your successes, challenges, and creative ways of using your homegrown black corn. Share your photos, recipes, and tips in the comments below. Let’s build a community of black corn enthusiasts and inspire others to discover the joys of growing their own food. Let’s get growing!
Frequently Asked Questions (FAQ)
What exactly is black corn, and is it different from regular corn?
Black corn is a variety of corn that gets its deep, almost-black color from high levels of anthocyanins, the same antioxidants found in blueberries and other dark-colored fruits and vegetables. While it’s still corn, it often has a slightly sweeter and nuttier flavor compared to yellow corn. The texture can also vary depending on the specific variety, but it’s generally similar to other types of corn. The primary difference lies in its color and antioxidant content.
Is it difficult to grow black corn compared to other types of corn?
Generally, growing black corn is not significantly more difficult than growing other types of corn. The basic requirements are the same: full sun, well-drained soil, and adequate water. However, some varieties of black corn might be more susceptible to certain pests or diseases, so it’s essential to research the specific variety you’re planting and take appropriate preventative measures. Providing adequate nutrients and ensuring proper pollination are also crucial for a successful harvest.
What kind of soil is best for growing black corn?
Black corn thrives in well-drained soil that is rich in organic matter. A slightly acidic to neutral pH (around 6.0 to 7.0) is ideal. Before planting, amend your soil with compost, aged manure, or other organic materials to improve its fertility and drainage. If your soil is heavy clay, consider adding sand or other amendments to improve drainage. A soil test can help you determine the specific nutrient needs of your soil and guide your fertilization strategy.
How much sunlight does black corn need?
Like all corn varieties, black corn requires full sun to thrive. Aim for at least 6-8 hours of direct sunlight per day. Insufficient sunlight can lead to stunted growth, poor pollination, and reduced yields. Choose a planting location that receives ample sunlight throughout the day.
How often should I water my black corn plants?
Water your black corn plants regularly, especially during dry periods. The soil should be kept consistently moist, but not waterlogged. Water deeply and less frequently, rather than shallowly and more often, to encourage deep root growth. A good rule of thumb is to water when the top inch of soil feels dry to the touch. Mulching around the base of the plants can help retain moisture and suppress weeds.
What are some common pests and diseases that affect black corn, and how can I prevent them?
Common pests that can affect black corn include corn earworms, aphids, and stalk borers. Diseases include corn smut, rust, and leaf blight. To prevent these problems, practice good garden hygiene, such as removing plant debris and weeds. Consider using organic pest control methods, such as introducing beneficial insects or applying neem oil. Choose disease-resistant varieties of black corn whenever possible. Crop rotation can also help prevent the buildup of pests and diseases in the soil.
When is the best time to harvest black corn?
The best time to harvest black corn depends on the specific variety and your intended use. For fresh eating, harvest when the kernels are plump and milky, usually around 20-25 days after the silks emerge. The silks should be dry and brown. For drying and grinding into cornmeal, allow the ears to dry on the stalk until the kernels are hard and the husks are completely dry.
Can I save seeds from my black corn crop to plant next year?
Yes, you can save seeds from your black corn crop, but be aware that if you’re growing other types of corn nearby, there’s a chance of cross-pollination. This can result in variations in the color and flavor of the corn in subsequent generations. To minimize cross-pollination, isolate your black corn plants from other corn varieties by at least 200 feet. Allow the ears to dry completely on the stalk, then remove the kernels and store them in a cool, dry place.
What are some creative ways to use black corn in cooking?
Black corn can be used in a variety of dishes, just like regular corn. Try using it to make cornbread, tortillas, polenta, or succotash. The unique color adds a visual appeal to salads and side dishes. You can also grill or roast the ears for a delicious and healthy snack. The kernels can be dried and ground into cornmeal for baking or cooking. Experiment with different recipes and discover your favorite ways to enjoy this versatile grain.
Where can I buy black corn seeds?
Black corn seeds can be purchased from a variety of sources, including online seed companies, local nurseries, and garden centers. Look for reputable suppliers that offer high-quality seeds and detailed information about the specific variety you’re interested in. Consider purchasing from companies that specialize in heirloom or open-pollinated seeds.

Leave a Comment