
Grow broccoli in kitchen? Absolutely! Imagine harvesting fresh, vibrant broccoli right from your kitchen, no matter the season. Forget those bland, overpriced supermarket florets – we’re talking about homegrown goodness bursting with flavor and nutrients. For centuries, humans have cultivated food close to home, from ancient Roman window boxes overflowing with herbs to the modern-day victory gardens that nourished communities during wartime. This connection to our food source is deeply ingrained, and now, with a few clever DIY tricks, you can tap into that tradition, even in the smallest of apartments.
But why bother with growing broccoli indoors? Well, let’s face it, life gets busy! We all crave fresh, healthy food, but finding the time and space for a traditional garden can be a challenge. That’s where these simple, effective DIY hacks come in. I’m going to show you how to bypass the limitations of outdoor gardening and bring the joy of fresh broccoli directly into your kitchen. Plus, you’ll be amazed at how rewarding it is to nurture a plant from seed to harvest, knowing exactly what went into it. Get ready to unleash your inner urban farmer and grow broccoli in kitchen with these easy-to-follow tips and tricks!
Growing Broccoli in the Kitchen: Your DIY Guide for Fresh Vegetables
Hey there! Do you want to grow fresh broccoli right in your kitchen? Sounds crazy, but it’s easier than you think! I’ll show you how to start your own little broccoli garden with a few simple steps and materials. Don’t worry, you don’t need a green thumb, just a little patience and my guide. Let’s get started!
What You’ll Need: The Materials List
Before we begin, here is a list of everything you’ll need. Don’t worry, you probably have most of these things at home already!
-
-
-
Broccoli seeds: Organic quality is best, so you can be sure there are no harmful substances on them.
-
Seed-starting mix: Special soil for starting plants. It is low in nutrients and loose, ideal for germination.
-
Starter pots or trays: Small pots or trays in which you can sow the seeds. You can also use egg cartons or yogurt cups if you want to be creative!
-
Spray bottle: For moistening the soil.
-
Plastic wrap or a mini-greenhouse: To keep the humidity high.
-
A bright location: Preferably a windowsill with plenty of sunlight.
-
Patience: Broccoli takes a little time to grow.
-
-
Phase 1: Sowing – The Start of Your Broccoli Adventure
Sowing is the first and most important step. Here you lay the foundation for your little broccoli garden.
-
-
-
Prepare the starter pots: Fill the starter pots or trays with seed-starting mix. Press the soil down lightly, but not too firmly. It should remain loose and airy.
-
Sow the seeds: Sprinkle the broccoli seeds evenly over the soil. 2-3 seeds per pot are sufficient. Gently press the seeds into the soil, about 0.5 cm (0.2 inches) deep.
-
Cover the seeds: Cover the seeds with a thin layer of seed-starting mix.
-
Water: Gently moisten the soil with the spray bottle. The soil should be damp, but not wet. Avoid washing the seeds away.
-
Cover: Cover the starter pots with plastic wrap or a mini-greenhouse. This ensures high humidity, which is important for germination.
-
Location: Place the starter pots in a bright and warm location. A windowsill with plenty of sunlight is ideal. The temperature should be between 18 and 22 degrees Celsius (64-72°F).
-
-
Phase 2: Germination – Patience is Required
Now it’s time to wait and watch. Germination usually takes 5-10 days.
-
-
-
Check the moisture: Check the moisture of the soil daily. It should always be slightly moist. Spray the soil with the spray bottle if necessary.
-
Ventilation: Ventilate the starter pots briefly every day by removing the plastic wrap or the mini-greenhouse for a few minutes. This prevents mold.
-
Observation: Observe the seeds closely. As soon as the first seedlings appear, you can remove the plastic wrap or the mini-greenhouse.
-
-
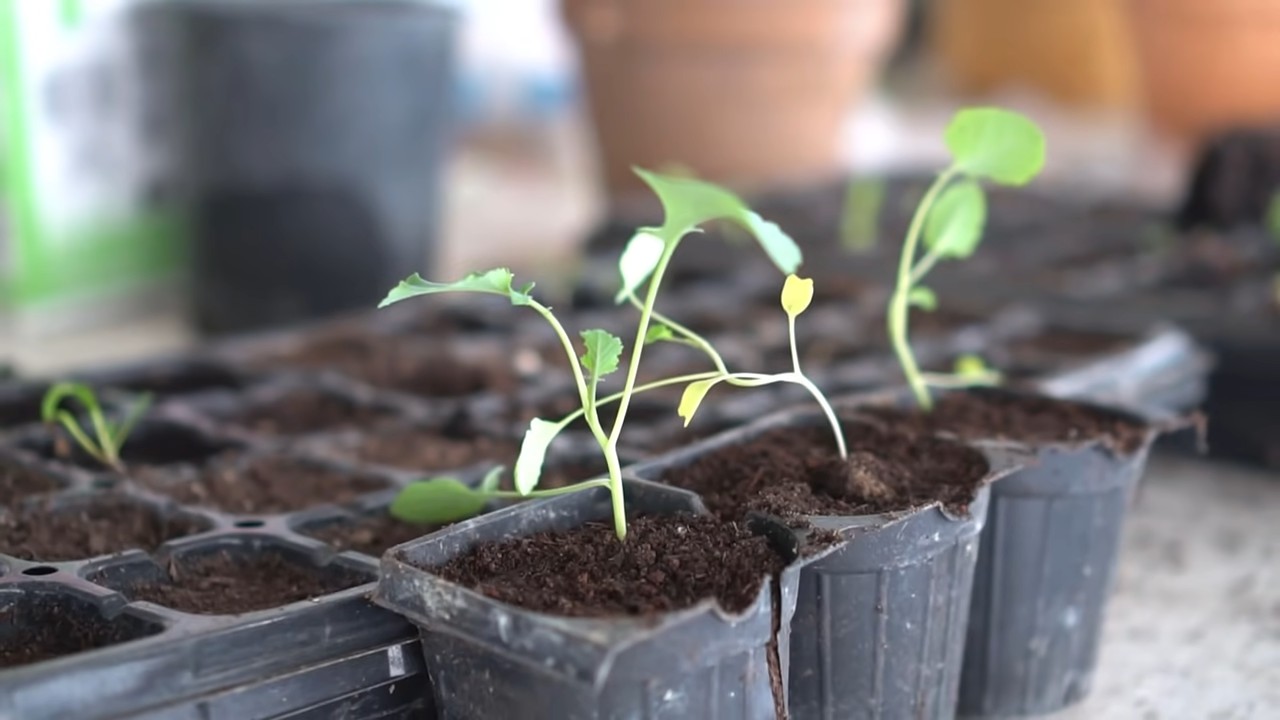
Phase 3: Rearing – The Little Broccoli Seedlings Grow
Once the seedlings are there, the actual rearing begins. Now the little broccoli seedlings need a lot of light and care.
-
-
-
Location: Continue to place the starter pots in a bright location. If the sun is too strong, you can shade the seedlings a bit with a cloth or paper.
-
Watering: Water the seedlings regularly, but not too much. The soil should always be slightly moist. Avoid waterlogging, as this can lead to root rot.
-
Thinning: If several seedlings have grown in one pot, you should thin them out. This means removing the weakest seedlings so that the strongest have enough space to grow.
-
Here’s how: Moisten the soil well. Carefully remove the weakest seedling. Be careful not to damage the roots of the other seedlings.
-
-
Fertilizing: After about 2-3 weeks, you can fertilize the seedlings for the first time. Use an organic liquid fertilizer for vegetables. Follow the dosage instructions on the package.
-
Rotating: Rotate the starter pots regularly so that the seedlings grow evenly and do not bend towards the light.
-
-
Phase 4: Pricking Out – Moving to Larger Pots
When the seedlings are large enough (about 5-7 cm / 2-3 inches high), it’s time to prick them out into larger pots. This gives them more space to grow and develop.
-
-
-
Prepare the larger pots: Fill the larger pots with vegetable soil. Press the soil down lightly.
-
Lift out the seedlings: Moisten the soil in the starter pots well. Carefully lift the seedlings out of the soil with a spoon or a dibber. Be careful not to damage the roots.
-
Place the seedlings: Place the seedlings in the larger pots. The roots should have enough space. Fill the pots with soil and press it down lightly.
-
Watering: Water the seedlings well after pricking them out.
-
Location: Place the pots in a bright and warm location.
-
-
Phase 5: Care – So Your Broccoli Thrives
Now that your broccoli seedlings are in larger pots, it’s important to care for them well.
-
-
-
Watering: Water the seedlings regularly, but not too much. The soil should always be slightly moist. Avoid waterlogging.
-
Fertilizing: Fertilize the seedlings every 2-3 weeks with an organic liquid fertilizer for vegetables.
-
Light: Broccoli needs a lot of light. Place the pots in the brightest possible location. If necessary, you can provide additional light to the seedlings with a grow light.
-
Temperature: The ideal temperature for broccoli is between 15 and 20 degrees Celsius (59-68°F).
-
Pests: Watch out for pests like aphids or caterpillars. If infested, you can treat the seedlings with a biological pesticide.
-
Rotating: Rotate the pots regularly so that the seedlings grow evenly.
-
-
Phase 6: The Harvest – Finally, Fresh Broccoli from Your Own Cultivation!
After about 8-12 weeks, you can harvest your first broccoli.
-
-
-
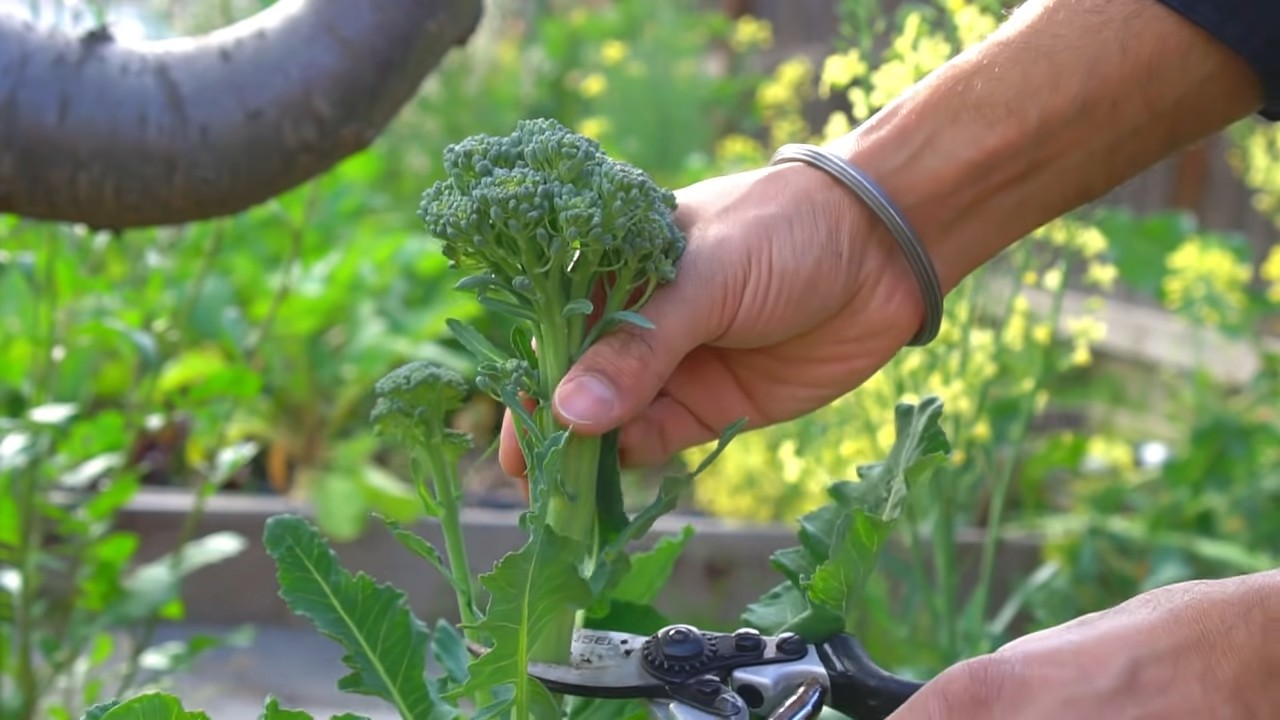
Harvest time: The broccoli is ripe when the florets are firm and closed.
-
Harvesting: Cut the broccoli with a sharp knife. Leave the stalk, as it often forms side shoots that you can harvest later.
-
Enjoy: Enjoy your fresh broccoli from your own cultivation! You can cook, steam, fry, or eat it raw.
-
-
Additional Tips for Your Broccoli Success
-
-
Variety selection: Choose a broccoli variety that is suitable for growing in pots. There are special dwarf varieties that are particularly well-suited.
-
Conclusion
So, there you have it! Growing broccoli in your kitchen, once seemingly impossible, is now within your reach. This DIY trick isn’t just about saving money; it’s about experiencing the joy of nurturing life, connecting with your food source, and enjoying the unparalleled freshness of homegrown produce. Forget those wilted, flavorless broccoli heads from the supermarket. Imagine crisp, vibrant florets, bursting with nutrients and ready to be transformed into your favorite dishes, all thanks to your own green thumb.
This method offers a sustainable and rewarding way to supplement your diet, especially during colder months when outdoor gardening is limited. Plus, it’s a fantastic educational opportunity for children, teaching them about plant life cycles and the importance of healthy eating.
But the beauty of this DIY project lies in its adaptability. Feel free to experiment with different broccoli varieties. Try sprouting broccoli seeds specifically designed for microgreens for a quicker harvest and a peppery kick. Or, if you have a bit more space and patience, consider transplanting your seedlings to larger containers as they grow, allowing them to develop into more substantial plants. You can even explore different lighting options to optimize growth, from natural sunlight near a window to supplemental grow lights for consistent results.
Don’t be afraid to get creative with your growing medium either. While soil works perfectly well, you could also experiment with hydroponics or other soilless methods for a unique and efficient growing experience. The possibilities are endless!
This DIY broccoli growing method is a must-try because it empowers you to take control of your food supply, reduce your environmental impact, and enjoy the freshest, most flavorful broccoli imaginable. It’s a simple, cost-effective, and incredibly rewarding project that will transform the way you think about food.
We urge you to give this DIY trick a try. Start small, be patient, and don’t be discouraged by initial setbacks. Every gardener, no matter how experienced, faces challenges along the way. The key is to learn from your mistakes, adapt your approach, and keep experimenting.
Once you’ve harvested your first batch of homegrown broccoli, we’d love to hear about your experience! Share your photos, tips, and tricks in the comments below. Let’s build a community of indoor broccoli growers and inspire others to embrace the joy of homegrown food. What worked for you? What challenges did you face? What delicious recipes did you create with your homegrown bounty? Your insights will be invaluable to other aspiring gardeners. So, grab your seeds, prepare your growing medium, and get ready to embark on a rewarding journey of growing broccoli in your kitchen! Happy gardening!
Frequently Asked Questions (FAQ)
What kind of broccoli seeds should I use for growing indoors?
While you can technically use any broccoli seeds, some varieties are better suited for indoor growing than others. Look for varieties that are compact and early-maturing, such as ‘Waltham 29’ or ‘De Cicco’. These varieties tend to produce smaller heads and mature more quickly, making them ideal for container gardening. You can also consider using sprouting broccoli seeds, which are specifically designed for growing microgreens and offer a faster harvest.
How much light does my indoor broccoli need?
Broccoli requires a significant amount of light to thrive. Ideally, aim for at least 6-8 hours of direct sunlight per day. If you don’t have a sunny window, you can supplement with grow lights. Fluorescent or LED grow lights are excellent options, providing the necessary spectrum of light for healthy growth. Position the lights about 6-12 inches above the plants and adjust as they grow.
What type of soil is best for growing broccoli indoors?
A well-draining potting mix is essential for growing broccoli indoors. Avoid using garden soil, as it can be too heavy and compact, leading to drainage problems. A good potting mix should be light, airy, and rich in organic matter. You can also amend your potting mix with compost or other organic materials to provide additional nutrients.
How often should I water my indoor broccoli plants?
Water your broccoli plants regularly, keeping the soil consistently moist but not waterlogged. Check the soil moisture level daily and water when the top inch feels dry to the touch. Avoid overwatering, as this can lead to root rot. Ensure that your containers have drainage holes to allow excess water to escape.
How long does it take to grow broccoli indoors?
The time it takes to grow broccoli indoors depends on the variety you’re growing and the growing conditions. Sprouting broccoli seeds for microgreens can be harvested in as little as a week. However, if you’re growing broccoli for full-sized heads, it can take anywhere from 60 to 90 days from seed to harvest.
What are some common problems I might encounter when growing broccoli indoors?
Some common problems you might encounter include aphids, cabbage worms, and fungal diseases. Inspect your plants regularly for signs of pests or diseases and take action promptly. You can control aphids with insecticidal soap or neem oil. Cabbage worms can be handpicked or treated with Bacillus thuringiensis (Bt). To prevent fungal diseases, ensure good air circulation and avoid overwatering.
Can I grow broccoli in a small apartment?
Yes, you can absolutely grow broccoli in a small apartment! The key is to choose compact varieties and provide adequate light. You can grow broccoli in containers on a windowsill, balcony, or under grow lights. Vertical gardening systems can also be a great way to maximize space in a small apartment.
How do I know when my broccoli is ready to harvest?
Broccoli is ready to harvest when the heads are firm and tightly closed. The florets should be dark green and plump. If the florets start to open and turn yellow, it’s a sign that the broccoli is overripe. Cut the main head off with a sharp knife, leaving a few inches of stem. Side shoots may continue to develop after the main head is harvested, providing you with additional broccoli over time.
Can I grow broccoli from scraps?
While you can’t grow a full broccoli head from scraps, you can potentially regrow the leaves and small florets from the stem. Place the broccoli stem in a shallow dish of water, making sure the cut end is submerged. Change the water every day. After a few days, you should see new leaves and small florets starting to grow. You can then transplant the stem to a pot of soil and continue to care for it as you would a regular broccoli plant. However, keep in mind that the yield will be much smaller than growing from seed.
Is growing broccoli in kitchen worth the effort?
Absolutely! While it requires some effort and attention, growing broccoli in your kitchen is a rewarding experience that offers numerous benefits. You’ll enjoy the freshest, most flavorful broccoli imaginable, save money on groceries, and connect with your food source. Plus, it’s a fun and educational project that can be enjoyed by the whole family. The satisfaction of harvesting your own homegrown broccoli is truly unparalleled.

Leave a Comment