
Grow Cauliflower at Home, you say? Absolutely! Imagine stepping into your backyard and harvesting your own crisp, creamy cauliflower – fresher and tastier than anything you’ll find at the grocery store. Forget those bland, pre-packaged veggies; we’re talking about a culinary adventure right in your own garden!
For centuries, cauliflower has been a staple in diets around the world, with roots tracing back to the Mediterranean. From Roman banquets to modern-day kitchens, this versatile vegetable has consistently proven its worth. But what if I told you that you don’t need a sprawling farm to enjoy this nutritional powerhouse?
Many people shy away from growing cauliflower, thinking it’s too difficult or requires too much space. But that’s simply not true! With a few clever tricks and DIY hacks, you can successfully grow cauliflower at home, even in a small garden or containers. This article is your ultimate guide to demystifying the process. I’m going to share my tried-and-true methods for nurturing these beautiful brassicas from seed to harvest. Get ready to impress your friends and family with your homegrown cauliflower creations!
Blumenkohl selbst anbauen: Dein umfassender DIY-Leitfaden
Hey Gartenfreunde! Habt ihr euch jemals gefragt, wie ihr diesen knackigen, vielseitigen Blumenkohl direkt in eurem Garten anbauen könnt? Ich zeige euch, wie es geht! Es ist einfacher, als ihr vielleicht denkt, und das Ergebnis ist einfach köstlich. Lasst uns gemeinsam in die Welt des Blumenkohlanbaus eintauchen!
Was du brauchst: Die richtige Ausrüstung und Materialien
Bevor wir loslegen, brauchen wir natürlich das richtige Werkzeug und die passenden Materialien. Hier ist eine Liste, die euch helfen wird, alles vorzubereiten:
* Blumenkohlsamen oder Jungpflanzen: Die Grundlage für unseren Erfolg! Wählt eine Sorte, die zu eurem Klima passt.
* Anzuchterde: Für die Aussaat im Haus oder im Frühbeet.
* Gartenerde: Gut vorbereiteter Boden ist das A und O.
* Kompost oder organischer Dünger: Für eine nährstoffreiche Grundlage.
* Gießkanne oder Gartenschlauch: Regelmäßige Bewässerung ist wichtig.
* Gartenwerkzeug: Spaten, Harke, Pflanzkelle.
* Mulchmaterial: Stroh, Holzhackschnitzel oder Rasenschnitt, um den Boden feucht zu halten und Unkraut zu unterdrücken.
* Pflanzschilder: Damit ihr wisst, wo ihr was gepflanzt habt.
* Schutznetz (optional): Gegen Schädlinge wie Kohlweißlinge.
Der richtige Zeitpunkt: Wann Blumenkohl pflanzen?
Der Zeitpunkt ist entscheidend für eine erfolgreiche Ernte. Blumenkohl mag es kühl, daher sind Frühling und Herbst die besten Zeiten zum Pflanzen.
* Frühlingsanbau: Beginnt mit der Aussaat im Haus etwa 6-8 Wochen vor dem letzten erwarteten Frost. Die Jungpflanzen können dann nach dem Frost ins Freie gepflanzt werden.
* Herbstanbau: Säät die Samen im Sommer aus, damit die Pflanzen im Herbst reifen können. Achtet darauf, dass sie genügend Zeit haben, bevor der erste Frost kommt.
Schritt-für-Schritt-Anleitung: So pflanzt du Blumenkohl richtig
Jetzt geht’s ans Eingemachte! Hier ist eine detaillierte Anleitung, wie ihr Blumenkohl erfolgreich anpflanzt:
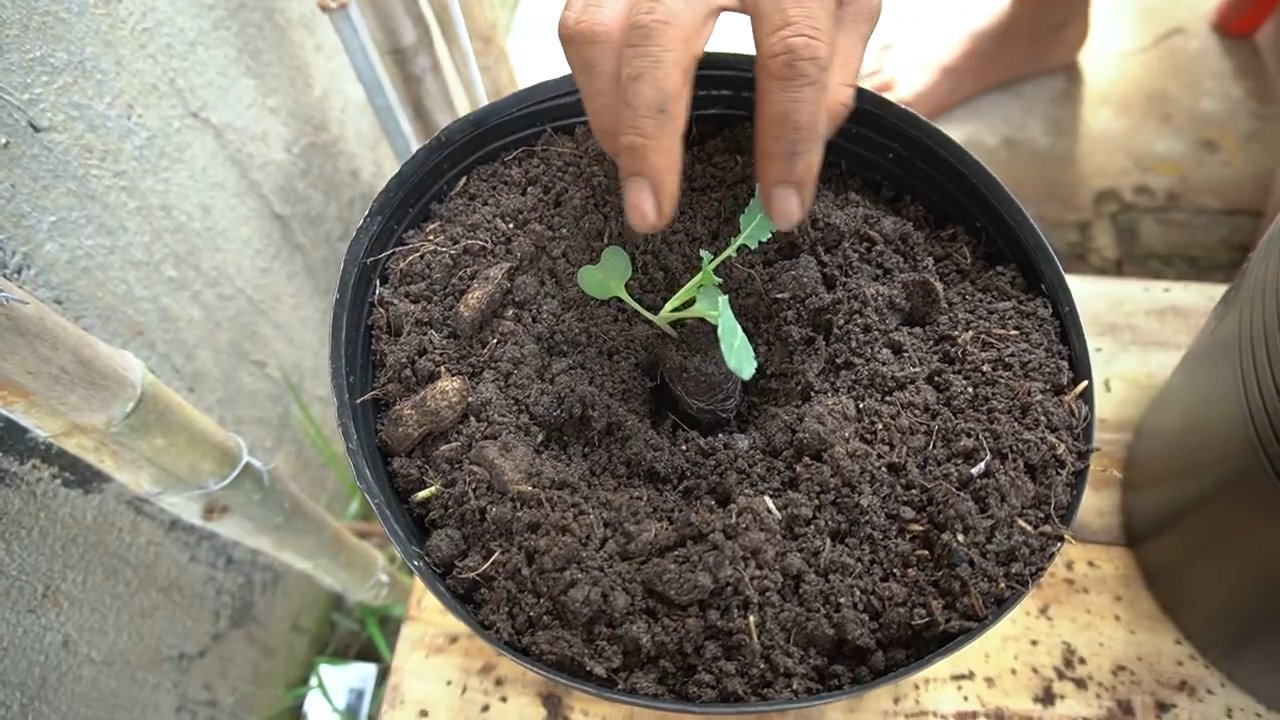
1. Vorbereitung der Aussaat (optional)
Wenn ihr mit Samen beginnt, müsst ihr diese zuerst aussäen.
1. Aussaatgefäße vorbereiten: Füllt kleine Töpfe oder Anzuchtschalen mit Anzuchterde.
2. Samen aussäen: Legt 2-3 Samen pro Topf etwa 1 cm tief in die Erde.
3. Bewässern: Gießt die Erde vorsichtig an, sodass sie feucht, aber nicht nass ist.
4. Warm stellen: Stellt die Töpfe an einen warmen, hellen Ort (ca. 18-20°C).
5. Keimung abwarten: Die Samen sollten innerhalb von 7-10 Tagen keimen.
6. Pikieren: Sobald die Sämlinge ein paar Blätter haben, könnt ihr sie in größere Töpfe pikieren, wenn nötig.
2. Bodenvorbereitung im Garten
Ein guter Boden ist das A und O für gesunde Blumenkohlpflanzen.
1. Standort wählen: Sucht einen sonnigen Standort mit mindestens 6 Stunden Sonnenlicht pro Tag.
2. Boden lockern: Grabt den Boden mit einem Spaten um und entfernt Steine und Unkraut.
3. Boden verbessern: Mischt Kompost oder organischen Dünger unter die Erde, um sie mit Nährstoffen anzureichern. Blumenkohl ist ein Starkzehrer!
4. pH-Wert prüfen: Blumenkohl bevorzugt einen pH-Wert zwischen 6,0 und 7,0. Testet den Boden und passt ihn gegebenenfalls an.
3. Das Pflanzen der Blumenkohlpflanzen
Jetzt ist es Zeit, die Pflanzen in den Garten zu setzen!
1. Pflanzlöcher graben: Grabt Löcher, die etwas größer sind als die Wurzelballen der Pflanzen.
2. Pflanzen einsetzen: Nehmt die Pflanzen vorsichtig aus den Töpfen und setzt sie in die Löcher. Achtet darauf, dass die Oberseite des Wurzelballens mit der Erdoberfläche abschließt.
3. Löcher füllen: Füllt die Löcher mit Erde und drückt sie leicht an.
4. Gießen: Gießt die Pflanzen gründlich an.
5. Abstand beachten: Haltet einen Abstand von etwa 45-60 cm zwischen den Pflanzen und 60-75 cm zwischen den Reihen ein.
4. Pflege nach dem Pflanzen: Gießen, Düngen, Schützen
Die richtige Pflege ist entscheidend für eine reiche Ernte.
1. Regelmäßig gießen: Blumenkohl braucht viel Wasser, besonders während der Wachstumsphase. Gießt regelmäßig, besonders bei trockenem Wetter.
2. Düngen: Düngt die Pflanzen alle 2-3 Wochen mit einem organischen Dünger oder Komposttee.
3. Mulchen: Tragt eine Schicht Mulch um die Pflanzen auf, um den Boden feucht zu halten und Unkraut zu unterdrücken.
4. Schädlingsbekämpfung: Kontrolliert die Pflanzen regelmäßig auf Schädlinge wie Kohlweißlinge, Blattläuse oder Kohlfliegen. Verwendet bei Bedarf biologische Schädlingsbekämpfungsmittel oder ein Schutznetz.
5. Kopf schützen (Blanchieren): Sobald sich der Blumenkohlkopf zu bilden beginnt, könnt ihr ihn vor direkter Sonneneinstrahlung schützen, indem ihr die äußeren Blätter darüber bindet. Dies verhindert, dass er sich verfärbt und bitter wird. Diesen Vorgang nennt man Blanchieren.
Häufige Probleme und Lösungen
Auch beim Blumenkohlanbau können Probleme auftreten. Hier sind einige häufige Probleme und wie ihr sie lösen könnt:
* Kohlhernie: Eine Pilzkrankheit, die die Wurzeln befällt. Vermeidet befallene Böden und verwendet resistente Sorten.
* Kohlweißlinge: Die Raupen fressen die Blätter. Sammelt die Raupen ab oder verwendet ein Schutznetz.
* Blattläuse: Saugen Pflanzensaft. Besprüht die Pflanzen mit einer Seifenlösung oder verwendet Nützlinge wie Marienkäfer.
* Falscher Mehltau: Eine Pilzkrankheit, die sich durch gelbe Flecken auf den Blättern äußert. Sorgt für gute Belüftung und vermeidet Staunässe.
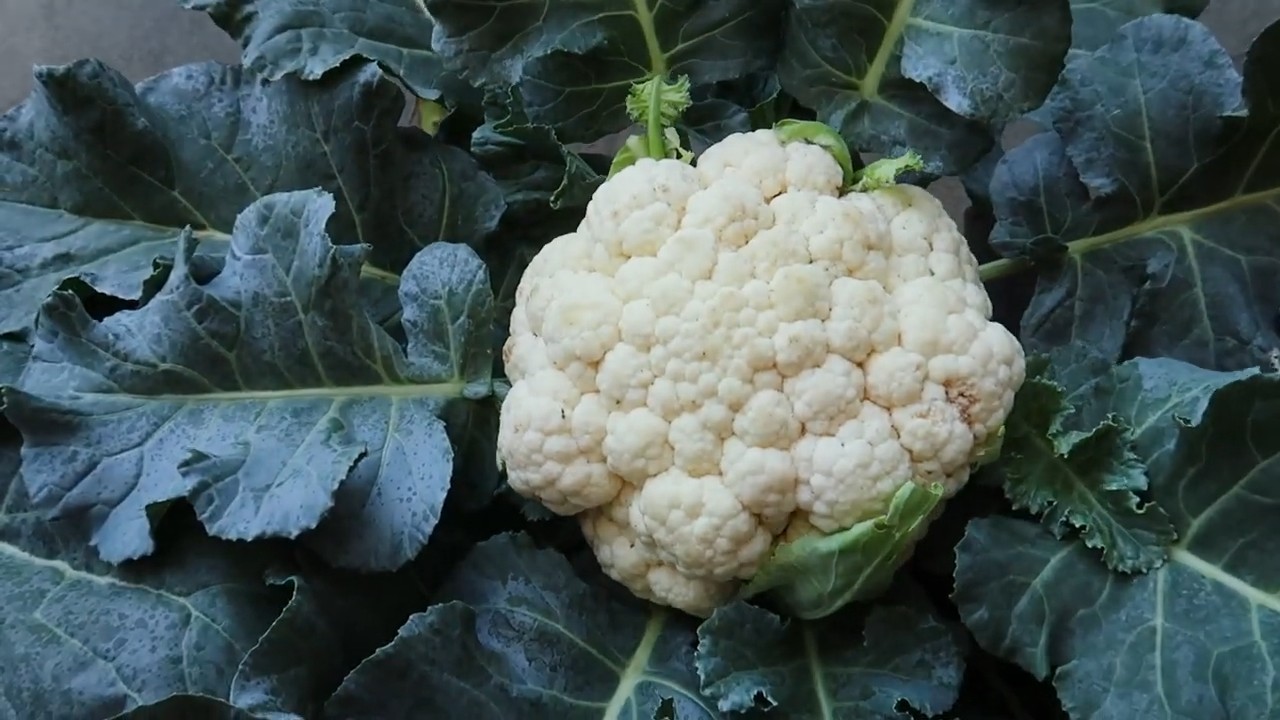
Die Ernte: Wann ist der Blumenkohl reif?
Die Ernte ist der krönende Abschluss eurer Arbeit!
1. Reife erkennen: Der Blumenkohl ist reif, wenn der Kopf fest und kompakt ist und die Röschen noch geschlossen sind.
2. Ernten: Schneidet den Blumenkohlkopf mit einem scharfen Messer ab, lasst dabei einige Blätter am Strunk.
3. Lagerung: Blumenkohl kann im Kühlschrank etwa eine Woche gelagert werden.
Zusätzliche Tipps für den erfolgreichen Blumenkohlanbau
Hier sind noch ein paar zusätzliche Tipps, die euch helfen werden, euren Blumenkohl noch besser anzubauen:
* Fruchtfolge beachten: Baut Blumenkohl nicht jedes Jahr am selben Standort an, um Krankheiten und Schädlingen vorzubeugen.
* Verschiedene Sorten ausprobieren: Es gibt viele verschiedene Blumenkohlsorten, probiert verschiedene aus, um eure Lieblingssorte zu finden.
* Bodenanalyse durchführen: Eine Bodenanalyse kann euch helfen, den Nährstoffbedarf eures Bodens besser zu verstehen und ihn entsprechend zu düngen.
* Beobachtet eure Pflanzen: Achtet auf Veränderungen im Aussehen eurer Pflanzen und reagiert schnell auf Probleme.
Ich hoffe, dieser Leitfaden hilft euch dabei, euren eigenen Blumenkohl erfolgreich anzubauen. Viel Spaß beim Gärtnern und guten Appetit!
Conclusion
Growing your own cauliflower at home might seem daunting, but as you’ve discovered, it’s a surprisingly rewarding and achievable endeavor. Forget the bland, overpriced heads at the grocery store – imagine biting into a crisp, flavorful cauliflower, nurtured by your own hands and bursting with freshness. This isn’t just about saving money; it’s about connecting with your food, understanding its journey from seed to table, and enjoying the unparalleled taste of homegrown produce.
This DIY approach to cauliflower cultivation offers a multitude of benefits. You have complete control over the growing process, ensuring that your cauliflower is free from harmful pesticides and herbicides. You can choose varieties that are best suited to your local climate and personal preferences, experimenting with colorful options like purple or orange cauliflower for a visually stunning and nutritionally diverse harvest. Plus, the satisfaction of harvesting your own cauliflower is simply unmatched.
But the real magic lies in the flavor. Homegrown cauliflower boasts a sweetness and depth of flavor that you simply won’t find in store-bought varieties. Whether you roast it with herbs and spices, steam it for a healthy side dish, or blend it into a creamy soup, your homegrown cauliflower will elevate any meal.
Ready to take your cauliflower game to the next level? Don’t be afraid to experiment! Try different planting times to extend your harvest season. Consider companion planting with herbs like rosemary or thyme to deter pests and enhance flavor. And if you’re feeling adventurous, explore the world of fermentation and pickle your excess cauliflower for a tangy and probiotic-rich treat.
We’ve provided you with the knowledge and tools to successfully grow cauliflower at home. Now, it’s your turn to get your hands dirty and experience the joy of homegrown goodness. We encourage you to embrace this DIY project, share your successes (and challenges!) with us in the comments below, and inspire others to embark on their own cauliflower-growing adventures. Let’s cultivate a community of passionate gardeners and celebrate the delicious rewards of homegrown food! Share your photos and tips – we can’t wait to see what you create!
Frequently Asked Questions (FAQ)
Q: How much space do I really need to grow cauliflower?
A: While cauliflower plants can get fairly large, reaching up to 2-3 feet wide, you can still grow them successfully in smaller spaces with careful planning. If you’re limited on space, consider growing dwarf varieties that are specifically bred to be more compact. Container gardening is also a viable option, but you’ll need a large pot (at least 12 inches in diameter) and ensure adequate drainage. Remember to space your plants appropriately to allow for proper air circulation and sunlight penetration, even in a smaller garden. Overcrowding can lead to disease and stunted growth.
Q: What if I don’t have a garden? Can I still grow cauliflower?
A: Absolutely! Container gardening is your friend. Choose a large pot (at least 12 inches in diameter and depth) with good drainage. Use a high-quality potting mix that is rich in organic matter. Place the pot in a sunny location that receives at least 6 hours of direct sunlight per day. Water regularly, especially during hot weather, and fertilize every few weeks with a balanced fertilizer. You might need to provide support for the cauliflower head as it develops, especially if it gets heavy.
Q: My cauliflower head is forming, but it’s turning yellow. What’s happening?
A: Yellowing of the cauliflower head is usually caused by exposure to sunlight. This is why blanching is so important. When the head is about 2-3 inches in diameter, gently pull the surrounding leaves over the head and secure them with twine or rubber bands. This will protect the head from the sun and keep it white. If you’re growing a colored variety (purple, orange, etc.), you don’t need to blanch it. Yellowing can also be a sign of nutrient deficiency, so make sure you’re fertilizing regularly with a balanced fertilizer.
Q: How do I know when my cauliflower is ready to harvest?
A: The ideal time to harvest cauliflower is when the head is firm, compact, and has reached the desired size (usually 6-8 inches in diameter, depending on the variety). The florets should be tightly packed together and not starting to separate or become loose. If you wait too long, the head will become grainy and the flavor will deteriorate. Use a sharp knife to cut the head from the plant, leaving a few leaves attached to protect the head.
Q: What are some common pests and diseases that affect cauliflower, and how can I prevent them?
A: Cauliflower can be susceptible to several pests and diseases, including cabbage worms, aphids, flea beetles, clubroot, and black rot. To prevent these problems, practice good garden hygiene by removing plant debris and weeds regularly. Use row covers to protect young plants from pests. Companion planting with herbs like rosemary or thyme can also help deter pests. Choose disease-resistant varieties whenever possible. If you notice signs of pests or diseases, treat them promptly with appropriate organic or chemical controls. Crop rotation is also crucial to prevent soilborne diseases from building up.
Q: Can I grow cauliflower in the fall or winter?
A: Yes, you can! In fact, cauliflower often thrives in cooler weather. Fall and winter crops are less likely to be affected by pests and diseases that are more prevalent in the summer. Choose varieties that are specifically bred for fall or winter planting. Start seeds indoors in late summer and transplant them into the garden in early fall. Provide protection from frost if necessary. With proper planning and care, you can enjoy a delicious harvest of homegrown cauliflower even in the colder months.
Q: What’s the best way to store cauliflower after harvesting?
A: To store cauliflower, trim off any excess leaves and wrap the head loosely in plastic wrap. Store it in the refrigerator crisper drawer for up to a week. Avoid washing the cauliflower before storing it, as this can promote spoilage. You can also freeze cauliflower for longer storage. To freeze it, cut the head into florets and blanch them in boiling water for 3 minutes. Then, plunge them into ice water to stop the cooking process. Drain well and freeze in a single layer on a baking sheet. Once frozen, transfer the florets to a freezer bag or container. Frozen cauliflower can be stored for up to 8 months.
Q: What are some creative ways to use my homegrown cauliflower?
A: The possibilities are endless! Of course, you can roast, steam, or sauté it as a simple side dish. But you can also use it to make cauliflower rice, cauliflower pizza crust, cauliflower mashed potatoes, or creamy cauliflower soup. Try adding it to stir-fries, curries, or pasta dishes. You can even pickle it for a tangy and probiotic-rich treat. Don’t be afraid to experiment and get creative in the kitchen! Your homegrown cauliflower will add a delicious and nutritious boost to any meal.

Leave a Comment