
Grow Celery at Home? Absolutely! Imagine stepping into your backyard and snipping fresh, crisp celery stalks whenever you need them. No more limp, store-bought celery that’s been sitting on the shelf for days. This isn’t just a dream; it’s an achievable reality with a few simple tricks and a little DIY magic.
Celery, with its refreshing crunch, has been enjoyed for centuries. Originating in the Mediterranean, it was initially valued for its medicinal properties before becoming a culinary staple. Today, it’s a key ingredient in soups, salads, and countless other dishes. But let’s be honest, buying celery can be a gamble. Sometimes it’s perfect, other times it’s stringy and flavorless. That’s where growing your own comes in!
I’m going to show you how to grow celery at home, even if you have limited space or gardening experience. We’ll explore easy DIY methods that will save you money, reduce food waste, and provide you with the freshest, most flavorful celery you’ve ever tasted. Think of the satisfaction of harvesting your own produce and knowing exactly where it came from. Plus, it’s a fun and rewarding project for the whole family. So, grab your gardening gloves, and let’s get started!
Grow Your Own Celery: A Beginner’s Guide
Hey there, fellow gardening enthusiasts! Ever thought about growing your own celery? It’s easier than you might think, and the taste of fresh, homegrown celery is absolutely unbeatable. Plus, it’s a fun and rewarding project. I’m going to walk you through the whole process, from starting with a store-bought stalk to harvesting your very own crunchy celery.
What You’ll Need
Before we dive in, let’s gather everything you’ll need. This will make the whole process smoother and more enjoyable.
* Celery Stalk: Choose a healthy-looking celery stalk from the grocery store. Look for one with a firm base and vibrant green leaves.
* Shallow Dish or Jar: Something to hold water and the celery base.
* Potting Soil: A good quality potting mix is essential for healthy growth.
* Pot or Container: Choose a pot that’s at least 8 inches in diameter and 8 inches deep. Celery needs room for its roots to grow.
* Water: For watering the celery.
* Spray Bottle (Optional): For misting the leaves.
* Fertilizer (Optional): A balanced liquid fertilizer can help boost growth.
Regrowing Celery from a Stalk: The First Steps
This is where the magic begins! We’re going to take that humble celery stalk and coax it into producing new growth.
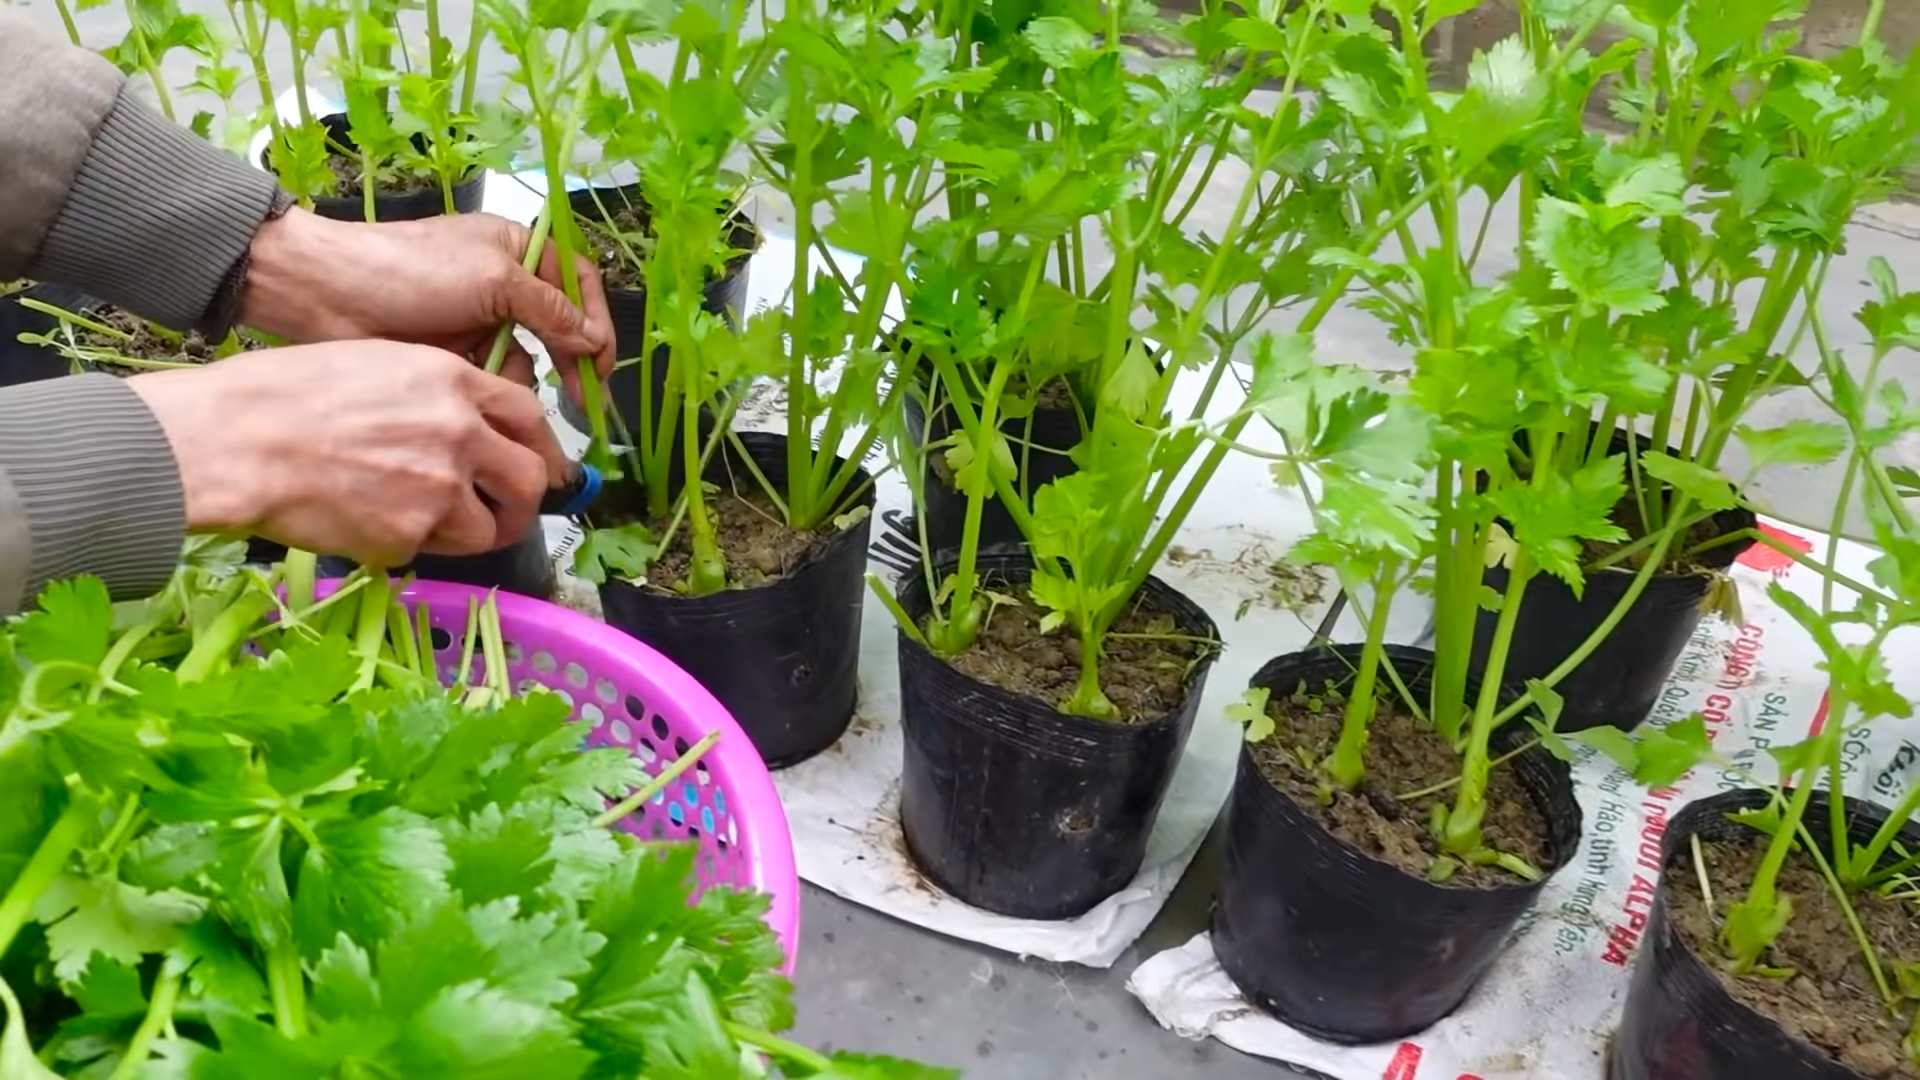
1. Prepare the Celery Base: Carefully cut off the celery stalks about 2 inches from the base. You want to keep the base intact, as this is where the new growth will emerge. Don’t throw away the stalks you cut off! You can use them in your cooking.
2. Place in Water: Put the celery base in your shallow dish or jar. Add enough water to cover the bottom inch or so of the base. Be careful not to submerge the entire base, as this can lead to rot.
3. Find a Sunny Spot: Place the dish or jar in a bright, sunny location. A windowsill is perfect. Celery needs plenty of sunlight to thrive.
4. Change the Water Regularly: Change the water every day or two to keep it fresh and prevent bacteria from growing. This is really important!
5. Observe and Wait: Within a few days, you should start to see small roots emerging from the bottom of the celery base and new leaves sprouting from the top. This is so exciting!
Planting Your Celery Seedling
Once your celery has developed a good root system and some healthy new leaves, it’s time to move it to a pot with soil.
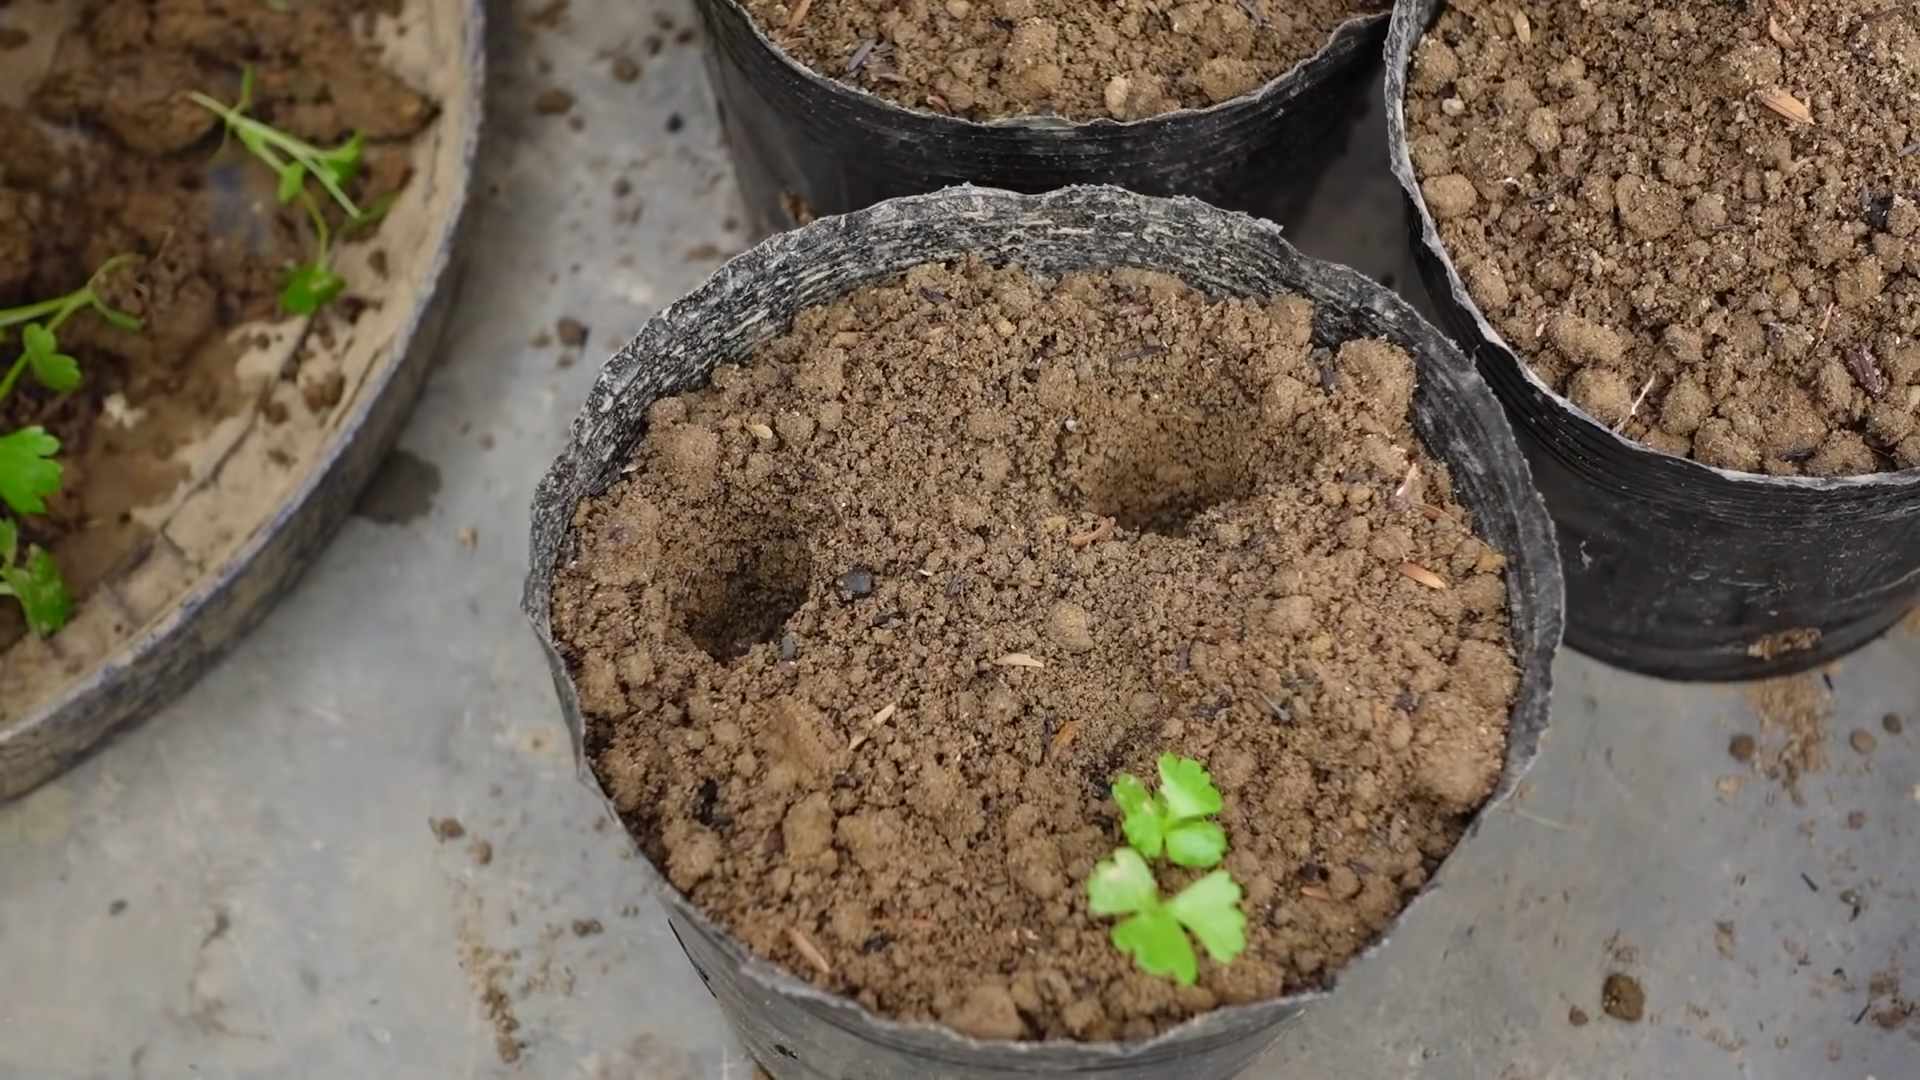
1. Prepare the Pot: Fill your pot with potting soil, leaving about an inch of space at the top. Gently pat down the soil.
2. Create a Hole: Make a hole in the center of the pot that’s large enough to accommodate the celery base and its roots.
3. Carefully Transplant: Gently remove the celery base from the water and carefully place it in the hole. Make sure the roots are spread out and not bunched together.
4. Cover the Roots: Fill the hole with soil, gently covering the roots. Don’t bury the base of the celery too deep; the top of the base should be just above the soil line.
5. Water Thoroughly: Water the soil thoroughly until water drains out of the bottom of the pot. This will help settle the soil and ensure the roots are well-hydrated.
Caring for Your Growing Celery
Now that your celery is planted, it’s time to provide it with the care it needs to grow into a healthy, productive plant.
1. Sunlight: Celery needs at least 6 hours of sunlight per day. If you don’t have a sunny spot indoors, you may need to supplement with a grow light.
2. Watering: Keep the soil consistently moist, but not soggy. Water when the top inch of soil feels dry to the touch. Avoid overwatering, as this can lead to root rot.
3. Fertilizing (Optional): If you want to give your celery a boost, you can fertilize it every two weeks with a balanced liquid fertilizer. Follow the instructions on the fertilizer package.
4. Misting (Optional): Celery loves humidity. You can mist the leaves with water every day or two to help keep them hydrated.
5. Pest Control: Keep an eye out for pests like aphids and spider mites. If you see any, you can treat them with insecticidal soap or neem oil.
6. Blanching (Optional): Blanching celery stalks makes them milder and less bitter. About two weeks before you plan to harvest, you can blanch the stalks by wrapping them with newspaper or cardboard. This will block sunlight and prevent them from turning green.
Troubleshooting Common Problems
Even with the best care, you might encounter a few problems along the way. Here are some common issues and how to address them:
* Yellowing Leaves: This can be caused by overwatering, underwatering, or nutrient deficiencies. Check the soil moisture and adjust your watering schedule accordingly. If the soil is consistently moist, you may be overwatering. If the soil is dry, you may need to water more frequently. You can also try fertilizing with a balanced fertilizer.
* Stunted Growth: This can be caused by lack of sunlight, poor soil, or pests. Make sure your celery is getting enough sunlight and that the soil is well-draining and nutrient-rich. Check for pests and treat them as needed.
* Root Rot: This is caused by overwatering and poor drainage. Make sure your pot has drainage holes and that you’re not overwatering. If you suspect root rot, you can try repotting the celery in fresh soil.
* Bolting: Bolting is when the celery plant prematurely produces a flower stalk. This can be caused by stress, such as extreme temperatures or lack of water. To prevent bolting, keep your celery well-watered and protected from extreme temperatures.
Harvesting Your Homegrown Celery
The moment you’ve been waiting for! Harvesting your own celery is incredibly satisfying.
1. When to Harvest: You can harvest your celery when the stalks are at least 6 inches long and thick enough to eat. This usually takes about 80-100 days from planting.
2. How to Harvest: To harvest, simply cut the stalks off at the base of the plant with a sharp knife. You can harvest individual stalks as needed, or you can harvest the entire plant at once.
3. Storing Your Celery: Store your harvested celery in the refrigerator. Wrap it in a damp paper towel and place it in a plastic bag. This will help keep it fresh and crisp.
Enjoying Your Homegrown Celery
Now for the best part: enjoying the fruits (or rather, vegetables) of your labor! Homegrown celery is delicious in salads, soups, stews, and as a crunchy snack. You can also use the leaves to add flavor to your dishes.
Here are a few ideas:
* Celery Sticks with Peanut Butter: A classic and healthy snack.
* Celery Soup: A comforting and flavorful soup.
* Celery Salad: A refreshing and crunchy salad.
* Celery Juice: A healthy and hydrating juice.
* Add to Stir-fries: Celery adds a nice crunch to stir-fries.
* Use in Stuffing: Celery is a key ingredient in many stuffing recipes.
Tips for Success
Here are a few extra tips to help you succeed in growing your own celery:
* Start with a Healthy Stalk: Choose a celery stalk that is firm, crisp, and has vibrant green leaves.
* Use Good Quality Potting Soil: This will provide your celery with the nutrients it needs to grow.
* Provide Plenty of Sunlight: Celery needs at least 6 hours of sunlight per day.
* Water Regularly: Keep the soil consistently moist, but not soggy.
* Be Patient: Celery takes time to grow. Don’t get discouraged if you don’t see results immediately.
* Experiment: Try different varieties of celery to see which ones you like best.
Growing your own celery is a rewarding experience that allows you to enjoy fresh, healthy produce right from your own home. With a little patience and care, you can easily grow your own celery and enjoy its delicious flavor in a variety of dishes. Happy gardening!
Conclusion
So, there you have it! Growing celery at home from kitchen scraps isn’t just a fun experiment; it’s a sustainable way to reduce food waste, enjoy fresh, flavorful celery, and connect with the natural world, even if you only have a small space. Forget those limp, store-bought stalks that lack that vibrant crunch and intense celery flavor. With a little patience and minimal effort, you can cultivate your own supply of this versatile vegetable, ready to be added to soups, salads, smoothies, or enjoyed as a healthy snack.
This method of regrowing celery is particularly appealing because it’s incredibly accessible. You don’t need a sprawling garden or specialized equipment. A sunny windowsill, a container of water, and a bit of potting soil are all you need to embark on this rewarding journey. Plus, it’s a fantastic project for kids, teaching them about plant life cycles and the importance of reducing waste.
But don’t stop there! Once you’ve mastered the basic technique, feel free to experiment. Try different varieties of celery to see which ones thrive best in your environment. Consider adding organic fertilizer to boost growth and enhance flavor. You could even try transplanting your regrown celery into a larger container or directly into your garden for even more impressive results.
Think about the possibilities! Imagine adding freshly grown celery to your homemade chicken noodle soup, knowing you nurtured it from a humble kitchen scrap. Picture yourself impressing your friends and family with your green thumb and commitment to sustainable living. The satisfaction of harvesting your own celery is truly unparalleled.
We strongly encourage you to give this DIY trick a try. It’s a simple, cost-effective, and environmentally friendly way to enjoy fresh celery. And most importantly, it’s a lot of fun! Once you’ve experienced the joy of growing your own celery, you’ll never look at a celery stalk the same way again.
Don’t be afraid to get your hands dirty and embrace the process. Remember, even if your first attempt isn’t perfect, you’ll learn something valuable along the way. Gardening is all about experimentation and adaptation.
We’re confident that you’ll be amazed by the results. So, grab that celery base, find a sunny spot, and get ready to witness the magic of regrowth. And once you’ve harvested your first crop of homegrown celery, we’d love to hear about your experience! Share your photos, tips, and stories in the comments below. Let’s create a community of celery-growing enthusiasts and inspire others to embrace sustainable living. Let us know if you have found a better way to grow celery at home.
Frequently Asked Questions (FAQ)
Q: How long does it take to regrow celery from a base?
A: The initial regrowth phase, where you see new leaves sprouting from the celery base in water, typically takes about 1-2 weeks. Transplanting to soil and growing a full-sized celery stalk can take several months, usually around 3-4 months, depending on the variety, growing conditions, and care provided. Be patient; it’s a process that requires time and consistent attention.
Q: What kind of water should I use to regrow celery?
A: Tap water is generally fine, but it’s best to let it sit out for a few hours to allow chlorine to dissipate. Filtered water or rainwater is even better, as they are free of chemicals that could potentially inhibit growth. Change the water every 1-2 days to prevent bacterial growth and keep the celery base healthy.
Q: How much sunlight does regrowing celery need?
A: Celery needs plenty of sunlight to thrive. Aim for at least 6-8 hours of direct sunlight per day. If you don’t have a sunny windowsill, you can supplement with a grow light. Insufficient sunlight can result in leggy, weak growth.
Q: What kind of soil is best for growing celery?
A: Celery prefers rich, well-draining soil that is high in organic matter. A good potting mix amended with compost or aged manure is ideal. Ensure the soil is loose and airy to allow for proper root development. Avoid heavy clay soils, as they can become waterlogged and hinder growth.
Q: How often should I water my regrown celery?
A: Celery needs consistent moisture, but it doesn’t like to be waterlogged. Water deeply when the top inch of soil feels dry to the touch. Avoid letting the soil dry out completely, as this can stress the plant. During hot weather, you may need to water more frequently.
Q: Can I grow celery indoors year-round?
A: Yes, you can grow celery indoors year-round, provided you have adequate light and temperature control. Use grow lights to supplement natural sunlight during the winter months. Maintain a consistent temperature between 60-70°F (15-21°C).
Q: What are some common problems when growing celery, and how can I fix them?
A: Some common problems include:
* **Yellowing leaves:** This can be caused by overwatering, underwatering, nutrient deficiencies, or lack of sunlight. Adjust your watering schedule, fertilize with a balanced fertilizer, and ensure the plant receives adequate sunlight.
* **Pests:** Aphids and spider mites can sometimes infest celery plants. Treat infestations with insecticidal soap or neem oil.
* **Bolting (premature flowering):** This can occur if the plant is stressed by heat or drought. Ensure the plant receives consistent moisture and is protected from extreme temperatures.
Q: Can I eat the celery leaves?
A: Absolutely! Celery leaves are perfectly edible and have a stronger flavor than the stalks. They can be used in soups, salads, stir-fries, or as a garnish. Don’t let them go to waste!
Q: How do I harvest my regrown celery?
A: You can harvest individual stalks as needed, or you can harvest the entire plant at once. To harvest individual stalks, simply cut them off at the base of the plant. To harvest the entire plant, cut it off at the soil line.
Q: Can I regrow celery from the same base multiple times?
A: While it’s possible to get a second or even third regrowth from the same base, the subsequent harvests will likely be smaller and less vigorous. It’s generally best to start with a fresh celery base for optimal results.
Q: What if my celery base rots instead of regrowing?
A: Rotting is usually caused by overwatering or poor drainage. Make sure the celery base is not submerged in water for extended periods. Change the water frequently and ensure the container has drainage holes if you’ve already transplanted it to soil. Using clean water and a clean container can also help prevent rot.
Q: Is regrowing celery from a base as nutritious as growing it from seed?
A: While the nutrient content may vary slightly, regrown celery still provides essential vitamins and minerals. The primary benefit is reducing food waste and enjoying fresh, homegrown celery with minimal effort.
Q: Can I grow different varieties of celery using this method?
A: Yes, you can try regrowing different varieties of celery. However, some varieties may be more successful than others depending on your local climate and growing conditions. Experiment to see which varieties thrive best in your environment.
Q: What are some creative ways to use my homegrown celery?
A: The possibilities are endless! Use it in soups, stews, salads, smoothies, juices, stir-fries, dips, and as a healthy snack. You can also use the leaves to make celery salt or add them to vegetable broth for extra flavor. Get creative and experiment with different recipes!


Leave a Comment