
Grow celery without watering? Sounds like magic, right? Well, it’s not quite magic, but it’s definitely a clever gardening hack that can save you time, water, and a whole lot of effort! I’m so excited to share this DIY trick with you because, let’s be honest, who has time to constantly water their plants these days?
Celery, with its crisp stalks and refreshing flavor, has been cultivated for centuries. Originating in the Mediterranean, it was initially valued for its medicinal properties before becoming a culinary staple. From ancient Roman feasts to modern-day salads, celery has a rich history. But one thing has remained constant: its need for consistent moisture. Until now!
This DIY article is all about revolutionizing how you grow celery without watering. Imagine enjoying fresh, homegrown celery without the daily chore of watering. This method is perfect for busy gardeners, those living in water-scarce regions, or anyone simply looking for a more sustainable and low-maintenance approach to gardening. I’ll guide you through a simple, step-by-step process that will have you harvesting delicious celery with minimal effort. Get ready to ditch the watering can and embrace a smarter way to garden!
DIY Self-Watering Celery: A No-Watering Wonder!
Hey there, fellow gardening enthusiasts! Are you tired of constantly watering your celery plants? Do you dream of fresh, crunchy celery without the daily chore? Well, you’re in luck! I’m going to show you how to create a self-watering system that will keep your celery happy and hydrated with minimal effort. This method is perfect for busy gardeners, those who live in dry climates, or anyone who just wants to simplify their gardening routine.
What You’ll Need:
Before we dive in, let’s gather our supplies. This project is relatively inexpensive and uses readily available materials.
* A large plastic container (think a storage tote or a large bucket) – This will be our reservoir. The bigger, the better, as it will hold more water and require less frequent refills.
* A smaller plastic container (a bucket, a sturdy plastic pot, or even a cut-off milk jug) – This will be the planting container for your celery. Make sure it can fit comfortably inside the larger container with some space around it.
* Wicking material (cotton rope, strips of old t-shirts, felt strips) – This is the key to our self-watering system! The wicking material will draw water from the reservoir up to the soil. I personally prefer cotton rope because it’s durable and readily available.
* Potting mix – Choose a good quality potting mix that drains well. Celery likes moisture but doesn’t like to sit in soggy soil.
* Celery seedlings or a celery stalk base – You can start from seed, but using seedlings or regrowing from a stalk base is much faster.
* Drill or sharp knife – For creating drainage holes.
* Water
* Optional: Mulch (straw, wood chips, etc.) – To help retain moisture in the soil.
Step-by-Step Instructions: Building Your Self-Watering Celery System
Okay, let’s get our hands dirty! Follow these steps to create your very own self-watering celery haven.
1. Prepare the Planting Container:
* First, we need to make sure our planting container has adequate drainage. Using your drill or sharp knife, carefully create several drainage holes in the bottom of the smaller container. I usually aim for about 4-5 holes, each about 1/4 inch in diameter.
* Next, we’ll insert the wicking material. Cut several lengths of your chosen wicking material (cotton rope, t-shirt strips, etc.). The length should be long enough to reach the bottom of the large container and extend a few inches up into the planting container.
* Thread the wicking material through the drainage holes, leaving a good portion of the wick dangling out the bottom. You want a secure connection between the soil and the water reservoir. I usually use 3-4 wicks, spaced evenly around the bottom of the container.
2. Set Up the Water Reservoir:
* Now, let’s prepare the large container, which will act as our water reservoir. No modifications are needed here, just make sure it’s clean and ready to hold water.
3. Assemble the System:
* Place the smaller planting container inside the larger water reservoir. The wicks should be dangling down into the larger container.
* Make sure the planting container is stable and doesn’t tip over easily. You might need to add some rocks or bricks to the bottom of the larger container to raise the planting container if it’s sitting too low. The goal is to have the bottom of the planting container slightly above the bottom of the water reservoir, so the wicks are the only thing touching the water.
4. Fill with Potting Mix:
* Now it’s time to add the potting mix to the planting container. Gently fill the container with your chosen potting mix, making sure to bury the ends of the wicks that are inside the container. Leave about an inch or two of space at the top of the container.
* Lightly moisten the potting mix with water. This will help the wicks start drawing water up from the reservoir.
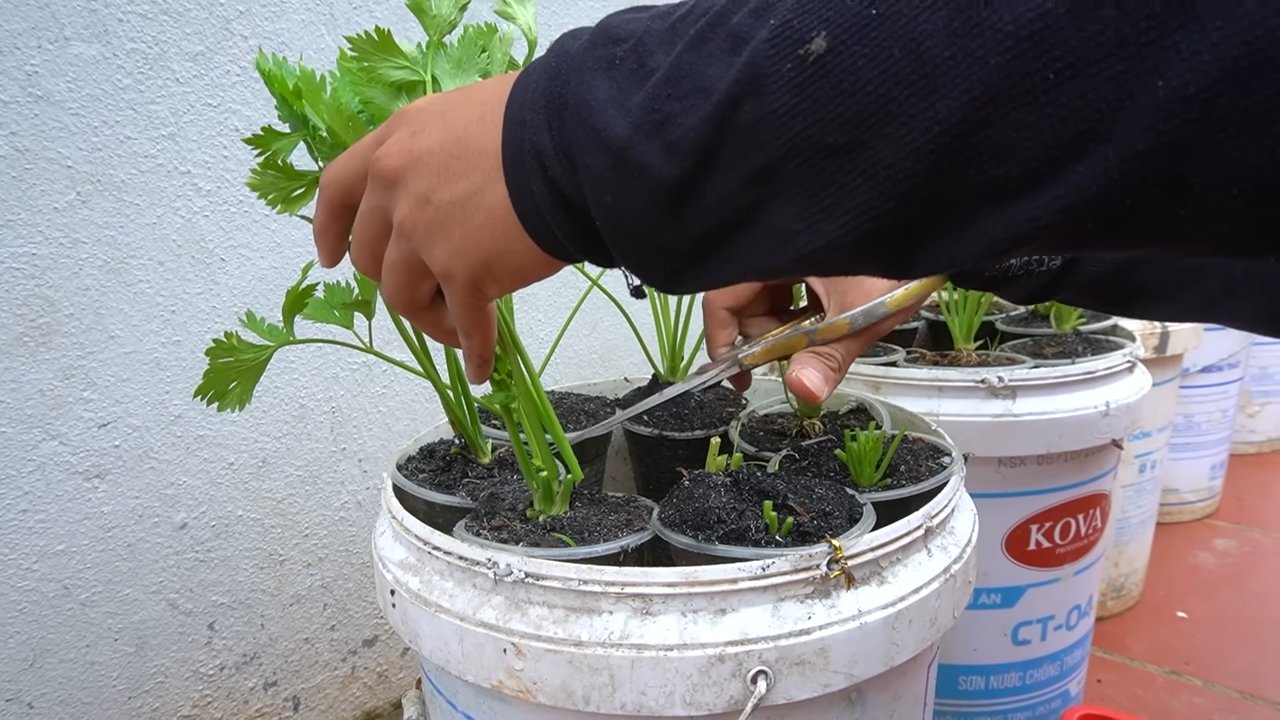
5. Plant Your Celery:
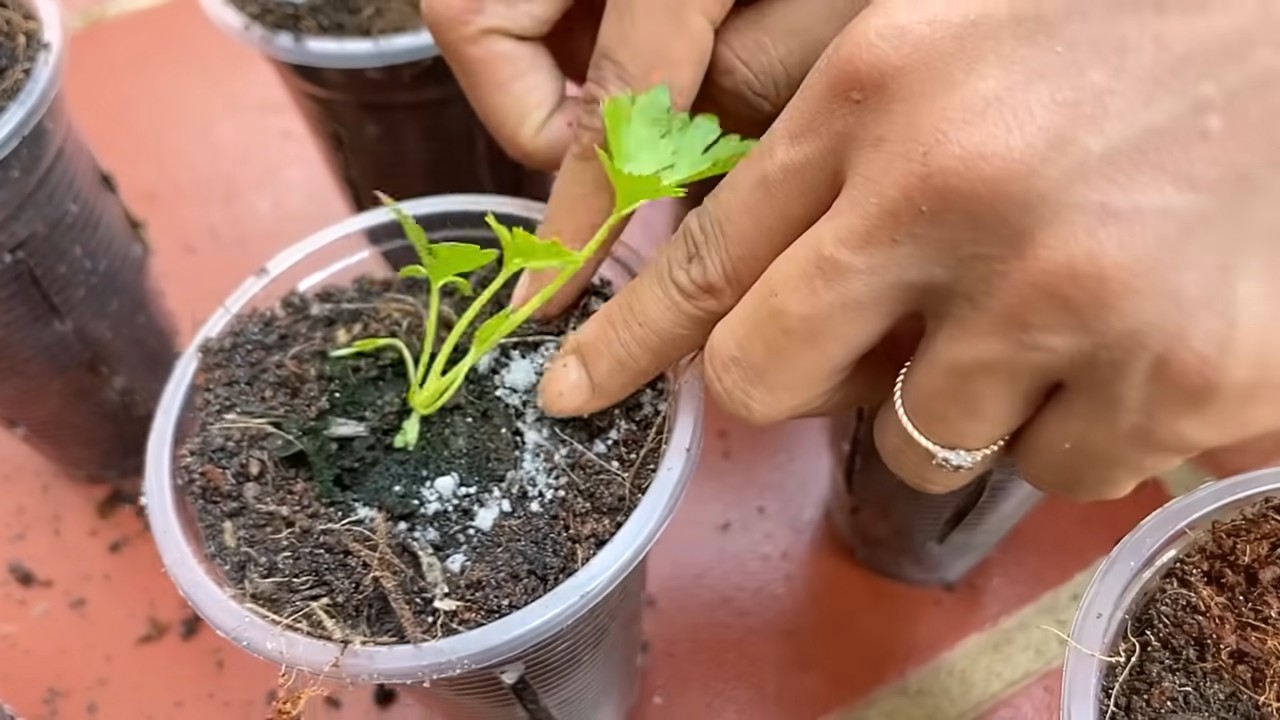
* Carefully plant your celery seedlings or celery stalk base into the potting mix. If you’re using seedlings, space them according to the instructions on the seed packet. If you’re regrowing from a stalk base, simply place the base in the center of the container, with the cut side facing up.
* Gently water the newly planted celery to help it settle in.
6. Fill the Reservoir:
* Now, carefully fill the larger container with water. Be careful not to overfill it; you want the water level to be below the bottom of the planting container. The wicks will draw the water up into the soil as needed.
7. Mulch (Optional):
* To help retain moisture and suppress weeds, you can add a layer of mulch around your celery plants. Straw, wood chips, or even shredded leaves work well.
Maintaining Your Self-Watering Celery
Once your self-watering system is set up, maintenance is a breeze! Here are a few tips to keep your celery thriving:
* Check the Water Level: Regularly check the water level in the reservoir. How often you need to refill it will depend on the size of the container, the weather, and the size of your celery plants. I usually check mine every few days, especially during hot weather.
* Fertilize: Celery is a heavy feeder, so you’ll need to fertilize it regularly. You can use a liquid fertilizer diluted according to the instructions on the label. Add the fertilizer to the water in the reservoir.
* Sunlight: Celery needs plenty of sunlight to grow well. Place your self-watering system in a location that receives at least 6 hours of direct sunlight per day.
* Pest Control: Keep an eye out for pests like aphids and slugs. Treat them as needed with organic pest control methods.
* Harvesting: You can start harvesting your celery when the stalks are about 6-8 inches tall. Simply cut off the stalks you need, leaving the rest of the plant to continue growing.
Troubleshooting Tips
Even with a self-watering system, you might encounter a few challenges. Here are some common issues and how to address them:
* Celery is Wilting: If your celery is wilting, even though the reservoir is full, the wicks might not be working properly. Make sure the wicks are making good contact with the soil and the water. You might need to add more wicks or replace them if they’re clogged.
* Soil is Too Wet: If the soil is constantly soggy, even though you haven’t watered it, the wicks might be drawing up too much water. Try using a smaller diameter wicking material or reducing the number of wicks.
* Algae Growth: Algae can sometimes grow in the water reservoir, especially if it’s exposed to sunlight. This isn’t usually harmful, but it can be unsightly. To prevent algae growth, you can add a few drops of hydrogen peroxide to the water or cover the reservoir with a lid.
* Root Rot: While this system minimizes overwatering, root rot can still occur if the soil is consistently waterlogged. Ensure your potting mix is well-draining and that the wicks aren’t drawing up excessive amounts of water. If you suspect root rot, you may need to repot the celery in fresh soil.
Regrowing Celery from a Stalk Base: A Bonus Tip!
Did you know you can regrow celery from the base of a stalk you bought at the grocery store? It’s a fun and easy way to get free celery! Here’s how:
1. Save the Base: After you’ve used the celery stalks, save the base (the part where the stalks are connected).
2. Place in Water: Place the celery base in a shallow dish of water, with the cut side facing up.
3. Sunlight: Place the dish in a sunny location.
4. Change the Water: Change the water every day or two.
5. Roots and New Growth: After a few days, you should start to see roots growing from the bottom of the base and new growth emerging from the top.
6. Plant in Your Self-Watering System: Once the roots are about an inch long, you can plant the celery base in your self-watering system, following the instructions above.
Why This Works: The Science Behind Self-Watering
The magic behind this system lies in a principle called capillary action. The wicking material acts like a sponge, drawing water from the reservoir up into the soil. The soil then absorbs the water, providing a constant supply of moisture to the celery plants. This eliminates the need for frequent watering and helps to prevent overwatering, which can lead to root rot. The plant takes up water as needed, creating a balanced and healthy growing environment.
Adapting the System:
Conclusion
So, there you have it! Growing celery without watering might sound like a horticultural paradox, but with this simple self-watering container trick, it’s entirely achievable. We’ve walked you through the process, highlighting the ease and efficiency of this method. But why is this DIY approach a must-try?
Firstly, it drastically reduces water consumption. In a world increasingly conscious of water conservation, this is a significant advantage. Traditional celery cultivation is notoriously thirsty, demanding frequent and often wasteful watering. This method minimizes water loss through evaporation and runoff, delivering moisture directly to the roots where it’s needed most.
Secondly, it simplifies celery cultivation. Forget the daily chore of watering. This self-watering system provides a consistent moisture level, reducing the risk of underwatering or overwatering, both of which can lead to stunted growth or disease. This makes it ideal for busy gardeners or those new to growing celery.
Thirdly, it promotes healthier, more robust celery plants. Consistent moisture levels lead to more even growth, resulting in crispier, more flavorful stalks. You’ll be amazed at the difference in taste and texture compared to store-bought celery.
But don’t stop there! This method is incredibly versatile. Consider these variations to tailor it to your specific needs and preferences:
* Container Size: Experiment with different container sizes to accommodate varying numbers of celery plants. A larger container will require less frequent refilling of the water reservoir.
* Soil Amendments: Enhance the soil mix with compost, worm castings, or other organic amendments to provide additional nutrients for your celery plants.
* Wicking Materials: While cotton rope is a reliable choice, you can also experiment with other absorbent materials like strips of old t-shirts or felt.
* Fertilizing: While the self-watering system provides consistent moisture, remember that celery is a heavy feeder. Supplement with a liquid fertilizer every few weeks to ensure optimal growth.
* Companion Planting: Plant companion plants like onions, garlic, or marigolds around your celery to deter pests and improve overall garden health.
This DIY self-watering container is more than just a gardening hack; it’s a sustainable and efficient way to enjoy fresh, homegrown celery. It’s a testament to the power of simple solutions in addressing complex challenges. By minimizing water waste and simplifying the growing process, it makes celery cultivation accessible to everyone, regardless of their gardening experience or available time.
We strongly encourage you to give this DIY trick a try. It’s a rewarding experience that will not only provide you with delicious celery but also contribute to a more sustainable gardening practice. Once you’ve tried it, we’d love to hear about your experience! Share your photos, tips, and variations in the comments below. Let’s build a community of gardeners who are passionate about growing celery without watering and sharing their knowledge with others. Let’s revolutionize the way we grow celery, one self-watering container at a time! Your journey to delicious, homegrown celery starts now!
Frequently Asked Questions (FAQ)
What type of container is best for this DIY self-watering celery system?
The ideal container is a large, opaque plastic bin or bucket. Opaque containers prevent algae growth in the water reservoir. The size depends on how many celery plants you want to grow. A 5-gallon bucket is suitable for 2-3 plants, while a larger bin can accommodate more. Ensure the container is food-grade if possible, especially if you’re concerned about chemicals leaching into the soil.
How often do I need to refill the water reservoir?
The frequency of refilling depends on several factors, including the size of the container, the weather conditions, and the size of your celery plants. In hot, sunny weather, you may need to refill it every few days. In cooler, cloudier weather, you may only need to refill it once a week. Check the water level regularly by lifting the inner container or using a dipstick. Refill when the water level is noticeably low.
What type of soil mix should I use?
A well-draining potting mix is essential. Celery needs moisture but doesn’t like to sit in soggy soil. A mix of equal parts potting soil, compost, and perlite or vermiculite works well. The compost provides nutrients, while the perlite or vermiculite improves drainage and aeration. Avoid using garden soil, as it can compact and hinder drainage.
Can I use this method for other vegetables besides celery?
Yes, this self-watering container method can be adapted for other vegetables that require consistent moisture, such as tomatoes, peppers, cucumbers, and lettuce. However, you may need to adjust the size of the container and the type of soil mix depending on the specific needs of the vegetable. For example, tomatoes and peppers may require a larger container and a soil mix with more nutrients.
What if the wicking material doesn’t seem to be working?
Several factors can cause the wicking material to fail. First, ensure the wicking material is making good contact with both the soil and the water reservoir. If the material is too loose or not properly inserted, it won’t effectively draw water up. Second, check that the wicking material is absorbent enough. Some synthetic materials may not wick water as well as natural fibers like cotton. Third, make sure the soil is not too compacted. Compacted soil can prevent the water from wicking evenly throughout the container. Loosen the soil around the wicking material to improve water absorption.
How do I prevent pests and diseases in my self-watering celery container?
While the self-watering system helps maintain healthy plants, it doesn’t eliminate the risk of pests and diseases. Regularly inspect your celery plants for signs of infestation or disease. Common celery pests include aphids, celery loopers, and spider mites. Control pests with insecticidal soap or neem oil. To prevent fungal diseases, ensure good air circulation around the plants and avoid overhead watering. Remove any diseased leaves promptly to prevent the spread of infection.
Is it possible to grow celery from seed using this method?
Yes, you can start celery from seed in a self-watering container. However, celery seeds are notoriously slow to germinate. Start the seeds indoors in a seed-starting tray and transplant the seedlings into the self-watering container once they are large enough to handle. Be sure to harden off the seedlings gradually before transplanting them outdoors.
How do I know when my celery is ready to harvest?
Celery is typically ready to harvest when the stalks are at least 6-8 inches long and have a crisp, firm texture. You can harvest individual stalks as needed or harvest the entire plant at once. To harvest individual stalks, simply cut them off at the base of the plant with a sharp knife. To harvest the entire plant, cut it off just below the soil surface.
Can I grow celery without watering indoors using this method?
Yes, this method is well-suited for indoor celery cultivation. Place the self-watering container in a location that receives at least 6 hours of direct sunlight per day. If you don’t have enough natural light, supplement with grow lights. Indoor celery may require more frequent fertilization, as it doesn’t have access to the same nutrients as outdoor plants.
What are the benefits of growing celery without watering compared to traditional methods?
The primary benefits are water conservation, reduced maintenance, and healthier plants. Traditional celery cultivation requires frequent watering, which can be wasteful and time-consuming. The self-watering container provides a consistent moisture level, reducing the risk of underwatering or overwatering. This leads to more even growth, crispier stalks, and a more flavorful harvest. Furthermore, it’s an environmentally friendly approach that promotes sustainable gardening practices.


Leave a Comment