
Grow Cherry Tomatoes: Your Guide to a Bountiful Harvest
Growing cherry tomatoes is a rewarding experience, and I’m thrilled to share my favorite Grow Cherry Tomatoes tricks and DIY solutions with you! Forget expensive, underwhelming supermarket tomatoes – imagine biting into a sun-ripened, intensely flavorful cherry tomato you’ve grown yourself, bursting with juicy sweetness. That’s the magic we’re unlocking today.
For centuries, cultivating tomatoes has been a cherished tradition, passed down through generations of gardeners. From ancient Aztec civilizations who first cultivated them to modern-day home growers, the simple act of nurturing a tomato plant from seed to fruit holds a unique satisfaction. But let’s be honest, sometimes even the most experienced gardeners face challenges. That’s why I’ve compiled these Grow Cherry Tomatoes tips and DIY projects – to help you navigate the process with ease and achieve an abundant harvest.
Why This Matters
In a world increasingly focused on convenience, there’s something incredibly fulfilling about growing your own food. Knowing exactly where your food comes from, ensuring its freshness and quality, and experiencing the sheer joy of harvesting your own produce are invaluable benefits. Plus, homegrown cherry tomatoes are often far superior in taste and texture to store-bought varieties. This guide will empower you to take control of your food source and enjoy the delicious rewards of your labor.
So, whether you’re a seasoned gardener or a complete beginner, get ready to discover simple yet effective techniques to maximize your cherry tomato yield. Let’s dive into the world of homegrown goodness and learn how to successfully Grow Cherry Tomatoes!
Growing Cherry Tomatoes: A Complete DIY Guide
I love cherry tomatoes! They’re so versatile, and nothing beats the taste of a homegrown tomato. This guide will walk you through everything you need to know to successfully grow your own delicious cherry tomatoes, from seed to ripe fruit.
Phase 1: Starting Seeds Indoors
- Choose your seeds: Select a variety of cherry tomato that suits your climate and growing conditions. Consider factors like disease resistance and the size of the fruit you prefer.
- Gather your supplies: You’ll need seed starting mix (not regular garden soil!), small pots or seed trays, a seed starting kit (optional but helpful), a watering can with a fine rose, and a warm, sunny location.
- Sow the seeds: Fill your pots or trays with seed starting mix, leaving about ½ inch of space at the top. Gently press the seeds into the soil, about ¼ inch deep and about 1 inch apart. Cover with a thin layer of soil.
- Water gently: Use a fine mist from your watering can to moisten the soil. Avoid overwatering, as this can lead to damping off (a fungal disease that kills seedlings).
- Provide warmth and light: Place your pots in a warm location (ideally around 70-75°F) with plenty of sunlight. A sunny windowsill is perfect, or you can use grow lights to supplement natural light, especially during shorter winter days. Aim for at least 6-8 hours of light per day.
- Maintain moisture: Keep the soil consistently moist but not soggy. Check the moisture level daily and water as needed. You can use a humidity dome to help maintain moisture levels, especially in dry environments.
- Thin seedlings: Once your seedlings have developed their first true leaves (the leaves that appear after the cotyledons, or seed leaves), thin them out to give each plant enough space to grow. Gently remove the weaker seedlings, leaving the strongest ones.
Phase 2: Transplanting Seedlings Outdoors
- Harden off seedlings: Before transplanting your seedlings outdoors, you need to gradually acclimate them to the outdoor environment. This process, called hardening off, helps prevent shock and ensures a smoother transition. Start by placing your seedlings outdoors for a few hours each day, gradually increasing the time over a week or two. Protect them from direct sunlight and strong winds during this period.
- Prepare the garden bed: Choose a sunny location in your garden that receives at least 6-8 hours of direct sunlight per day. Cherry tomatoes need plenty of sun to produce a good crop. Amend the soil with compost or other organic matter to improve drainage and fertility. Cherry tomatoes prefer well-drained soil with a slightly acidic pH (around 6.0-6.8).
- Dig planting holes: Dig holes that are slightly larger than the root balls of your seedlings. Space the holes about 18-24 inches apart, depending on the variety of tomato you’ve chosen. Some varieties are more compact than others.
- Transplant seedlings: Carefully remove your seedlings from their pots, being careful not to damage the roots. Plant them in the holes, ensuring that the top of the root ball is level with the soil surface. Gently fill in the holes with soil and firm it around the base of the plants.
- Water thoroughly: Water your newly transplanted seedlings deeply to help them settle in. Use a watering can or a soaker hose to avoid splashing soil onto the leaves.
Phase 3: Ongoing Care and Maintenance
- Watering: Water your tomato plants regularly, especially during dry periods. Aim to keep the soil consistently moist but not waterlogged. Deep watering is better than frequent shallow watering, as it encourages deeper root growth.
- Mulching: Apply a layer of mulch around your tomato plants to help retain moisture, suppress weeds, and regulate soil temperature. Organic mulches like straw or shredded leaves are ideal.
- Fertilizing: Feed your tomato plants regularly with a balanced fertilizer, following the instructions on the package. You can use a liquid fertilizer or a slow-release granular fertilizer. Avoid over-fertilizing, as this can lead to excessive leaf growth at the expense of fruit production.
- Staking or caging: Cherry tomatoes, especially indeterminate varieties, can grow quite tall and sprawling. Support your plants by staking them individually or using tomato cages. This will help prevent the plants from falling over and improve air circulation, reducing the risk of diseases.
- Pruning: Pruning can improve air circulation and fruit production. Remove any suckers (small shoots that grow from the base of the plant) to encourage more energy to go into fruit production. You can also prune out any diseased or damaged leaves.
- Pest and disease control: Regularly inspect your plants for pests and diseases. Take appropriate action if you notice any problems. This might involve using insecticidal soap or neem oil for pests, or removing infected leaves or plants to prevent the spread of disease. Prevention is key! Good air circulation and proper watering can help prevent many common tomato problems.
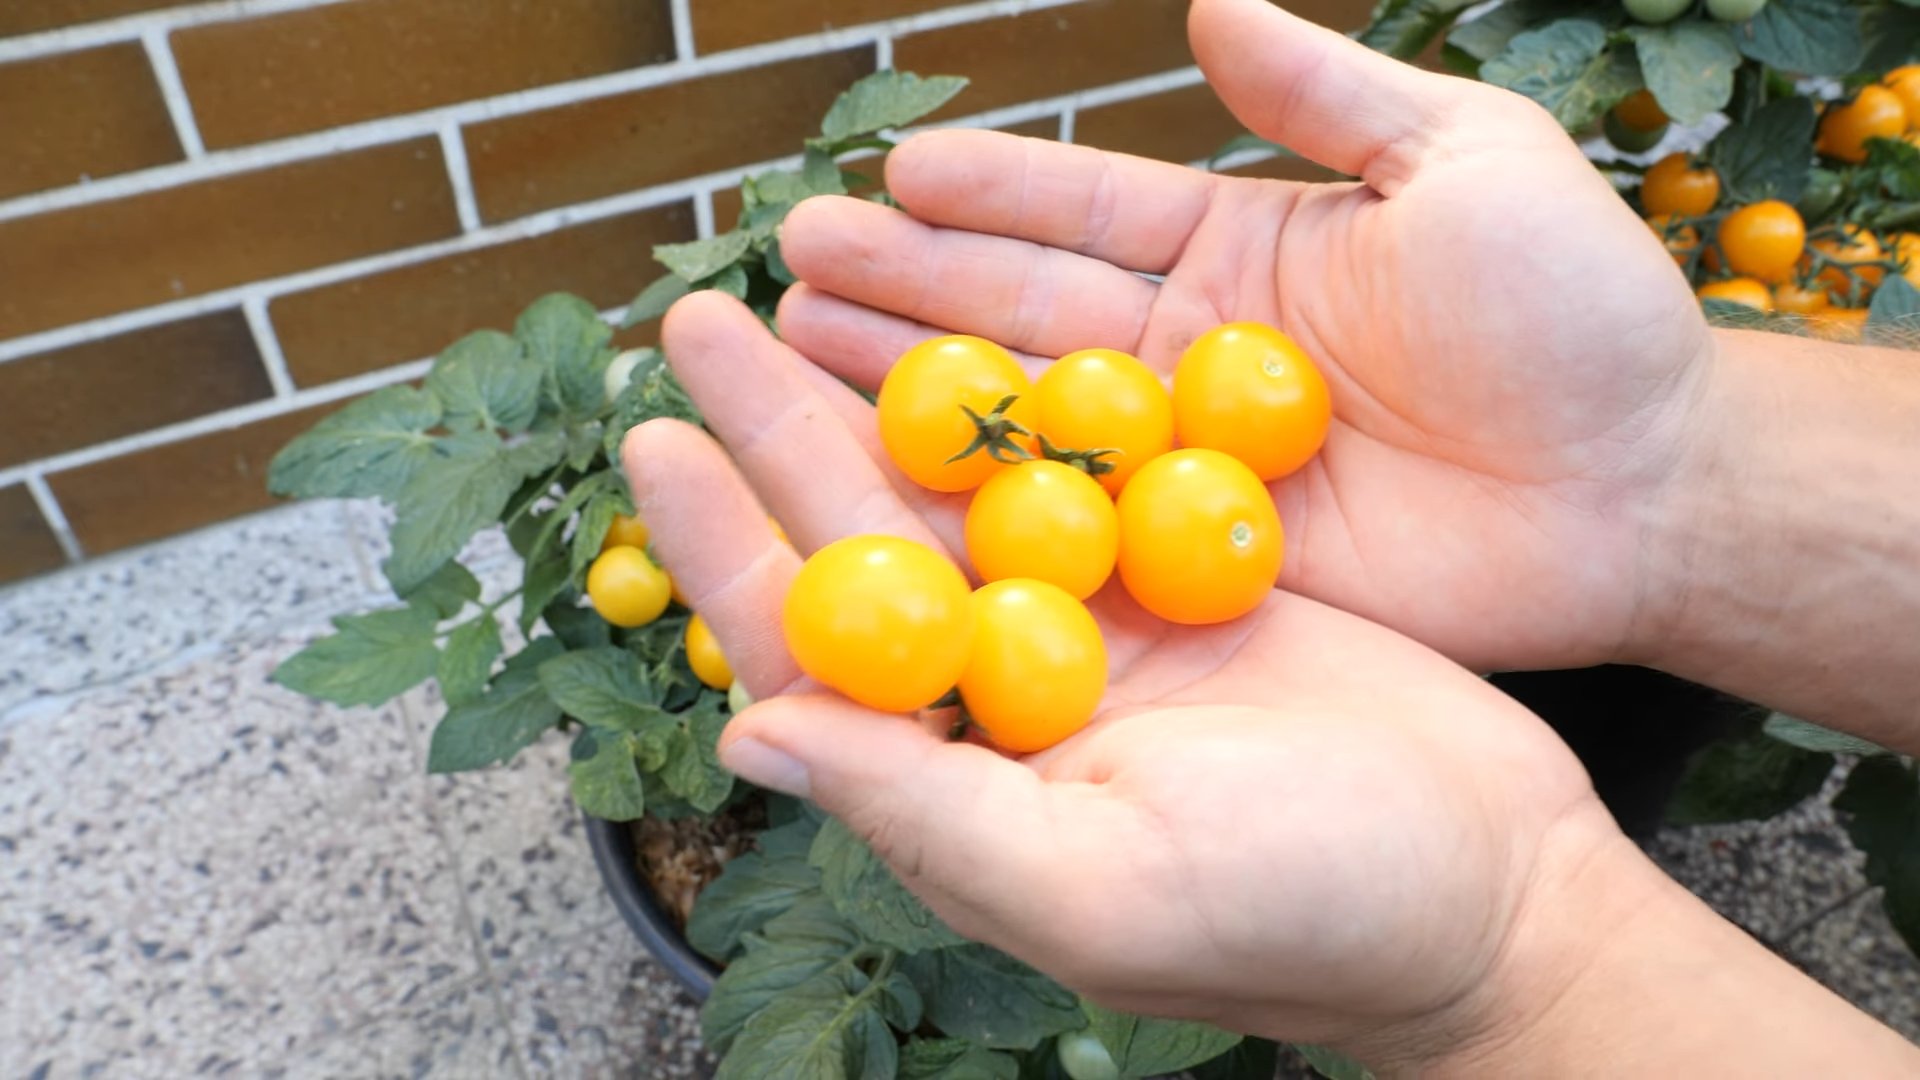
- Harvesting: Cherry tomatoes are ready for harvest when they are fully colored and slightly soft to the touch. Harvest regularly to encourage continued production. You can pick them when they are still slightly firm if you prefer a more acidic taste.
Phase 4: Protecting Your Crop
- Protect from birds: Birds love cherry tomatoes! Use netting or other bird deterrents to protect your crop from hungry birds.
- Protect from extreme weather: Extreme heat or cold can damage your tomato plants. Provide shade during exceptionally hot periods and protect your plants from frost during cooler months.
- Pest control: Regularly check your plants for pests like aphids, whiteflies, or tomato hornworms. Use appropriate pest control methods, such as insecticidal soap or neem oil, to address any infestations.
- Disease prevention: Ensure good air circulation around your plants to prevent fungal diseases. Water at the base of the plants to avoid wetting the foliage.
With a little care and attention, you’ll be enjoying the sweet taste of homegrown cherry tomatoes in no time!

Conclusion
So there you have it – a comprehensive guide to growing your own cherry tomatoes! This DIY trick isn’t just about saving money on groceries; it’s about experiencing the unparalleled joy of nurturing a plant from seed to succulent, sun-ripened fruit. The taste difference between a homegrown cherry tomato and one from the supermarket is truly remarkable. The burst of sweetness, the intense flavor, the satisfying pop as you bite into it – these are experiences you simply can’t replicate with store-bought produce. Growing your own cherry tomatoes connects you to the earth, teaches patience and rewards you with an abundance of delicious, healthy food. It’s a rewarding experience for the whole family, especially children who can learn about the life cycle of plants and the importance of nurturing nature. This simple yet effective method makes growing cherry tomatoes accessible to everyone, regardless of your gardening experience. Don’t be intimidated – even a small balcony or windowsill can be transformed into a thriving cherry tomato patch.
Beyond the basic method outlined, there are countless ways to personalize your cherry tomato growing experience. Experiment with different varieties – from the classic red to yellow, orange, or even black cherry tomatoes. Each variety offers a unique flavor profile, adding excitement and diversity to your harvest. Consider using different growing mediums, such as coco coir or a hydroponic system, to further optimize your yield. You can also explore companion planting, incorporating herbs like basil or oregano near your tomato plants to deter pests and enhance the overall flavor. For those with limited space, vertical gardening techniques, like using hanging baskets or trellises, can maximize your space and yield. The possibilities are endless!
We strongly encourage you to try this DIY method of growing cherry tomatoes. It’s a rewarding and surprisingly simple process that will enrich your life in more ways than one. Share your experience with us! Post pictures of your thriving plants and delicious harvest on social media using #GrowCherryTomatoes and tag us. We’d love to see your success and learn from your experiences. Let’s build a community of home gardeners, sharing tips, tricks, and the joy of growing our own food. Remember, the journey is as rewarding as the destination – so get your hands dirty and start growing! You won’t regret it. The taste of a homegrown cherry tomato is a taste of pure satisfaction and a testament to the magic of nature and your own green thumb.
Frequently Asked Questions
What type of soil is best for growing cherry tomatoes?
Cherry tomatoes thrive in well-draining soil that is rich in organic matter. A good soil mix would be a combination of potting soil, compost, and perlite. Ensure the soil is slightly acidic with a pH between 6.0 and 6.8. Avoid heavy clay soils as they can retain too much water, leading to root rot.
How much sunlight do cherry tomato plants need?
Cherry tomatoes are sun-worshippers! They need at least 6-8 hours of direct sunlight per day to produce a bountiful harvest. Choose a location in your garden or on your balcony that receives ample sunlight throughout the day. If you’re growing them indoors, consider using grow lights to supplement natural sunlight.
How often should I water my cherry tomato plants?
Watering frequency depends on several factors, including weather conditions, soil type, and pot size. Generally, aim to water deeply but infrequently, allowing the soil to dry slightly between waterings. Overwatering can lead to root rot, while underwatering can stress the plants and reduce fruit production. Check the soil moisture regularly by sticking your finger a couple of inches into the soil. Water when the top inch feels dry.
What are some common problems when growing cherry tomatoes?
Common problems include pests like aphids, whiteflies, and tomato hornworms. Regularly inspect your plants for signs of infestation and take appropriate action, such as using insecticidal soap or introducing beneficial insects. Diseases like blossom-end rot and early blight can also affect cherry tomatoes. Ensure proper watering and good air circulation to prevent these issues. Providing adequate support for the plants, especially as they grow taller, is also crucial to prevent damage.
When can I expect to harvest my cherry tomatoes?
The time it takes for cherry tomatoes to mature depends on the variety and growing conditions. Generally, you can expect to harvest your first tomatoes 60-80 days after planting the seeds. The fruits will turn from green to their characteristic color (red, yellow, orange, etc.) when they are ripe and ready to pick. Harvest regularly to encourage further fruit production.
Can I grow cherry tomatoes in containers?
Absolutely! Container gardening is a great option for growing cherry tomatoes, especially if you have limited space. Choose containers that are at least 5 gallons in size to provide ample room for root development. Ensure the containers have drainage holes to prevent waterlogging. You can use a variety of containers, from standard plastic pots to decorative ceramic pots.
What should I do with my harvest?
The possibilities are endless! Enjoy your fresh cherry tomatoes in salads, sandwiches, pasta dishes, or as a delicious snack. You can also preserve your harvest by making sauces, jams, or freezing them for later use. The vibrant flavor of homegrown cherry tomatoes adds a special touch to any recipe.
What if my cherry tomato plants aren’t producing many fruits?
Several factors can affect fruit production, including insufficient sunlight, improper watering, nutrient deficiencies, or pest infestations. Review the growing conditions and address any potential issues. Ensure your plants are receiving adequate sunlight, water, and nutrients. Regularly check for pests and diseases and take appropriate action. Consider adding a balanced fertilizer to provide the necessary nutrients for optimal fruit production.
Leave a Comment