
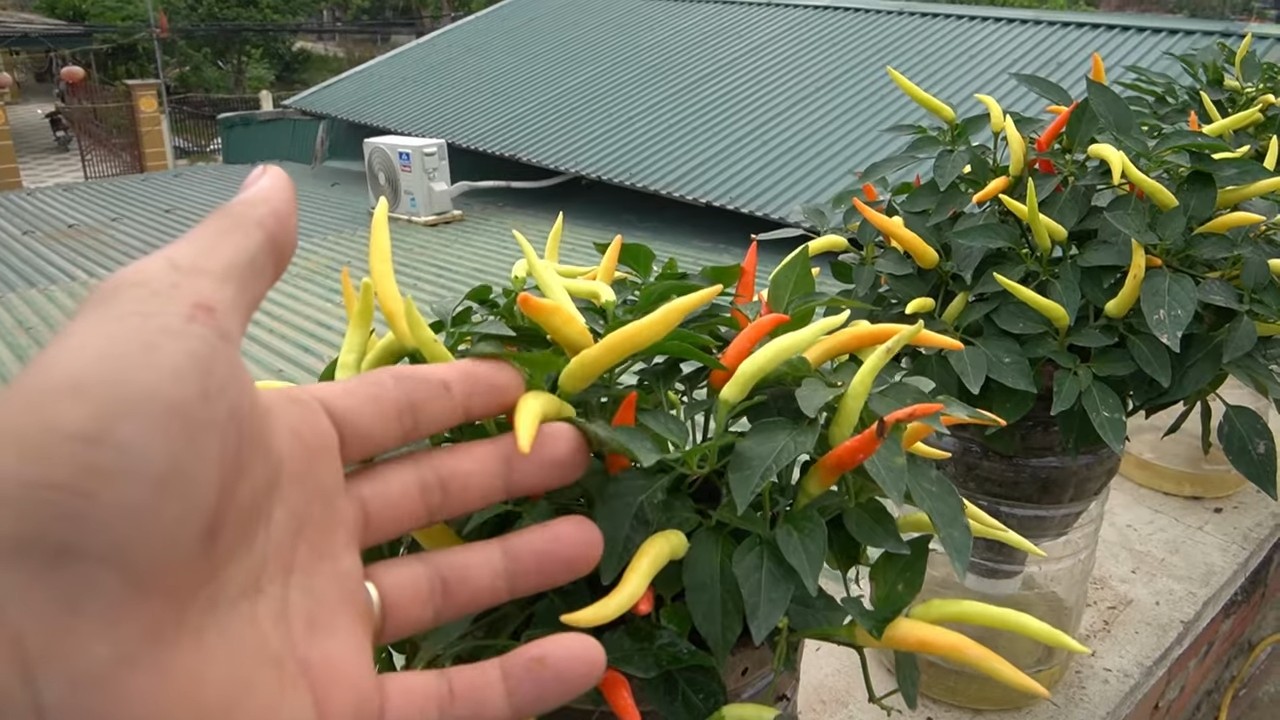
Grow chili peppers at home and ignite your culinary adventures! Imagine plucking fiery red chilies straight from your own garden, ready to add a kick to your favorite dishes. Forget bland, store-bought peppers – with a few simple tricks, you can cultivate a thriving chili pepper patch right in your backyard, balcony, or even on your windowsill.
The history of chili peppers is as vibrant as their flavor. Originating in South America, these fiery fruits have been cultivated for thousands of years, playing a significant role in the cuisines and cultures of countless societies. From ancient Aztec rituals to modern-day culinary masterpieces, chili peppers have always been prized for their unique taste and health benefits.
Why should you learn to grow chili peppers at home? Well, for starters, it’s incredibly rewarding! There’s nothing quite like the satisfaction of nurturing a plant from seed to harvest. Plus, you’ll have access to fresh, organic peppers whenever you need them, saving you money and ensuring the highest quality ingredients. But more importantly, growing your own chili peppers allows you to experiment with different varieties, from mild and sweet to scorching hot, tailoring your garden to your specific taste preferences. I’m excited to share some easy DIY tricks and hacks that will help you cultivate a bountiful chili pepper harvest, no matter your gardening experience. Let’s get started!
Chili Anbau für Jedermann: Dein DIY-Guide für scharfe Erfolge!
Hey Chili-Liebhaber! Hast du dich jemals gefragt, wie du diese feurigen Schoten, die dein Essen so aufpeppen, selbst anbauen kannst? Keine Sorge, es ist einfacher als du denkst! Ich zeige dir, wie du mit ein paar einfachen Schritten deine eigene Chili-Plantage zu Hause starten kannst. Egal, ob du einen Garten, einen Balkon oder nur ein sonniges Fensterbrett hast, Chili-Pflanzen sind überraschend anpassungsfähig und belohnen dich mit einer reichen Ernte.
Was du brauchst: Die Chili-Grundausstattung
Bevor wir loslegen, lass uns sicherstellen, dass du alles hast, was du brauchst. Hier ist eine Liste der wichtigsten Dinge:
* Chili-Samen: Wähle deine Lieblingssorten! Von milden Jalapeños bis zu höllisch scharfen Habaneros, die Auswahl ist riesig. Achte auf qualitativ hochwertige Samen von einem vertrauenswürdigen Anbieter.
* Anzuchterde: Diese ist leichter und nährstoffärmer als normale Blumenerde und ideal für die empfindlichen Keimlinge.
* Anzuchtgefäße: Kleine Töpfe, Anzuchtschalen oder sogar Eierkartons funktionieren super. Hauptsache, sie haben Drainagelöcher.
* Sprühflasche: Zum sanften Befeuchten der Erde.
* Mini-Gewächshaus (optional): Hilft, die Luftfeuchtigkeit hoch zu halten und die Keimung zu beschleunigen. Ein durchsichtiger Plastikbeutel tut’s auch.
* Pikierstab (optional): Ein kleiner Stab zum schonenden Vereinzeln der Keimlinge.
* Blumenerde: Wenn die Pflanzen größer werden, brauchen sie nährstoffreichere Erde.
* Töpfe oder Kübel: Für die ausgewachsenen Chili-Pflanzen. Die Größe hängt von der Sorte ab.
* Dünger: Spezieller Chili-Dünger oder Tomatendünger ist ideal.
* Gießkanne: Zum Bewässern der Pflanzen.
* Sonnenlicht: Chili-Pflanzen lieben die Sonne! Ein sonniger Standort ist entscheidend für eine reiche Ernte.
Phase 1: Die Chili-Samen zum Leben erwecken – Die Anzucht
Die Anzucht ist der erste und wichtigste Schritt. Hier legen wir den Grundstein für gesunde und kräftige Chili-Pflanzen.
1. Vorbereitung der Anzuchtgefäße: Fülle deine Anzuchtgefäße mit Anzuchterde. Drücke die Erde leicht an, aber nicht zu fest. Sie sollte locker und luftig bleiben.
2. Aussaat der Samen: Lege in jedes Gefäß 1-2 Samen. Bedecke sie mit einer dünnen Schicht Erde (ca. 0,5 cm). Chili-Samen sind Lichtkeimer, aber eine dünne Schicht Erde hilft, sie feucht zu halten.
3. Befeuchten der Erde: Befeuchte die Erde vorsichtig mit einer Sprühflasche. Die Erde sollte feucht, aber nicht nass sein. Vermeide Staunässe, da dies zu Schimmelbildung führen kann.
4. Schaffen eines Mini-Gewächshauses: Stelle die Anzuchtgefäße in ein Mini-Gewächshaus oder decke sie mit einem durchsichtigen Plastikbeutel ab. Dies erhöht die Luftfeuchtigkeit und fördert die Keimung. Achte darauf, dass der Beutel nicht direkt auf der Erde aufliegt.
5. Der richtige Standort: Stelle das Mini-Gewächshaus an einen warmen und hellen Ort. Eine Temperatur von 22-28°C ist ideal für die Keimung. Vermeide direkte Sonneneinstrahlung, da dies die Erde zu schnell austrocknen kann.
6. Geduld ist gefragt: Die Keimung kann je nach Sorte und Temperatur 1-3 Wochen dauern. Halte die Erde während dieser Zeit feucht, aber nicht nass. Lüfte das Mini-Gewächshaus regelmäßig, um Schimmelbildung zu vermeiden.
Phase 2: Die kleinen Chili-Pflänzchen – Pikieren und Umtopfen
Sobald die ersten Keimlinge ihre Köpfe aus der Erde strecken, beginnt die nächste Phase: das Pikieren und Umtopfen.
1. Der richtige Zeitpunkt zum Pikieren: Wenn die Keimlinge ihre ersten richtigen Blätter (neben den Keimblättern) entwickelt haben, ist es Zeit zum Pikieren. Das bedeutet, dass du die kleinen Pflänzchen in separate Töpfe umpflanzt, damit sie mehr Platz zum Wachsen haben.
2. Vorbereitung der Töpfe: Fülle kleine Töpfe (ca. 8-10 cm Durchmesser) mit Anzuchterde.
3. Das vorsichtige Herausnehmen der Keimlinge: Befeuchte die Erde in den Anzuchtgefäßen leicht. Löse die Keimlinge vorsichtig mit einem Pikierstab oder einem Löffel aus der Erde. Versuche, die Wurzeln so wenig wie möglich zu beschädigen.
4. Das Einpflanzen in die neuen Töpfe: Mache ein kleines Loch in die Erde in den neuen Töpfen. Setze die Keimlinge hinein und bedecke die Wurzeln mit Erde. Drücke die Erde leicht an.
5. Angießen: Gieße die pikierten Pflänzchen vorsichtig an.
6. Der richtige Standort nach dem Pikieren: Stelle die Töpfe an einen hellen, aber nicht zu sonnigen Ort. Vermeide direkte Mittagssonne in den ersten Tagen nach dem Pikieren.
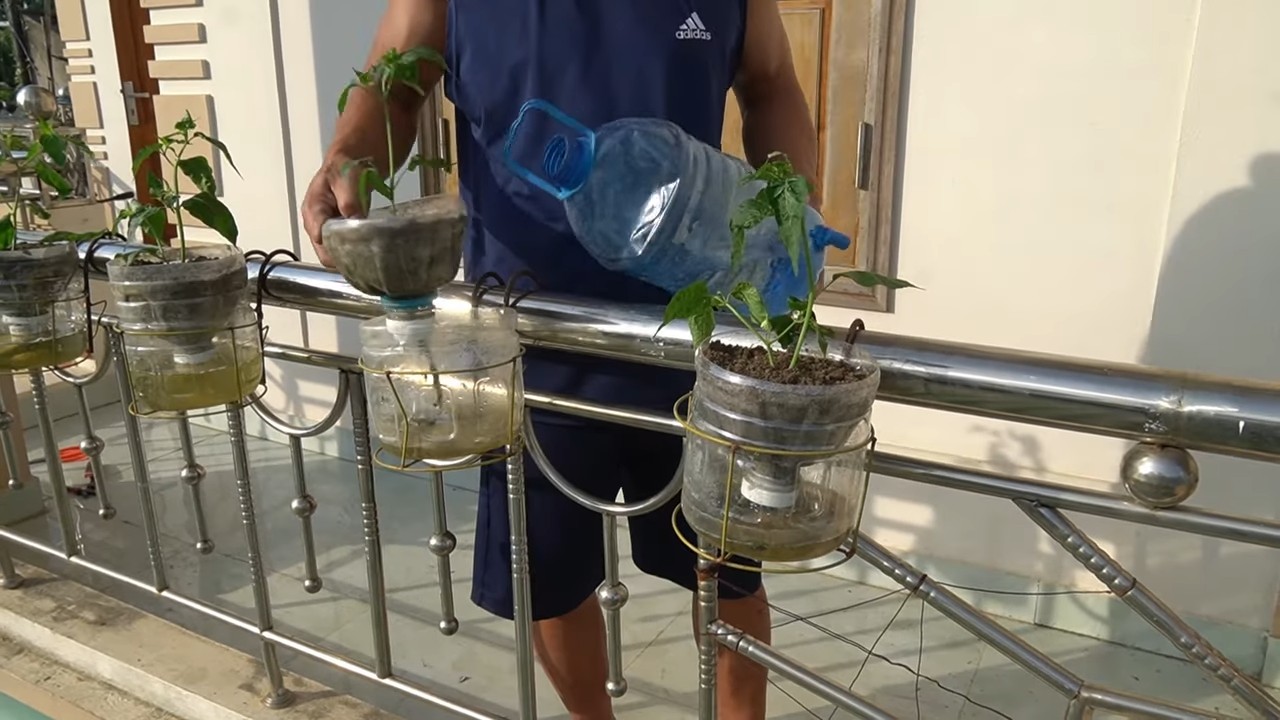
7. Umtopfen in größere Töpfe: Wenn die Pflanzen größer werden und die Wurzeln den Topf durchdringen, ist es Zeit, sie in größere Töpfe umzutopfen. Wähle Töpfe mit einem Durchmesser von mindestens 20 cm. Verwende Blumenerde für das Umtopfen.
Phase 3: Die Chili-Pflanzen im Wachstum – Pflege und Düngung
Jetzt, wo deine Chili-Pflanzen in ihren Töpfen wachsen, ist es wichtig, sie richtig zu pflegen, damit sie gesund und stark werden.
1. Der richtige Standort: Chili-Pflanzen lieben die Sonne! Stelle sie an einen sonnigen Ort, an dem sie mindestens 6 Stunden Sonnenlicht pro Tag bekommen.
2. Bewässerung: Gieße die Pflanzen regelmäßig, aber vermeide Staunässe. Die Erde sollte immer leicht feucht sein. Überprüfe die Feuchtigkeit der Erde, indem du deinen Finger in die Erde steckst. Wenn sich die Erde trocken anfühlt, ist es Zeit zum Gießen.
3. Düngung: Chili-Pflanzen sind Starkzehrer und brauchen regelmäßige Düngung. Verwende einen speziellen Chili-Dünger oder Tomatendünger. Beginne mit der Düngung, sobald die Pflanzen ihre ersten Blüten bilden. Befolge die Anweisungen auf der Düngerpackung.
4. Beschneiden (optional): Das Beschneiden kann die Verzweigung der Pflanzen fördern und zu einer höheren Ernte führen. Schneide die Triebspitzen ab, um die Bildung von Seitentrieben anzuregen.
5. Unterstützung: Einige Chili-Sorten werden sehr groß und brauchen eine Unterstützung, um nicht umzuknicken. Verwende Stäbe oder Rankgitter, um die Pflanzen zu stützen.
6. Schutz vor Schädlingen: Chili-Pflanzen können von verschiedenen Schädlingen befallen werden, wie z.B. Blattläusen, Spinnmilben oder Weißen Fliegen. Kontrolliere die Pflanzen regelmäßig auf Schädlinge und bekämpfe sie gegebenenfalls mit geeigneten Mitteln. Es gibt viele biologische Schädlingsbekämpfungsmittel, die du verwenden kannst.
7. Überwinterung (optional): Wenn du deine Chili-Pflanzen überwintern möchtest, schneide sie im Herbst zurück und stelle sie an einen kühlen und hellen Ort. Gieße sie nur sparsam. Im Frühjahr kannst du sie dann wieder ins Freie stellen.
Phase 4: Die Ernte – Der Lohn deiner Mühe
Nach all der Arbeit und Geduld ist es endlich soweit: Die Chili-Ernte!
1. Der richtige Zeitpunkt für die Ernte: Die Chili-Schoten sind reif, wenn sie ihre endgültige Farbe erreicht haben und sich leicht vom Stiel lösen lassen.
2. Die Ernte: Schneide die Chili-Schoten mit einer Schere
Conclusion
So, there you have it! Growing chili peppers at home isn’t just a fun hobby; it’s a gateway to fresher, more flavorful meals and a deeper connection with the food you eat. We’ve walked you through the essential steps, from selecting the right seeds to nurturing your plants and harvesting your fiery bounty. But why should you take the plunge and dedicate some time and effort to this rewarding endeavor?
The answer is simple: control and quality. When you grow your own chili peppers, you know exactly what goes into them. No mystery pesticides, no long-distance transportation that diminishes flavor, just pure, unadulterated chili goodness. Imagine the satisfaction of adding a pinch of your homegrown habanero to your salsa or sprinkling some dried cayenne flakes from your own garden onto your pizza. The flavor is simply unmatched.
Beyond the superior taste, growing chili peppers at home offers a fantastic opportunity to experiment. Don’t limit yourself to just one variety! Try a range of peppers, from the mild jalapeño to the scorching ghost pepper, and discover your personal favorites. You can even cross-pollinate different varieties to create your own unique chili pepper hybrids. Think of the bragging rights!
And the best part? It’s easier than you might think. With a little patience and attention, even beginner gardeners can successfully grow chili peppers at home. Whether you have a sprawling backyard or just a sunny windowsill, there’s a way to make it work. Consider these variations to tailor the experience to your specific needs and preferences:
* **Container Gardening:** If space is limited, opt for container gardening. Choose pots that are at least 5 gallons in size and use a well-draining potting mix. Dwarf varieties of chili peppers are particularly well-suited for containers.
* **Hydroponics:** For a more advanced approach, explore hydroponic systems. This method allows you to grow chili peppers without soil, using nutrient-rich water solutions.
* **Vertical Gardening:** Maximize your space by creating a vertical garden. Use hanging baskets or stackable planters to grow chili peppers vertically.
* **Different Varieties:** Experiment with different chili pepper varieties to find your favorites. Consider your heat tolerance and the types of dishes you enjoy cooking. Some popular choices include jalapeños, serranos, cayenne peppers, habaneros, and ghost peppers.
* **Preserving Your Harvest:** Once you’ve harvested your chili peppers, explore different preservation methods. You can dry them, pickle them, make hot sauce, or freeze them for later use.
Growing chili peppers at home is more than just a gardening project; it’s an investment in your culinary enjoyment and a connection to the natural world. It’s a chance to learn, experiment, and create something truly special.
So, what are you waiting for? Grab some seeds, get your hands dirty, and embark on your own chili pepper growing adventure. We’re confident that you’ll be amazed by the results. And once you’ve harvested your first crop, we’d love to hear about your experience! Share your tips, tricks, and photos with us in the comments below. Let’s build a community of chili pepper enthusiasts and inspire others to discover the joys of growing their own food. Happy growing!
Frequently Asked Questions (FAQ)
1. What is the best time of year to start growing chili peppers?
The best time to start growing chili peppers depends on your climate. In general, you should start your seeds indoors 6-8 weeks before the last expected frost. This allows the seedlings to develop a strong root system before being transplanted outdoors. If you live in a warmer climate with a longer growing season, you can start your seeds directly outdoors after the last frost. However, starting indoors gives you a head start and allows you to control the growing environment more effectively.
2. What kind of soil is best for growing chili peppers?
Chili peppers thrive in well-draining soil that is rich in organic matter. A slightly acidic to neutral pH (around 6.0-7.0) is ideal. You can improve the soil by adding compost, aged manure, or other organic amendments. If you’re growing in containers, use a high-quality potting mix specifically formulated for vegetables. Avoid using garden soil in containers, as it can become compacted and poorly drained.
3. How much sunlight do chili peppers need?
Chili peppers need at least 6-8 hours of direct sunlight per day to thrive. Choose a location in your garden that receives plenty of sunlight throughout the day. If you’re growing indoors, place your plants near a sunny window or use grow lights to supplement natural light. Insufficient sunlight can lead to leggy growth, reduced flowering, and smaller peppers.
4. How often should I water my chili pepper plants?
Water your chili pepper plants regularly, especially during hot and dry weather. The soil should be kept consistently moist but not waterlogged. Overwatering can lead to root rot, while underwatering can stress the plants and reduce yields. Check the soil moisture level regularly by sticking your finger into the soil. If the top inch of soil feels dry, it’s time to water.
5. What are some common pests and diseases that affect chili peppers?
Chili peppers can be susceptible to various pests and diseases, including aphids, spider mites, whiteflies, blossom-end rot, and fungal diseases. Regularly inspect your plants for signs of infestation or disease. Use organic pest control methods, such as insecticidal soap or neem oil, to control pests. Ensure good air circulation to prevent fungal diseases. Blossom-end rot is caused by calcium deficiency and can be prevented by adding calcium to the soil or using a calcium-rich fertilizer.
6. How do I know when my chili peppers are ripe?
The color of the chili pepper is the best indicator of ripeness. Most chili peppers will turn from green to red, yellow, orange, or brown when they are ripe, depending on the variety. The pepper should also feel firm and slightly glossy. You can also taste a small piece of the pepper to check for ripeness. The flavor should be fully developed and the heat level should be at its peak.
7. How do I harvest chili peppers?
To harvest chili peppers, use a sharp knife or scissors to cut the pepper from the plant, leaving a small stem attached. Avoid pulling the pepper off the plant, as this can damage the plant. Harvest the peppers when they are fully ripe and have reached their desired color and size.
8. Can I grow chili peppers indoors?
Yes, you can grow chili peppers indoors, especially if you live in a climate with cold winters. Choose a sunny location near a window or use grow lights to provide adequate light. Use a well-draining potting mix and water regularly. You may also need to hand-pollinate the flowers to ensure fruit production.
9. How do I store chili peppers?
There are several ways to store chili peppers. You can dry them, pickle them, make hot sauce, or freeze them. To dry chili peppers, string them together and hang them in a well-ventilated area until they are completely dry. You can also use a dehydrator to dry them more quickly. To pickle chili peppers, follow a recipe for pickled vegetables. To make hot sauce, blend the chili peppers with vinegar, salt, and other spices. To freeze chili peppers, wash them, dry them, and place them in a freezer bag.
10. What are some creative ways to use my homegrown chili peppers?
The possibilities are endless! You can use your homegrown chili peppers to make salsa, hot sauce, chili, stews, soups, and stir-fries. You can also dry them and grind them into chili powder. Add them to marinades, rubs, and sauces for a spicy kick. Experiment with different varieties and flavor combinations to create your own unique dishes. Don’t be afraid to get creative and have fun!

Leave a Comment