
Grow collard greens easily, even if you think you have a “brown thumb”! Have you ever dreamed of stepping into your backyard and harvesting fresh, vibrant greens for a delicious and healthy meal? Imagine the satisfaction of knowing exactly where your food comes from and that it’s free from harmful chemicals. Well, dream no more! This DIY guide is packed with simple, yet effective tricks to help you cultivate a thriving collard green patch, no matter your gardening experience.
Collard greens have a rich history, particularly in Southern American cuisine, where they’ve been a staple for generations. They represent resilience, resourcefulness, and a connection to the land. But you don’t have to be a Southerner to appreciate these nutritional powerhouses! They’re packed with vitamins, minerals, and fiber, making them a fantastic addition to any diet.
So, why do you need these DIY tricks? Because growing your own food can be intimidating! Many people struggle with pests, soil conditions, or simply don’t know where to start. I’m here to tell you that grow collard greens easily is totally achievable with the right knowledge and a few clever hacks. I’m going to share my tried-and-true methods for overcoming common challenges and ensuring a bountiful harvest. Get ready to transform your garden and enjoy the freshest, most flavorful collard greens you’ve ever tasted!

Growing Collard Greens: A Beginner-Friendly Guide
Hey there, fellow garden enthusiasts! I’m so excited to share my tried-and-true method for growing collard greens. These leafy greens are not only delicious and nutritious but also surprisingly easy to cultivate, even if you’re a complete beginner. Trust me, if I can do it, you can too!
Why Grow Collard Greens?
Before we dive into the how-to, let’s talk about why you should even bother growing collard greens in the first place.
* Nutritional Powerhouse: Collard greens are packed with vitamins A, C, and K, as well as calcium, iron, and fiber. They’re a true superfood!
* Easy to Grow: Seriously, these plants are incredibly resilient and can tolerate a wide range of conditions.
* Long Harvest Season: You can harvest collard greens throughout the fall, winter, and even into early spring in many climates.
* Delicious and Versatile: From Southern-style braised greens to healthy smoothies, collard greens can be used in countless recipes.
* Beautiful in the Garden: The large, vibrant green leaves add a touch of beauty to any garden.
Getting Started: What You’ll Need
Okay, let’s gather our supplies. Here’s what you’ll need to get started:
* Collard Green Seeds or Seedlings: You can start from seed or purchase seedlings from your local garden center. I’ve had success with both!
* Well-Draining Soil: Collard greens prefer soil that’s rich in organic matter and drains well.
* Compost or Aged Manure: This will help improve the soil’s fertility and drainage.
* Fertilizer: A balanced fertilizer (like 10-10-10) will give your plants a boost.
* Watering Can or Hose: Essential for keeping your plants hydrated.
* Gardening Gloves: To protect your hands.
* Trowel or Shovel: For planting.
* Optional: Row Covers: To protect your plants from pests and frost.
Step-by-Step Planting Guide
Now for the fun part – planting! I’ll walk you through the process, whether you’re starting from seed or using seedlings.
Starting from Seed
1. Choose Your Planting Time: Collard greens are a cool-season crop, so the best time to plant them is in the spring or fall. For a fall harvest, sow seeds 6-8 weeks before the first expected frost. For a spring harvest, start seeds indoors 4-6 weeks before the last expected frost or direct sow them outdoors once the soil has warmed up to at least 50°F (10°C).
2. Prepare the Soil: Choose a sunny spot in your garden that gets at least 6 hours of sunlight per day. Clear the area of any weeds or debris. Amend the soil with compost or aged manure to improve its fertility and drainage. I usually dig in a generous amount – about 2-3 inches.
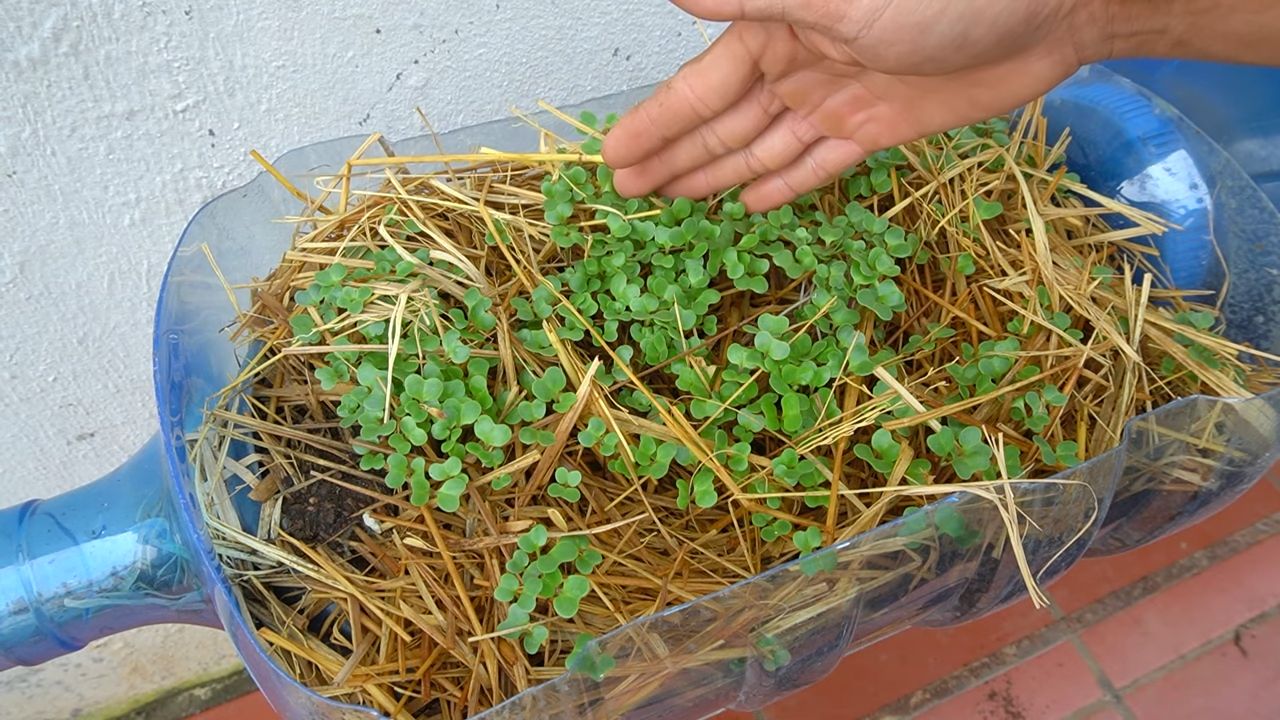
3. Sow the Seeds: Sow the seeds about ½ inch deep and 1-2 inches apart in rows that are 18-24 inches apart. Gently cover the seeds with soil and water thoroughly.
4. Keep the Soil Moist: Keep the soil consistently moist until the seeds germinate, which usually takes about 7-14 days.
5. Thin the Seedlings: Once the seedlings have developed a few true leaves, thin them to 12-18 inches apart. This will give them enough space to grow and mature. I know it’s hard to thin them out, but it’s crucial for healthy growth!
Planting Seedlings
1. Choose Healthy Seedlings: Select seedlings that are healthy and have a good root system. Avoid plants that are yellowed, wilted, or have signs of pests or diseases.
2. Prepare the Planting Hole: Dig a hole that is slightly larger than the root ball of the seedling.
3. Amend the Soil: Mix some compost or aged manure into the soil at the bottom of the hole.
4. Plant the Seedling: Gently remove the seedling from its container and loosen the roots. Place the seedling in the hole, making sure that the top of the root ball is level with the surrounding soil.
5. Backfill and Water: Backfill the hole with soil and gently firm it around the base of the plant. Water thoroughly.
6. Space Appropriately: Space seedlings 12-18 inches apart in rows that are 18-24 inches apart.
Caring for Your Collard Greens
Once your collard greens are planted, it’s important to provide them with the care they need to thrive.
1. Watering: Collard greens need consistent moisture, especially during hot, dry weather. Water deeply whenever the top inch of soil feels dry to the touch. I usually water them in the morning to allow the leaves to dry before nightfall, which helps prevent fungal diseases.
2. Fertilizing: Fertilize your collard greens every 4-6 weeks with a balanced fertilizer. Follow the instructions on the fertilizer package. You can also side-dress them with compost or aged manure.
3. Weeding: Keep the area around your collard greens free of weeds. Weeds compete with your plants for water and nutrients. I like to hand-pull weeds regularly.
4. Pest Control: Collard greens can be susceptible to pests such as cabbage worms, aphids, and flea beetles. Inspect your plants regularly for signs of pests.
* Cabbage Worms: These green caterpillars can quickly devour your collard green leaves. Handpick them off the plants or use a biological insecticide like Bacillus thuringiensis (Bt).
* Aphids: These tiny insects suck the sap from plants, causing them to weaken and yellow. Spray them off with a strong stream of water or use insecticidal soap.
* Flea Beetles: These small, jumping beetles can create small holes in the leaves. Cover your plants with row covers to prevent them from reaching the plants.
5. Disease Prevention: Collard greens can also be susceptible to diseases such as downy mildew and black rot. To prevent these diseases, make sure to provide good air circulation around your plants and avoid overhead watering. If you notice any signs of disease, remove the affected leaves immediately.
Harvesting Your Collard Greens
The best part of growing collard greens is, of course, harvesting them!
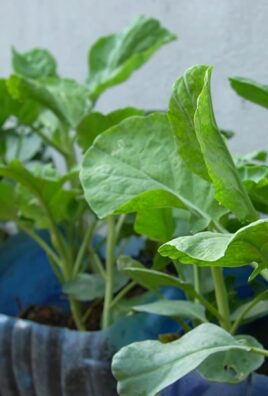
1. When to Harvest: You can start harvesting collard greens when the leaves are about 10-12 inches long. The lower leaves are usually the first to mature.
2. How to Harvest: Use a sharp knife or scissors to cut the leaves off the plant, leaving the central bud intact. This will allow the plant to continue producing new leaves.
3. Harvesting Technique: Harvest the outer, older leaves first, working your way up the plant. This will encourage the plant to produce more new leaves.
4. Continuous Harvest: You can harvest collard greens continuously throughout the fall, winter, and even into early spring in many climates.
5. Storage: Store harvested collard greens in the refrigerator for up to a week. Wash them thoroughly before using.
Troubleshooting Common Problems
Even with the best care, you might encounter some problems while growing collard greens. Here are a few common issues and how to address them:
* Yellowing Leaves: This could be a sign of nutrient deficiency, overwatering, or disease. Check the soil’s pH and nutrient levels. Ensure proper drainage and treat any diseases promptly.
* Holes in Leaves: This is usually caused by pests like cabbage worms or flea beetles. Implement the pest control measures mentioned earlier.
* Slow Growth: This could be due to poor soil, lack of sunlight, or insufficient watering. Amend the soil with compost, ensure the plants are getting enough sunlight, and water regularly.
* Bolting (Premature Flowering): This can happen if the plants are stressed by heat or drought. Provide consistent watering and shade during hot weather.
Extra Tips for Success
Here are a few extra tips to help you grow the best collard greens ever:
* Choose the Right Variety: There are many different varieties of collard greens to choose from, so select one that is well-suited to your climate and growing conditions. Some popular varieties include ‘Georgia Southern’, ‘Champion’, and ‘Vates’.
* Rotate Your Crops: Avoid planting collard greens in the same spot year after year. Crop rotation helps prevent the buildup of soilborne diseases and pests.
* Use Row Covers: Row covers can protect your plants from pests, frost, and harsh weather.
* Companion Planting: Plant collard greens with companion plants like dill, chamomile, and rosemary to attract
Conclusion
So, there you have it! Growing your own collard greens is not only achievable but also incredibly rewarding. Forget those limp, pre-packaged greens from the grocery store. With this simple DIY trick, you can cultivate vibrant, flavorful collard greens right in your backyard, on your balcony, or even in a sunny windowsill. The satisfaction of harvesting your own food, knowing exactly where it came from and what went into it, is unparalleled. Plus, the taste difference is undeniable – homegrown collard greens are bursting with freshness and a depth of flavor you simply can’t find in store-bought varieties.
This method is a must-try for several reasons. First, it’s incredibly cost-effective. A single packet of collard green seeds can yield a bountiful harvest, saving you money on produce throughout the growing season. Second, it’s environmentally friendly. By growing your own food, you reduce your carbon footprint associated with transportation and packaging. Third, it’s empowering. Taking control of your food source is a deeply satisfying experience that connects you to nature and promotes self-sufficiency.
But the benefits don’t stop there. Growing your own collard greens allows you to experiment with different varieties. Try planting Georgia Southern collards for their classic flavor, or Vates collards for their cold-hardiness. You can even explore more exotic options like Champion collards or Top Bunch collards. Each variety offers a unique taste and texture, allowing you to tailor your harvest to your specific preferences.
Furthermore, consider companion planting to enhance your collard green garden. Marigolds can deter pests, while herbs like rosemary and thyme can improve the flavor of your greens. Experiment with different combinations to find what works best for your growing conditions.
Don’t be intimidated if you’re a beginner gardener. This DIY trick is designed to be accessible to everyone, regardless of their experience level. With a little bit of patience and attention, you’ll be enjoying fresh, delicious collard greens in no time.
We encourage you to give this DIY trick a try and experience the joy of growing your own collard greens. Once you’ve harvested your first batch, be sure to share your experience with us! Post photos of your garden, share your favorite collard green recipes, and let us know what tips and tricks you’ve discovered along the way. Together, we can create a community of thriving collard green gardeners! Remember, mastering the art of how to grow collard greens is easier than you think.
Frequently Asked Questions (FAQ)
What is the best time of year to plant collard greens?
The best time to plant collard greens depends on your climate. In warmer climates, you can plant them in the fall for a winter harvest or in early spring for a spring harvest. In colder climates, start seeds indoors 6-8 weeks before the last frost and transplant them outdoors after the danger of frost has passed. You can also plant seeds directly in the ground in late spring or early summer for a fall harvest. Collard greens are quite cold-hardy and can tolerate light frosts, which actually improves their flavor.
What kind of soil do collard greens need?
Collard greens prefer well-drained soil that is rich in organic matter. Amend your soil with compost or aged manure before planting to improve its fertility and drainage. A soil pH of 6.0 to 7.5 is ideal. If your soil is acidic, you can add lime to raise the pH. Consider a soil test to determine the specific nutrient needs of your soil.
How much sunlight do collard greens need?
Collard greens need at least 6 hours of sunlight per day to thrive. Choose a sunny location in your garden for planting. If you’re growing them indoors, place them near a south-facing window or use grow lights to supplement natural sunlight. Insufficient sunlight can result in leggy plants with poor leaf development.
How often should I water collard greens?
Water collard greens regularly, especially during dry periods. Aim to keep the soil consistently moist but not waterlogged. Water deeply at the base of the plants, avoiding wetting the leaves, which can promote fungal diseases. Mulching around the plants can help retain moisture in the soil and suppress weed growth.
What are some common pests and diseases that affect collard greens?
Common pests that affect collard greens include aphids, cabbage worms, flea beetles, and slugs. You can control these pests with organic methods such as handpicking, insecticidal soap, or Bacillus thuringiensis (Bt). Common diseases include black rot, downy mildew, and clubroot. Prevent these diseases by practicing crop rotation, providing good air circulation, and avoiding overhead watering. Choose disease-resistant varieties whenever possible.
How do I harvest collard greens?
You can begin harvesting collard greens when the leaves are about 8-10 inches long. Harvest the outer leaves first, leaving the inner leaves to continue growing. This allows you to enjoy a continuous harvest throughout the growing season. Use a sharp knife or scissors to cut the leaves close to the stem.
Can I freeze collard greens?
Yes, you can freeze collard greens for later use. Wash the leaves thoroughly, remove the tough stems, and blanch them in boiling water for 2-3 minutes. Then, plunge them into ice water to stop the cooking process. Drain the greens well, pack them into freezer bags or containers, and freeze them for up to 12 months.
How can I improve the flavor of my collard greens?
The flavor of collard greens can be enhanced by adding ingredients such as smoked meats (ham hocks, bacon), onions, garlic, vinegar, or hot sauce during cooking. Slow cooking is key to tenderizing the leaves and developing their flavor. Some people also prefer to add a touch of sweetness, such as brown sugar or molasses. Experiment with different combinations to find your favorite flavor profile.
Are collard greens nutritious?
Yes, collard greens are incredibly nutritious. They are an excellent source of vitamins A, C, and K, as well as calcium, iron, and fiber. They are also rich in antioxidants, which can help protect against chronic diseases. Adding collard greens to your diet is a great way to boost your overall health and well-being.
Can I grow collard greens in containers?
Yes, you can successfully grow collard greens in containers. Choose a large container (at least 12 inches in diameter) with drainage holes. Use a high-quality potting mix and provide regular watering and fertilization. Container-grown collard greens may require more frequent watering than those grown in the ground. Place the container in a sunny location.
Leave a Comment