
Grow Lettuce Indoors Easily and enjoy fresh, crisp salads all year round, regardless of the weather outside! Imagine stepping into your kitchen and harvesting vibrant, flavorful lettuce leaves just moments before tossing them into your favorite dish. No more trips to the grocery store for wilted, overpriced greens. This isn’t just a dream; it’s an achievable reality with a few simple tricks and a little DIY spirit.
For centuries, humans have cultivated lettuce, tracing its origins back to ancient Egypt where it was initially grown for its seeds and oil. Over time, the leafy vegetable evolved into the diverse range of varieties we enjoy today. While traditionally grown outdoors, the desire for fresh produce year-round has led to innovative indoor gardening techniques.
Why should you learn to grow lettuce indoors easily? Because it’s empowering! It puts you in control of your food source, reduces your carbon footprint, and provides a rewarding connection to nature. Plus, it’s incredibly satisfying to nurture a plant from seed to harvest. In this article, I’ll share my favorite DIY hacks and proven methods to help you cultivate a thriving indoor lettuce garden, even if you have limited space or experience. Get ready to unlock the secrets to fresh, homegrown salads at your fingertips!
It’s This Easy to Grow Lettuce Indoors: Your DIY Guide for Fresh Enjoyment
I love fresh lettuce, but in the winter, it’s often difficult to get crisp leaves without digging deep into your pockets. That’s why I decided to grow my own lettuce indoors! And I can tell you, it’s much easier than you might think. With this guide, I’ll show you how you can do it too – no green-thumb genius required.
What you need: Your Shopping List for Indoor Lettuce
Before we get started, here is a list of everything you’ll need for your indoor lettuce project:
- Lettuce seeds: Choose your favorite varieties! Loose-leaf lettuce, romaine, lamb’s lettuce – the selection is huge. Make sure the seeds are suitable for growing in pots.
- Seed starting mix: This soil is particularly low in nutrients and loose, ideal for the germination of the seeds.
- Pots or seed trays: You can use small pots for individual plants or larger trays where you sow several seeds.
- Potting soil: After the seedlings have germinated, they need more nutrient-rich soil.
- Spray bottle: For moistening the soil.
- Watering can: For later watering.
- Grow light (optional, but recommended): Especially in winter when daylight is scarce, a grow light provides sufficient light.
- A sunny spot by the window (or the spot for your grow light): Lettuce needs light!
- Small trowel or spoon: For transplanting the seedlings.
- Labels and a pen: To label the different lettuce varieties.
Phase 1: Sowing – The Start of Your Lettuce Garden
Sowing is the first and most important step. Here I’ll show you how to do it right:
- Preparing the seed trays/pots: Fill the seed trays or pots with seed starting mix. Press the soil down lightly, but not too firmly. It should remain loose and airy.
- Sowing the seeds: Distribute the lettuce seeds evenly on the soil. Make sure they are not too close together, as the seedlings will otherwise have too little space later. A rule of thumb is to leave about 1-2 cm of space between the seeds.
- Covering the seeds: Cover the seeds with a thin layer of seed starting mix (approx. 0.5 cm).
- Moistening the soil: Gently moisten the soil with a spray bottle. The soil should be damp, but not wet. Avoid washing the seeds away.
- Covering (optional): You can cover the seed trays/pots with plastic wrap or a lid to increase humidity. This promotes germination. However, make sure to ventilate the wrap/lid regularly to prevent mold.
- The right location: Place the seed trays/pots in a warm and bright place. A temperature of 18-20°C (64-68°F) is ideal for germination. Avoid direct sunlight, as the soil can dry out too quickly.
Phase 2: Germination – Patience is Required
Now it’s time to wait! Germination takes about 5-10 days, depending on the lettuce variety and temperature.
- Regular checks: Check the soil daily and moisten it with the spray bottle if necessary. The soil should always be slightly moist.
- Ventilating: If you have covered the seed trays/pots, ventilate them regularly to prevent mold.
- Be patient: Don’t be discouraged if the seeds don’t germinate immediately. Sometimes it takes a little longer.
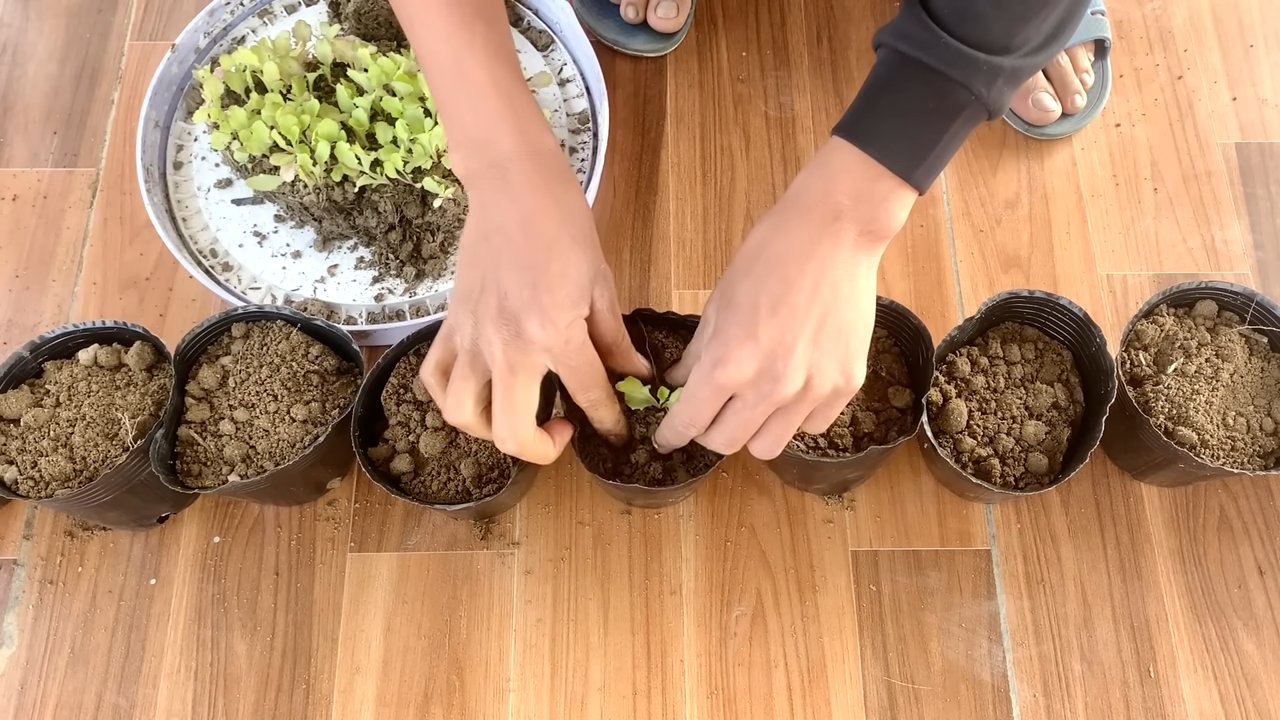
Phase 3: Pricking Out – Giving the Seedlings More Space
As soon as the seedlings have developed their first true leaves (besides the initial seed leaves), it’s time for pricking out. This means you transplant the small plants into larger pots so they have more space to grow.
- Preparing the pots: Fill the larger pots with potting soil.
- Carefully lifting the seedlings: Gently loosen the soil around the seedlings with a small trowel or a spoon. Try to damage the roots as little as possible.
- Transplanting the seedlings: Make a small hole in the potting soil and place the seedling in it. Make sure the roots are not bent. Fill the hole with soil and press it down lightly.
- Watering in: Gently water the seedlings after transplanting.
Phase 4: Care – So Your Lettuce Thrives
Now the real work begins! With the right care, you’ll ensure that your lettuce thrives and you can soon harvest.
- The right location: Place the pots with the seedlings in a bright and sunny spot. If you don’t have a sufficiently bright windowsill, use a grow light.
- Watering: Water the lettuce regularly, but avoid waterlogging. The soil should always be slightly moist. It’s best to water in the morning so the leaves can dry during the day.
- Fertilizing (optional): If you wish, you can fertilize your lettuce regularly. Use an organic liquid fertilizer that is suitable for leafy greens. Follow the dosage instructions on the package.
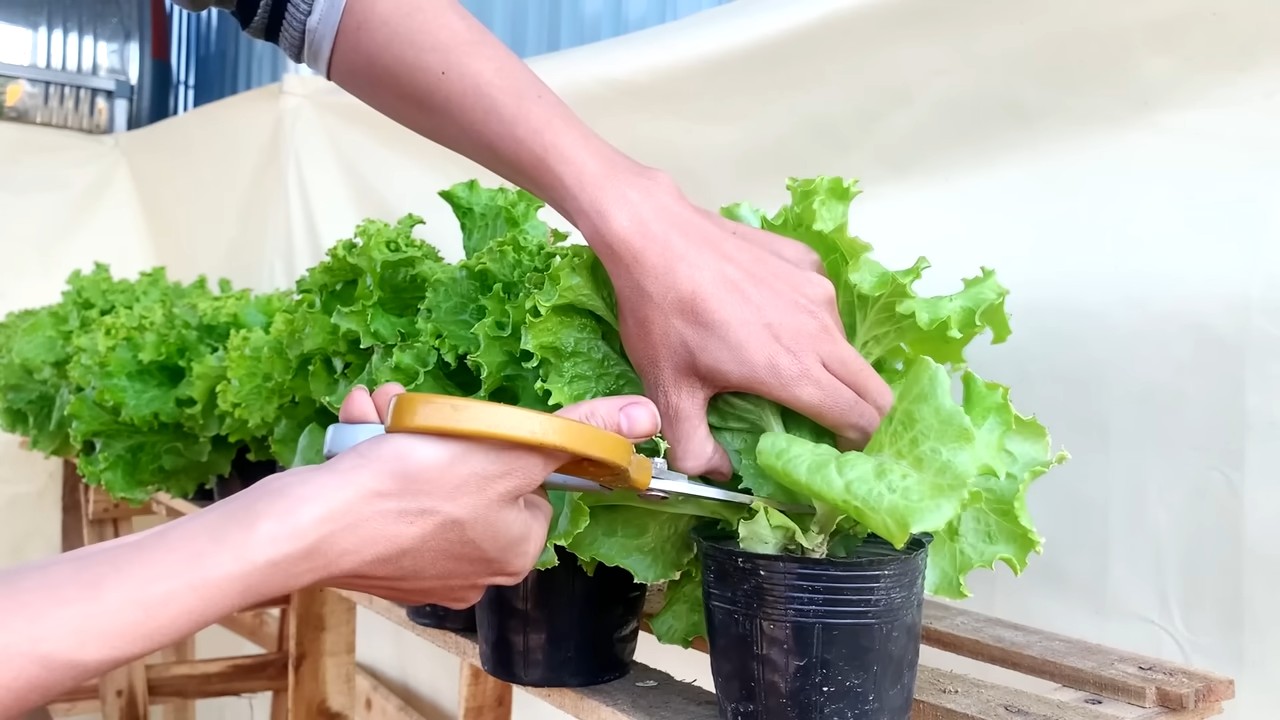
- Regular harvesting: You can harvest loose-leaf lettuce gradually by cutting the outer leaves. For romaine and other types of lettuce, you harvest them once they have reached the desired size.
- Protection from pests: Check your lettuce plants regularly for pests like aphids or slugs. If necessary, you can use natural pesticides.
Additional Tips for Your Indoor Lettuce Garden
- Rotation: Don’t always plant the same type of lettuce in the same pot. Rotate the varieties to avoid depleting the soil of specific nutrients.
- Ventilation: Ensure good air circulation to prevent mold. Open the window regularly or set up a fan.
- Cleanliness: Keep your indoor lettuce garden clean to prevent diseases and pests. Regularly remove dead leaves and soil.
- Observation: Observe your lettuce plants closely and react to changes. If the leaves turn yellow or get spots, it could be a sign of a nutrient deficiency or a disease.
Which lettuce varieties are particularly well-suited for indoor growing?
Some lettuce varieties are better suited for indoor growing than others. Here are a few of my favorites:
- Loose-leaf lettuce: Loose-leaf lettuce is particularly easy to grow and can be harvested gradually.
- Romaine lettuce: Romaine lettuce is robust and grows well even with less light.
- Lamb’s lettuce (Mâche/Corn Salad): Lamb’s lettuce is winter-hardy and can also be grown at cooler temperatures.
- Asian greens: Asian greens like Mizuna or Tatsoi are fast-growing and easy to care for.
With these tips and tricks, nothing stands in the way of your own indoor lettuce garden! I wish you much success and a bountiful harvest! And remember: even if something goes wrong, don’t be discouraged.
Conclusion
So, there you have it! Growing lettuce indoors easily is not just a pipe dream; it’s an achievable reality that can bring fresh, vibrant greens to your table year-round. We’ve walked you through the simple steps, from selecting the right lettuce varieties and containers to providing adequate light and water. But why should you take the plunge and embark on this indoor gardening adventure?
Firstly, consider the unparalleled freshness. Imagine snipping crisp, flavorful lettuce leaves just moments before adding them to your salad. The taste and texture are simply unmatched by store-bought varieties that have traveled miles and sat on shelves. You’ll be amazed at the difference in flavor and the satisfaction of knowing exactly where your food comes from.
Secondly, think about the convenience. No more last-minute trips to the grocery store for a head of lettuce. With your indoor garden, you’ll have a constant supply of fresh greens right at your fingertips. This is especially beneficial for those living in urban areas or regions with harsh climates where outdoor gardening is challenging.
Thirdly, let’s not forget the cost savings. While there’s an initial investment in supplies like containers, soil, and grow lights (if needed), you’ll quickly recoup those costs by reducing your grocery bills. Plus, you can save seeds from your lettuce plants to further minimize expenses.
But the benefits extend beyond just taste, convenience, and cost. Indoor gardening is a therapeutic and rewarding hobby. Nurturing your lettuce plants and watching them grow can be incredibly calming and stress-relieving. It’s a wonderful way to connect with nature, even when you’re indoors.
Ready to take your indoor lettuce growing to the next level? Here are a few variations to consider:
* Experiment with different lettuce varieties: Try growing a mix of romaine, butterhead, and loose-leaf lettuce to create your own custom salad blends.
* Add companion plants: Basil, chives, and parsley are excellent companion plants for lettuce and can enhance its flavor and growth.
* Explore hydroponics: If you’re feeling adventurous, consider growing your lettuce hydroponically, which involves growing plants without soil using nutrient-rich water solutions.
* Vertical Gardening: Maximize space by using vertical planters or wall-mounted containers. This is especially useful for small apartments or homes.
We’re confident that you’ll find growing lettuce indoors easily a fulfilling and rewarding experience. Don’t be afraid to experiment, learn from your mistakes, and most importantly, have fun!
We encourage you to give this DIY trick a try and share your experiences with us. Post photos of your indoor lettuce gardens on social media using #IndoorLettuceGarden and tag us so we can see your amazing creations. We’re eager to hear your tips, tricks, and success stories. Let’s create a community of indoor lettuce growers and inspire others to bring fresh, healthy greens into their homes. So, grab your seeds, pots, and soil, and get ready to enjoy the delicious rewards of your own indoor lettuce garden!
Frequently Asked Questions (FAQ)
What are the best lettuce varieties to grow indoors?
The best lettuce varieties for indoor growing are typically loose-leaf types, as they mature quickly and can be harvested continuously. Some excellent choices include:
* Black Seeded Simpson: A classic loose-leaf variety known for its mild flavor and rapid growth.
* Buttercrunch: A butterhead lettuce with tender, buttery leaves and a sweet taste.
* Red Sails: A beautiful loose-leaf lettuce with reddish-bronze leaves that add color to your salads.
* Tom Thumb: A compact butterhead lettuce that’s perfect for small spaces.
* Oak Leaf: A loose-leaf lettuce with deeply lobed leaves that resemble oak leaves.
These varieties are generally easy to grow and adapt well to indoor conditions. However, feel free to experiment with other lettuce types to find your favorites.
How much light does indoor lettuce need?
Lettuce requires at least 6-8 hours of light per day to thrive. If you don’t have a sunny windowsill that provides sufficient light, you’ll need to supplement with artificial grow lights. Fluorescent or LED grow lights are excellent options. Place the lights a few inches above the lettuce plants and adjust as they grow. A timer can be used to automate the lighting schedule. Insufficient light can lead to leggy growth and pale leaves.
What type of soil should I use for growing lettuce indoors?
Use a well-draining potting mix that’s specifically formulated for containers. Avoid using garden soil, as it can be too heavy and compact, which can hinder drainage and root growth. A good potting mix will retain moisture while still allowing for proper aeration. You can also amend the potting mix with compost or other organic matter to improve its fertility.
How often should I water my indoor lettuce plants?
Water your lettuce plants when the top inch of soil feels dry to the touch. Avoid overwatering, as this can lead to root rot. Water thoroughly until the water drains out of the bottom of the container. Be sure to empty the saucer underneath the container to prevent the plants from sitting in water. The frequency of watering will depend on factors such as the temperature, humidity, and size of the container.
How do I harvest lettuce from my indoor garden?
You can begin harvesting lettuce leaves when they are about 4-6 inches long. For loose-leaf varieties, simply snip off the outer leaves as needed, leaving the inner leaves to continue growing. This is known as “cut-and-come-again” harvesting. For head lettuce varieties, you can harvest the entire head when it’s fully formed.
Can I grow lettuce indoors year-round?
Yes, you can grow lettuce indoors year-round, provided you have adequate light and temperature control. Indoor conditions are generally more stable than outdoor conditions, which allows for consistent growth throughout the year.
What are some common problems when growing lettuce indoors?
Some common problems when growing lettuce indoors include:
* Leggy growth: This is usually caused by insufficient light. Provide more light or move the plants closer to the light source.
* Yellowing leaves: This can be caused by overwatering, underwatering, or nutrient deficiencies. Adjust your watering schedule and fertilize the plants if necessary.
* Pests: Aphids, spider mites, and whiteflies can sometimes infest indoor lettuce plants. Inspect your plants regularly and treat any infestations with insecticidal soap or neem oil.
* Root rot: This is caused by overwatering and poor drainage. Ensure that your containers have drainage holes and avoid overwatering.
Do I need to fertilize my indoor lettuce plants?
Yes, lettuce plants benefit from regular fertilization. Use a balanced liquid fertilizer diluted to half strength every 2-3 weeks. Avoid over-fertilizing, as this can lead to excessive leaf growth and reduced flavor.
How do I save seeds from my indoor lettuce plants?
To save seeds from your lettuce plants, allow a few plants to bolt (produce a flower stalk). Once the flowers have dried and the seed heads have formed, harvest the seed heads and allow them to dry completely. Then, gently crush the seed heads to release the seeds. Store the seeds in an airtight container in a cool, dry place.
Is growing lettuce indoors easily organic?
Yes, growing lettuce indoors easily can be organic. By using organic potting mix, organic fertilizers, and natural pest control methods, you can ensure that your indoor lettuce garden is free from synthetic chemicals. This allows you to enjoy fresh, healthy, and organically grown lettuce right from your own home.

Leave a Comment