
Grow Long Beans Tiny Space? Absolutely! Imagine harvesting armfuls of delicious, vibrant long beans from your own backyard, even if your “backyard” is just a small balcony or patio. It sounds like a dream, right? Well, get ready to turn that dream into a reality with these incredible DIY tricks and hacks!
For centuries, cultivating beans has been a cornerstone of diverse cultures worldwide. From ancient civilizations relying on them as a vital protein source to modern-day gardeners cherishing their unique flavors and textures, beans hold a special place in our hearts (and our diets!). Long beans, with their impressive length and delightful crunch, are no exception. But what if you’re short on space? That’s where these clever DIY solutions come in.
Let’s face it, not everyone has acres of land to dedicate to a sprawling vegetable garden. Many of us are living in apartments, condos, or homes with limited outdoor space. But that shouldn’t stop you from enjoying the satisfaction of growing your own food! These DIY tricks are designed to help you grow long beans in a tiny space, maximizing your yield and minimizing your footprint. I’m excited to share these simple, effective methods that will have you harvesting fresh, flavorful long beans in no time. Get ready to unleash your inner urban farmer!
Growing Long Beans in a Tiny Space: A DIY Vertical Garden Guide
Hey there, fellow gardening enthusiasts! Ever dreamed of harvesting fresh, delicious long beans right from your own backyard, even if your “backyard” is more like a balcony or a small patio? Well, dream no more! I’m here to share my tried-and-true method for growing long beans in a tiny space using a DIY vertical garden. It’s easier than you think, and the rewards are oh-so-satisfying.
Why Vertical Gardening for Long Beans?
Long beans, also known as yardlong beans or asparagus beans, are vigorous climbers. They need support to thrive and produce those impressively long pods. Vertical gardening is the perfect solution for small spaces because it allows you to maximize your growing area by utilizing vertical space instead of horizontal. Plus, it looks pretty darn cool!
What You’ll Need
Before we dive in, let’s gather our supplies. Don’t worry, you probably have some of these lying around already!
* Seeds: Long bean seeds, of course! Choose a variety that suits your climate. I personally love the ‘Red Noodle’ variety for its vibrant color and delicious flavor.
* Pots or Containers: I recommend using pots that are at least 12 inches in diameter and 12 inches deep. This gives the roots plenty of room to grow. You can use plastic pots, terracotta pots, or even repurposed containers like buckets or large tubs.
* Potting Mix: Use a high-quality potting mix that drains well. Avoid using garden soil, as it can become compacted in containers.
* Trellis or Support Structure: This is crucial for long beans to climb. You can use a bamboo trellis, a metal trellis, a DIY trellis made from branches, or even sturdy twine strung between posts. I’ll show you how to build a simple and effective trellis later on.
* Fertilizer: A balanced fertilizer (like 10-10-10) or a fertilizer specifically formulated for beans will help your plants thrive.
* Watering Can or Hose: For keeping your plants hydrated.
* Gardening Gloves: To protect your hands.
* Optional: Mulch (like straw or wood chips) to help retain moisture and suppress weeds.
Building Your DIY Trellis
Okay, let’s get our hands dirty! This is where the “DIY” part really shines. I’m going to show you how to build a simple A-frame trellis that’s perfect for long beans.
Materials for A-Frame Trellis:
* Bamboo Poles or Wooden Stakes: You’ll need six poles or stakes, each about 6-8 feet long.
* Twine or Garden Wire: For tying the poles together.
* Drill (Optional): If you want to make holes for the twine to pass through.
Steps to Build the Trellis:
1. Gather Your Materials: Make sure you have all your bamboo poles (or wooden stakes) and twine ready to go.
2. Form the “A” Frames: Take two poles and lean them against each other, forming an “A” shape. The top of the “A” should be about 1-2 feet apart.
3. Secure the Top: Use twine or garden wire to tightly tie the two poles together at the top where they intersect. Wrap the twine around several times for extra security. If you have a drill, you can drill small holes near the top of each pole and thread the twine through the holes before tying. This will make the connection even stronger.
4. Repeat: Repeat steps 2 and 3 to create two more “A” frames. You should now have three “A” frames.
5. Connect the Frames: Now, take the three “A” frames and stand them up in a row, spacing them about 2-3 feet apart.
6. Add Horizontal Support: Take the remaining two poles and lay them horizontally across the top of the “A” frames, connecting them together. One pole should be on one side of the “A” frames, and the other pole should be on the other side.
7. Secure the Horizontal Supports: Use twine or garden wire to tie the horizontal poles to each “A” frame. Again, wrap the twine around several times for a secure connection.
8. Reinforce (Optional): For extra stability, you can add diagonal supports by tying additional pieces of twine or wire between the “A” frames.
9. Test the Trellis: Gently shake the trellis to make sure it’s sturdy. If it wobbles, add more twine or wire to reinforce the connections.
Planting Your Long Beans
Alright, trellis is ready, now let’s get those seeds in the ground!
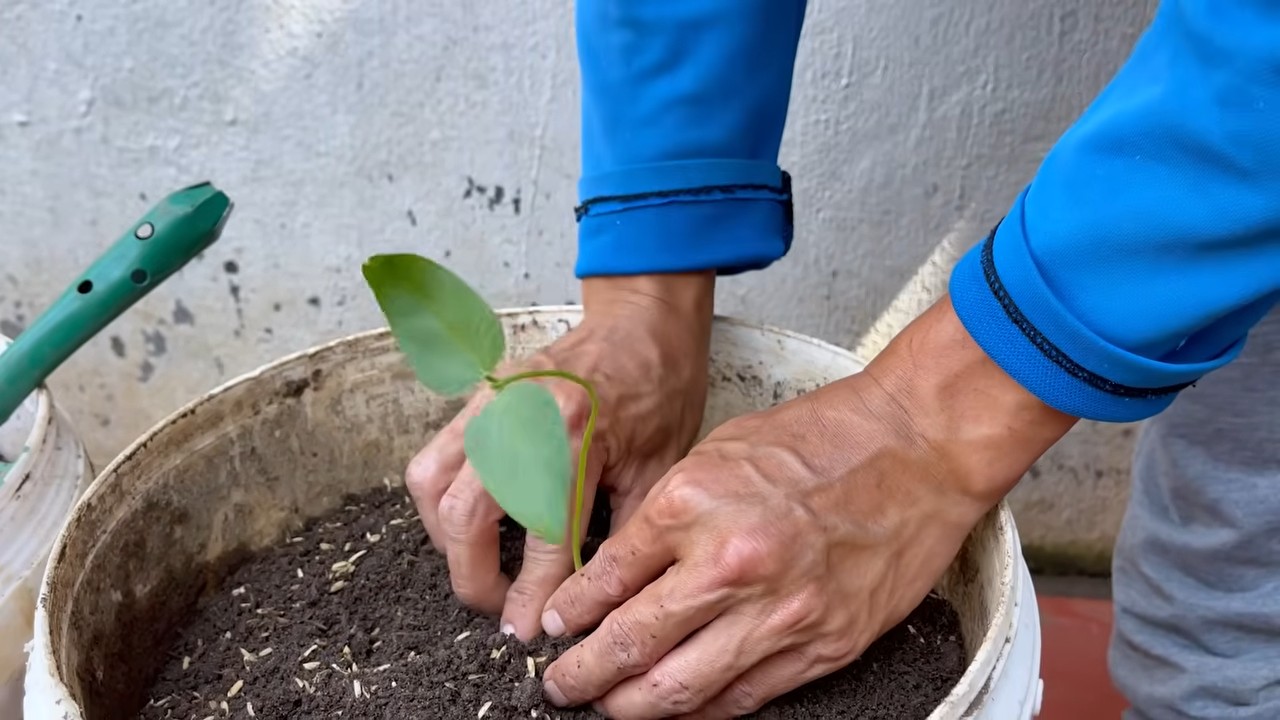
1. Prepare Your Pots: Fill your pots with potting mix, leaving about an inch of space at the top.
2. Sow the Seeds: Plant 2-3 long bean seeds per pot, about 1 inch deep. Space the seeds a few inches apart.
3. Water Gently: Water the pots gently until the soil is evenly moist. Avoid overwatering, as this can cause the seeds to rot.
4. Place in a Sunny Location: Long beans need at least 6-8 hours of sunlight per day. Place your pots in a sunny spot on your balcony, patio, or in your garden.
5. Wait and Watch: Keep the soil moist but not soggy. The seeds should germinate in about 7-14 days.
Caring for Your Long Bean Plants
Once your seedlings emerge, it’s time to provide them with the care they need to thrive.
1. Thin the Seedlings: Once the seedlings have a few sets of true leaves, thin them to one strong plant per pot. Snip off the weaker seedlings at the soil line.
2. Water Regularly: Water your long bean plants regularly, especially during hot, dry weather. The soil should be consistently moist but not waterlogged. Check the soil moisture by sticking your finger into the soil. If the top inch feels dry, it’s time to water.
3. Fertilize: Fertilize your long bean plants every 2-3 weeks with a balanced fertilizer or a fertilizer specifically formulated for beans. Follow the instructions on the fertilizer package.
4. Train the Vines: As the long bean vines grow, gently guide them onto the trellis. You may need to tie them to the trellis with twine or plant clips.
5. Pest Control: Keep an eye out for pests like aphids, spider mites, and bean beetles. If you spot any pests, treat them with an organic insecticide like neem oil or insecticidal soap.
6. Weed Control: Remove any weeds that pop up in your pots. Weeds can compete with your long bean plants for nutrients and water. Mulching can help suppress weed growth.
Harvesting Your Long Beans
The moment we’ve all been waiting for! Harvesting your homegrown long beans is incredibly rewarding.
1. Harvest Time: Long beans are typically ready to harvest about 60-70 days after planting. The pods should be long, slender, and firm.
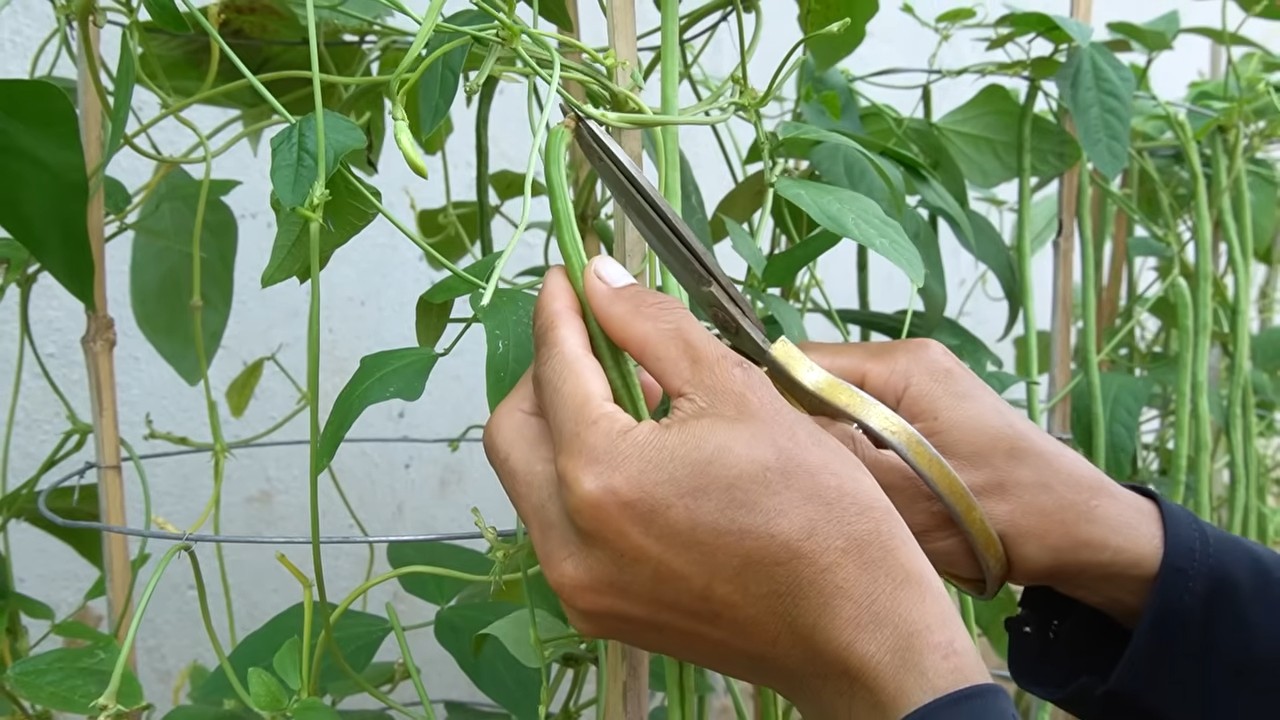
2. Harvesting Technique: Use scissors or pruning shears to cut the pods from the vine. Harvest the pods regularly to encourage the plant to produce more beans.
3. Enjoy Your Harvest: Long beans can be eaten raw, steamed, stir-fried, or added to soups and stews. They’re a delicious and nutritious addition to any meal!
Troubleshooting
Even with the best care, you might encounter some challenges along the way. Here are a few common problems and how to fix them:
* Yellowing Leaves: This could be a sign of overwatering, underwatering, or nutrient deficiency. Check the soil moisture and adjust your watering schedule accordingly. Fertilize your plants with a balanced fertilizer.
* Lack of Flowers: This could be due to insufficient sunlight, poor soil, or lack of pollination. Make sure your plants are getting enough sunlight. Improve the soil by adding compost or other organic matter. You can also try hand-pollinating the flowers by gently brushing them with a small paintbrush.
* Pest Infestation: Treat pest infestations with an organic insecticide like neem oil or insecticidal soap. You can also try attracting beneficial insects to your garden, such as ladybugs and lacewings, which will prey on pests.
Tips for Success
Here are a few extra tips to help you grow the best long beans possible:
* Choose the Right Variety: Select a long bean variety that is well-suited to your climate and growing conditions.
* Provide Adequate Support: Make sure your trellis is strong enough to support the weight of the long bean vines and pods.
* Water Deeply: When you water your long bean plants, water deeply so that the water reaches the roots.
* Mulch: Mulching helps retain moisture, suppress weeds
Conclusion
So, there you have it! Growing long beans in a tiny space isn’t just a pipe dream; it’s an achievable reality with a little ingenuity and the right approach. We’ve walked you through the essential steps, from selecting the perfect container and soil to providing the necessary support and care. But why should you actually dedicate your precious balcony, patio, or even windowsill to this endeavor?
The answer is multifaceted. First and foremost, the taste of homegrown long beans is simply unparalleled. Forget the bland, often fibrous offerings from the supermarket; these beans, bursting with freshness and flavor, will elevate your stir-fries, salads, and side dishes to a whole new level. Imagine the satisfaction of harvesting your own produce, knowing exactly where it came from and what went into its cultivation.
Beyond the culinary benefits, growing long beans in a small space is an incredibly rewarding experience. It’s a chance to connect with nature, even in the heart of the city. The daily observation of your plants, the nurturing care you provide, and the eventual harvest all contribute to a sense of accomplishment and well-being. It’s a mini-garden therapy session right at your doorstep!
Furthermore, this method of growing long beans is incredibly space-efficient. Vertical gardening techniques, like using trellises or stakes, allow you to maximize your yield without sacrificing valuable square footage. This is particularly crucial for urban dwellers who often have limited outdoor space.
But the possibilities don’t end here! Feel free to experiment with different varieties of long beans. Some are known for their exceptional flavor, while others boast vibrant colors. Consider companion planting to further enhance your garden’s health and productivity. Marigolds, for example, can help deter pests, while basil can improve the flavor of your beans.
And don’t be afraid to get creative with your container choices. While we’ve suggested specific sizes and materials, you can adapt the method to suit your own aesthetic preferences and available resources. Repurposed buckets, old tires, or even hanging baskets can all be transformed into thriving long bean habitats.
Ultimately, the key to success lies in consistent care and attention. Regularly water your plants, provide them with adequate sunlight, and monitor them for any signs of pests or diseases. With a little effort, you’ll be rewarded with a bountiful harvest of delicious, homegrown long beans.
We wholeheartedly encourage you to give this DIY trick a try. It’s a fun, rewarding, and sustainable way to enjoy fresh produce, even in the smallest of spaces. And most importantly, we want to hear about your experiences! Share your photos, tips, and challenges with us in the comments section below. Let’s create a community of urban gardeners, all united by our love of homegrown long beans. So, grab your seeds, prepare your containers, and get ready to embark on this exciting gardening adventure! You’ll be amazed at what you can achieve, even in a tiny space. Remember, growing long beans is easier than you think!
Frequently Asked Questions (FAQ)
What is the best time of year to plant long beans?
The ideal time to plant long beans is during the warm season, typically after the last frost. Long beans thrive in temperatures between 70°F and 85°F (21°C and 29°C). In most regions, this falls between late spring and early summer. However, if you live in a warmer climate with a longer growing season, you may be able to plant long beans multiple times throughout the year. Check your local weather patterns and frost dates to determine the optimal planting time for your area. Starting seeds indoors a few weeks before the last expected frost can give you a head start on the growing season.
How much sunlight do long beans need?
Long beans require at least 6-8 hours of direct sunlight per day to thrive. Sunlight is essential for photosynthesis, the process by which plants convert light energy into chemical energy for growth. If your growing space doesn’t receive enough natural sunlight, you may need to supplement with artificial lighting, such as grow lights. Position your containers in the sunniest spot available, and consider rotating them regularly to ensure that all sides of the plants receive adequate light exposure. Insufficient sunlight can lead to stunted growth, reduced yields, and pale, weak plants.
What kind of soil is best for growing long beans in containers?
The best soil for growing long beans in containers is a well-draining, nutrient-rich potting mix. Avoid using garden soil, as it can be too heavy and compact for container gardening. A good potting mix should contain a blend of peat moss, perlite, and vermiculite. These ingredients provide good drainage, aeration, and water retention. You can also amend your potting mix with compost or other organic matter to improve its fertility. Long beans prefer a slightly acidic to neutral soil pH, ideally between 6.0 and 7.0. Test your soil pH regularly and adjust as needed.
How often should I water my long bean plants?
Water your long bean plants regularly, especially during hot, dry weather. The frequency of watering will depend on factors such as the size of your container, the type of soil you’re using, and the weather conditions. As a general rule, water when the top inch of soil feels dry to the touch. Avoid overwatering, as this can lead to root rot. When watering, water deeply and thoroughly, ensuring that the entire root ball is moistened. Consider using a watering can or a soaker hose to avoid splashing water on the leaves, which can promote fungal diseases.
Do long beans need fertilizer?
Yes, long beans benefit from regular fertilization. Use a balanced fertilizer with an NPK ratio of 10-10-10 or 20-20-20. Apply the fertilizer according to the manufacturer’s instructions. You can also use organic fertilizers, such as compost tea or fish emulsion. Fertilize your long bean plants every 2-3 weeks during the growing season. Avoid over-fertilizing, as this can lead to excessive vegetative growth and reduced yields.
How do I support my long bean plants?
Long beans are climbing plants and require support to grow properly. You can use a trellis, stakes, or a fence to provide support. Install the support structure when you plant your long bean seedlings. As the plants grow, gently guide the vines up the support structure. Tie the vines to the support structure with soft twine or plant ties if necessary. Regular pruning can also help to keep the plants manageable and encourage branching.
What are some common pests and diseases that affect long beans?
Some common pests that affect long beans include aphids, bean beetles, and spider mites. These pests can damage the leaves and stems of the plants, reducing their yield. You can control these pests with insecticidal soap, neem oil, or by handpicking them off the plants. Common diseases that affect long beans include powdery mildew, rust, and anthracnose. These diseases can cause spots on the leaves and stems, and can eventually kill the plants. You can prevent these diseases by providing good air circulation, avoiding overwatering, and using disease-resistant varieties.
When are long beans ready to harvest?
Long beans are typically ready to harvest about 60-90 days after planting. Harvest the beans when they are young and tender, before the seeds inside become too large. The beans should be about 12-18 inches long. Harvest the beans regularly to encourage continued production. Use scissors or pruning shears to cut the beans from the plant.
Can I grow long beans indoors?
While it’s more challenging, you can grow long beans indoors if you provide them with adequate light, warmth, and support. You’ll need a large container, a well-draining potting mix, and a strong trellis or other support structure. You’ll also need to provide supplemental lighting, such as grow lights, to ensure that the plants receive enough light. Indoor long beans may not produce as many beans as outdoor plants, but you can still enjoy a small harvest.
What are some creative ways to use long beans in cooking?
Long beans are a versatile vegetable that can be used in a variety of dishes. They can be stir-fried, steamed, boiled, or grilled. They can be added to salads, soups, and stews. They can also be pickled or fermented. Some popular long bean recipes include stir-fried long beans with garlic and chili, long bean salad with sesame dressing, and long bean curry. Get creative and experiment with different flavors and cooking methods to find your favorite ways to enjoy long beans.
Leave a Comment