
Grow Microgreens at Home and unlock a world of flavor and nutrition right on your windowsill! Have you ever wondered how chefs add those vibrant, tiny greens to your restaurant meals? Well, the secret is out, and it’s easier than you think to cultivate these power-packed plants yourself. For centuries, sprouting seeds and growing young greens have been a part of various cultures, offering a sustainable way to access fresh produce, especially during colder months. Think of it as a miniature garden, bursting with potential, right in your kitchen!
But why should you bother to grow microgreens at home? In today’s fast-paced world, we’re all looking for ways to eat healthier and save time and money. Microgreens are not only incredibly nutritious, often containing higher concentrations of vitamins and minerals than their mature counterparts, but they also add a delightful burst of flavor to salads, sandwiches, and countless other dishes. Plus, let’s be honest, there’s something incredibly satisfying about nurturing life and watching your own food grow. I’m excited to share some simple DIY tricks and hacks that will have you harvesting your own delicious microgreens in no time. Get ready to transform your kitchen into a miniature, edible oasis!
Grow Your Own Delicious Microgreens: A Beginner’s Guide
Okay, so you want to jump on the microgreen bandwagon? Awesome! I’m telling you, growing your own microgreens is seriously rewarding. Not only are they packed with nutrients and flavor, but it’s also a super easy and inexpensive way to add a little green to your life, especially during those long winter months. Plus, nothing beats the taste of something you’ve grown yourself! Let’s dive in!
What You’ll Need
Before we get started, let’s gather our supplies. Don’t worry, you probably have a lot of this stuff lying around already.
* Seeds: This is the most important part! You can use a variety of seeds, like broccoli, radish, sunflower, peas, kale, arugula, mustard, and even cilantro. I recommend starting with broccoli or radish – they’re pretty foolproof. Make sure you’re buying seeds specifically for microgreens or sprouting, as regular garden seeds might be treated with chemicals.
* Growing Trays: You’ll need two trays – one with drainage holes and one without. The one without drainage will act as a water reservoir. You can find these at most garden centers or online. You can even repurpose plastic takeout containers if you’re feeling thrifty! Just make sure they’re clean.
* Growing Medium: You have a few options here. You can use potting mix, coconut coir, or even a hydroponic grow mat. I personally prefer coconut coir because it’s sustainable and holds moisture well. Avoid using garden soil, as it can be too heavy and may contain pests or diseases.
* Spray Bottle: This is essential for keeping your microgreens moist.
* Weight (Optional): A small weight, like a book or a brick wrapped in plastic, can help with germination and create stronger stems.
* Light Source (Optional): While microgreens can grow indoors with indirect sunlight, a grow light can significantly improve their growth and color, especially if you live in a darker climate. A simple LED grow light will do the trick.
* Scissors or Knife: For harvesting your delicious microgreens!
Step-by-Step Instructions: Planting Your Microgreens
Alright, let’s get our hands dirty! This process is surprisingly simple, and you’ll be amazed at how quickly your microgreens start to sprout.
1. Prepare Your Growing Tray: Take the tray with drainage holes and line it with your chosen growing medium. Moisten the medium thoroughly with water. You want it to be damp, but not soaking wet. Think of a wrung-out sponge. If you’re using coconut coir, it will expand as it absorbs water.
2. Sow Your Seeds: Now comes the fun part! Sprinkle your seeds evenly over the surface of the moistened growing medium. Don’t overcrowd them, but you should aim for a fairly dense layer. Think of it like a carpet of seeds. For smaller seeds like broccoli or radish, you can use a shaker to help distribute them evenly.
3. Mist the Seeds: Gently mist the seeds with water using your spray bottle. This will help them settle into the growing medium and initiate the germination process.
4. Cover and Weigh Down (Optional): Cover the tray with a lid or another tray to create a dark and humid environment. This will encourage the seeds to germinate. If you’re using a weight, place it on top of the cover. This will help the seeds make good contact with the growing medium and result in stronger stems.
5. Germination Period: Place the covered tray in a dark, room-temperature location. Check the tray daily to ensure the growing medium remains moist. Mist with water as needed. The germination period typically lasts for 2-4 days, depending on the type of seed.
Caring for Your Microgreens
Once your seeds have germinated, it’s time to give them some light and air!
1. Remove the Cover and Weight: Once you see the seeds sprouting (little white roots emerging), remove the cover and weight.
2. Introduce Light: Place the tray under a grow light or in a location with bright, indirect sunlight. Avoid direct sunlight, as it can scorch the delicate seedlings. If you’re using a grow light, position it a few inches above the tray.
3. Watering: This is crucial! The key to healthy microgreens is consistent moisture. Instead of watering from above, which can damage the delicate seedlings, use the bottom-watering method. Pour water into the tray without drainage holes (the reservoir tray) and place the tray with the microgreens inside. The growing medium will absorb the water from the bottom. Allow the microgreens to soak up the water for about 15-20 minutes, then remove the tray and drain any excess water from the reservoir tray. Repeat this process every day or two, depending on how quickly the growing medium dries out. You want to keep the medium consistently moist, but not waterlogged.
4. Air Circulation: Good air circulation is important to prevent mold and mildew. If you’re growing your microgreens in a humid environment, consider using a small fan to circulate the air.
5. Monitor Growth: Keep an eye on your microgreens and watch them grow! You’ll notice them developing their first true leaves (the second set of leaves after the initial seed leaves).
Harvesting Your Microgreens
The best part! Harvesting your microgreens is super satisfying.
1. Harvest Time: Your microgreens are ready to harvest when they have developed their first true leaves and are about 1-3 inches tall, depending on the variety. This usually takes about 7-14 days from planting.
2. Harvesting Technique: Using sharp scissors or a knife, cut the microgreens just above the growing medium.
3. Washing (Optional): Gently wash the harvested microgreens in cool water to remove any remaining growing medium.
4. Storage: Store your harvested microgreens in an airtight container in the refrigerator. They should last for about a week.
Troubleshooting
Even with the best intentions, sometimes things can go wrong. Here are a few common problems and how to fix them:
* Mold: Mold is a common problem, especially in humid environments. To prevent mold, ensure good air circulation and avoid overwatering. If you see mold, remove the affected area immediately. You can also try spraying the microgreens with a diluted hydrogen peroxide solution (1 part hydrogen peroxide to 10 parts water).
* Leggy Microgreens: Leggy microgreens are tall and spindly, with long stems and small leaves. This is usually caused by insufficient light. Move your microgreens to a brighter location or use a grow light.
* Slow Growth: Slow growth can be caused by a variety of factors, including insufficient light, lack of moisture, or poor-quality seeds. Make sure your microgreens are getting enough light and water, and consider using a different brand of seeds.
* Uneven Germination: Uneven germination can be caused by uneven seed distribution or inconsistent moisture. Make sure you’re spreading the seeds evenly and keeping the growing medium consistently moist.
Seed Specific Tips
While the general process is the same, here are a few tips for specific types of microgreens:
* Sunflower: Sunflower seeds have a tough outer shell. Some people recommend soaking them in water for 8-12 hours before planting to improve germination. They also benefit from being weighed down heavily during the germination period.
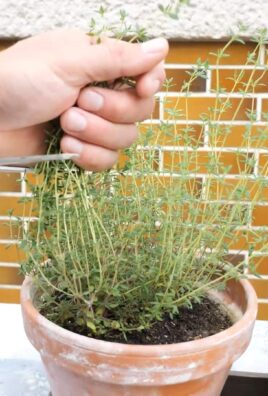
* Pea Shoots: Pea shoots also benefit from soaking before planting. They can be a bit more challenging to grow than other microgreens, but they’re definitely worth the effort! They need a bit more space and support as they grow.
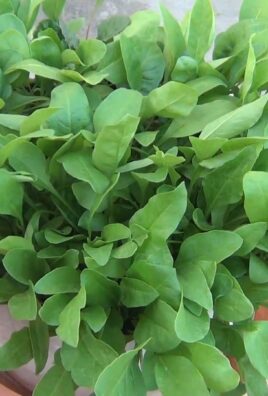
* Radish: Radish microgreens are super easy and fast-growing. They have a spicy, peppery flavor that’s great in salads and sandwiches.
* Broccoli: Broccoli microgreens are another easy option and are packed with nutrients. They have a mild, slightly sweet flavor.
Enjoying Your Harvest
Now that you’ve harvested your delicious microgreens, it’s time to enjoy them! Here are a few ideas:
* Salads: Add microgreens to your salads for a boost of flavor and nutrients.
* Sandwiches and Wraps: Sprinkle microgreens on your sandwiches and wraps for a fresh, crunchy texture.
* Smoothies: Blend microgreens into your smoothies for an extra dose of vitamins and minerals.
* Garnishes: Use microgreens as a garnish for soups, omelets, and other dishes.
* Juices: Add microgreens to your juicer for a nutrient-packed juice.
Growing microgreens is a fun and rewarding experience. With a little practice, you’ll be harvesting your own delicious and nutritious greens in no time! Happy growing!
Conclusion
So, there you have it! Growing microgreens at home is not just a trendy kitchen experiment; it’s a gateway to fresher, more nutritious meals, a sustainable lifestyle, and a surprisingly rewarding hobby. We’ve walked you through the simple steps, highlighting how accessible and cost-effective it is to cultivate these tiny powerhouses right on your windowsill.
Why is this DIY trick a must-try? Because it empowers you to take control of your food source, ensuring you have access to vibrant, flavorful greens year-round, regardless of the season or your location. Forget those wilted, overpriced greens from the supermarket! With a minimal investment of time and resources, you can enjoy a constant supply of fresh, organic microgreens bursting with flavor and nutrients.
But the benefits extend beyond just convenience and cost savings. Growing your own microgreens connects you to the natural world, fostering a sense of accomplishment and well-being. It’s a mindful activity that can be surprisingly therapeutic, offering a welcome respite from the stresses of daily life. Plus, it’s a fantastic way to introduce children to the wonders of gardening and healthy eating habits.
Looking for variations? Absolutely! Experiment with different seed varieties to discover your favorite flavor profiles. Radish microgreens offer a peppery kick, while broccoli microgreens provide a mild, earthy taste. Sunflower microgreens are nutty and crunchy, and pea shoots are sweet and tender. You can even create your own custom blends to suit your culinary preferences.
Consider using different growing mediums as well. While soil is a popular choice, you can also try coco coir, hemp mats, or even hydroponic systems for a soilless approach. Each medium offers its own unique advantages in terms of water retention, nutrient availability, and ease of use.
Another fun variation is to experiment with different containers. While we recommended shallow trays, you can also use repurposed plastic containers, glass jars, or even vertical growing systems to maximize space. Get creative and find what works best for you!
We strongly encourage you to give this DIY trick a try. It’s easier than you think, and the rewards are well worth the effort. Imagine adding a vibrant garnish of freshly grown microgreens to your salads, sandwiches, soups, and smoothies. Picture yourself impressing your friends and family with your homegrown culinary creations.
Don’t be afraid to experiment, learn from your mistakes, and most importantly, have fun! The world of microgreens is vast and exciting, and there’s always something new to discover.
Once you’ve embarked on your microgreen growing journey, we’d love to hear about your experience. Share your photos, tips, and recipes with us and the wider community. Let’s inspire each other to embrace the joys of homegrown goodness and unlock the full potential of these tiny nutritional powerhouses. So go ahead, start growing your own microgreens at home today! You won’t regret it.
Frequently Asked Questions (FAQ)
What exactly are microgreens, and why are they so good for me?
Microgreens are essentially the seedlings of vegetables and herbs, harvested just after the cotyledon leaves (the first leaves to emerge) have developed, and sometimes after the first true leaves appear. They are packed with nutrients, often containing higher concentrations of vitamins, minerals, and antioxidants than their mature counterparts. This is because the plant is in its most concentrated growth phase, drawing on all its stored energy to develop. They are also incredibly flavorful, adding a burst of fresh, intense taste to any dish.
What kind of seeds can I use to grow microgreens?
The possibilities are vast! Some popular choices include:
* **Brassicas:** Broccoli, kale, cabbage, radish, mustard
* **Legumes:** Peas, lentils, chickpeas
* **Cereals:** Wheatgrass, barley, oats
* **Amaranthaceae:** Amaranth, quinoa
* **Asteraceae:** Sunflower, lettuce, endive
* **Apiaceae:** Carrot, celery, dill, fennel
However, it’s crucial to use seeds specifically intended for sprouting or microgreen production. Avoid using seeds that have been treated with fungicides or other chemicals, as these are not safe for consumption. Look for seeds labeled as “organic” or “untreated” to ensure you’re growing healthy, edible microgreens.
How much light do microgreens need?
Microgreens need plenty of light to thrive. Ideally, they should receive at least 4-6 hours of direct sunlight per day. If you don’t have a sunny windowsill, you can supplement with artificial lighting, such as fluorescent grow lights or LED grow lights. Position the lights a few inches above the microgreens and keep them on for 12-16 hours per day. Insufficient light can lead to leggy, pale microgreens that are less flavorful and nutritious.
How often should I water my microgreens?
Maintaining proper moisture is essential for successful microgreen cultivation. The growing medium should be consistently moist but not waterlogged. Water your microgreens once or twice a day, depending on the humidity and temperature. Use a spray bottle to gently mist the surface of the soil or growing medium. Avoid overwatering, as this can lead to mold growth and root rot. A good way to check if your microgreens need watering is to feel the soil. If it feels dry to the touch, it’s time to water.
How long does it take for microgreens to grow?
The growing time for microgreens varies depending on the seed variety and environmental conditions. Generally, most microgreens are ready to harvest within 7-14 days. Some varieties, such as radish and mustard, may be ready in as little as 5-7 days, while others, such as sunflower and pea shoots, may take up to 14-21 days. You’ll know your microgreens are ready to harvest when they have developed their cotyledon leaves and sometimes their first true leaves.
How do I harvest microgreens?
Harvesting microgreens is easy! Simply use a pair of scissors or a sharp knife to cut the stems just above the soil line. Rinse the harvested microgreens gently with water and pat them dry with a paper towel. They are now ready to use in your favorite recipes. It’s best to harvest microgreens just before you plan to use them for optimal freshness and flavor.
Can I regrow microgreens after harvesting?
Unfortunately, microgreens cannot be regrown after harvesting. Unlike some vegetables that can be harvested multiple times, microgreens are a one-time crop. Once you’ve harvested them, you’ll need to start a new batch of seeds to grow more. However, the short growing time makes it easy to have a continuous supply of fresh microgreens.
What if my microgreens get moldy?
Mold growth is a common problem when growing microgreens, especially in humid environments. To prevent mold, ensure good air circulation around your microgreens. Avoid overwatering and use a well-draining growing medium. If you notice mold, remove the affected areas immediately. You can also try spraying the microgreens with a diluted solution of hydrogen peroxide or apple cider vinegar. If the mold is widespread, it’s best to discard the entire batch and start over.
How do I store harvested microgreens?
To store harvested microgreens, gently rinse them with water and pat them dry with a paper towel. Place them in a sealed container lined with a paper towel to absorb excess moisture. Store the container in the refrigerator for up to a week. It’s best to use microgreens as soon as possible for optimal freshness and flavor.
Is growing microgreens at home really worth the effort?
Absolutely! Growing microgreens at home is a rewarding and sustainable way to enjoy fresh, nutritious greens year-round. It’s a cost-effective alternative to buying store-bought microgreens, and it allows you to control the quality and safety of your food. Plus, it’s a fun and educational activity that can be enjoyed by people of all ages. Once you experience the taste and benefits of homegrown microgreens, you’ll be hooked!

Leave a Comment