
Grow Mint Indoors? Absolutely! Imagine stepping into your kitchen and snipping fresh, fragrant mint leaves for your tea, mojito, or even a delicious salad, all year round. No more sad, wilted bunches from the grocery store! For centuries, mint has been cherished not only for its refreshing flavor but also for its medicinal properties. Ancient Egyptians used it for digestive ailments, and the Romans spread its cultivation throughout Europe.
But let’s be honest, sometimes our outdoor gardens just don’t cooperate, or maybe you simply don’t have the space. That’s where the magic of indoor gardening comes in. I’m here to show you how easy and rewarding it can be to grow mint indoors, regardless of your experience level. This DIY guide is packed with simple tricks and hacks that will transform your windowsill into a thriving mint oasis.
Why do you need this? Because fresh mint elevates everything! Plus, growing your own herbs is incredibly satisfying, saves you money, and reduces your reliance on store-bought produce. Ready to ditch the expensive, pre-packaged mint and embrace the joy of homegrown goodness? Let’s get started!

Growing Mint Indoors: A Beginner’s Guide to Fresh Flavor Year-Round
Hey there, fellow plant enthusiasts! Are you craving the refreshing taste of mint but don’t have a garden or live in a climate where it thrives year-round outdoors? Don’t worry, I’ve got you covered! Growing mint indoors is surprisingly easy, and I’m going to walk you through every step so you can enjoy fresh mint whenever you need it.
Why Grow Mint Indoors?
Before we dive in, let’s talk about why growing mint indoors is such a great idea:
* Freshness at Your Fingertips: Imagine having fresh mint readily available for teas, cocktails, salads, or even just to add a sprig to your water. No more last-minute trips to the grocery store!
* Year-Round Availability: Say goodbye to seasonal limitations. With indoor growing, you can enjoy mint’s vibrant flavor all year long, regardless of the weather outside.
* Control Over Growing Conditions: You have complete control over the environment, ensuring optimal conditions for your mint to thrive. This means you can avoid pests, diseases, and harsh weather conditions.
* Aromatic Benefits: Mint is known for its invigorating scent, which can help freshen up your home and even boost your mood.
* It’s Easy and Fun! Seriously, growing mint indoors is a rewarding experience, even for beginners.
What You’ll Need
Here’s a list of everything you’ll need to get started:
* Mint Cuttings or a Potted Mint Plant: You can either propagate mint from cuttings (which I’ll explain how to do) or purchase a small potted mint plant from a nursery or garden center.
* A Pot with Drainage Holes: Choose a pot that’s at least 6 inches in diameter to give your mint room to grow. Drainage holes are essential to prevent waterlogging.
* Potting Mix: Use a well-draining potting mix specifically formulated for herbs or vegetables. Avoid using garden soil, as it can be too heavy and compact.
* Watering Can or Spray Bottle: For watering your mint.
* A Sunny Location: Mint needs plenty of sunlight to thrive, so choose a spot that receives at least 4-6 hours of direct sunlight per day. A south-facing window is ideal. If you don’t have enough natural light, you can supplement with a grow light.
* Optional: Liquid Fertilizer: A balanced liquid fertilizer can help boost growth, but it’s not essential.
Propagating Mint from Cuttings (Optional)
If you’re starting from cuttings, here’s how to do it:
1. Select Healthy Stems: Choose healthy, vibrant stems from an existing mint plant. Look for stems that are at least 4-6 inches long and have several leaves.
2. Remove Lower Leaves: Gently remove the leaves from the bottom 2 inches of the stem. This will expose the nodes where roots will develop.
3. Place Cuttings in Water: Place the cuttings in a glass or jar filled with water, making sure the nodes are submerged.
4. Wait for Roots to Develop: Place the glass in a bright, indirect light location and change the water every few days. You should see roots starting to develop within a week or two.
5. Plant the Rooted Cuttings: Once the roots are about an inch long, you can plant the cuttings in your prepared pot.
Planting Your Mint
Whether you’re starting from cuttings or a potted plant, the planting process is the same:
1. Prepare the Pot: Fill your pot with potting mix, leaving about an inch of space at the top.
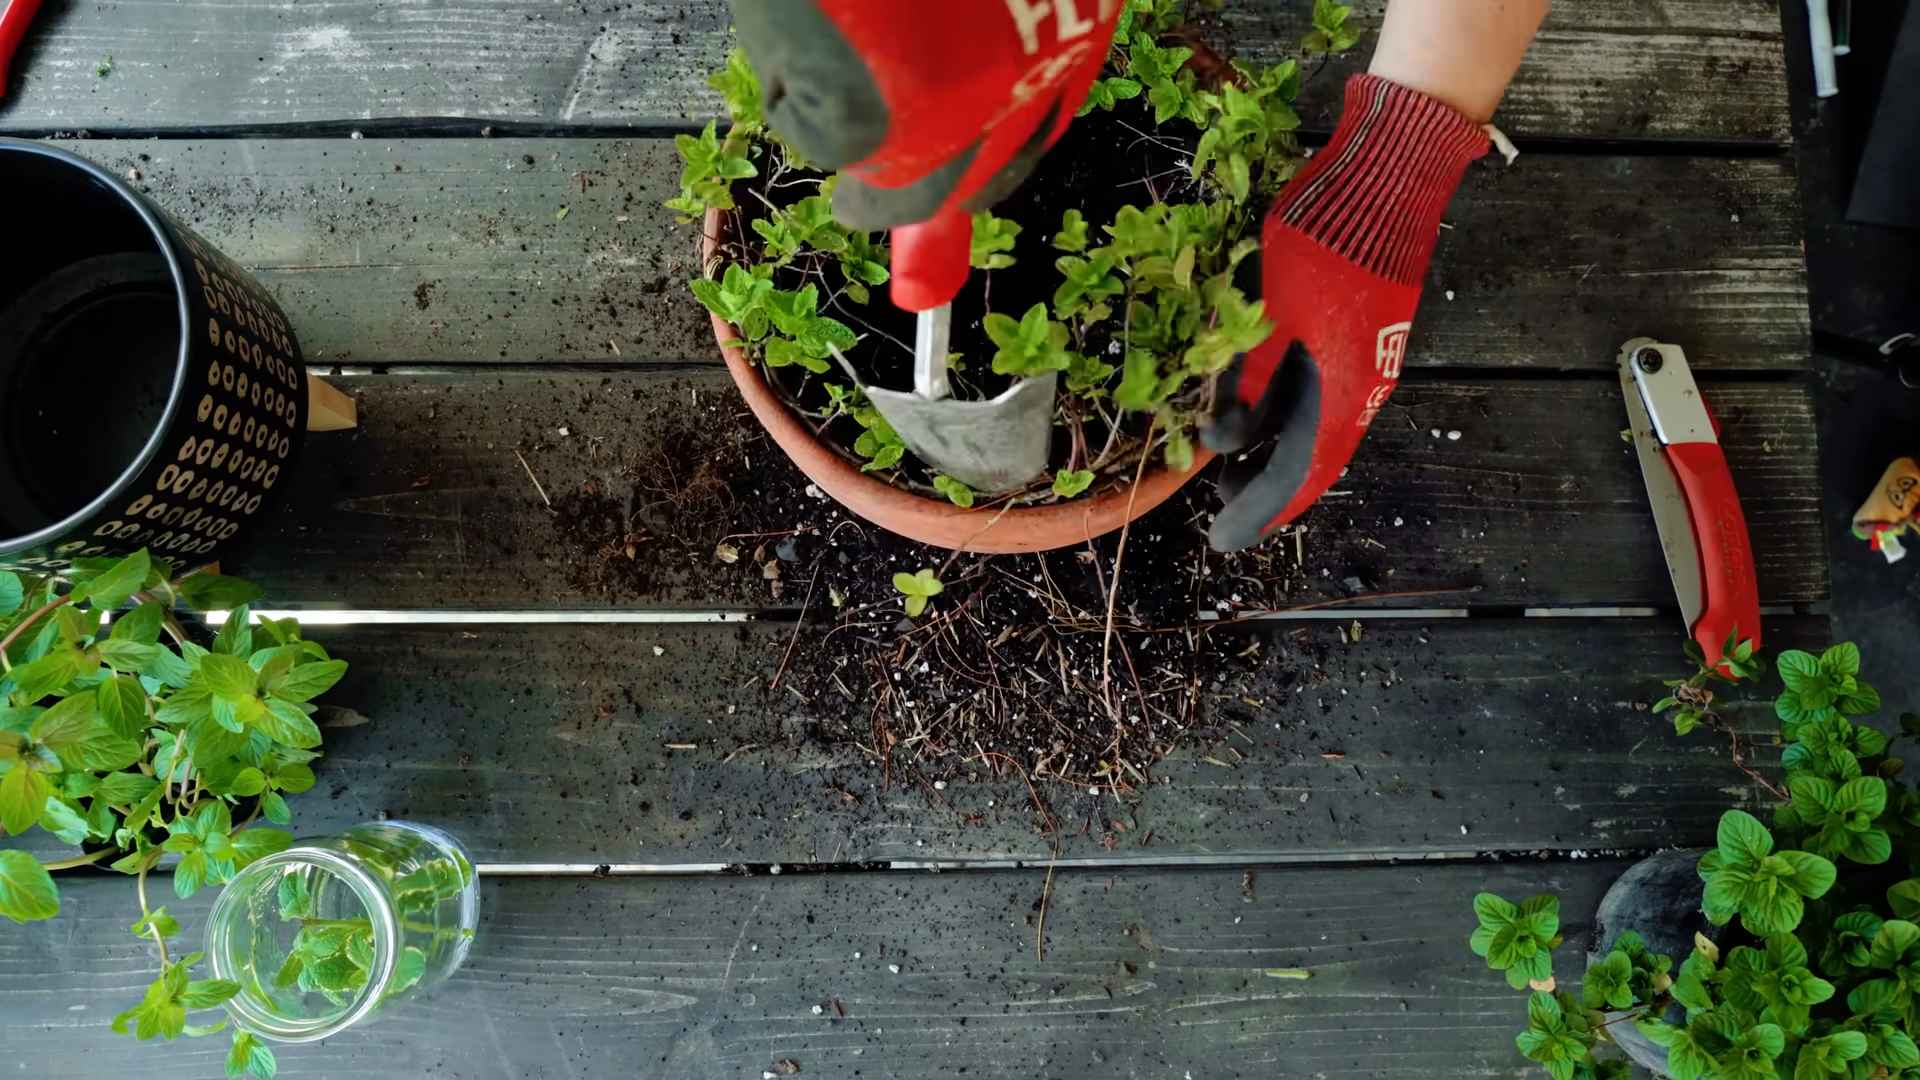
2. Create a Hole: Dig a hole in the center of the pot that’s large enough to accommodate the root ball of your mint plant or the roots of your cuttings.
3. Plant the Mint: Gently remove the mint plant from its original container (if applicable) and loosen the roots slightly. Place the plant or cuttings in the hole and backfill with potting mix.
4. Water Thoroughly: Water the soil thoroughly until water drains out of the drainage holes. This will help settle the soil and ensure the roots are properly hydrated.
Caring for Your Indoor Mint
Now that your mint is planted, here’s how to keep it happy and healthy:
1. Watering: Mint likes to be kept consistently moist, but not waterlogged. Water when the top inch of soil feels dry to the touch. Avoid overwatering, as this can lead to root rot.
2. Sunlight: As I mentioned earlier, mint needs plenty of sunlight. Place your pot in a sunny location that receives at least 4-6 hours of direct sunlight per day. If you don’t have enough natural light, you can supplement with a grow light.
3. Fertilizing (Optional): If you want to give your mint a boost, you can fertilize it every few weeks with a balanced liquid fertilizer. Follow the instructions on the fertilizer label.
4. Pruning: Regular pruning is essential for keeping your mint plant bushy and productive. Pinch off the top leaves of the stems to encourage branching. You can also harvest leaves as needed for cooking or tea.
5. Pest Control: Keep an eye out for pests like aphids, spider mites, and whiteflies. If you notice any pests, you can try spraying your plant with insecticidal soap or neem oil.
6. Repotting: Mint is a fast-growing plant, so you may need to repot it into a larger container every year or two. Choose a pot that’s a few inches larger in diameter than the current pot.
Troubleshooting
Here are some common problems you might encounter when growing mint indoors and how to solve them:
* Yellowing Leaves: This can be caused by overwatering, underwatering, or lack of nutrients. Check the soil moisture and adjust your watering schedule accordingly. You may also need to fertilize your plant.
* Leggy Growth: This is usually caused by insufficient sunlight. Move your plant to a sunnier location or supplement with a grow light.
* Pests: As mentioned earlier, keep an eye out for pests and treat them promptly with insecticidal soap or neem oil.
* Root Rot: This is caused by overwatering and poor drainage. Make sure your pot has drainage holes and avoid overwatering. If you suspect root rot, you may need to repot your plant in fresh potting mix.
Harvesting Your Mint
Harvesting your mint is easy! Simply pinch off the leaves or stems as needed. The more you harvest, the more your plant will grow. For the best flavor, harvest your mint in the morning, after the dew has dried.
Enjoying Your Fresh Mint
Now that you have a thriving indoor mint plant, it’s time to enjoy the fruits (or rather, leaves) of your labor! Here are just a few ways to use your fresh mint:
* Tea: Steep fresh mint leaves in hot water for a refreshing and soothing tea.
* Cocktails: Add mint to mojitos, mint juleps, or other cocktails for a burst of flavor.
* Salads: Sprinkle chopped mint over salads for a fresh and aromatic touch.
* Desserts: Use mint to garnish desserts like chocolate mousse or ice cream.
* Cooking: Add mint to sauces, marinades, and other dishes for a unique flavor.
* Infused Water: Add mint leaves to a pitcher of water for a refreshing and healthy drink.
Tips for Success
Here are a few extra tips to help you succeed in growing mint indoors:
* Choose the Right Variety: There are many different varieties of mint, each with its own unique flavor and aroma. Some popular varieties for indoor growing include peppermint, spearmint, and chocolate mint.
* Rotate Your Plant: Rotate your plant regularly to ensure that all sides receive equal sunlight.
* Provide Good Air Circulation: Good air circulation can help prevent fungal diseases.
* Don’t Be Afraid to Experiment: Growing mint indoors is a learning process. Don’t be afraid to experiment with different techniques to find what works best for you.
Growing mint indoors is a simple and rewarding way to enjoy fresh flavor year-round. With a little care and attention, you can have a thriving mint plant that provides you with a constant supply of aromatic leaves for all your culinary and beverage needs. Happy growing!
Conclusion
So, there you have it! Growing mint indoors is not only achievable, but it’s also incredibly rewarding. Imagine having fresh, vibrant mint leaves at your fingertips, ready to elevate your culinary creations, infuse your beverages with refreshing flavor, or simply add a touch of fragrant greenery to your home. This DIY project is a must-try for anyone who appreciates fresh herbs, enjoys a bit of gardening, or simply wants to add a touch of life to their indoor space.
The benefits extend far beyond mere convenience. Think about the money you’ll save by not having to constantly purchase mint from the grocery store, often in those frustratingly small and expensive packages. Consider the satisfaction of nurturing a plant from a small cutting or seedling to a thriving, aromatic herb. And, of course, there’s the sheer joy of knowing exactly where your food comes from and that it’s free from harmful pesticides.
But the best part about growing mint indoors is its versatility. While we’ve focused on the basics, there’s plenty of room for experimentation. Why not try different varieties of mint? Peppermint, spearmint, chocolate mint – each offers a unique flavor profile that can add a special touch to your recipes. You could even dedicate a small shelf or corner to a mini indoor herb garden, growing other complementary herbs like basil, parsley, or chives alongside your mint.
For a fun variation, consider using decorative pots or containers to add a touch of personality to your indoor garden. Upcycled teacups, mason jars, or even old watering cans can make charming and unique planters. Just be sure to provide adequate drainage to prevent root rot.
Another exciting avenue to explore is hydroponic mint cultivation. This soil-less method can be incredibly efficient and can even accelerate growth. There are many readily available hydroponic kits designed for indoor herb gardening, making it easier than ever to get started.
Ultimately, the success of your indoor mint garden hinges on providing the right conditions: ample sunlight (or a good grow light), well-draining soil, and consistent watering. Don’t be afraid to experiment and adjust your approach as needed. Observe your plants closely and learn to recognize the signs of stress, such as yellowing leaves or stunted growth.
We are confident that with a little care and attention, you’ll be enjoying the delightful aroma and flavor of homegrown mint in no time. So, grab a pot, some soil, and a mint cutting or seedling, and embark on this rewarding DIY adventure.
We encourage you to try this simple yet effective method of growing mint indoors and share your experiences with us! Let us know what varieties you’re growing, what challenges you’ve encountered, and what delicious recipes you’ve created with your homegrown mint. Share your photos and tips in the comments below – we can’t wait to see your indoor mint gardens flourish!
Frequently Asked Questions (FAQ)
What is the best location for growing mint indoors?
The ideal location for growing mint indoors is a spot that receives at least 4-6 hours of direct sunlight per day. A south-facing window is often the best choice. If you don’t have access to enough natural light, consider using a grow light. Position the grow light a few inches above the plants and keep it on for 12-14 hours per day. Rotate the pot regularly to ensure that all sides of the plant receive adequate light.
What type of soil should I use for growing mint indoors?
Mint thrives in well-draining soil that is rich in organic matter. A good potting mix specifically formulated for herbs is an excellent choice. You can also create your own potting mix by combining equal parts of potting soil, perlite, and compost. Perlite helps to improve drainage, while compost provides essential nutrients. Avoid using garden soil, as it can be too heavy and may contain pests or diseases.
How often should I water my indoor mint plant?
Water your mint plant when the top inch of soil feels dry to the touch. Avoid overwatering, as this can lead to root rot. When you water, water thoroughly until water drains out of the bottom of the pot. Be sure to empty the saucer beneath the pot to prevent the plant from sitting in water. During the winter months, when growth slows down, you may need to water less frequently.
How do I propagate mint indoors?
Mint is incredibly easy to propagate from cuttings. Simply take a 4-6 inch cutting from a healthy stem, removing the lower leaves. Place the cutting in a glass of water, ensuring that the leaves are above the waterline. Change the water every few days. Within a week or two, roots should begin to form. Once the roots are about an inch long, you can plant the cutting in a pot filled with well-draining soil. Keep the soil moist until the plant is established.
Why are the leaves on my indoor mint plant turning yellow?
Yellowing leaves can be a sign of several problems, including overwatering, underwatering, nutrient deficiency, or pest infestation. Check the soil moisture to ensure that you are not overwatering or underwatering. If the soil is consistently dry, water more frequently. If the soil is consistently wet, allow it to dry out before watering again. If the yellowing is accompanied by stunted growth, consider fertilizing your plant with a balanced liquid fertilizer. Inspect the leaves for signs of pests, such as aphids or spider mites.
How do I deal with pests on my indoor mint plant?
Common pests that can affect indoor mint plants include aphids, spider mites, and whiteflies. To control these pests, you can try spraying your plant with a solution of insecticidal soap or neem oil. Be sure to follow the instructions on the product label. You can also try wiping the leaves with a damp cloth to remove pests manually. For severe infestations, you may need to use a stronger insecticide.
Can I grow different varieties of mint together in the same pot?
While it’s technically possible to grow different varieties of mint together in the same pot, it’s generally not recommended. Mint is a vigorous grower and can quickly become invasive. Different varieties of mint can compete for resources and one variety may eventually outcompete the others. It’s best to grow each variety of mint in its own separate pot.
How do I harvest mint leaves from my indoor plant?
To harvest mint leaves, simply pinch or cut off the stems just above a leaf node. This will encourage the plant to branch out and produce more leaves. Avoid removing more than one-third of the plant at a time. Harvest mint leaves regularly to keep the plant compact and bushy. The best time to harvest mint leaves is in the morning, after the dew has dried.
How do I store fresh mint leaves?
Fresh mint leaves can be stored in the refrigerator for up to a week. To store them, wrap the leaves in a damp paper towel and place them in a plastic bag or container. You can also freeze mint leaves for longer storage. To freeze them, wash and dry the leaves, then spread them out on a baking sheet and freeze them until solid. Once frozen, transfer the leaves to a freezer bag or container. Frozen mint leaves can be used in smoothies, sauces, and other cooked dishes.
Is growing mint indoors a good way to have fresh mint year-round?
Yes, absolutely! Growing mint indoors allows you to enjoy fresh mint leaves year-round, regardless of the weather outside. With proper care and attention, your indoor mint plant can thrive and provide you with a continuous supply of this versatile herb. It’s a sustainable and cost-effective way to add fresh flavor to your meals and beverages.
Leave a Comment