
Grow Mushrooms at Home – sounds like something out of a fantasy novel, right? But trust me, it’s totally achievable, and I’m here to show you how! Forget trekking through damp forests; you can cultivate these fascinating fungi right in your own kitchen, basement, or even a spare closet.
Mushrooms have been revered for centuries, popping up in ancient medicinal practices and culinary traditions across the globe. From the shiitake in East Asian cuisine to the truffle in European delicacies, these little powerhouses have always held a special place. But beyond their delicious flavor and potential health benefits, growing your own mushrooms is incredibly rewarding.
Why should you learn to grow mushrooms at home? Well, for starters, it’s a fantastic way to reduce your grocery bill and ensure you’re eating fresh, organic produce. Plus, it’s a sustainable and eco-friendly activity that connects you with nature. Imagine the satisfaction of harvesting your own gourmet mushrooms, knowing exactly where they came from and how they were grown. In this article, I’ll share some simple, DIY tricks and hacks to get you started on your mushroom-growing journey. Get ready to unlock the secrets of the fungal kingdom and enjoy the delicious rewards!
Mushroom Cultivation at Home: Your Comprehensive DIY Guide
Hello, mushroom friends! Have you ever wondered what it would be like to grow your own delicious and fresh mushrooms? It’s easier than you might think! In this article, I’ll show you how to start your own little mushroom farm at home with simple tools and a bit of patience. Let’s dive into the fascinating world of mushrooms together!
What You’ll Need for Your Mushroom Cultivation
Before we get started, here is a list of the things you’ll need. Don’t worry, you might already have many of these at home!
- Mushroom Spawn: This is the “seed” for your mushrooms. You can buy it online or at specialized garden centers. Be sure to choose the right variety for your conditions (temperature, humidity). Popular varieties for beginners are Oyster mushrooms (Pleurotus ostreatus) and Shiitake mushrooms (Lentinula edodes).
- Substrate: This is the material on which your mushrooms will grow. Different mushroom varieties are suited to different substrates. For oyster mushrooms, straw, coffee grounds, or wood chips are good choices. Shiitake prefer hardwood chips or logs.
- Container: You will need a container to house your substrate and mushroom spawn. This can be a bucket, a plastic bag, a glass jar, or even a specially designed mushroom growing bag.
- Spray Bottle: A spray bottle is essential for keeping the humidity high.
- Cleanliness: Hygiene is key! Alcohol for disinfection, gloves, and a clean workspace are important to avoid contamination.
- Patience: Mushrooms take time to grow. Be patient and don’t give up if it doesn’t work right away!
- Optional: A thermometer and a hygrometer will help you keep an eye on the temperature and humidity.
The Preparation: Substrate and Environment
Proper preparation is crucial for the success of your mushroom cultivation. Here are the steps you should follow:
1. Prepare the Substrate:
- Straw: If you are using straw, you must pasteurize it to kill unwanted microorganisms. The easiest way to do this is to pour boiling water over the straw in a large pot or bucket and let it soak for at least an hour. Afterward, let the straw cool and drain until it is moist but no longer dripping wet.
- Coffee Grounds: Coffee grounds are already pasteurized because they were heated during brewing. Simply collect them and let them cool. Make sure they don’t get moldy.
- Wood Chips: Wood chips should also be pasteurized, especially if you want to grow Shiitake. Pour boiling water over them and let them cool.
2. Clean Your Workspace: Thoroughly clean your workspace with alcohol. Wear gloves to avoid contamination.
3. Prepare the Container: Clean your container thoroughly with soap and water, and then disinfect it with alcohol.
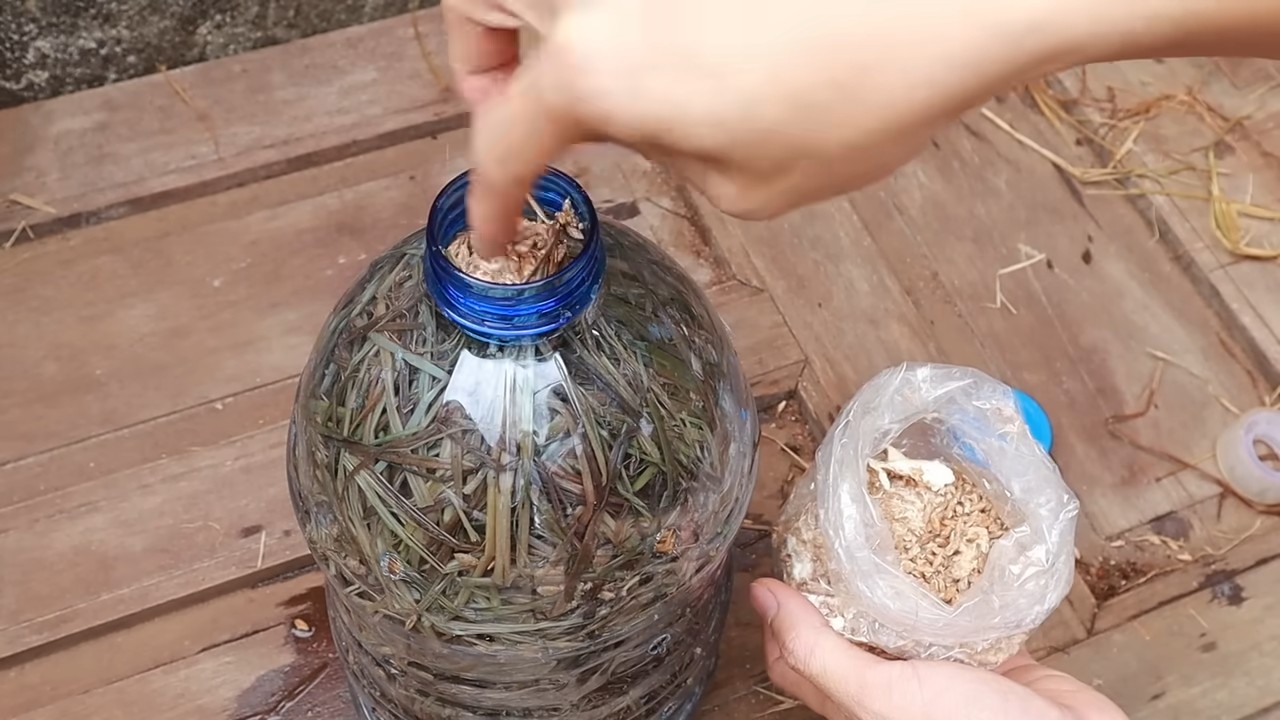
The Inoculation: Adding Mushroom Spawn to the Substrate
Now comes the exciting part: We’re adding the mushroom spawn to the substrate!
- Layering: Fill your container layer by layer with substrate and mushroom spawn. Start with a layer of substrate, then a layer of spawn, then more substrate, and so on. The final layer should be substrate.
- Mind the Ratio: The ratio of mushroom spawn to substrate should be about 1:10. This means you need one part spawn for every 10 parts of substrate.
- Press Lightly: Press the layers down lightly so that the mushroom spawn has good contact with the substrate.
- Close the Container: Close your container, but not airtight. Mushrooms need oxygen to grow. If you are using a plastic bag, you can close it with a rubber band and poke a few small holes in it.
The Incubation: Waiting and Observing
Now it’s time to wait and watch! The incubation phase is crucial for the growth of the mycelium, the fungal network.
- Dark and Warm Place: Place your container in a dark and warm location. The ideal temperature depends on the mushroom variety but is usually between 20 and 25 degrees Celsius (68-77°F).
- Humidity: Make sure the humidity is high. Spray the container regularly with water, but avoid waterlogging.
- Observe: Observe your container regularly. After a few days or weeks, you should see the mycelium, a white, fluffy network, spreading through the substrate.
- Be Patient: The incubation phase can last several weeks. Be patient and don’t give up!
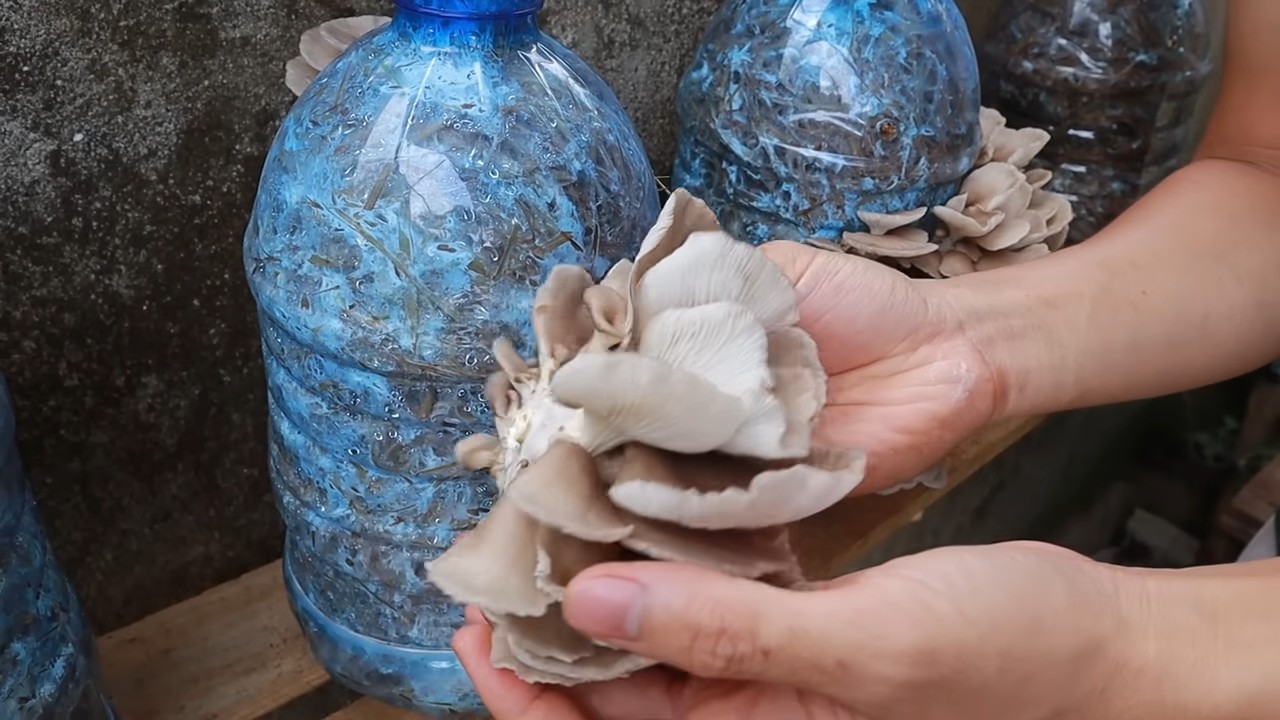
The Fruiting: Harvesting Mushrooms
When the mycelium has completely colonized the substrate, it’s time for fruiting!
- Light: Move your container to a brighter place, but avoid direct sunlight.
- Increase Humidity: Increase the humidity even more. Spray the container several times a day with water.
- Ventilation: Ensure good ventilation. Open the container regularly to let in fresh air.
- Lower the Temperature: Slightly lower the temperature. The ideal temperature for fruiting is usually a bit lower than for incubation.
- Harvest Mushrooms: After a few days or weeks, you should see the first mushrooms. Harvest them when they have reached the desired size. Gently twist the mushrooms off or cut them with a sharp knife.
Specific Tips for Oyster Mushrooms
Oyster mushrooms are relatively easy to grow and are therefore ideal for beginners.
- Substrate: Straw, coffee grounds, wood chips
- Temperature: Incubation: 20-25°C (68-77°F), Fruiting: 15-20°C (59-68°F)
- Humidity: Very high (80-90%)
- Special Notes: Oyster mushrooms need a lot of light and ventilation during the fruiting phase.
Specific Tips for Shiitake
Shiitake are a bit more demanding, but the effort is worth it!
- Substrate: Hardwood chips or logs
- Temperature: Incubation: 20-25°C (68-77°F), Fruiting: 10-15°C (50-59°F)
- Humidity: High (70-80%)
- Special Notes: Shiitake need a cold treatment (shock) to trigger fruiting. Submerge the logs or chips in cold water for 24 hours.
Troubleshooting: What to Do When Something Goes Wrong?
Even with careful preparation, problems can arise. Here are some common problems and their solutions:
No Mushrooms: If no mushrooms form after some time, there could be several reasons. Check the temperature, humidity, and ventilation. Perhaps the mushroom spawn simply needs more time.
Mold: If mold forms, it’s a sign of contamination. Remove the affected area immediately and disinfect the container. If the mold is widespread, you will unfortunately have to discard the culture.
Conclusion
So, there you have it! Cultivating your own mushrooms at home isn’t just a quirky hobby; it’s a rewarding journey into the fascinating world of fungi. From the satisfaction of nurturing life from simple materials to the unparalleled freshness and flavor of homegrown mushrooms, the benefits are undeniable. This DIY trick, while requiring some patience and attention to detail, offers a sustainable and cost-effective way to enjoy a gourmet ingredient right from your own kitchen.
Think about the possibilities! Imagine adding freshly harvested oyster mushrooms to your stir-fries, incorporating shiitakes into a hearty soup, or simply sautéing some delicate enoki for a quick and delicious side dish. The flavor profile of homegrown mushrooms is often richer and more complex than what you find in the grocery store, elevating your culinary creations to a whole new level.
Beyond the culinary advantages, growing mushrooms at home connects you to the natural world in a tangible way. It’s a hands-on learning experience that can be enjoyed by individuals and families alike. Plus, you’re reducing your carbon footprint by sourcing food locally and minimizing packaging waste.
Don’t be afraid to experiment with different mushroom varieties and growing mediums. While we’ve outlined a basic method, there’s plenty of room for customization. Try using different types of substrate, such as coffee grounds or straw, to see how it affects the growth and flavor of your mushrooms. You can also explore different cultivation techniques, such as using a monotub or a fruiting chamber, to optimize your yields.
Consider these variations:
* Oyster Mushrooms on Coffee Grounds: Oyster mushrooms are particularly well-suited for growing on coffee grounds, making them a sustainable and eco-friendly choice. Simply mix the coffee grounds with a suitable substrate like straw or sawdust, inoculate with oyster mushroom spawn, and watch them flourish.
* Shiitake Mushrooms on Logs: For a more traditional approach, try growing shiitake mushrooms on hardwood logs. This method requires more space and time, but it yields a bountiful harvest of flavorful shiitakes.
* Mushroom Grow Kits: If you’re new to mushroom cultivation, consider starting with a pre-made mushroom grow kit. These kits provide everything you need to get started, making the process simple and straightforward.
The key to success is to be patient, observant, and willing to learn from your mistakes. Mushroom cultivation is a learning process, and it may take some trial and error before you achieve consistent results. But don’t give up! The rewards are well worth the effort.
We strongly encourage you to give this DIY trick a try. It’s a fun, educational, and delicious way to bring the magic of the fungal kingdom into your home. And most importantly, we want to hear about your experiences! Share your successes, your challenges, and your tips with us in the comments below. Let’s create a community of mushroom enthusiasts and learn from each other. Happy growing! Let us know how your journey to grow mushrooms at home goes!
Frequently Asked Questions (FAQ)
What are the easiest types of mushrooms to grow at home for beginners?
Oyster mushrooms are generally considered the easiest to grow for beginners due to their fast growth rate, tolerance of various substrates, and relatively simple cultivation requirements. They are also quite forgiving of minor environmental fluctuations. Shiitake mushrooms are another popular choice, but they require more patience and a longer cultivation time. Button mushrooms, the kind you typically find in grocery stores, are more challenging to grow at home and are best left to experienced cultivators.
What kind of substrate should I use to grow mushrooms?
The best substrate depends on the type of mushroom you’re growing. Oyster mushrooms thrive on a variety of substrates, including straw, coffee grounds, sawdust, and even cardboard. Shiitake mushrooms are typically grown on hardwood logs or sawdust blocks. Button mushrooms require a composted substrate that is rich in nitrogen. It’s important to research the specific substrate requirements for the mushroom variety you’re growing to ensure optimal growth.
How long does it take to grow mushrooms at home?
The time it takes to grow mushrooms varies depending on the species and the growing conditions. Oyster mushrooms can typically be harvested within a few weeks of inoculation, while shiitake mushrooms may take several months to produce their first flush. Button mushrooms have a relatively short cultivation cycle, but they require more precise environmental control. Factors such as temperature, humidity, and light can also affect the growth rate of mushrooms.
What are the ideal temperature and humidity conditions for growing mushrooms?
The ideal temperature and humidity conditions vary depending on the mushroom species. Oyster mushrooms generally prefer temperatures between 60-75°F (15-24°C) and high humidity levels (80-90%). Shiitake mushrooms prefer cooler temperatures, around 50-60°F (10-15°C), and moderate humidity levels (70-80%). Button mushrooms require a more precise temperature range, around 65-70°F (18-21°C), and high humidity levels (85-95%). Maintaining the correct temperature and humidity is crucial for successful mushroom cultivation.
How do I prevent contamination when growing mushrooms?
Contamination is a common problem in mushroom cultivation, but it can be prevented by following proper sanitation practices. Sterilize your substrate and equipment thoroughly before inoculation. Use a clean workspace and wear gloves to avoid introducing contaminants. Maintain proper ventilation to prevent the buildup of mold and bacteria. Regularly inspect your growing containers for signs of contamination, such as mold or unusual odors. If you detect contamination, remove the affected area immediately to prevent it from spreading.
How often should I water my mushrooms?
The frequency of watering depends on the humidity levels and the type of substrate you’re using. The goal is to keep the substrate moist but not waterlogged. Oyster mushrooms generally require frequent misting to maintain high humidity levels. Shiitake mushrooms may need less frequent watering, especially if they are grown on logs. Button mushrooms require consistent moisture, but overwatering can lead to contamination. Monitor the moisture levels of your substrate regularly and water as needed.
What kind of lighting do mushrooms need?
Mushrooms don’t require a lot of light, but they do need some light to initiate fruiting. Indirect sunlight or artificial light is sufficient. Avoid exposing your mushrooms to direct sunlight, as this can dry them out. A simple fluorescent light or LED grow light can provide adequate illumination. The amount of light needed varies depending on the mushroom species, but generally, a few hours of light per day is sufficient.
Are there any safety precautions I should take when growing mushrooms at home?
While most cultivated mushrooms are safe to eat, it’s important to properly identify the species before consuming them. Never eat wild mushrooms unless you are absolutely certain of their identification. Wear gloves when handling mushroom spawn and substrate to avoid skin irritation. Wash your hands thoroughly after handling mushrooms. If you have any allergies to molds or fungi, take extra precautions to avoid exposure.
What do I do if my mushrooms aren’t growing?
If your mushrooms aren’t growing, there could be several reasons. Check the temperature and humidity levels to ensure they are within the optimal range for the species you’re growing. Make sure the substrate is properly hydrated but not waterlogged. Ensure there is adequate ventilation to prevent the buildup of mold and bacteria. Check for signs of contamination and remove any affected areas. If you’ve ruled out these factors, the spawn may be old or of poor quality. Try using fresh spawn from a reputable source.
Can I reuse the substrate after harvesting mushrooms?
Yes, you can reuse the substrate after harvesting mushrooms, but it will likely be depleted of nutrients. You can amend the substrate with fresh nutrients, such as coffee grounds or compost, to encourage further growth. However, the yield may be lower than the first flush. Alternatively, you can compost the spent substrate and use it to enrich your garden soil.

Leave a Comment