
Grow onions at home, and unlock a world of flavor and freshness right outside your door! Imagine stepping into your garden and plucking a perfectly ripe onion, bursting with that sharp, sweet taste that elevates any dish. Forget those bland, store-bought onions – we’re talking about homegrown goodness, packed with nutrients and grown with love (by you!).
For centuries, onions have been a staple in cuisines across the globe. From ancient Egypt, where they were revered and even used as offerings to the gods, to the bustling markets of today, onions have always held a vital place in our culinary traditions. But why rely on supermarkets when you can cultivate your own supply?
In this DIY guide, I’m going to share some simple yet effective tricks and hacks to help you grow onions at home, even if you have limited space or gardening experience. We’ll cover everything from choosing the right varieties to planting techniques and pest control. Say goodbye to expensive grocery store runs and hello to a thriving onion patch that will impress your friends and family. Let’s get our hands dirty and start growing!
Zwiebeln zu Hause anbauen: Ein umfassender DIY-Leitfaden
Hallo Gartenfreunde! Habt ihr euch jemals gefragt, wie es wäre, eure eigenen Zwiebeln anzubauen? Es ist einfacher als ihr denkt und unglaublich befriedigend! Ich zeige euch, wie ihr mit einfachen Mitteln und ein wenig Geduld eure eigenen Zwiebeln ziehen könnt. Egal, ob ihr einen großen Garten oder nur einen kleinen Balkon habt, dieser Leitfaden hilft euch dabei. Los geht’s!
Was ihr für den Zwiebelanbau braucht
Bevor wir loslegen, hier eine Liste der Dinge, die ihr benötigt:
* Zwiebelsetzlinge oder Zwiebelsamen: Setzlinge sind einfacher für Anfänger, aber Samen sind günstiger. Ich werde beide Methoden erklären.
* Geeignete Erde: Gut durchlässige, nährstoffreiche Erde ist ideal. Ihr könnt Gartenerde mit Kompost mischen.
* Pflanzgefäße oder ein Gartenbeet: Je nachdem, wie viel Platz ihr habt.
* Gießkanne oder Schlauch: Zum Bewässern.
* Gartengeräte: Eine kleine Schaufel oder Kelle, um die Erde zu bearbeiten.
* Dünger (optional): Ein organischer Dünger kann das Wachstum fördern.
* Geduld: Zwiebeln brauchen Zeit zum Wachsen!
Zwiebeln aus Setzlingen anbauen
Setzlinge sind kleine, vorgezogene Zwiebeln, die ihr einfach in die Erde pflanzen könnt. Das ist die einfachste Methode, besonders für Anfänger.
Schritt-für-Schritt-Anleitung
1. Vorbereitung der Erde: Lockert die Erde in eurem Pflanzgefäß oder Gartenbeet auf. Entfernt Steine und Unkraut. Mischt Kompost unter, um die Erde mit Nährstoffen anzureichern. Die Erde sollte locker und gut durchlässig sein.
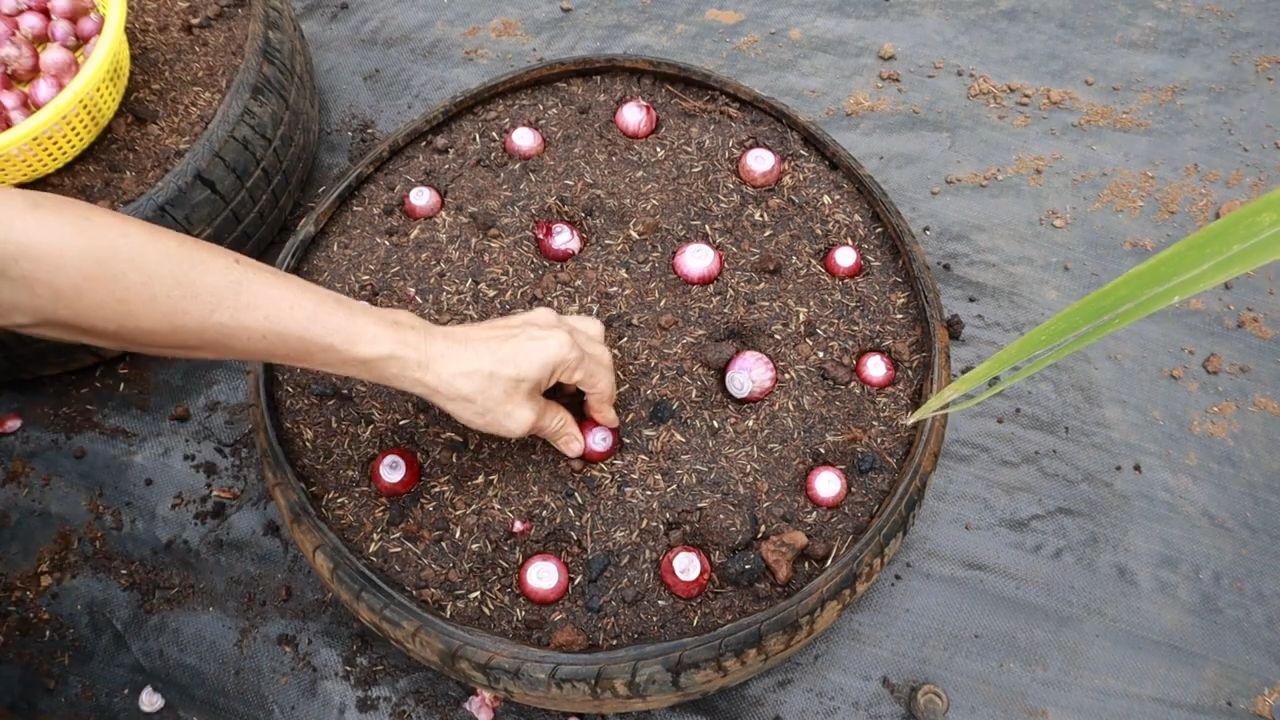
2. Pflanzen der Setzlinge: Macht kleine Löcher in die Erde, etwa 2-3 cm tief. Der Abstand zwischen den Löchern sollte etwa 10-15 cm betragen, damit die Zwiebeln genügend Platz zum Wachsen haben. Setzt die Setzlinge in die Löcher und bedeckt sie mit Erde. Achtet darauf, dass die Spitze der Setzlinge noch aus der Erde herausschaut.
3. Bewässerung: Gießt die Setzlinge nach dem Pflanzen gründlich. Die Erde sollte feucht, aber nicht nass sein. Achtet darauf, dass das Wasser gut abfließen kann, um Staunässe zu vermeiden.
4. Pflege: Gießt die Zwiebeln regelmäßig, besonders in trockenen Perioden. Entfernt Unkraut, das um die Zwiebeln herum wächst. Düngt die Zwiebeln alle paar Wochen mit einem organischen Dünger, um das Wachstum zu fördern.
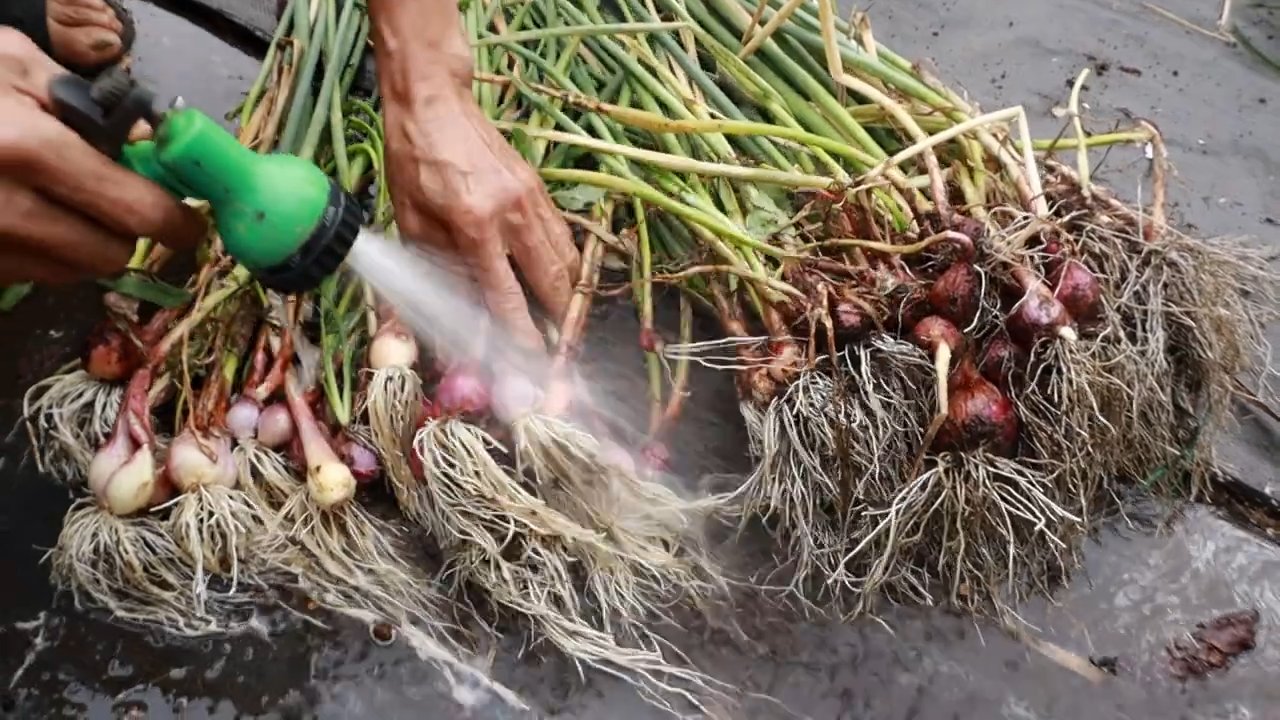
5. Ernte: Zwiebeln aus Setzlingen sind in der Regel nach etwa 90-120 Tagen erntereif. Ihr erkennt die Reife daran, dass das Laub gelb wird und umfällt. Zieht die Zwiebeln vorsichtig aus der Erde und lasst sie einige Tage an einem trockenen, luftigen Ort trocknen.
Zwiebeln aus Samen anbauen
Das Anbauen von Zwiebeln aus Samen erfordert etwas mehr Geduld und Sorgfalt, ist aber eine lohnende Erfahrung.
Schritt-für-Schritt-Anleitung
1. Aussaat: Beginnt mit der Aussaat der Zwiebelsamen im Frühjahr, etwa 8-10 Wochen vor dem letzten erwarteten Frost. Ihr könnt die Samen in Anzuchtschalen oder direkt in ein vorbereitetes Beet säen. Streut die Samen dünn auf die Erde und bedeckt sie leicht mit Erde.
2. Keimung: Haltet die Erde feucht, aber nicht nass. Die Samen keimen in der Regel innerhalb von 7-14 Tagen. Stellt die Anzuchtschalen an einen hellen Ort, aber nicht in direktes Sonnenlicht.
3. Pikieren: Sobald die Sämlinge groß genug sind, um sie zu handhaben (etwa 5-7 cm hoch), könnt ihr sie pikieren. Das bedeutet, dass ihr die Sämlinge vorsichtig aus der Anzuchtschale nehmt und in einzelne Töpfe oder in ein vorbereitetes Beet umpflanzt. Achtet darauf, dass die Wurzeln nicht beschädigt werden.
4. Vorbereitung des Beetes: Lockert die Erde im Beet auf und entfernt Steine und Unkraut. Mischt Kompost unter, um die Erde mit Nährstoffen anzureichern. Die Erde sollte locker und gut durchlässig sein.
5. Pflanzen der Sämlinge: Macht kleine Löcher in die Erde, etwa 10-15 cm tief. Der Abstand zwischen den Löchern sollte etwa 10-15 cm betragen, damit die Zwiebeln genügend Platz zum Wachsen haben. Setzt die Sämlinge in die Löcher und bedeckt sie mit Erde.
6. Bewässerung: Gießt die Sämlinge nach dem Pflanzen gründlich. Die Erde sollte feucht, aber nicht nass sein. Achtet darauf, dass das Wasser gut abfließen kann, um Staunässe zu vermeiden.
7. Pflege: Gießt die Zwiebeln regelmäßig, besonders in trockenen Perioden. Entfernt Unkraut, das um die Zwiebeln herum wächst. Düngt die Zwiebeln alle paar Wochen mit einem organischen Dünger, um das Wachstum zu fördern.
8. Ernte: Zwiebeln aus Samen sind in der Regel nach etwa 120-150 Tagen erntereif. Ihr erkennt die Reife daran, dass das Laub gelb wird und umfällt. Zieht die Zwiebeln vorsichtig aus der Erde und lasst sie einige Tage an einem trockenen, luftigen Ort trocknen.
Tipps und Tricks für den erfolgreichen Zwiebelanbau
Hier sind noch ein paar zusätzliche Tipps, die euch helfen werden, erfolgreich Zwiebeln anzubauen:
* Wählt den richtigen Standort: Zwiebeln brauchen viel Sonne, mindestens 6 Stunden pro Tag.
* Achtet auf die Fruchtfolge: Baut Zwiebeln nicht jedes Jahr am selben Ort an, um Krankheiten und Schädlingen vorzubeugen.
* Schützt die Zwiebeln vor Schädlingen: Zwiebelfliegen und andere Schädlinge können Zwiebeln befallen. Verwendet natürliche Schädlingsbekämpfungsmittel, um sie zu schützen.
* Gießt richtig: Zwiebeln brauchen regelmäßige Bewässerung, aber vermeidet Staunässe.
* Düngt regelmäßig: Ein organischer Dünger kann das Wachstum fördern und die Ernte verbessern.
* Erntet rechtzeitig: Wartet nicht zu lange mit der Ernte, da die Zwiebeln sonst faulen können.
Häufige Probleme und Lösungen
Auch beim Zwiebelanbau können Probleme auftreten. Hier sind einige häufige Probleme und wie ihr sie lösen könnt:
* Gelbe Blätter: Gelbe Blätter können ein Zeichen für Nährstoffmangel, Wassermangel oder Schädlingsbefall sein. Überprüft die Erde, bewässert regelmäßig und verwendet bei Bedarf einen Dünger oder ein Schädlingsbekämpfungsmittel.
* Kleine Zwiebeln: Kleine Zwiebeln können ein Zeichen für zu wenig Sonne, zu wenig Wasser oder zu wenig Nährstoffe sein. Stellt sicher, dass die Zwiebeln genügend Sonne bekommen, bewässert regelmäßig und düngt bei Bedarf.
* Faule Zwiebeln: Faule Zwiebeln können ein Zeichen für Staunässe oder Pilzbefall sein. Achtet darauf, dass das Wasser gut abfließen kann und verwendet bei Bedarf ein Fungizid.
* Schädlinge: Zwiebelfliegen und andere Schädlinge können Zwiebeln befallen. Verwendet natürliche Schädlingsbekämpfungsmittel, um sie zu schützen.
Zwiebelsorten für den Hausgarten
Es gibt viele verschiedene Zwiebelsorten, die ihr in eurem Hausgarten anbauen könnt. Hier sind einige beliebte Sorten:
* Gelbe Zwiebeln: Diese Zwiebeln sind vielseitig und eignen sich gut zum Kochen und Lagern.
* Rote Zwiebeln: Diese Zwiebeln haben einen milderen Geschmack und eignen sich gut für Salate und Sandwiches.
* Weiße Zwiebeln:
Conclusion
So, there you have it! Growing onions at home is not only achievable, but it’s also a deeply rewarding experience that puts you in control of your food source and connects you with the natural world. Forget those bland, store-bought onions that lack the vibrant flavor and freshness you crave. With just a little effort and these simple steps, you can cultivate a bounty of delicious, homegrown onions right in your own backyard, balcony, or even windowsill.
Why is this DIY trick a must-try? Because it’s about more than just saving a few dollars at the grocery store. It’s about enjoying the unparalleled taste of freshly harvested produce, knowing exactly where your food comes from, and reducing your environmental footprint by minimizing transportation and packaging. Plus, let’s be honest, there’s a certain satisfaction that comes from nurturing a tiny seed into a plump, flavorful onion.
But the best part? The possibilities are endless! Experiment with different varieties of onions to discover your favorites. Try growing red onions for their beautiful color and mild sweetness, yellow onions for their versatility in cooking, or white onions for their crisp, pungent bite. You can even explore shallots and scallions for a more delicate flavor profile.
Don’t have a traditional garden? No problem! Onions thrive in containers, making them perfect for apartment dwellers or those with limited space. Just be sure to choose a pot that’s at least 6 inches deep and wide to accommodate the bulb’s growth.
And if you’re feeling adventurous, consider companion planting your onions with other vegetables and herbs. Carrots, lettuce, and chamomile are all excellent companions for onions, as they can help deter pests and improve the overall health of your garden.
We encourage you to take the plunge and try growing onions at home. It’s a simple, satisfying, and delicious way to connect with nature and enjoy the fruits (or rather, vegetables) of your labor. Once you taste the difference between homegrown and store-bought onions, you’ll never go back!
Don’t be afraid to experiment, adapt the techniques to your specific environment, and most importantly, have fun! And once you’ve harvested your first crop of homegrown onions, be sure to share your experience with us. We’d love to hear your tips, tricks, and favorite ways to use your homegrown bounty. Share your photos and stories on social media using #HomegrownOnions and let’s inspire others to join the growing revolution!
Frequently Asked Questions (FAQ)
Q: What is the best time of year to plant onions?
A: The best time to plant onions depends on your climate and the type of onion you’re growing. In general, you can plant onion sets or transplants in the spring, about 4-6 weeks before the last expected frost. For those in warmer climates, you can also plant onions in the fall for a winter harvest. Check your local gardening resources for specific planting dates in your area.
Q: Can I grow onions from seed?
A: Yes, you can absolutely grow onions from seed! Starting onions from seed requires a bit more patience and planning, as it takes longer for the onions to mature. Start your seeds indoors about 8-10 weeks before the last expected frost. Once the seedlings are large enough, transplant them outdoors into your garden.
Q: What kind of soil do onions need?
A: Onions prefer well-drained, fertile soil that is rich in organic matter. Amend your soil with compost or well-rotted manure before planting to improve its fertility and drainage. Onions also prefer a slightly acidic to neutral soil pH, around 6.0 to 7.0.
Q: How much sunlight do onions need?
A: Onions need at least 6-8 hours of sunlight per day to thrive. Choose a sunny location in your garden or on your balcony for your onion plants. If you’re growing onions indoors, supplement with grow lights if necessary.
Q: How often should I water my onions?
A: Water your onions regularly, especially during dry periods. Keep the soil consistently moist, but avoid overwatering, which can lead to rot. A good rule of thumb is to water deeply once or twice a week, depending on the weather and soil conditions.
Q: What are some common onion pests and diseases?
A: Some common onion pests include onion maggots, thrips, and aphids. Diseases that can affect onions include onion rot, downy mildew, and purple blotch. To prevent pests and diseases, practice good garden hygiene, such as removing weeds and debris, and rotate your crops regularly. You can also use organic pest control methods, such as insecticidal soap or neem oil, to control pests.
Q: How do I know when my onions are ready to harvest?
A: Onions are typically ready to harvest when the tops begin to turn yellow and fall over. You can also gently dig around the bulb to check its size. If the bulb is large and firm, it’s likely ready to harvest.
Q: How do I cure onions after harvesting?
A: Curing onions is essential for extending their storage life. After harvesting, gently brush off any excess soil and lay the onions out in a single layer in a well-ventilated area, such as a garage or shed. Allow the onions to cure for 2-3 weeks, or until the necks are completely dry and the outer skins are papery.
Q: How should I store my homegrown onions?
A: Store cured onions in a cool, dry, and dark place, such as a pantry or basement. You can store them in mesh bags or loosely woven baskets to allow for good air circulation. Properly cured and stored onions can last for several months.
Q: Can I grow onions in containers?
A: Yes, onions grow very well in containers! Choose a pot that is at least 6 inches deep and wide to accommodate the bulb’s growth. Use a well-draining potting mix and water regularly. Container-grown onions may need more frequent watering and fertilization than those grown in the ground.
Q: What are some good companion plants for onions?
A: Onions are excellent companion plants for many vegetables and herbs. Carrots, lettuce, tomatoes, chamomile, and summer savory are all good companions for onions, as they can help deter pests and improve the overall health of your garden. Avoid planting onions near beans or peas, as they can inhibit each other’s growth.
Q: Can I use my homegrown onions in any recipe?
A: Absolutely! Homegrown onions can be used in any recipe that calls for onions. Their fresh, vibrant flavor will enhance the taste of your dishes. Use them in soups, stews, stir-fries, salads, and more. The possibilities are endless!

Leave a Comment