
Grow Peas Indoors? Absolutely! Imagine harvesting fresh, sweet peas right from your windowsill, even in the dead of winter. Forget trekking to the farmer’s market or relying on grocery store produce – with a few simple tricks, you can cultivate your own little pea patch inside your home. For centuries, humans have nurtured plants indoors, from ancient Egyptians growing herbs in clay pots to Victorian-era conservatories overflowing with exotic blooms. This tradition continues today, fueled by a desire for fresh, healthy food and a connection to nature, regardless of our living space.
But why grow peas indoors specifically? Well, for many of us, outdoor gardening isn’t always an option. Limited space, harsh climates, or simply a busy lifestyle can keep us from enjoying the joys of homegrown vegetables. That’s where indoor gardening hacks come in! This DIY guide is packed with easy-to-follow instructions and clever tips to help you successfully cultivate peas indoors, regardless of your experience level. I’m going to show you how to choose the right varieties, create the perfect growing environment, and troubleshoot common problems, so you can enjoy a bountiful harvest of delicious, homegrown peas all year round. Let’s get started!
Growing Peas Indoors: Your Comprehensive DIY Guide
Hey plant friends! Do you fancy fresh, crisp peas but don’t have a garden, or the weather isn’t cooperating? Don’t worry, I’ll show you how you can easily grow peas indoors! It’s easier than you think and brings a piece of spring into your home. Let’s get started!
What you need: The Right Equipment
Before we start, let’s gather everything we need. This will make the whole process much smoother.
- Pea seeds: It’s best to choose varieties that are suitable for growing in pots. Bush or dwarf peas are a good choice. I personally really like the “Little Marvel” variety.
- Pots or containers: They should be at least 15-20 cm (6-8 inches) deep to give the roots enough space. Remember that they must have drainage holes so water can escape.
- High-quality potting soil: Use a well-draining potting soil. You can also mix in some compost to improve the nutrient supply.
- Plant stakes or a trellis: Peas are climbing plants and need something to hold onto. Bamboo stakes, small trellises, or even twigs from the garden are suitable.
- Spray bottle: For moistening the soil.
- A bright windowsill or grow light: Peas need a lot of light to grow well.
- Optional: A small trowel or scoop for filling the pots.
Step-by-Step Guide: Sowing and Caring for Peas
Now let’s get down to it! Here is a detailed guide on how to get your peas to sprout indoors.
1. Preparing the Seeds:
- I like to soak the pea seeds overnight in lukewarm water. This helps them to germinate faster.
- Place the seeds in a bowl and cover them with water. Let them swell for 12-24 hours.
- Drain the water and gently pat the seeds dry.
2. Filling the Pots:
- Fill the pots with potting soil, but leave about 2-3 cm (1 inch) of space to the rim.
- Press the soil down lightly, but not too firmly. It should remain loose and airy.
3. Sowing the Seeds:
- Make small holes in the soil with your finger or a pen, about 2-3 cm (1 inch) deep.
- Place 2-3 seeds in each hole. This increases the likelihood that at least one will germinate.
- Cover the seeds with soil and press down lightly.
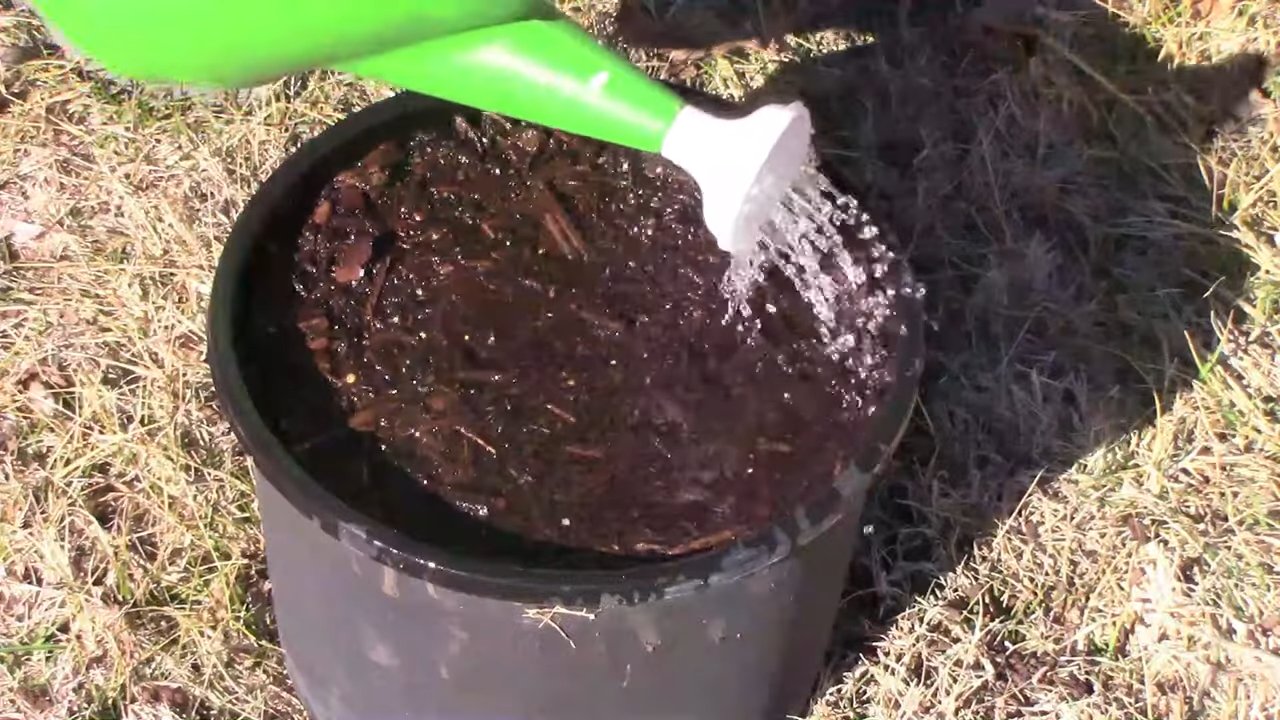
4. Watering:
- Water the soil gently until it is well-moistened. Avoid waterlogging.
- I prefer to use a spray bottle for this to avoid disturbing the soil too much.
5. Choosing the Right Location:
- Place the pots in a bright location, e.g., on a windowsill with plenty of sunlight.
- If you don’t have a bright windowsill, you can also use a grow light.
- Peas need at least 6-8 hours of sunlight per day.
6. Observing Germination:
- The seeds should germinate within 7-14 days.
- Keep the soil moist, but not wet.
- Once the first seedlings appear, you can use the spray bottle a little less often and water gently instead.
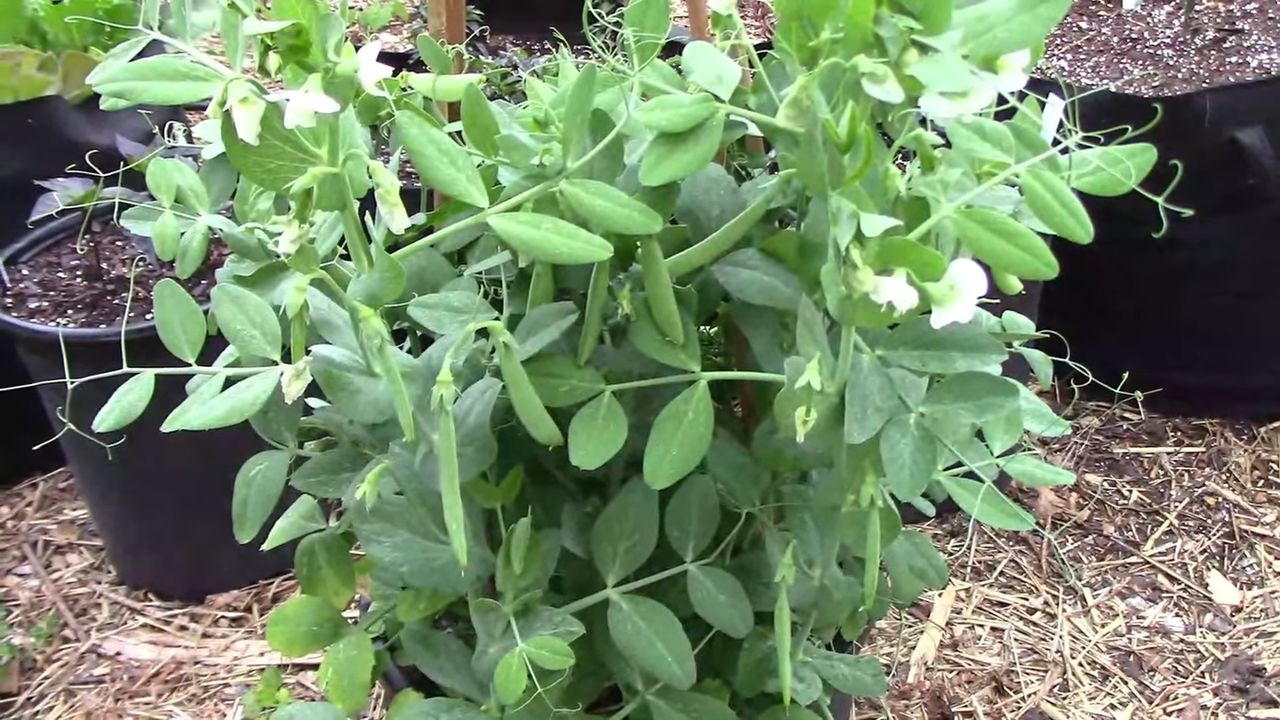
7. Supporting the Plants:
- Once the pea plants are about 10-15 cm (4-6 inches) tall, they need a climbing support.
- Insert plant stakes or a trellis into the soil.
- Gently guide the plants along the stakes or trellis.
8. Watering and Fertilizing:
- Water the peas regularly, but avoid waterlogging.
- The soil should always be slightly moist.
- Fertilize the plants every 2-3 weeks with an organic liquid fertilizer. I like to use a fertilizer for vegetables.
9. Pests and Diseases:
- Watch for signs of pests or diseases.
- Aphids are a common problem. You can combat them with a jet of water or a mild soap solution.
- Also watch out for powdery mildew, especially with high humidity. Ensure good ventilation.
10. The Harvest:
- The peas are ready to harvest when the pods are plump and can be easily opened.
- Pick the peas regularly to encourage the production of new pods.
- Enjoy your homegrown peas fresh from the pot!
Additional Tips and Tricks for Successful Pea Cultivation
Here are a few more tips that can help you maximize your pea harvest:
- Succession Planting: If you have several pots, you can sow the peas at different intervals to have a continuous harvest.
- Pruning: You can prune the tips of the pea plants to encourage the growth of side shoots.
- Ventilation: Ensure good ventilation to prevent diseases. Open the window regularly or set up a fan.
- Mulching: A thin layer of mulch (e.g., straw or wood chips) can help retain moisture in the soil and suppress weeds.
- Observation: Observe your plants regularly and react quickly to problems.
Common Problems and Solutions
Even when growing peas indoors, problems can occur. Here are some common problems and how you can solve them:
- Yellow leaves: Can be a sign of a nutrient deficiency. Fertilize the plants with a suitable fertilizer.
- Poor germination: The seeds may have been too old or the soil too dry. Use fresh seeds and ensure even moisture.
- Aphids: Combat them with a jet of water or a mild soap solution.
- Powdery mildew: Ensure good ventilation and avoid waterlogging.
Why Grow Peas Indoors? The Advantages
There are many good reasons to grow peas indoors:
- Fresh peas all year round: You are no longer dependent on the season.
- Control over conditions: You can control the temperature, light, and moisture.
- No pests: Indoors, the plants are less susceptible to pests.
- A piece of nature in the house: It’s just nice to have something green in the house.
- Sustainability: You save a trip to the supermarket and reduce your ecological footprint.
I hope this guide has helped and inspired you to grow your own peas indoors. It’s a rewarding project that will provide you with fresh, delicious peas right at your doorstep (or rather, on your windowsill). Happy gardening
Conclusion
So, there you have it! Growing peas indoors is not only possible, but it’s also a remarkably rewarding experience, especially when you’re craving that fresh, sweet taste of homegrown goodness outside of the typical growing season. This DIY trick transforms your windowsill into a miniature garden, bringing a touch of spring into your home even during the coldest months. Forget those bland, store-bought peas – imagine the vibrant flavor and satisfying crunch of peas you nurtured yourself, from seed to table.
This method is a must-try for several compelling reasons. First, it extends your growing season, allowing you to enjoy fresh peas long before or after the outdoor growing season. Second, it’s incredibly space-efficient, making it perfect for apartment dwellers or anyone with limited garden space. Third, it’s a fantastic way to introduce children to the wonders of gardening and the process of food production. Finally, and perhaps most importantly, it’s incredibly satisfying to harvest your own food, knowing exactly where it came from and how it was grown.
But don’t stop there! Experiment with different varieties of peas. Snow peas, snap peas, and shelling peas all thrive indoors, each offering a unique flavor and texture. Try using different types of containers, from repurposed yogurt containers to stylish terracotta pots. Consider adding a trellis or support system to encourage vertical growth and maximize your yield. You can even try succession planting, sowing new seeds every few weeks to ensure a continuous harvest.
Beyond the basic method, consider these variations:
* Microgreens: Harvest your pea shoots as microgreens for a nutrient-packed addition to salads and sandwiches. Simply snip the young shoots a few inches above the soil line.
* Hydroponics: For a more advanced approach, explore hydroponic systems for growing peas indoors. This method eliminates the need for soil and can result in faster growth and higher yields.
* Companion Planting: Even indoors, companion planting can be beneficial. Try planting your peas alongside herbs like mint or rosemary, which can help deter pests.
The beauty of this DIY trick is its simplicity and adaptability. It’s a project that can be tailored to your specific needs and preferences. Whether you’re a seasoned gardener or a complete beginner, growing peas indoors is an achievable and enjoyable endeavor.
We wholeheartedly encourage you to give this a try. It’s a simple, cost-effective, and incredibly rewarding way to bring a little bit of the garden indoors. And most importantly, don’t forget to share your experiences! We’d love to hear about your successes, your challenges, and any variations you’ve discovered. Share your photos and stories on social media using #IndoorPeaGarden or leave a comment below. Let’s create a community of indoor pea growers and inspire others to discover the joy of homegrown food. Embrace the opportunity to grow peas indoors and taste the difference!
Frequently Asked Questions (FAQ)
What type of peas are best for growing indoors?
While many pea varieties can be grown indoors, bush varieties tend to be more manageable than vining types, which require extensive support. Popular choices include ‘Little Marvel,’ ‘Sugar Ann’ (a bush snap pea), and ‘Oregon Sugar Pod II’ (a bush snow pea). These varieties are compact and produce well in containers. However, don’t be afraid to experiment with other varieties to see what works best for you and your growing conditions. Just be sure to provide adequate support if you choose a vining variety.
How much light do indoor peas need?
Peas need at least 6-8 hours of direct sunlight per day to thrive. A south-facing window is ideal. If you don’t have enough natural light, supplement with grow lights. Fluorescent or LED grow lights are excellent options. Position the lights a few inches above the plants and keep them on for 12-16 hours per day. Insufficient light can lead to leggy growth and reduced yields.
What kind of soil should I use for growing peas indoors?
Use a well-draining potting mix specifically formulated for containers. Avoid using garden soil, as it can become compacted and doesn’t drain well in pots. A good potting mix will provide the necessary nutrients and aeration for healthy root growth. You can also amend your potting mix with compost or other organic matter to improve its fertility.
How often should I water my indoor pea plants?
Keep the soil consistently moist, but not waterlogged. Water when the top inch of soil feels dry to the touch. Overwatering can lead to root rot, so ensure your containers have drainage holes. The frequency of watering will depend on factors such as the size of your container, the temperature, and the humidity. Check the soil moisture regularly and adjust your watering schedule accordingly.
Do I need to fertilize my indoor pea plants?
Peas are relatively light feeders, but they will benefit from occasional fertilization. Use a balanced liquid fertilizer diluted to half strength every 2-3 weeks. Avoid over-fertilizing, as this can lead to excessive foliage growth at the expense of flower and pod production. Look for a fertilizer that is specifically formulated for vegetables or flowering plants.
How long does it take for peas to grow indoors?
The time it takes for peas to mature indoors depends on the variety and growing conditions. Generally, you can expect to harvest your first peas about 60-70 days after planting. Snow peas and snap peas are typically ready for harvest sooner than shelling peas. Keep an eye on the pods and harvest them when they are plump and tender.
How do I prevent pests and diseases when growing peas indoors?
Growing peas indoors significantly reduces the risk of pests and diseases compared to outdoor gardening. However, it’s still important to take precautions. Inspect your plants regularly for signs of pests such as aphids or spider mites. If you find any pests, you can try washing them off with a strong stream of water or using insecticidal soap. Ensure good air circulation to prevent fungal diseases. Avoid overwatering and remove any dead or yellowing leaves promptly.
Can I grow peas indoors year-round?
Yes, you can grow peas indoors year-round, provided you have adequate light and temperature control. Peas prefer cooler temperatures, so avoid placing them near heat sources. If you live in a very warm climate, you may need to provide supplemental cooling. With proper care, you can enjoy fresh peas from your indoor garden any time of year.
What do I do after harvesting my peas?
After harvesting your peas, you can either replant new seeds for another crop or allow the plants to die back naturally. If you choose to replant, be sure to use fresh potting mix. If you allow the plants to die back, you can compost them and use the compost to enrich your garden soil.
My pea plants are flowering, but not producing pods. What could be the problem?
Several factors can contribute to a lack of pod production. Insufficient pollination is a common issue. While peas are self-pollinating, you can help the process along by gently shaking the plants or using a small brush to transfer pollen from one flower to another. Other potential causes include nutrient deficiencies, temperature stress, and insufficient light. Ensure your plants are receiving adequate light, water, and nutrients, and that the temperature is within the optimal range for pea growth.
Leave a Comment