
Grow pineapple on terrace? Absolutely! Imagine plucking a juicy, sun-ripened pineapple straight from your own terrace garden. Sounds like a tropical dream, right? Well, it’s more achievable than you might think! For centuries, pineapples have symbolized hospitality and warmth, a tradition rooted in their exotic origins and association with welcoming travelers. Now, you can bring that same welcoming spirit and a touch of the tropics to your own home.
In this DIY guide, I’m going to share some simple yet effective tricks to help you grow pineapple on terrace successfully, even if you’re a complete beginner. Let’s face it, store-bought pineapples are great, but nothing beats the satisfaction of nurturing your own plant and enjoying the fruits (literally!) of your labor. Plus, with rising grocery costs and a growing desire for sustainable living, learning how to grow your own food, even something as seemingly exotic as a pineapple, is becoming increasingly appealing. So, grab your gardening gloves, and let’s embark on this exciting journey together!

Ananas auf der Terrasse ziehen: Mein DIY-Leitfaden für tropisches Flair zu Hause
Ich liebe Ananas! Und was gibt es Besseres, als sie einfach selbst anzubauen? Ich zeige dir, wie du mit etwas Geduld und den richtigen Schritten eine Ananas auf deiner Terrasse ziehen kannst. Es ist einfacher, als du denkst, und das Ergebnis ist einfach fantastisch.
Was du brauchst:
* Eine reife Ananas (am besten aus dem Bioladen, da diese oft nicht mit Wachstumsinhibitoren behandelt wurden)
* Ein scharfes Messer
* Einen Topf (mindestens 20 cm Durchmesser)
* Hochwertige Blumenerde (am besten eine Mischung aus Blumenerde, Sand und Perlit für gute Drainage)
* Wasser
* Optional: Wurzelhormonpulver
* Optional: Eine Sprühflasche
* Optional: Eine durchsichtige Plastiktüte oder ein Mini-Gewächshaus
Die Vorbereitung: Die Ananas-Krone richtig schneiden
1. Die Ananas auswählen: Achte darauf, dass die Ananas reif ist. Die Blätter sollten grün und fest sein, und die Frucht sollte einen angenehmen, süßen Duft verströmen. Vermeide Ananas mit braunen oder welken Blättern.
2. Die Krone abschneiden: Nimm dein scharfes Messer und schneide die Krone mit etwa 2-3 cm Fruchtfleisch ab. Sei vorsichtig, damit du die Blätter nicht beschädigst.
3. Fruchtfleisch entfernen: Entferne das gesamte Fruchtfleisch von der Krone. Das ist wichtig, da das Fruchtfleisch sonst faulen und Schimmel bilden kann. Du kannst das Fruchtfleisch vorsichtig mit dem Messer abschaben oder es mit den Fingern abbrechen.
4. Die unteren Blätter entfernen: Entferne die untersten Blätter der Krone (etwa 2-3 Reihen), bis du einen kleinen Stiel freigelegt hast. Hier werden später die Wurzeln wachsen.
5. Optional: Wurzelhormon anwenden: Tauche den freigelegten Stiel in Wurzelhormonpulver. Das fördert die Wurzelbildung, ist aber nicht unbedingt notwendig.
Die Bewurzelung: So bringst du die Ananas zum Wachsen
Es gibt zwei Hauptmethoden, um die Ananas-Krone zu bewurzeln: im Wasser oder direkt in der Erde. Ich persönlich bevorzuge die Wassermethode, da ich so den Fortschritt der Wurzelbildung besser beobachten kann.
Methode 1: Bewurzelung im Wasser
1. Ein Glas vorbereiten: Fülle ein Glas mit Wasser. Das Wasser sollte sauber und zimmerwarm sein.
2. Die Krone ins Wasser stellen: Stelle die Ananas-Krone so ins Wasser, dass nur der freigelegte Stiel im Wasser ist. Die Blätter sollten nicht im Wasser sein, da sie sonst faulen können.
3. Einen hellen Standort wählen: Stelle das Glas an einen hellen, warmen Ort, aber nicht in direktes Sonnenlicht. Ein Fensterbrett ist ideal.
4. Wasser wechseln: Wechsle das Wasser alle 2-3 Tage, um die Bildung von Bakterien und Algen zu verhindern.
5. Geduld haben: Es kann einige Wochen dauern, bis sich Wurzeln bilden. Sei geduldig und beobachte die Krone regelmäßig. Du solltest nach etwa 2-4 Wochen erste Wurzeln sehen.
Methode 2: Bewurzelung direkt in der Erde
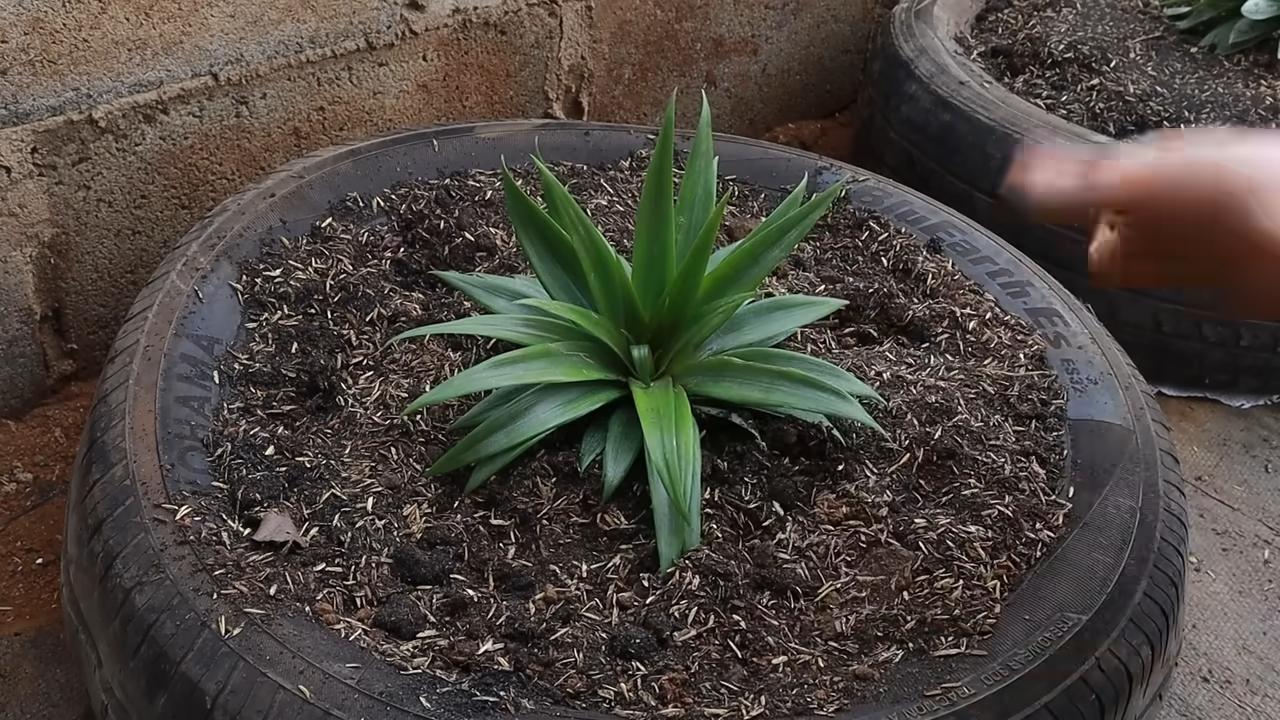
1. Den Topf vorbereiten: Fülle den Topf mit der vorbereiteten Blumenerde. Achte darauf, dass die Erde locker und gut durchlässig ist.
2. Ein Pflanzloch machen: Mache ein kleines Loch in die Mitte der Erde.
3. Die Krone einpflanzen: Setze die Ananas-Krone in das Loch und drücke die Erde leicht an. Achte darauf, dass die unteren Blätter nicht mit der Erde bedeckt sind.
4. Angießen: Gieße die Ananas-Krone vorsichtig an. Die Erde sollte feucht, aber nicht nass sein.
5. Einen hellen Standort wählen: Stelle den Topf an einen hellen, warmen Ort, aber nicht in direktes Sonnenlicht.
6. Feuchtigkeit erhalten: Besprühe die Blätter regelmäßig mit Wasser, um die Luftfeuchtigkeit zu erhöhen. Du kannst auch eine durchsichtige Plastiktüte oder ein Mini-Gewächshaus über den Topf stülpen, um die Feuchtigkeit zu halten.
7. Geduld haben: Es kann einige Wochen dauern, bis sich Wurzeln bilden. Sei geduldig und halte die Erde feucht.
Das Einpflanzen: Der Umzug in den Topf
Sobald die Wurzeln etwa 2-3 cm lang sind (bei der Wassermethode) oder du merkst, dass die Krone fest im Topf sitzt (bei der direkten Methode), ist es Zeit, die Ananas in einen größeren Topf umzupflanzen.
1. Einen größeren Topf vorbereiten: Wähle einen Topf, der etwas größer ist als der vorherige (mindestens 20 cm Durchmesser). Fülle den Topf mit der vorbereiteten Blumenerde.
2. Die Ananas vorsichtig aus dem Wasser nehmen (bei der Wassermethode): Sei vorsichtig, um die Wurzeln nicht zu beschädigen.
3. Ein Pflanzloch machen: Mache ein Loch in die Mitte der Erde.
4. Die Ananas einpflanzen: Setze die Ananas in das Loch und drücke die Erde leicht an. Achte darauf, dass die Wurzeln gut bedeckt sind.
5. Angießen: Gieße die Ananas vorsichtig an. Die Erde sollte feucht, aber nicht nass sein.
Die Pflege: So bleibt deine Ananas glücklich
Die richtige Pflege ist entscheidend für das Wachstum deiner Ananas.
* Standort: Ananas lieben die Sonne! Stelle den Topf an einen sonnigen, warmen Ort. Ideal sind mindestens 6 Stunden Sonnenlicht pro Tag.
* Gießen: Gieße die Ananas regelmäßig, aber vermeide Staunässe. Die Erde sollte immer leicht feucht sein. Im Winter weniger gießen.
* Düngen: Dünge die Ananas während der Wachstumsperiode (Frühling und Sommer) alle 2-3 Wochen mit einem Flüssigdünger für Obstpflanzen.
* Luftfeuchtigkeit: Ananas lieben hohe Luftfeuchtigkeit. Besprühe die Blätter regelmäßig mit Wasser oder stelle den Topf auf einen Untersetzer mit Wasser und Kieselsteinen.
* Überwintern: Ananas sind nicht winterhart. Wenn die Temperaturen unter 15°C fallen, solltest du die Ananas ins Haus holen und an einen hellen, warmen Ort stellen. Gieße im Winter weniger.
* Schädlinge: Achte auf Schädlinge wie Spinnmilben oder Wollläuse. Bei Befall kannst du die Blätter mit einem feuchten Tuch abwischen oder ein geeignetes Insektizid verwenden.
Die Blüte und Fruchtbildung: Geduld ist gefragt
Es kann 1-3 Jahre dauern, bis deine Ananas blüht und Früchte trägt. Die Blüte ist ein wunderschönes Ereignis: Aus der Mitte der Pflanze wächst ein Blütenstand mit vielen kleinen, violetten Blüten.
Um die Fruchtbildung zu fördern, kannst du folgende Tricks anwenden:
* Ethylen-Gas: Stelle einen Apfel in eine Plastiktüte und stülpe die Tüte über die Ananas. Äpfel produzieren Ethylen-Gas, das die Fruchtbildung anregen kann. Lasse die Tüte für ein paar Tage über der Ananas.
* Magnesiumsulfat (Bittersalz): Gieße die Ananas regelmäßig mit einer Lösung aus Magnesiumsulfat (1 Teelöffel pro Liter Wasser). Magnesiumsulfat fördert die Blütenbildung.
Die Ernte: Der Lohn für deine Mühe
Wenn die Ananas reif ist, verströmt sie einen süßen Duft und die Schale wird gelb-orange. Die Ernte ist ein besonderer Moment! Schneide die Ananas vorsichtig mit einem scharfen Messer ab.
Wichtiger Hinweis: Nach der Ernte der Ananas stirbt die Mutterpflanze ab. Aber keine Sorge! Oft bilden sich an der Basis der Pflanze Ableger (sogenannte “Kindel”). Diese kannst du abtrennen und neu einpflanzen, um weitere Ananas zu ziehen.
Ich hoffe, dieser Leitfaden hilft dir dabei, deine eigene Ananas auf der Terrasse zu ziehen. Es ist ein lohnendes Projekt, das dir nicht
Conclusion
So, there you have it! Growing your own pineapple on your terrace isn’t just a fun project; it’s a rewarding experience that brings a touch of the tropics right to your doorstep. Imagine the satisfaction of harvesting a sweet, juicy pineapple that you nurtured from start to finish. It’s a conversation starter, a testament to your green thumb, and a delicious addition to your summer cocktails and desserts.
This DIY pineapple growing trick is a must-try for several reasons. First, it’s surprisingly easy. You don’t need acres of land or specialized equipment. A pot, some soil, a pineapple top, and a little patience are all you need to embark on this exciting journey. Second, it’s incredibly cost-effective. Instead of throwing away the pineapple top, you’re giving it a new life and saving money on store-bought pineapples in the long run. Third, it’s an environmentally friendly way to reduce food waste and connect with nature.
But the best reason to try this is the unparalleled flavor of a homegrown pineapple. The taste is noticeably sweeter and more vibrant than anything you can find in the supermarket. It’s a difference you have to experience to believe.
Don’t be afraid to experiment with variations! Try different types of potting soil to see what works best in your climate. Consider adding organic fertilizers to boost growth and fruit production. You can even try growing multiple pineapple plants in different sized containers to compare their growth rates. If you live in a colder climate, consider bringing your pineapple plant indoors during the winter months to protect it from frost. You can also use grow lights to supplement natural sunlight and ensure healthy growth.
We encourage you to take the plunge and try this DIY pineapple growing trick. It’s a fun, educational, and ultimately delicious project that will bring joy to your terrace and your taste buds. Once you’ve harvested your first pineapple, be sure to share your experience with us! We’d love to see photos of your plants and hear about your successes (and any challenges you encountered along the way). Share your tips, tricks, and variations in the comments below. Let’s create a community of pineapple growers and spread the joy of homegrown tropical fruit! This is a great way to learn more about **growing pineapple** and share your knowledge with others.
Now, let’s address some frequently asked questions to help you get started on your pineapple-growing adventure.
Frequently Asked Questions (FAQ)
How long does it take to grow a pineapple from a top?
Patience is key when growing pineapples! It typically takes anywhere from 2 to 3 years for a pineapple plant to mature and produce fruit. The exact timeframe depends on various factors, including climate, sunlight exposure, soil quality, and the specific variety of pineapple. Don’t get discouraged if you don’t see fruit right away. Consistent care and attention will eventually pay off.
What kind of soil is best for growing pineapples?
Pineapples thrive in well-draining, slightly acidic soil. A mixture of potting soil, perlite, and peat moss is a good option. The perlite helps with drainage, while the peat moss provides acidity. Avoid heavy clay soils, as they can retain too much water and lead to root rot. You can also amend your soil with compost or other organic matter to improve its fertility and drainage.
How much sunlight does a pineapple plant need?
Pineapples are sun-loving plants and require at least 6 hours of direct sunlight per day. If you’re growing your pineapple indoors, place it near a sunny window or use a grow light to supplement natural sunlight. Insufficient sunlight can result in slow growth and reduced fruit production.
How often should I water my pineapple plant?
Water your pineapple plant regularly, especially during the growing season (spring and summer). Allow the soil to dry out slightly between waterings. Avoid overwatering, as this can lead to root rot. In the winter, reduce watering frequency as the plant’s growth slows down. A good rule of thumb is to water when the top inch of soil feels dry to the touch.
How do I know when my pineapple is ripe?
Several signs indicate that your pineapple is ripe and ready to harvest. The fruit will turn from green to yellow or golden-brown. It will also emit a sweet, fragrant aroma. The “eyes” of the pineapple will flatten out, and the fruit will feel slightly soft to the touch. You can also gently tug on one of the leaves; if it comes off easily, the pineapple is likely ripe.
Can I grow a pineapple indoors?
Yes, you can grow a pineapple indoors, especially if you live in a colder climate. Choose a large pot with drainage holes and use a well-draining potting mix. Place the plant near a sunny window or use a grow light to provide adequate sunlight. Maintain a consistent temperature and humidity level. Be aware that indoor-grown pineapples may take longer to fruit than those grown outdoors.
What are some common problems when growing pineapples?
Some common problems when growing pineapples include root rot, mealybugs, and scale insects. Root rot is caused by overwatering and poor drainage. Mealybugs and scale insects are sap-sucking pests that can weaken the plant. To prevent root rot, ensure your soil is well-draining and avoid overwatering. To control mealybugs and scale insects, you can use insecticidal soap or neem oil. Regularly inspect your plant for signs of pests or diseases and take action promptly.
Do I need to fertilize my pineapple plant?
Yes, fertilizing your pineapple plant can help promote healthy growth and fruit production. Use a balanced fertilizer specifically formulated for tropical plants. Apply the fertilizer according to the package instructions, typically every 2-3 months during the growing season. Avoid over-fertilizing, as this can damage the plant.
How do I encourage my pineapple plant to flower?
Getting your pineapple plant to flower can be a bit tricky, but there are a few things you can try. One method is to expose the plant to ethylene gas, which is a natural plant hormone that promotes flowering. You can do this by placing a ripe apple or banana near the plant and covering it with a plastic bag for a few days. The ripening fruit will release ethylene gas, which may trigger flowering. Another method is to use a commercial ethylene-releasing product.
What do I do after harvesting my pineapple?
After harvesting your pineapple, you can replant the top to grow another plant! Simply cut off the top of the pineapple, remove the lower leaves, and allow it to dry for a few days. Then, plant it in a pot of well-draining soil and water it regularly. With proper care, the pineapple top will root and grow into a new plant, continuing the cycle. You can also harvest any pups (small offshoots) that grow from the base of the plant and plant them separately.

Leave a Comment