
Grow Radishes Beginner Friendly: Ever dreamt of harvesting your own crunchy, peppery radishes right from your backyard? I know I have! There’s something incredibly satisfying about nurturing a tiny seed into a vibrant, edible treasure. And guess what? It’s easier than you think! This DIY guide is your express ticket to radish-growing success, even if you’ve never touched a trowel before.
Radishes have a surprisingly rich history, dating back to ancient times. They were cultivated in Egypt before the pyramids were even built! From humble beginnings as a staple food, they’ve journeyed across cultures, adding a zesty kick to cuisines worldwide. But beyond their historical significance, radishes offer a quick and rewarding gardening experience.
Let’s face it, we all crave instant gratification sometimes. Waiting months for a tomato to ripen can test anyone’s patience! That’s where radishes shine. They’re incredibly fast growers, often ready to harvest in as little as three weeks. Plus, they’re packed with nutrients and add a delightful crunch to salads, sandwiches, and even dips. So, if you’re looking for a beginner-friendly project that delivers quick results and fresh, healthy produce, learning to grow radishes beginner friendly is the perfect place to start. I’m excited to share my favorite tips and tricks to help you cultivate a bountiful radish harvest in no time!
Radieschen Anbauen: Dein Anfängerfreundlicher Leitfaden für eine Knackige Ernte
Hey Gartenfreunde! Radieschen sind der perfekte Einstieg in die Welt des Gemüseanbaus. Sie sind schnell, unkompliziert und liefern schon nach wenigen Wochen eine leckere Ernte. Ich zeige dir, wie du ganz einfach deine eigenen Radieschen ziehen kannst – egal ob im Garten, auf dem Balkon oder sogar auf der Fensterbank. Los geht’s!
Was du für den Radieschenanbau brauchst:
* Radieschensamen: Wähle am besten Sorten, die für den Anbauzeitraum geeignet sind. Es gibt frühe, mittlere und späte Sorten.
* Geeignete Erde: Radieschen mögen lockere, humusreiche Erde. Du kannst spezielle Gemüseerde kaufen oder deine Gartenerde mit Kompost aufbessern.
* Ein Pflanzgefäß oder Beet: Je nachdem, wo du anbauen möchtest, brauchst du einen Topf, einen Balkonkasten oder ein vorbereitetes Beet.
* Gießkanne oder Gartenschlauch: Radieschen brauchen regelmäßige Bewässerung.
* Optional: Ein Reihenzieher (hilft beim Anlegen gerader Reihen), ein kleines Unkrautjäteisen.
Der richtige Zeitpunkt für die Aussaat:
Radieschen sind Kaltkeimer, das heißt, sie keimen am besten bei kühleren Temperaturen. Du kannst sie deshalb schon früh im Jahr aussäen, sobald der Boden frostfrei ist.
* Frühjahrsaussaat: Ab März/April, sobald der Boden nicht mehr gefroren ist.
* Sommersaussaat: Bis August/September, um auch im Herbst noch Radieschen ernten zu können.
* Wichtig: Vermeide Aussaaten in der prallen Mittagssonne im Hochsommer, da die Hitze die Keimung beeinträchtigen kann.
Schritt-für-Schritt-Anleitung: Radieschen säen und pflegen
1. Vorbereitung des Bodens oder Pflanzgefäßes
1. Boden lockern: Egal ob im Beet oder im Topf, lockere die Erde gründlich auf. Entferne Steine und grobe Wurzeln.
2. Erde verbessern: Mische Kompost oder organischen Dünger unter die Erde, um sie mit Nährstoffen anzureichern. Das sorgt für ein gesundes Wachstum der Radieschen.
3. Oberfläche ebnen: Glätte die Oberfläche der Erde, damit die Samen gleichmäßig verteilt werden können.
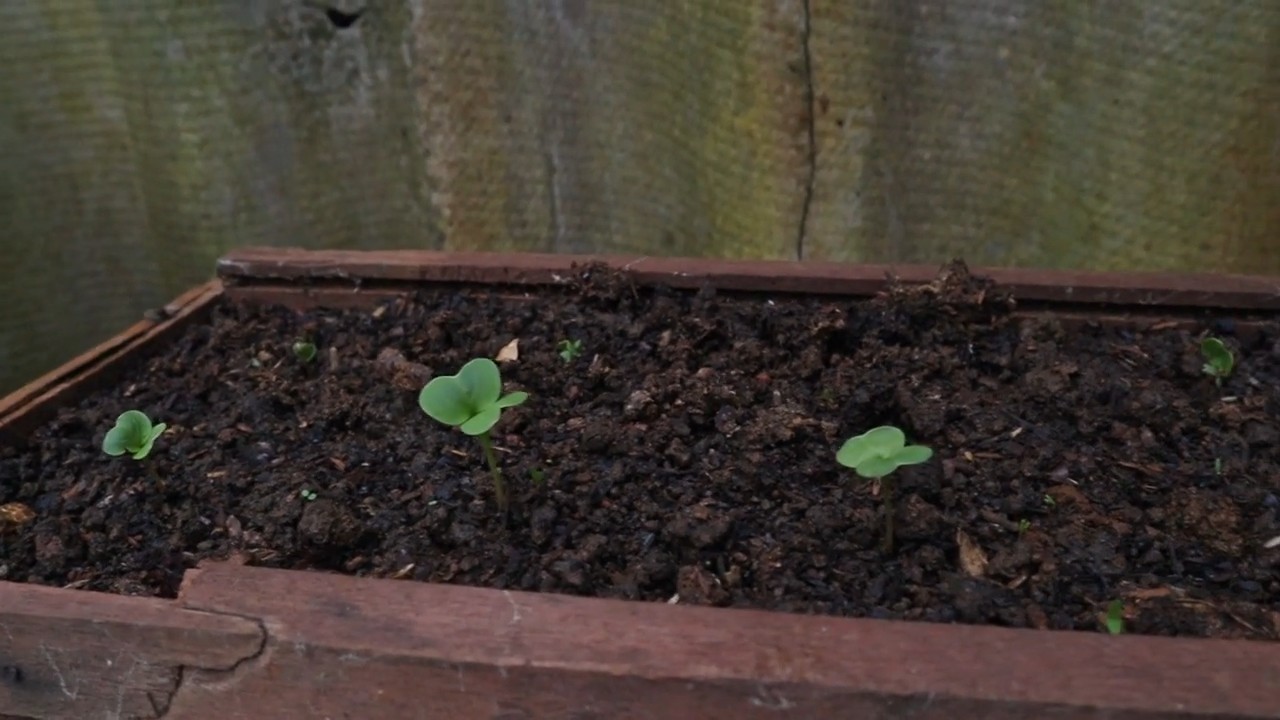
2. Aussaat der Radieschensamen
1. Reihen ziehen (optional): Mit einem Reihenzieher oder einfach mit dem Finger ziehst du flache Rillen in die Erde. Der Abstand zwischen den Reihen sollte etwa 10-15 cm betragen.
2. Samen ausbringen: Verteile die Radieschensamen gleichmäßig in den Rillen. Achte darauf, dass die Samen nicht zu dicht liegen, da die Radieschen sonst nicht genügend Platz zum Wachsen haben. Ein Abstand von 2-3 cm zwischen den Samen ist ideal.
3. Samen bedecken: Bedecke die Samen mit einer dünnen Schicht Erde (ca. 0,5-1 cm).
4. Andrücken: Drücke die Erde leicht an, damit die Samen guten Kontakt zum Boden haben.
5. Angießen: Gieße die Erde vorsichtig an, damit die Samen nicht weggeschwemmt werden. Verwende am besten eine Gießkanne mit Brauseaufsatz.
3. Pflege der Radieschen
1. Regelmäßig gießen: Radieschen brauchen eine gleichmäßige Feuchtigkeit, besonders während der Keimung und des Wachstums. Gieße regelmäßig, aber vermeide Staunässe.
2. Unkraut entfernen: Halte das Beet oder den Topf unkrautfrei, damit die Radieschen nicht um Nährstoffe und Licht konkurrieren müssen.
3. Vereinzeln (pikieren): Wenn die Radieschen zu dicht stehen, solltest du sie vereinzeln. Das bedeutet, dass du einige der kleinen Pflänzchen entfernst, damit die verbleibenden genügend Platz zum Wachsen haben. Der Abstand zwischen den Pflanzen sollte etwa 2-3 cm betragen.
4. Schutz vor Schädlingen: Radieschen können von Erdflöhen befallen werden. Diese kleinen Käfer fressen Löcher in die Blätter. Du kannst die Pflanzen mit einem Gemüseschutznetz schützen oder mit natürlichen Mitteln wie Brennnesseljauche behandeln.
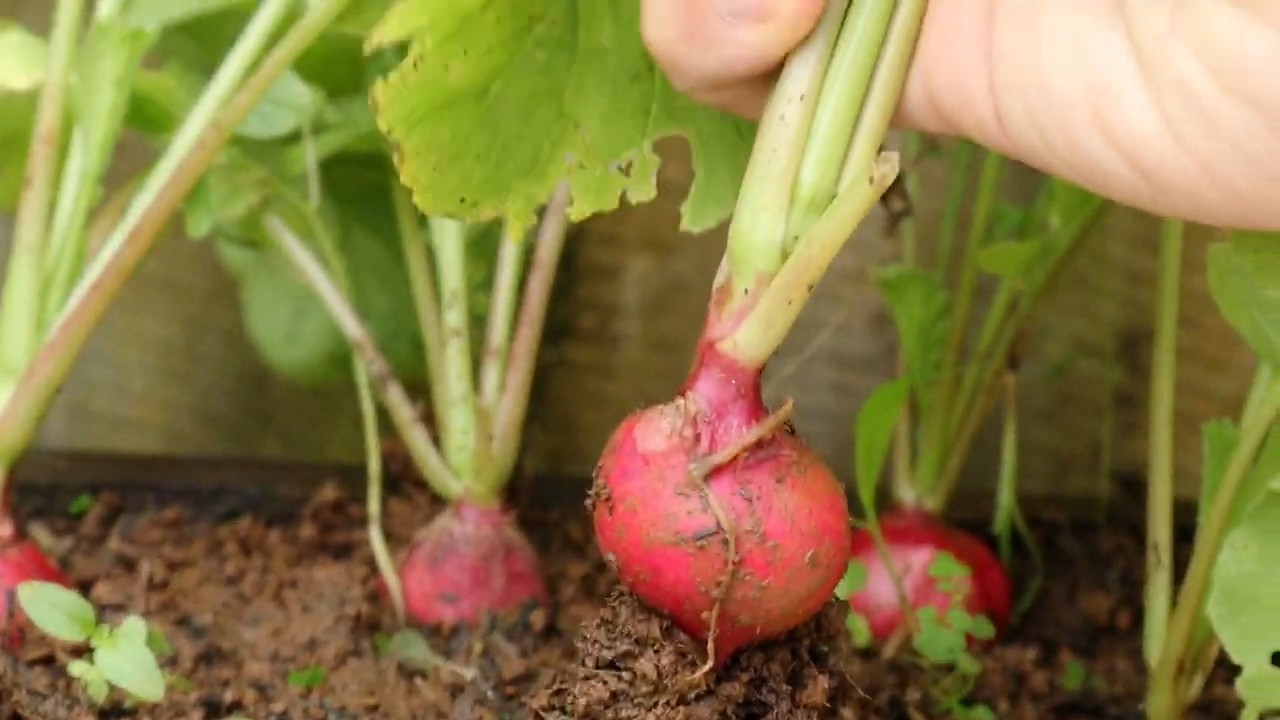
4. Ernte der Radieschen
1. Erntezeitpunkt: Radieschen sind in der Regel 4-6 Wochen nach der Aussaat erntereif. Du erkennst den richtigen Zeitpunkt daran, dass die Knollen eine Größe von etwa 2-3 cm erreicht haben.
2. Ernten: Ziehe die Radieschen vorsichtig aus der Erde. Wenn sie sich schwer ziehen lassen, kannst du die Erde um die Knolle herum etwas lockern.
3. Blätter entfernen: Entferne die Blätter der Radieschen, bevor du sie lagerst. Die Blätter ziehen Feuchtigkeit aus den Knollen und lassen sie schneller welken.
4. Lagerung: Radieschen sind nicht lange haltbar. Du kannst sie im Kühlschrank in einem feuchten Tuch oder in einer Plastiktüte für einige Tage aufbewahren. Am besten schmecken sie jedoch frisch geerntet.
Häufige Probleme und Lösungen:
* Radieschen werden nicht dick: Das kann verschiedene Ursachen haben. Möglicherweise ist der Boden zu trocken oder zu nährstoffarm. Gieße regelmäßig und dünge die Pflanzen bei Bedarf. Auch zu dicht stehende Pflanzen können sich gegenseitig behindern. Vereinzele sie rechtzeitig.
* Radieschen sind scharf: Schärfe kann durch Trockenheit oder Hitze entstehen. Achte auf eine gleichmäßige Bewässerung und säe die Radieschen nicht in der prallen Mittagssonne aus.
* Radieschen platzen: Das passiert oft nach starken Regenfällen, wenn die Pflanzen plötzlich viel Wasser aufnehmen. Achte auf eine gute Drainage im Boden und gieße die Pflanzen regelmäßig, aber nicht zu viel.
* Blätter werden von Erdflöhen befallen: Schütze die Pflanzen mit einem Gemüseschutznetz oder behandle sie mit natürlichen Mitteln wie Brennnesseljauche.
Sortenempfehlungen für Anfänger:
* ‘Runder Roter’ oder ‘Runder Weißer’: Klassische, schnellwachsende Sorten.
* ‘Eiszapfen’: Längliche, weiße Sorte mit mildem Geschmack.
* ‘French Breakfast’: Längliche, rot-weiße Sorte mit feinem Aroma.
Zusätzliche Tipps für eine erfolgreiche Ernte:
* Nachsaat: Säe alle 2-3 Wochen neue Radieschen aus, um eine kontinuierliche Ernte zu gewährleisten.
* Mischkultur: Radieschen vertragen sich gut mit anderen Gemüsesorten wie Salat, Karotten oder Spinat.
* Radieschenblätter verwenden: Die Blätter der Radieschen sind essbar und können in Salaten oder Suppen verwendet werden. Sie haben einen leicht scharfen Geschmack.
Ich hoffe, dieser Leitfaden hilft dir dabei, deine eigenen Radieschen erfolgreich anzubauen. Viel Spaß beim Gärtnern und guten Appetit!
Conclusion
So, there you have it! Growing radishes at home is not only incredibly simple, even for the most novice gardener, but it’s also a remarkably rewarding experience. Forget those bland, store-bought radishes that lack that peppery zing. With this easy DIY trick, you’ll be harvesting crisp, flavorful radishes in just a few short weeks. The satisfaction of nurturing something from seed to table is unparalleled, and the taste of freshly grown radishes is simply unmatched.
This method is a must-try because it eliminates many of the common pitfalls that beginners face. The controlled environment of a container allows you to manage soil quality, moisture levels, and sunlight exposure more effectively, leading to a higher success rate. Plus, it’s a fantastic way to introduce children to the joys of gardening and teach them about where their food comes from.
But don’t stop there! Experiment with different varieties of radishes. Try French Breakfast radishes for their mild flavor and elongated shape, or opt for the vibrant Cherry Belle radishes for a classic, peppery bite. You can even explore less common varieties like Watermelon radishes, which boast a stunning pink interior.
Consider companion planting your radishes with other vegetables like carrots or lettuce. These plants can help deter pests and improve the overall health of your garden. You can also add a layer of mulch to your container to help retain moisture and suppress weeds.
And if you’re feeling adventurous, why not try succession planting? Sow a new batch of radish seeds every week or two to ensure a continuous harvest throughout the growing season. This way, you’ll always have a supply of fresh radishes on hand for salads, snacks, and other culinary creations.
We wholeheartedly encourage you to give this DIY trick for growing radishes a try. It’s a fun, easy, and rewarding project that will bring a touch of freshness to your kitchen and a sense of accomplishment to your heart. Don’t be intimidated by the prospect of gardening – radishes are incredibly forgiving and resilient plants.
Once you’ve harvested your first batch of homegrown radishes, we’d love to hear about your experience! Share your photos, tips, and tricks in the comments below. Let’s create a community of radish enthusiasts and inspire others to discover the joys of growing their own food. Happy gardening!
Frequently Asked Questions (FAQ)
What kind of container should I use for growing radishes?
The best container for growing radishes should be at least 6 inches deep and have drainage holes. Radishes don’t have deep root systems, but they need enough space to develop properly. A wide container is preferable to a narrow one, as it will allow you to plant more radishes. You can use plastic pots, terracotta pots, or even repurposed containers like buckets or tubs. Just make sure the container is clean and free of any harmful chemicals.
What type of soil is best for radishes?
Radishes thrive in loose, well-draining soil that is rich in organic matter. Avoid heavy clay soils, as they can become compacted and hinder root development. A good potting mix specifically formulated for vegetables is an excellent choice. You can also amend your existing soil with compost or other organic materials to improve its drainage and fertility. A slightly acidic to neutral pH (around 6.0 to 7.0) is ideal.
How much sunlight do radishes need?
Radishes need at least 6 hours of sunlight per day to grow properly. Choose a location that receives full sun for the majority of the day. If you live in a hot climate, you may need to provide some afternoon shade to prevent the radishes from bolting (going to seed prematurely). If you don’t have a sunny spot outdoors, you can also grow radishes indoors under grow lights.
How often should I water radishes?
Radishes need consistent moisture to grow quickly and develop crisp, flavorful roots. Water them regularly, especially during hot, dry weather. The soil should be kept consistently moist but not waterlogged. Check the soil moisture by sticking your finger into the soil – if the top inch feels dry, it’s time to water. Avoid overhead watering, as this can lead to fungal diseases. Instead, water at the base of the plants.
How long does it take for radishes to grow?
Radishes are one of the fastest-growing vegetables, typically maturing in just 3 to 4 weeks. The exact time will depend on the variety of radish, the growing conditions, and the weather. Check the seed packet for specific information on the maturity time for your chosen variety.
Why are my radishes all leaves and no root?
There are several reasons why your radishes might be producing lots of leaves but small or no roots. One common cause is overcrowding. If the radishes are planted too close together, they will compete for resources and may not have enough space to develop properly. Thin out the seedlings to ensure they have adequate spacing. Another possible cause is lack of sunlight. Radishes need at least 6 hours of sunlight per day to grow properly. Insufficient watering or nutrient-poor soil can also contribute to poor root development.
What are some common pests and diseases that affect radishes?
Radishes are generally pest-resistant, but they can be susceptible to certain pests and diseases. Common pests include flea beetles, root maggots, and aphids. Flea beetles can chew small holes in the leaves, while root maggots can damage the roots. Aphids can suck the sap from the plants, weakening them. Diseases that can affect radishes include damping-off, white rust, and clubroot. To prevent pests and diseases, practice good garden hygiene, such as removing weeds and debris, and avoid overwatering. You can also use organic pest control methods, such as insecticidal soap or neem oil.
Can I eat radish leaves?
Yes, radish leaves are edible and nutritious! They have a peppery flavor similar to the roots, but milder. You can add them to salads, soups, or stir-fries. They can also be used to make pesto or sauteed as a side dish. Choose young, tender leaves for the best flavor and texture.
How do I know when radishes are ready to harvest?
Radishes are typically ready to harvest when the roots are about 1 inch in diameter. Gently loosen the soil around the radish and pull it out of the ground. If the roots are too small, leave them in the ground for a few more days. If they are too large, they may become woody and bitter.
Can I grow radishes in the winter?
Yes, you can grow radishes in the winter in mild climates or in a greenhouse or cold frame. Choose a variety that is suitable for winter growing, such as ‘Black Spanish’ or ‘French Breakfast’. Provide adequate sunlight and protection from frost.
What are some creative ways to use radishes?
Beyond salads, radishes are incredibly versatile. Try pickling them for a tangy condiment, roasting them for a sweet and savory side dish, or grating them into coleslaw for a peppery kick. You can also use them to make radish butter, radish salsa, or even radish soup. Don’t be afraid to experiment and discover new ways to enjoy this delicious and nutritious vegetable.

Leave a Comment