
Grow Radishes Faster and enjoy the crisp, peppery bite of homegrown goodness sooner than you ever thought possible! Have you ever planted radishes, eagerly anticipating that fresh, crunchy addition to your salads, only to find yourself waiting… and waiting… and waiting? I know I have! It can be frustrating when you’re craving that vibrant flavor. But don’t worry, I’m here to share some game-changing DIY tricks that will have you harvesting radishes in record time.
Radishes have a surprisingly long and fascinating history, dating back to ancient times. They were cultivated in Egypt before the pyramids were even built! These humble root vegetables have been a staple in diets across the globe for centuries, prized for their quick growth and nutritional benefits. But in today’s fast-paced world, who has time to wait weeks for a radish to mature? That’s where these DIY hacks come in.
Let’s face it, we all want to maximize our gardening efforts and enjoy the fruits (or, in this case, vegetables!) of our labor as quickly as possible. Whether you’re a seasoned gardener or just starting out, these simple yet effective techniques will help you grow radishes faster and more efficiently. Imagine the satisfaction of harvesting a bountiful crop of radishes just weeks after planting! Get ready to unlock the secrets to rapid radish growth and impress your friends and family with your gardening prowess. Let’s get started!
Grow Radishes Faster: My Secret DIY Soil Boosting Hack!
Hey there, fellow garden enthusiasts! I’m so excited to share my tried-and-true method for getting radishes from seed to salad in record time. We all know how impatient we can get waiting for those crunchy, peppery delights, right? Well, this DIY soil boosting hack is going to be your new best friend. It’s all about creating the perfect environment for rapid radish growth. Let’s dive in!
Understanding Radish Needs: The Foundation for Speed
Before we get our hands dirty, let’s quickly chat about what radishes crave. They’re not fussy, which is great, but understanding their basic needs will make this hack even more effective.
* Loose, well-draining soil: Radishes need room to expand! Compacted soil will lead to stunted, misshapen roots.
* Plenty of sunlight: Aim for at least 6 hours of direct sunlight per day.
* Consistent moisture: Radishes need consistent watering to prevent cracking and ensure rapid growth.
* Cool temperatures: Radishes thrive in cooler weather, making spring and fall ideal planting times.
* Nutrient boost: While not heavy feeders, a little extra phosphorus and potassium can encourage root development.
The DIY Soil Boosting Hack: My Secret Weapon
This hack focuses on amending your soil with ingredients that promote drainage, aeration, and a gentle nutrient boost. It’s all about creating a radish paradise!
* Key Ingredients:
* Compost: The foundation of healthy soil! It improves drainage, adds nutrients, and supports beneficial microbes.
* Perlite: This volcanic glass improves drainage and aeration, preventing soil compaction.
* Bone Meal: A slow-release source of phosphorus, essential for root development.
* Wood Ash (optional): Provides potassium and trace minerals, but use sparingly as it can raise soil pH.
* Tools You’ll Need:
* Gardening gloves
* Trowel or garden fork
* Measuring cup or scoop
* Watering can or hose
Step-by-Step Instructions: Let’s Get Planting!
Alright, let’s get down to business! Follow these steps carefully, and you’ll be harvesting radishes before you know it.
1. Prepare the Planting Area:
* First, choose a sunny spot in your garden that gets at least 6 hours of direct sunlight.
* Clear the area of any weeds, rocks, or debris. I like to use a garden fork to loosen the soil to a depth of about 6-8 inches. This makes it easier to incorporate the soil amendments.
* If you’re planting in raised beds or containers, make sure they’re clean and have adequate drainage holes.
2. Amend the Soil: The Magic Begins!
* This is where the magic happens! We’re going to create the perfect radish-growing environment.
* For every square foot of planting area, I like to add the following:
* 2 cups of compost: This is the base of our soil boost. It provides essential nutrients and improves soil structure.
* 1 cup of perlite: This is crucial for drainage and aeration. Radishes hate soggy soil!
* 1/2 cup of bone meal: This provides a slow-release source of phosphorus, which is vital for root development.
* (Optional) 1/4 cup of wood ash: If your soil is acidic, a little wood ash can help balance the pH and provide potassium. But be careful not to overdo it!
* Using your trowel or garden fork, thoroughly mix the amendments into the top 6-8 inches of soil. Make sure everything is evenly distributed.
3. Sow the Radish Seeds: Planting Time!
* Now it’s time to plant those tiny radish seeds!
* Radishes are typically planted about 1/2 inch deep and 1 inch apart. I like to create shallow furrows in the soil using my finger or a trowel.
* Sprinkle the seeds evenly along the furrows. Don’t overcrowd them!
* Gently cover the seeds with soil and lightly pat it down.
4. Water Thoroughly: Hydration is Key!
* After planting, water the area thoroughly with a gentle spray. You want to moisten the soil without disturbing the seeds.
* Keep the soil consistently moist but not soggy. Radishes need consistent moisture to germinate and grow quickly.
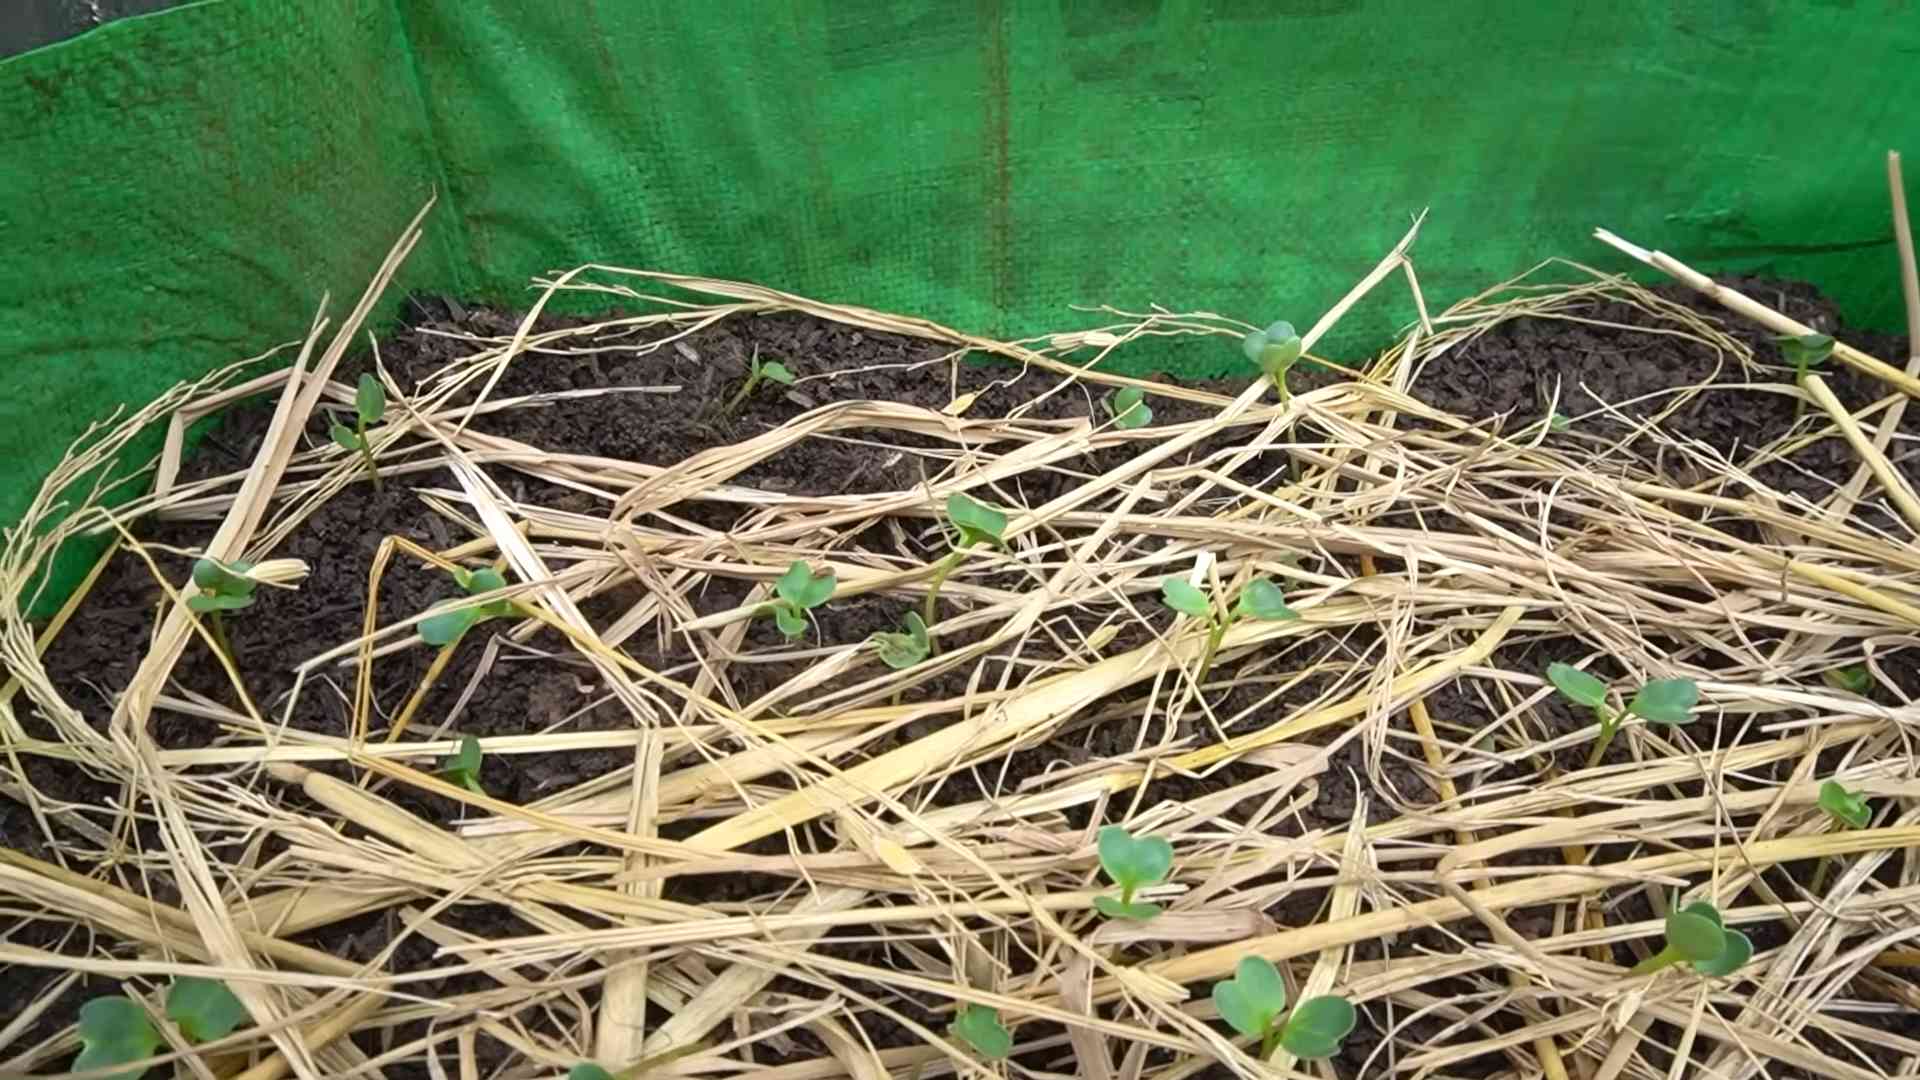
5. Thin Seedlings (If Necessary): Giving Them Room to Grow!
* Once the seedlings emerge (usually within 3-7 days), you may need to thin them out if they’re too close together.
* Thinning ensures that each radish has enough space to develop properly.
* Gently pull out the weaker seedlings, leaving about 1-2 inches between the remaining plants.
6. Maintain Consistent Moisture: Don’t Let Them Dry Out!
* Radishes need consistent moisture to grow quickly and prevent cracking.
* Water regularly, especially during dry spells. I like to check the soil moisture daily and water when the top inch feels dry.
* Avoid overwatering, as this can lead to root rot.
7. Weed Regularly: Protecting Your Precious Radishes!
* Weeds can compete with radishes for nutrients and water, so it’s important to keep the planting area weed-free.
* Gently pull out any weeds that emerge, being careful not to disturb the radish plants.
* Mulching around the plants can help suppress weed growth and retain moisture.
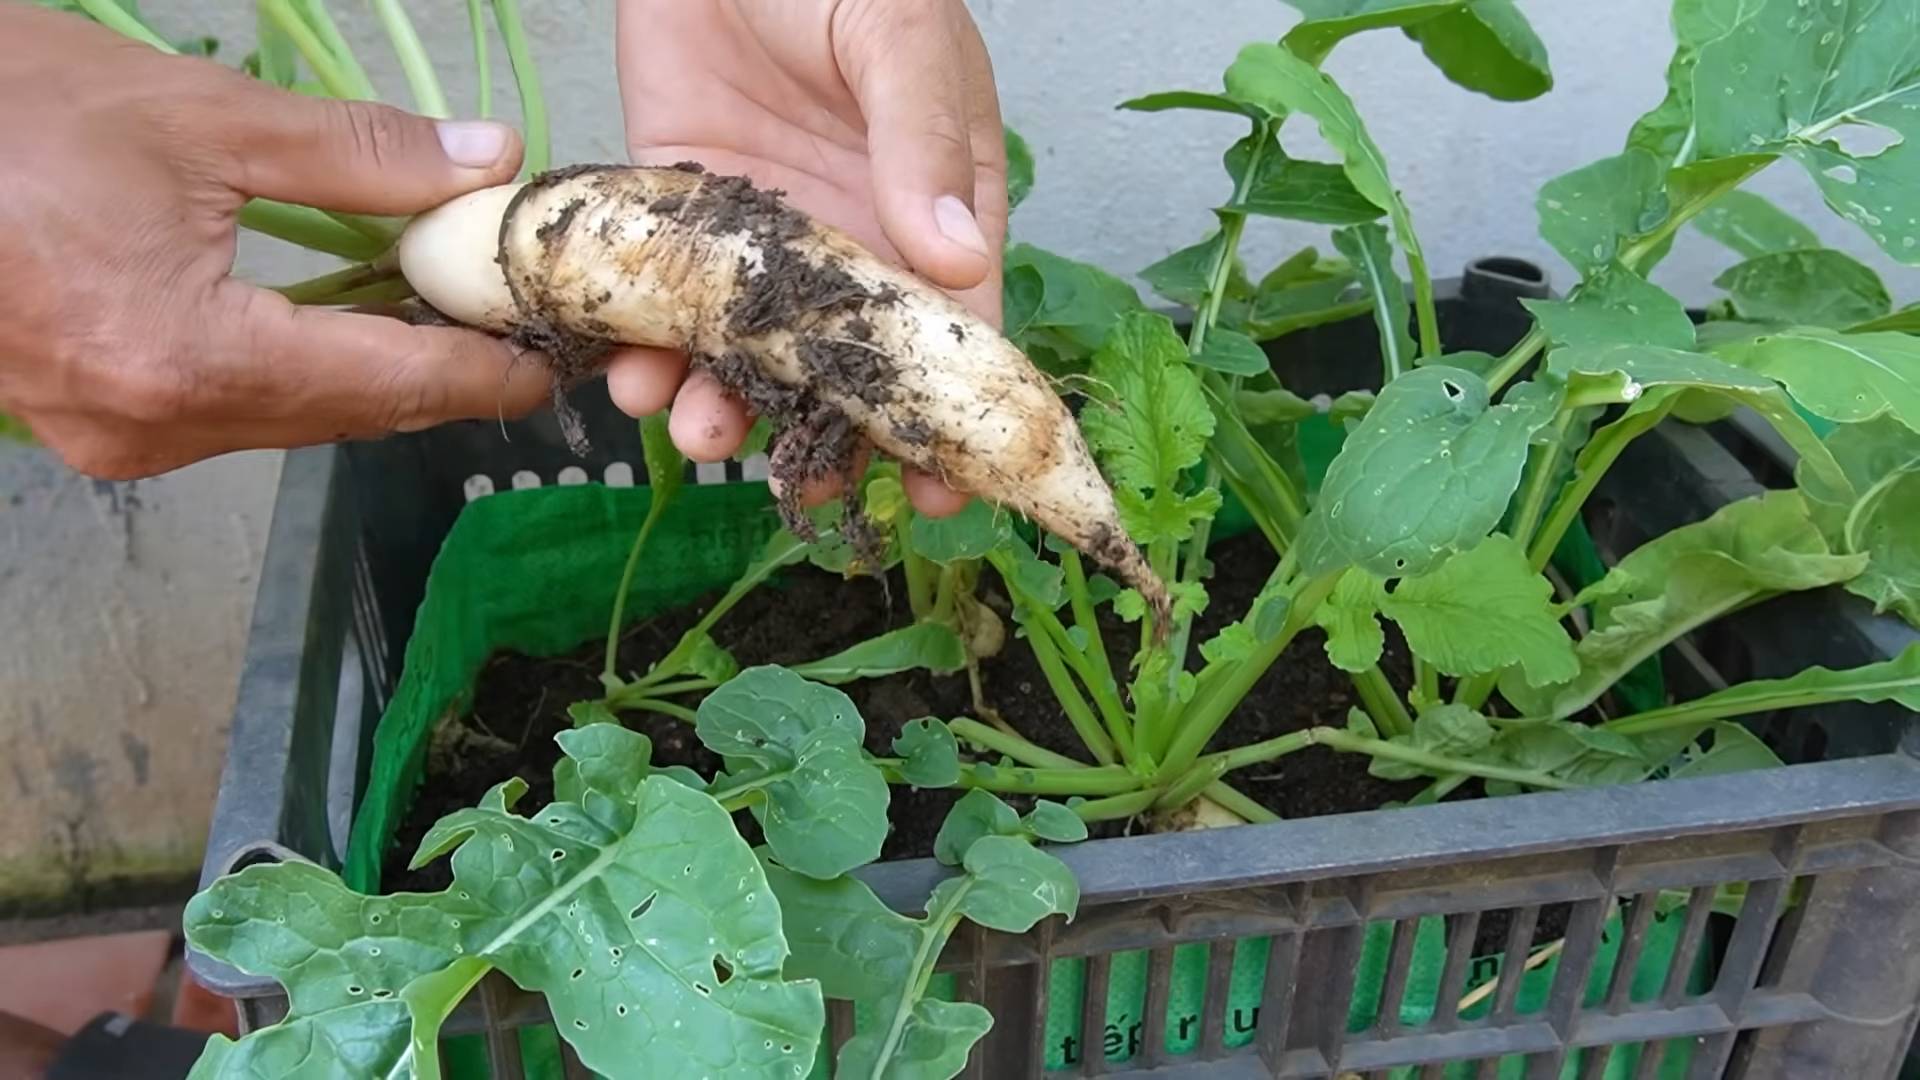
8. Harvest Time: The Moment We’ve Been Waiting For!
* Radishes are typically ready to harvest in 3-4 weeks, depending on the variety and growing conditions.
* Check the size of the radish roots by gently brushing away the soil around the base of the plant.
* When the roots are about 1 inch in diameter, they’re ready to harvest.
* Gently pull the radishes from the soil, being careful not to break the roots.
* Wash the radishes thoroughly and enjoy them fresh!
Troubleshooting Tips: Addressing Common Issues
Even with the best preparation, sometimes things don’t go exactly as planned. Here are a few common radish-growing problems and how to fix them:
* Radishes are cracking: This is usually caused by inconsistent watering. Make sure to water regularly and deeply, especially during dry spells.
* Radishes are small and stunted: This could be due to compacted soil, lack of nutrients, or overcrowding. Make sure to amend the soil properly, thin the seedlings, and provide a gentle nutrient boost.
* Radishes are bitter: This can be caused by hot weather or letting the radishes grow too large. Harvest them when they’re still relatively small and grow them during cooler months.
* Pests are attacking my radishes: Common radish pests include flea beetles and root maggots. Use row covers to protect your plants from pests, and consider using organic pest control methods if necessary.
Choosing the Right Radish Variety: Speed Matters!
Not all radishes are created equal! Some varieties are faster to mature than others. Here are a few of my favorite fast-growing radish varieties:
* Cherry Belle: A classic, round red radish that matures in about 22 days.
* French Breakfast: An elongated red and white radish with a mild flavor, ready in about 23 days.
* Sparkler: A round red radish with a white tip, maturing in about 25 days.
* Easter Egg: A mix of colorful radishes (red, pink, purple, white) that mature in about 25 days.
Extra Tips for Super-Fast Growth: Going the Extra Mile
Want to take your radish-growing game to the next level? Here are a few extra tips for super-fast growth:
* Soak the seeds before planting: Soaking the seeds in water for 12-24 hours before planting can help speed up germination.
* Use a cold frame or row covers: These can help protect your plants from cold weather and extend the growing season.
* Fertilize with a liquid fertilizer: A diluted liquid fertilizer, such as fish emulsion or seaweed extract, can provide a quick nutrient boost.
* Succession planting: Plant a new batch of radishes every 1-2 weeks to ensure a continuous harvest.
Final Thoughts: Enjoy Your Speedy Radishes!
Growing radishes quickly is totally achievable with this simple soil boosting hack. Remember to provide them with loose, well-draining soil, plenty of sunlight, consistent moisture, and a little extra love. With a little bit of effort, you’ll be enjoying fresh, crunchy radishes in no time! Happy gardening
Conclusion
So, there you have it! This simple DIY trick to grow radishes faster is more than just a gardening shortcut; it’s a game-changer for anyone who loves fresh, crisp radishes but hates waiting weeks for them to mature. We’ve explored how pre-soaking your radish seeds and preparing your soil with a nitrogen-rich amendment can significantly accelerate the germination and growth process, allowing you to enjoy a bountiful harvest in record time.
Think about it: no more impulse buys of bland, store-bought radishes when you can have a constant supply of vibrant, peppery goodness right from your own garden. Imagine adding them to salads, using them as a crunchy topping for tacos, or simply enjoying them raw with a sprinkle of sea salt. The possibilities are endless!
But the benefits extend beyond just speed. By controlling the growing environment from the very beginning, you’re also minimizing the risk of common radish problems like bolting (going to seed prematurely) and pest infestations. This means healthier, more flavorful radishes that are truly worth the effort.
Don’t be afraid to experiment with variations on this method. For example, try using different types of liquid to pre-soak your seeds. Some gardeners swear by chamomile tea for its anti-fungal properties, while others prefer a diluted seaweed extract to provide an extra boost of nutrients. You could also experiment with different soil amendments, such as compost tea or aged manure, to see which works best for your particular soil conditions.
Another exciting variation is to try succession planting. By sowing a small batch of pre-soaked radish seeds every week or two, you can ensure a continuous harvest throughout the growing season. This is especially useful if you have a small garden or limited space.
Consider also the type of radish you are growing. Some varieties, like Cherry Belle, are naturally faster-growing than others. Pairing a fast-growing variety with this DIY trick can yield truly impressive results.
Ready to give it a try? We wholeheartedly encourage you to implement this simple yet effective technique in your own garden. It’s easy, affordable, and the rewards are well worth the minimal effort.
We’re confident that you’ll be amazed at how quickly you can grow radishes faster using this method. But don’t just take our word for it – try it out for yourself and see the difference firsthand.
And most importantly, we want to hear about your experience! Share your results, tips, and variations in the comments section below. Let’s create a community of radish enthusiasts who are passionate about growing their own fresh, delicious produce. What worked for you? What challenges did you face? What unique twists did you add to the process? Your feedback will not only help other gardeners but also contribute to our collective knowledge of how to optimize radish cultivation.
So, grab your radish seeds, prepare your soil, and get ready to enjoy a faster, more rewarding gardening experience. Happy growing!
Frequently Asked Questions (FAQ)
What kind of radishes grow fastest?
Several radish varieties are known for their quick growth. Cherry Belle is a classic choice, maturing in as little as 22 days. French Breakfast radishes are another popular option, offering a mild flavor and a harvest time of around 25 days. Easter Egg radishes are a colorful mix that also mature relatively quickly. Sparkler radishes are another good option. When using this DIY trick to grow radishes faster, starting with a naturally fast-growing variety will only enhance the results.
How long should I soak radish seeds before planting?
The ideal soaking time for radish seeds is between 12 and 24 hours. Soaking them for longer than 24 hours can actually be detrimental, as it may lead to the seeds becoming waterlogged and unable to germinate properly. Use lukewarm water for soaking, and change the water if soaking for the longer end of the recommended time.
What is the best soil for growing radishes?
Radishes thrive in loose, well-drained soil that is rich in organic matter. Amend your soil with compost or well-rotted manure before planting to improve its fertility and drainage. Avoid heavy clay soils, as they can hinder root development and result in misshapen radishes. A slightly acidic to neutral soil pH (around 6.0 to 7.0) is ideal.
How much sunlight do radishes need?
Radishes need at least 6 hours of sunlight per day to grow properly. However, they can tolerate partial shade, especially in hotter climates. If you live in a region with intense summer heat, providing some afternoon shade can help prevent the radishes from bolting.
How often should I water radishes?
Radishes need consistent moisture to grow quickly and develop crisp, flavorful roots. Water them regularly, especially during dry spells. Aim to keep the soil consistently moist but not waterlogged. Overwatering can lead to root rot, while underwatering can cause the radishes to become tough and bitter.
What are common radish pests and diseases?
Common radish pests include flea beetles, root maggots, and aphids. Flea beetles can be controlled with row covers or insecticidal soap. Root maggots can be prevented by using floating row covers and practicing crop rotation. Aphids can be washed off with a strong stream of water or treated with insecticidal soap. Common radish diseases include damping-off and white rust. Damping-off can be prevented by using well-drained soil and avoiding overwatering. White rust can be controlled with fungicides.
Can I grow radishes in containers?
Yes, radishes are well-suited for container gardening. Choose a container that is at least 6 inches deep and has drainage holes. Use a high-quality potting mix and water regularly. Container-grown radishes may need more frequent watering than those grown in the ground.
Why are my radishes bolting (going to seed)?
Radishes bolt when they are exposed to stress, such as high temperatures, drought, or poor soil conditions. To prevent bolting, choose bolt-resistant varieties, provide adequate water, and amend your soil with organic matter. Shading the plants during the hottest part of the day can also help.
How do I know when my radishes are ready to harvest?
Radishes are typically ready to harvest when the roots are about 1 inch in diameter. Check the seed packet for the specific maturity date of your variety. Gently loosen the soil around the radish and pull it out of the ground. Harvest radishes promptly once they are mature, as they can become tough and bitter if left in the ground for too long.
Can I eat radish greens?
Yes, radish greens are edible and nutritious. They have a peppery flavor similar to the roots. Use them in salads, soups, or stir-fries. Choose young, tender greens for the best flavor and texture.
What are some creative ways to use radishes?
Beyond salads, radishes can be used in a variety of dishes. Try pickling them for a tangy snack, roasting them for a sweeter flavor, or grating them into coleslaw for a peppery kick. They also make a great addition to tacos, sandwiches, and dips.
Does this DIY trick work for all radish varieties?
While this DIY trick can benefit most radish varieties, the results may vary depending on the specific variety and your local growing conditions. Experiment with different varieties to see which ones respond best to this method. Remember that factors like soil quality, sunlight, and watering practices also play a crucial role in radish growth.


Leave a Comment