
Grow Rosemary Easily and unlock a world of fragrant possibilities right in your own backyard! Have you ever dreamed of snipping fresh rosemary sprigs to elevate your culinary creations or crafting your own aromatic herbal remedies? I know I have! For centuries, rosemary has been cherished not only for its culinary uses but also for its medicinal and symbolic significance, representing remembrance and fidelity in various cultures. From ancient Greece, where students wore rosemary garlands to enhance memory, to its widespread use in traditional medicine, this herb boasts a rich history.
But let’s be honest, sometimes growing herbs can feel a little intimidating, right? That’s where these simple DIY tricks and hacks come in. I’m going to share some of my favorite, tried-and-true methods to help you grow rosemary easily, even if you don’t have a green thumb. Whether you’re a seasoned gardener or just starting out, these tips will empower you to cultivate a thriving rosemary plant, adding a touch of Mediterranean charm and delicious flavor to your life. So, grab your gardening gloves, and let’s get started!
Grow Rosemary Easily: A DIY Propagation Guide
Hey there, fellow plant enthusiasts! I’m so excited to share my foolproof method for propagating rosemary. Rosemary is such a versatile herb – delicious in cooking, fragrant in the garden, and even beneficial for your hair! Buying rosemary plants can get expensive, so learning to propagate it yourself is a game-changer. This guide will walk you through everything you need to know to create your own rosemary army.
What You’ll Need
Before we dive in, let’s gather our supplies. This is a pretty simple process, so you probably already have most of these things lying around.
* Rosemary Plant (Mother Plant): You’ll need a healthy, established rosemary plant to take cuttings from. Choose one that looks vigorous and free of pests or diseases.
* Sharp, Clean Pruning Shears or Knife: Sterilize your cutting tools with rubbing alcohol to prevent the spread of disease. This is super important!
* Rooting Hormone (Optional but Recommended): Rooting hormone significantly increases your chances of success. I personally love using a powdered rooting hormone, but liquid works too.
* Small Pots or Seed Trays: Choose pots with drainage holes. I prefer using small, individual pots for each cutting, but seed trays work well too.
* Well-Draining Potting Mix: Rosemary hates soggy soil, so a well-draining mix is crucial. A mix of perlite, vermiculite, and peat moss works wonders. You can also use a cactus or succulent mix.
* Spray Bottle with Water: For misting the cuttings to keep them humid.
* Clear Plastic Bag or Humidity Dome (Optional): To create a humid environment for the cuttings.
* Labels and a Pen: To keep track of your cuttings. Trust me, you’ll want to label them!
Taking Rosemary Cuttings
This is where the magic begins! Taking cuttings is the first step to creating new rosemary plants.
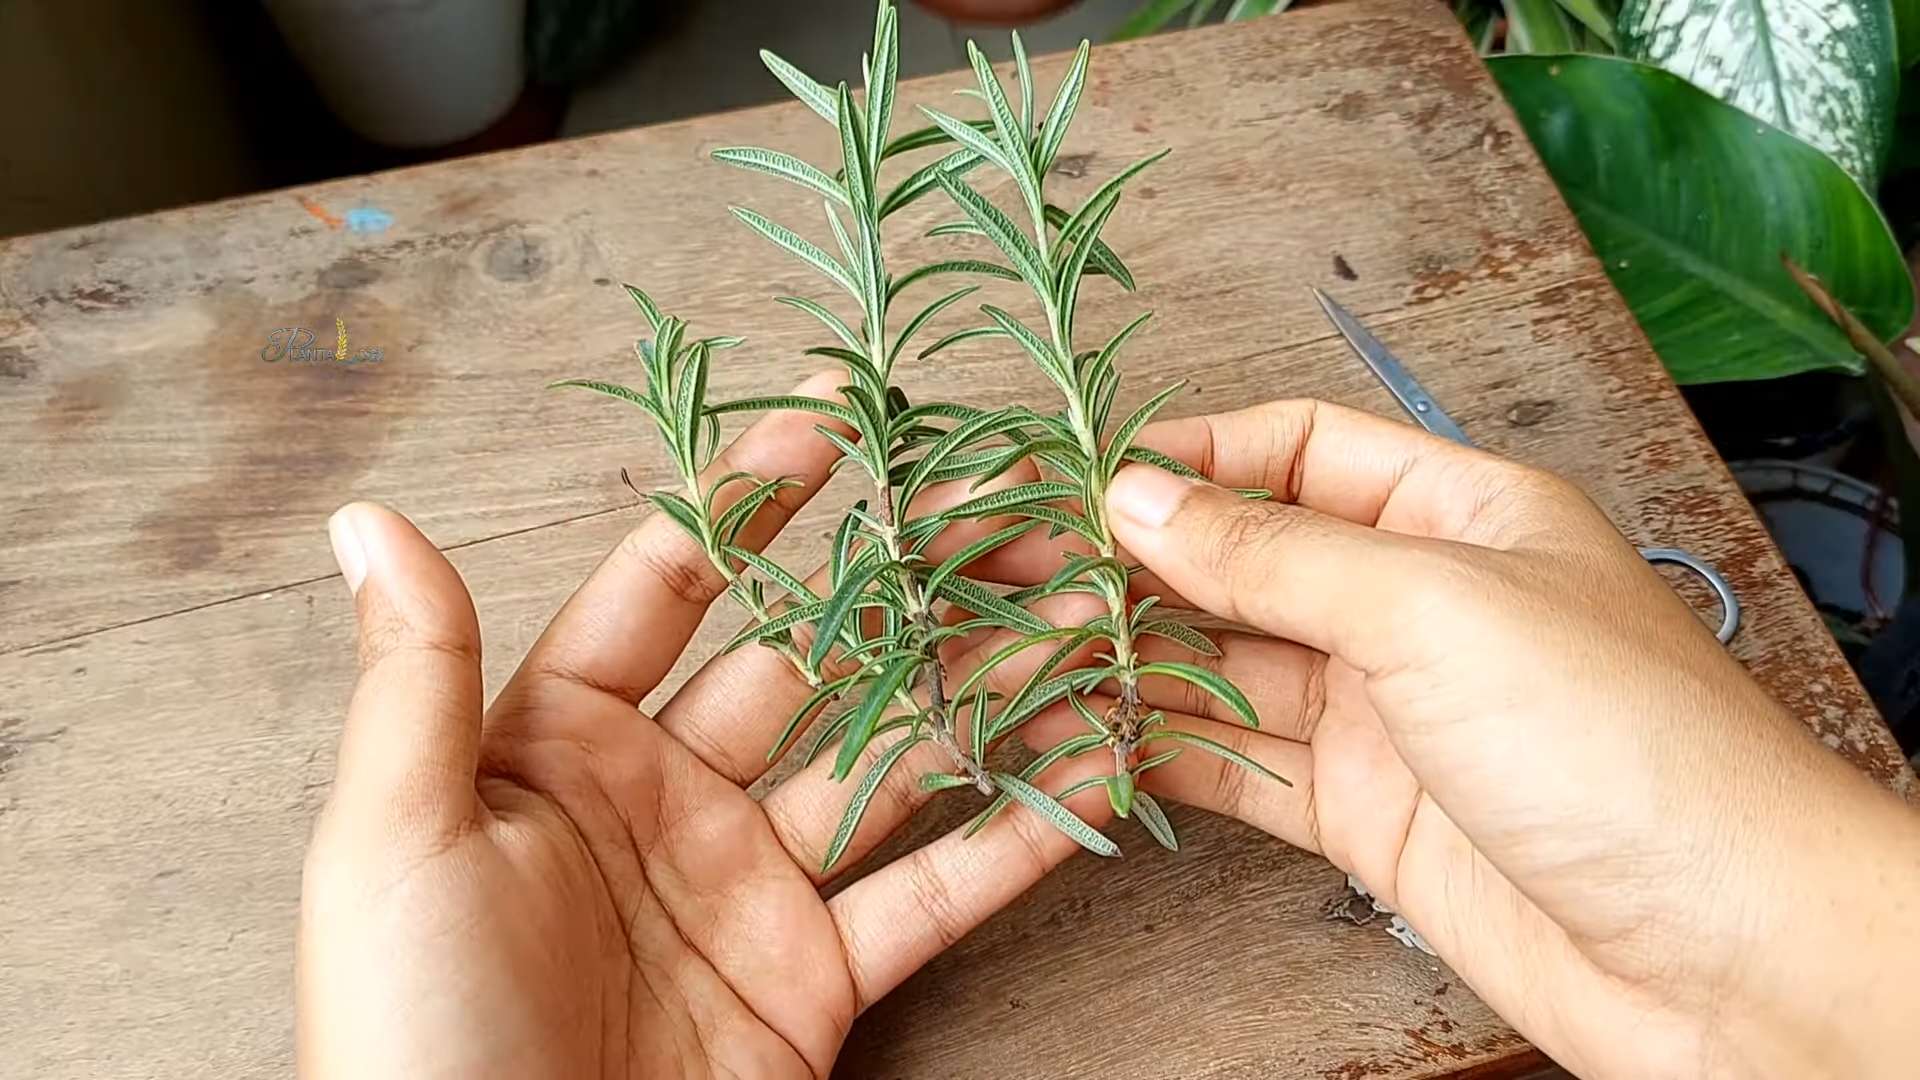
1. Choose Healthy Stems: Look for new growth on your rosemary plant. Select stems that are about 4-6 inches long and haven’t flowered yet. Avoid stems that are woody or too thick.
2. Make the Cut: Using your sterilized pruning shears or knife, make a clean cut just below a leaf node (the point where leaves grow from the stem). A clean cut helps prevent disease.
3. Remove Lower Leaves: Remove the leaves from the bottom 1-2 inches of the stem. This is important because these leaves will rot if they’re buried in the soil.
4. Prepare the Cutting: Gently scrape the outer layer of the stem on one side, near the bottom. This encourages root formation.
5. Apply Rooting Hormone (Optional): Dip the cut end of the stem into the rooting hormone powder, tapping off any excess. If you’re using liquid rooting hormone, follow the instructions on the label.
Planting Rosemary Cuttings
Now that we have our cuttings, it’s time to get them planted!
1. Prepare the Pots: Fill your small pots or seed trays with the well-draining potting mix. Moisten the soil slightly, but don’t soak it.
2. Make a Hole: Use a pencil or your finger to create a small hole in the soil for each cutting.
3. Plant the Cutting: Gently insert the cutting into the hole, making sure the bottom 1-2 inches of the stem are buried.
4. Gently Firm the Soil: Lightly press the soil around the cutting to secure it in place.
5. Water the Cuttings: Water the cuttings gently to settle the soil. Avoid overwatering.
6. Mist the Cuttings: Use a spray bottle to mist the cuttings with water. This helps create a humid environment.
Creating a Humid Environment
Rosemary cuttings need a humid environment to thrive. Here are a few ways to achieve this:
1. Plastic Bag Method: Place the pots or seed trays inside a clear plastic bag. Seal the bag, but leave a small opening for ventilation. This creates a mini-greenhouse effect.
2. Humidity Dome Method: If you have a humidity dome, place the pots or seed trays inside. Adjust the vents to maintain a humid environment.
3. Misting Regularly: If you don’t have a plastic bag or humidity dome, mist the cuttings several times a day to keep them humid.
Caring for Rosemary Cuttings
Patience is key! It takes time for rosemary cuttings to develop roots.
1. Location: Place the cuttings in a warm, bright location, but avoid direct sunlight. Direct sunlight can scorch the leaves. An east-facing window is ideal.
2. Watering: Keep the soil consistently moist, but not soggy. Water when the top inch of soil feels dry to the touch.
3. Ventilation: If you’re using a plastic bag or humidity dome, open it for a few minutes each day to allow for ventilation. This helps prevent fungal diseases.
4. Check for Rooting: After a few weeks, gently tug on the cuttings to check for root development. If you feel resistance, it means the cuttings have rooted. You can also look for new growth.
5. Remove from Humidity: Once the cuttings have rooted, gradually acclimate them to lower humidity levels by removing the plastic bag or humidity dome for increasing periods of time each day.
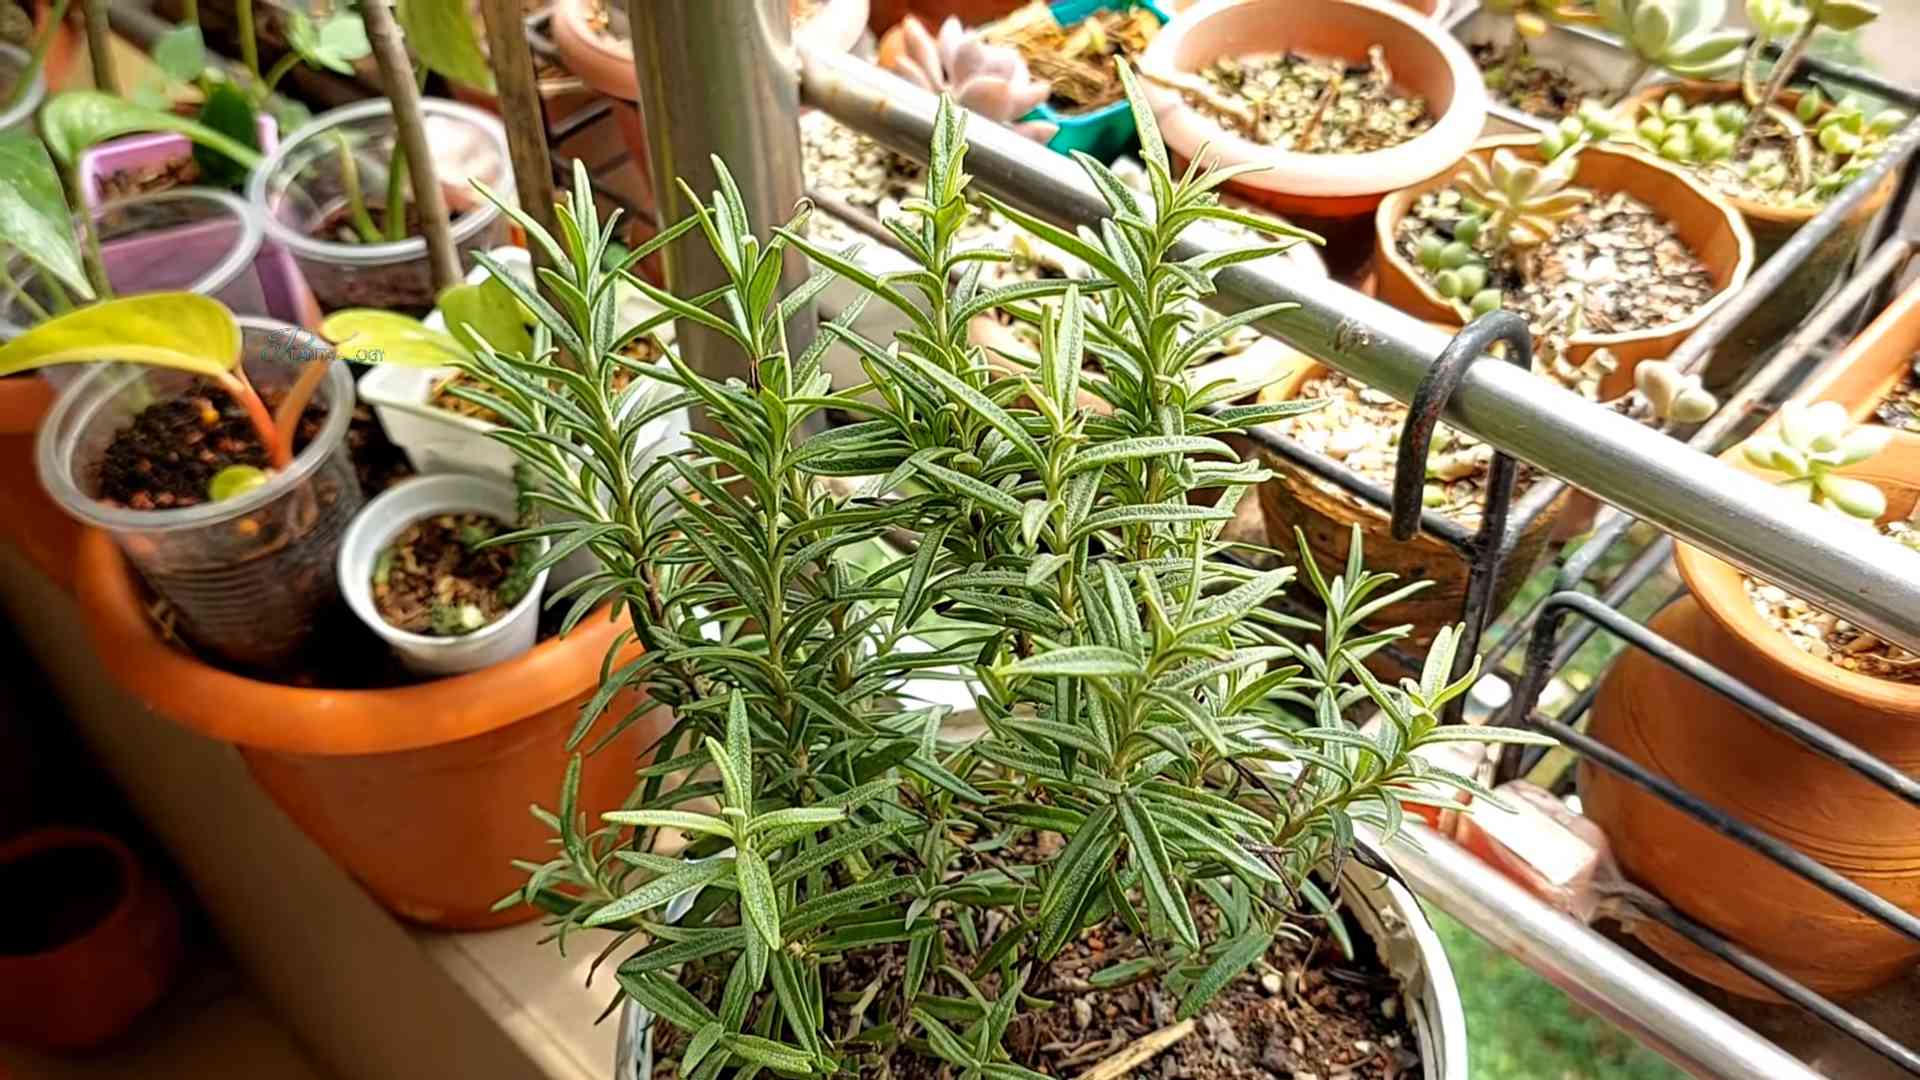
Transplanting Rosemary Cuttings
Once your rosemary cuttings have developed a strong root system, it’s time to transplant them into larger pots or directly into your garden.
1. Choose a Location: Rosemary thrives in full sun and well-draining soil. Choose a location that meets these requirements.
2. Prepare the Soil: Amend the soil with compost or other organic matter to improve drainage and fertility.
3. Dig a Hole: Dig a hole that is slightly larger than the root ball of the rosemary cutting.
4. Gently Remove the Cutting: Carefully remove the rosemary cutting from its pot, being careful not to damage the roots.
5. Plant the Cutting: Place the rosemary cutting in the hole and backfill with soil. Gently firm the soil around the plant.
6. Water Thoroughly: Water the newly transplanted rosemary plant thoroughly.
7. Mulch: Apply a layer of mulch around the plant to help retain moisture and suppress weeds.
Troubleshooting
Sometimes, things don’t go as planned. Here are a few common problems and how to fix them:
* Cuttings Rotting: This is usually caused by overwatering or poor drainage. Make sure your potting mix is well-draining and avoid overwatering. Also, ensure good ventilation.
* Cuttings Not Rooting: This could be due to several factors, including poor quality cuttings, lack of humidity, or insufficient light. Try taking cuttings from a different part of the plant, increasing humidity, and providing more light. Using rooting hormone is also highly recommended.
* Cuttings Drying Out: This is usually caused by low humidity. Make sure to mist the cuttings regularly or use a plastic bag or humidity dome.
Tips for Success
Here are a few extra tips to help you succeed with rosemary propagation:
* Take Cuttings in Spring or Summer: Rosemary cuttings root best during the growing season.
* Use Fresh Cuttings: The sooner you plant the cuttings after taking them, the better.
* Be Patient: It can take several weeks for rosemary cuttings to root. Don’t give up!
* Experiment: Try different methods and see what works best for you.
Enjoy Your New Rosemary Plants!
Congratulations! You’ve successfully propagated rosemary. Now you can enjoy your new plants in your garden, in your cooking, and even in your beauty routine. Rosemary is a wonderful herb to have around, and propagating it yourself is a rewarding experience. Happy gardening!
Conclusion
So, there you have it! Growing rosemary easily at home is not only achievable, but it’s also incredibly rewarding. Forget those expensive, often lackluster, sprigs from the grocery store. Imagine stepping outside your door and snipping fresh, fragrant rosemary whenever you need it. The aroma alone is enough to justify the effort, but the superior flavor and the satisfaction of nurturing your own herbs make this DIY project a true winner.
We’ve walked you through the simple steps, from choosing the right cutting to providing the optimal environment. Remember, patience is key, especially when propagating from cuttings. Don’t be discouraged if your first attempt isn’t a roaring success. Gardening is a learning process, and each attempt brings you closer to mastering the art of growing rosemary easily.
But the benefits extend beyond just having fresh rosemary on hand. Think about the possibilities! Infuse olive oil with rosemary for a gourmet touch to your cooking. Dry your homegrown rosemary for long-term storage and use in rubs, marinades, and teas. Create beautiful rosemary wreaths for holiday decorations. The versatility of this herb is truly remarkable.
Consider these variations to personalize your rosemary growing experience:
* Experiment with different rosemary varieties: From the upright ‘Blue Spires’ to the trailing ‘Prostratus,’ each variety offers a unique flavor profile and growth habit.
* Try different potting mixes: While we recommended a well-draining mix, you can adjust the composition to suit your specific climate and watering habits. Adding perlite or vermiculite can further improve drainage.
* Explore different propagation methods: While cuttings are a popular choice, you can also try growing rosemary from seeds, although this method is generally slower and less reliable.
* Rosemary companion planting: Plant rosemary near cabbage, beans, carrots, and sage to deter certain pests.
Growing rosemary easily is more than just a gardening project; it’s an investment in flavor, fragrance, and a touch of homegrown magic. It’s a sustainable way to enhance your culinary creations and connect with nature.
We are confident that with a little care and attention, you’ll be enjoying your own thriving rosemary plant in no time. Don’t be afraid to get your hands dirty and embrace the process.
Now, it’s your turn! We encourage you to try this DIY trick and share your experiences with us. What challenges did you encounter? What successes did you celebrate? What variations did you try? Share your tips, photos, and stories in the comments below. Let’s build a community of rosemary enthusiasts and learn from each other’s experiences. Happy growing!
Frequently Asked Questions (FAQ)
1. What is the best time of year to take rosemary cuttings?
The best time to take rosemary cuttings is typically in the spring or early summer, when the plant is actively growing. This is when the cuttings will root most readily. However, you can also take cuttings in the late summer or early fall, although the rooting process may be slower. Avoid taking cuttings during the dormant winter months.
2. How long does it take for rosemary cuttings to root?
Rosemary cuttings typically take between 4 to 8 weeks to root. The exact time will depend on factors such as the temperature, humidity, and the health of the cutting. Be patient and keep the cuttings consistently moist but not waterlogged. You can gently tug on the cutting after a few weeks to check for resistance, which indicates that roots have begun to form.
3. What kind of soil is best for growing rosemary?
Rosemary thrives in well-draining soil. A sandy or loamy soil is ideal. Avoid heavy clay soils that retain too much moisture, as this can lead to root rot. You can amend heavy soils with compost, perlite, or sand to improve drainage. A slightly acidic to neutral pH (around 6.0 to 7.0) is also preferred.
4. How much sunlight does rosemary need?
Rosemary needs at least 6 to 8 hours of sunlight per day to thrive. Choose a sunny location in your garden or place your potted rosemary plant in a spot that receives plenty of direct sunlight. If you live in a hot climate, some afternoon shade may be beneficial to prevent the plant from drying out too quickly.
5. How often should I water my rosemary plant?
Water rosemary deeply but infrequently. Allow the soil to dry out slightly between waterings. Overwatering is a common mistake that can lead to root rot. Check the soil moisture by sticking your finger into the soil. If the top inch or two feels dry, it’s time to water. During the hot summer months, you may need to water more frequently. In the winter, reduce watering significantly.
6. How do I fertilize my rosemary plant?
Rosemary is not a heavy feeder and does not require frequent fertilization. You can fertilize your rosemary plant once or twice during the growing season (spring and summer) with a balanced, slow-release fertilizer. Alternatively, you can use a liquid fertilizer diluted to half strength. Avoid over-fertilizing, as this can lead to leggy growth and reduced flavor.
7. How do I prune my rosemary plant?
Pruning rosemary is important for maintaining its shape and encouraging bushier growth. Prune your rosemary plant in the spring after it has finished flowering. Remove any dead, damaged, or crossing branches. You can also trim back the plant to maintain its desired size and shape. Avoid cutting back into the woody stems, as this can prevent new growth.
8. Can I grow rosemary indoors?
Yes, you can grow rosemary indoors, but it requires specific conditions. Provide your indoor rosemary plant with plenty of sunlight, well-draining soil, and good air circulation. Place it near a sunny window or use a grow light. Water sparingly and allow the soil to dry out between waterings. You may also need to increase the humidity around the plant, especially during the winter months when indoor air is dry.
9. What are some common problems that affect rosemary plants?
Some common problems that affect rosemary plants include root rot, powdery mildew, and spider mites. Root rot is caused by overwatering and poor drainage. Powdery mildew is a fungal disease that can occur in humid conditions. Spider mites are tiny pests that can suck the sap from the leaves. To prevent these problems, provide your rosemary plant with proper care, including well-draining soil, adequate sunlight, good air circulation, and appropriate watering.
10. How do I harvest rosemary?
To harvest rosemary, simply snip off sprigs of the plant using sharp scissors or pruning shears. You can harvest rosemary at any time of year, but the flavor is most intense during the growing season. Avoid removing more than one-third of the plant at a time, as this can stress the plant. Use fresh rosemary immediately or dry it for later use. To dry rosemary, hang sprigs upside down in a cool, dry, and well-ventilated place. Once the leaves are dry and brittle, you can store them in an airtight container.


Leave a Comment