
Grow Taro at Home? Absolutely! Imagine harvesting your own creamy, nutty-flavored taro root, right from your backyard. It’s easier than you might think, and this guide is packed with DIY tricks to help you succeed, even if you’re a beginner gardener.
Taro, also known as Colocasia esculenta, boasts a rich history, deeply intertwined with Polynesian and Asian cultures. For centuries, it has been a staple food, revered not just for its nutritional value but also for its cultural significance. From poi in Hawaii to various curries and stews across Asia, taro has nourished communities and played a vital role in traditional ceremonies.
But why should you consider growing taro at home? Well, beyond the satisfaction of cultivating your own food, growing taro offers a unique opportunity to connect with nature and enjoy fresh, organic produce. Plus, store-bought taro can sometimes be hard to find, and growing your own ensures a consistent supply. I’m going to show you some simple, effective DIY hacks that will make growing taro at home a breeze. From preparing the soil to managing pests, I’ve got you covered. Let’s get started and unlock the secrets to a thriving taro patch!
Growing Taro at Home: A Beginner’s Guide
Hey there, fellow plant enthusiasts! Ever thought about growing your own taro? It might seem a little exotic, but trust me, it’s totally doable, even if you don’t have a sprawling tropical garden. I’m going to walk you through everything you need to know to cultivate this fascinating plant right in your own home or backyard. Get ready to get your hands dirty!
Choosing Your Taro Variety
Before we dive in, let’s talk taro varieties. There are tons of different types, each with its own unique characteristics. Some are better suited for container growing, while others thrive in larger garden beds.
* Bun Long: This is a popular choice for its large, edible corms and relatively compact size. It’s a great option if you’re short on space.
* Dasheen: Another widely cultivated variety, Dasheen produces large corms and is known for its delicious flavor.
* Eddoe: Eddoe taro produces smaller corms and is often grown for its edible leaves as well.
* Ornamental Taro: If you’re more interested in the foliage, consider ornamental varieties like ‘Black Magic’ or ‘Illustris’. These have stunning dark purple or variegated leaves that add a touch of drama to any garden.
I recommend doing a little research to find a variety that suits your climate and growing conditions. Local nurseries are a great resource for finding taro varieties that are well-adapted to your area.
Preparing Your Taro for Planting
Okay, so you’ve got your taro corm (the underground stem that looks like a bulb). Now what? Here’s how to get it ready for planting:
1. Inspect the Corm: Give your taro corm a good once-over. Look for any signs of rot, damage, or pests. If you spot anything suspicious, it’s best to choose a different corm.
2. Sprouting (Optional but Recommended): While you can plant the corm directly into the soil, I’ve found that sprouting it first gives it a head start. To do this, place the corm in a shallow dish of water, making sure the top of the corm is exposed to air. Keep the dish in a warm, bright location. Change the water every few days to prevent algae growth. You should start to see sprouts emerging within a week or two.
3. Cutting the Corm (If Necessary): If your corm is very large, you can cut it into smaller pieces, making sure each piece has at least one “eye” or bud. This can help you propagate more plants from a single corm. Allow the cut surfaces to callous over for a day or two before planting to prevent rot.
Planting Your Taro
Now for the fun part – getting your taro into the ground (or pot)!
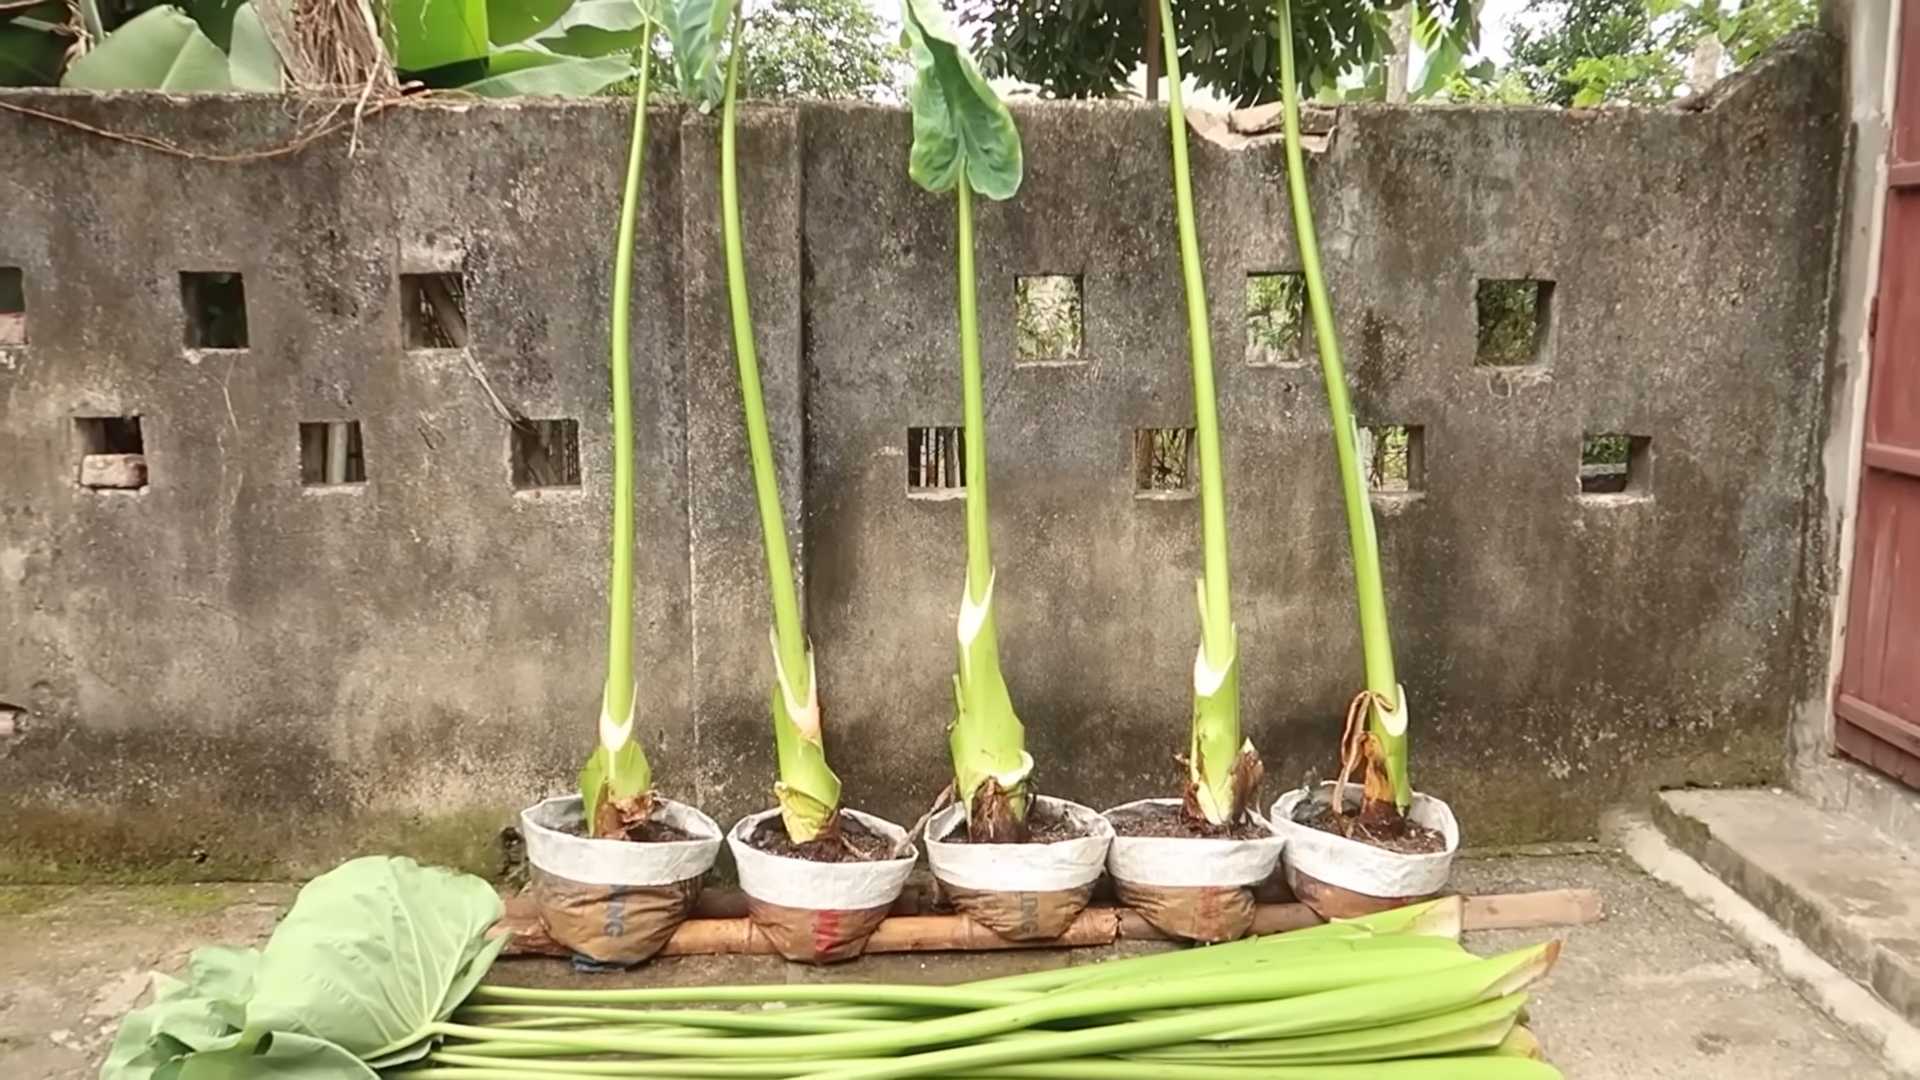
1. Choose Your Container (If Applicable): If you’re growing taro in a container, select a pot that’s at least 12 inches in diameter and depth. Taro needs plenty of room for its roots to grow. Make sure the pot has drainage holes to prevent waterlogging.
2. Prepare the Soil: Taro loves rich, well-draining soil. I like to use a mix of potting soil, compost, and perlite. The compost provides nutrients, while the perlite improves drainage. You can also add a slow-release fertilizer to give your taro a boost.
3. Plant the Corm: Dig a hole in the soil that’s deep enough to accommodate the corm. Place the corm in the hole with the sprouts (if any) facing upwards. Cover the corm with soil, leaving the very top exposed.
4. Water Thoroughly: Give your newly planted taro a good watering. The soil should be moist but not soggy.
Caring for Your Taro
Taro is relatively easy to care for, but there are a few things to keep in mind to ensure it thrives.
1. Sunlight: Taro prefers partial shade, especially in hot climates. Too much direct sunlight can scorch the leaves. If you’re growing taro indoors, place it near a bright window but away from direct sunlight.
2. Watering: Taro loves moisture! Keep the soil consistently moist, but avoid overwatering. You can even grow taro in a container with standing water, as long as the water is changed regularly.
3. Fertilizing: Feed your taro with a balanced fertilizer every few weeks during the growing season. I like to use a liquid fertilizer diluted to half strength.
4. Humidity: Taro thrives in humid environments. If you live in a dry climate, you can increase humidity by misting the leaves regularly or placing the pot on a tray filled with pebbles and water.
5. Pest Control: Taro is generally pest-resistant, but it can occasionally be bothered by aphids or spider mites. If you notice any pests, treat them with insecticidal soap or neem oil.
6. Overwintering: In colder climates, taro is not frost-hardy and needs to be brought indoors for the winter. Before the first frost, dig up the corms and store them in a cool, dry place. You can replant them in the spring. If you’re growing taro in a container, simply bring the container indoors.
Harvesting Your Taro
The time it takes for taro to mature depends on the variety and growing conditions. Generally, you can expect to harvest your taro corms in about 7-12 months.
1. Signs of Maturity: The leaves will start to turn yellow and die back when the corms are ready to harvest.
2. Digging Up the Corms: Carefully dig around the base of the plant to loosen the soil. Gently lift the plant out of the ground, being careful not to damage the corms.
3. Cleaning and Curing: Remove any excess soil from the corms and allow them to cure in a cool, dry place for a few days. This will help them develop a thicker skin and improve their storage life.
Enjoying Your Homegrown Taro
Now that you’ve harvested your taro, it’s time to enjoy the fruits (or rather, corms) of your labor! Taro can be cooked in a variety of ways – boiled, steamed, baked, or fried. It has a slightly sweet, nutty flavor and a starchy texture.
Important Note: Raw taro contains calcium oxalate crystals, which can cause irritation to the mouth and throat. Always cook taro thoroughly before eating it.
Here are a few ideas for using your homegrown taro:
* Poi: This is a traditional Hawaiian dish made from mashed taro corms.
* Taro Chips: Slice the taro corms thinly and fry them until crispy.
* Taro Curry: Add taro to your favorite curry recipe for a hearty and flavorful meal.
* Taro Root Vegetable Stew: Taro can be used in any root vegetable stew.
Troubleshooting
Even with the best care, you might encounter a few challenges when growing taro. Here are some common problems and how to fix them:
* Yellowing Leaves: This could be a sign of overwatering, underwatering, or nutrient deficiency. Check the soil moisture and adjust your watering schedule accordingly. Fertilize with a balanced fertilizer to provide essential nutrients.
* Brown Spots on Leaves: This could be caused by sunburn or fungal disease. Move the plant to a shadier location or treat it with a fungicide.
* Slow Growth: This could be due to insufficient sunlight, poor soil, or cold temperatures. Make sure the plant is getting enough light and that the soil is rich in nutrients. If you live in a cold climate, consider moving the plant indoors.
* Root Rot: This is caused by overwatering and poor drainage. Make sure the pot has drainage holes and that the soil is well-draining. If root rot is severe, you may need to repot the plant with fresh soil.
Propagating Taro
Want to expand your taro patch? Here are a few ways to propagate taro:
* From Corms: As mentioned earlier, you can cut large corms into smaller pieces, making sure each piece has at least one “eye” or bud. Plant these pieces in separate pots to grow new plants.
* From Offsets: Taro plants often produce small “offsets” or “suckers” around the base of the plant. These can be carefully separated from the mother plant and planted in their own pots.
* From Seeds: While it’s possible to grow taro from seeds, it’s a much slower and less reliable method. Taro seeds are also not always readily available.
Final Thoughts
Growing taro at home can be a rewarding experience. With a little bit of care and attention, you can enjoy fresh, homegrown taro in your favorite dishes. So go ahead, give it a try! You might just discover a new favorite plant. Happy gardening!

Conclusion
So, there you have it! Growing taro at home is not only achievable but also incredibly rewarding. Forget relying solely on specialty stores or farmers’ markets; with a little patience and the right approach, you can cultivate your own supply of this versatile and delicious root vegetable. We’ve walked you through the essential steps, from selecting the right taro variety and preparing the planting medium to providing the optimal growing conditions and harvesting your bounty.
Why is this DIY trick a must-try? Because it empowers you to connect with your food source, reduces your reliance on commercially grown produce (often shipped long distances), and allows you to enjoy the freshest, most flavorful taro imaginable. Imagine the satisfaction of serving a dish made with taro you nurtured from a small corm to a thriving plant. Plus, growing taro can be a beautiful and engaging hobby, adding a touch of the tropics to your garden or indoor space.
But the journey doesn’t end here! Feel free to experiment with different growing mediums. While we’ve recommended a well-draining potting mix, you might try incorporating more compost or even experimenting with hydroponics for a unique approach. Consider different taro varieties too. Some are better suited for specific climates or culinary uses. Explore the world of taro and discover your favorites! You can also try growing taro in different containers. While a large pot is ideal, you might find success with raised beds or even repurposed containers. Just ensure adequate drainage.
And don’t be afraid to get creative with your taro harvest. Beyond the traditional uses in poi, stews, and chips, taro can be incorporated into countless dishes. Try adding it to soups, curries, or even desserts. The possibilities are endless!
We are confident that with our guide, you’ll be able to successfully grow taro at home. We encourage you to embark on this exciting gardening adventure. The taste of homegrown taro is simply unmatched.
Now, we want to hear from you! Have you tried growing taro before? What challenges did you face? What successes did you celebrate? Share your experiences, tips, and photos in the comments below. Let’s build a community of taro enthusiasts and learn from each other. Your insights could be invaluable to other aspiring taro growers. So, grab your gardening gloves, prepare your planting medium, and get ready to experience the joy of growing your own taro. Happy gardening!
Frequently Asked Questions (FAQs)
1. What is taro, and why should I grow it?
Taro (Colocasia esculenta) is a starchy root vegetable that is a staple food in many tropical and subtropical regions. It’s known for its slightly sweet, nutty flavor and its versatility in cooking. Growing taro at home allows you to enjoy fresh, homegrown produce, reduce your reliance on commercially grown sources, and connect with your food. Plus, it can be a rewarding and engaging gardening hobby.
2. What climate is best for growing taro?
Taro thrives in warm, humid climates. It prefers temperatures between 70°F and 85°F (21°C and 29°C). While it can tolerate some shade, it needs at least 6 hours of sunlight per day. If you live in a cooler climate, you can still grow taro indoors or in a greenhouse.
3. What kind of soil does taro need?
Taro prefers well-draining soil that is rich in organic matter. A slightly acidic to neutral pH (6.0 to 7.0) is ideal. You can amend your soil with compost, aged manure, or other organic materials to improve its fertility and drainage. A good potting mix for taro would be a blend of peat moss, perlite, and vermiculite.
4. How often should I water my taro plant?
Taro needs consistent moisture, especially during the growing season. Water deeply whenever the top inch of soil feels dry to the touch. Avoid overwatering, which can lead to root rot. Ensure your pot has adequate drainage holes. Taro loves humidity, so consider misting the leaves regularly, especially if you’re growing it indoors.
5. How do I fertilize my taro plant?
Feed your taro plant with a balanced fertilizer (e.g., 10-10-10) every 4-6 weeks during the growing season. Follow the instructions on the fertilizer package. You can also use organic fertilizers, such as compost tea or fish emulsion. Avoid over-fertilizing, which can burn the roots.
6. When is the best time to harvest taro?
Taro is typically ready to harvest 6-12 months after planting, depending on the variety and growing conditions. The leaves will start to turn yellow and die back when the corm is mature. To harvest, carefully dig up the plant and separate the corm from the roots and leaves.
7. Can I grow taro in a container?
Yes, taro can be successfully grown in containers. Choose a large pot (at least 12 inches in diameter) with drainage holes. Use a well-draining potting mix and provide consistent moisture and fertilizer. Container-grown taro may not grow as large as taro grown in the ground, but it can still produce a decent harvest.
8. What are some common pests and diseases that affect taro?
Common pests that can affect taro include aphids, spider mites, and mealybugs. These can be controlled with insecticidal soap or neem oil. Root rot is a common disease that can occur if the soil is too wet. To prevent root rot, ensure your soil is well-draining and avoid overwatering.
9. Are all parts of the taro plant edible?
The corm (the underground stem) is the most commonly eaten part of the taro plant. The leaves are also edible, but they must be cooked thoroughly to remove calcium oxalate crystals, which can cause irritation. The stems can also be eaten after cooking.
10. How do I store taro after harvesting?
Store taro corms in a cool, dry, and dark place. They can be stored for several weeks. You can also freeze taro after cooking it. To freeze, peel and cut the taro into pieces, blanch it for a few minutes, and then freeze it in freezer bags or containers.
11. Can I grow taro from store-bought taro?
Yes, you can try growing taro from store-bought taro, but success is not guaranteed. Choose taro corms that are firm and free from blemishes. Plant the corm in a pot of well-draining soil and keep it moist. It may take several weeks or even months for the taro to sprout.
12. Is growing taro at home difficult?
Growing taro at home is relatively easy, especially if you live in a warm, humid climate. The key is to provide the plant with consistent moisture, well-draining soil, and adequate sunlight. With a little care and attention, you can enjoy a bountiful harvest of homegrown taro.
Leave a Comment