
Grow Winged Beans, Save Money, and Eat Like Royalty! Have you ever dreamed of a garden that not only feeds your family but also adds a touch of exotic flair to your dinner table? Well, get ready to ditch the grocery store prices and embrace the incredible world of winged beans! This DIY guide is your passport to cultivating this nutritional powerhouse right in your own backyard.
Winged beans, also known as the Goa bean or asparagus pea, boast a fascinating history, particularly in Southeast Asia and Papua New Guinea, where they’ve been a staple food source for centuries. Imagine generations relying on this versatile legume for its protein-rich pods, leaves, seeds, and even roots! It’s a testament to the bean’s incredible adaptability and nutritional value.
But why should you bother growing winged beans? In today’s world, where food costs are constantly rising, learning to grow winged beans is more than just a hobby; it’s a smart financial move. Plus, you’ll have access to fresh, organic produce that’s packed with vitamins and minerals. I’m excited to share my favorite DIY tricks and hacks that will help you cultivate a thriving winged bean patch, even if you’re a complete beginner. Get ready to save money, eat healthier, and impress your friends with your gardening prowess!
Grow Your Own Winged Beans: A Beginner’s Guide to Saving Money and Enjoying a Unique Vegetable
Winged beans, also known as goa beans or asparagus peas, are a fantastic and often overlooked vegetable. Not only are they delicious and nutritious, but growing them yourself can significantly cut down on your grocery bill. Plus, they’re a beautiful addition to any garden! I’ve been growing winged beans for a few years now, and I’m excited to share my tips and tricks with you so you can enjoy the same success.
Why Grow Winged Beans?
Before we dive into the how-to, let’s talk about why you should consider adding winged beans to your garden.
* Nutritional Powerhouse: Winged beans are packed with protein, vitamins, and minerals. Every part of the plant is edible – the pods, leaves, flowers, seeds, and even the tubers!
* Nitrogen Fixer: Like other legumes, winged beans help improve your soil by fixing nitrogen. This means they convert atmospheric nitrogen into a form that plants can use, naturally fertilizing your garden.
* Vertical Growth: Winged beans are climbers, so they don’t take up much ground space. They’re perfect for small gardens or for adding vertical interest to larger ones.
* Unique Flavor: The pods have a slightly nutty, asparagus-like flavor. They’re delicious stir-fried, steamed, or added to salads.
* Money Saver: Let’s be honest, specialty vegetables can be expensive! Growing your own winged beans is a great way to enjoy this unique food without breaking the bank.
Getting Started: What You’ll Need
To successfully grow winged beans, you’ll need a few essential supplies. Don’t worry, most of these are readily available at your local garden center or online.
* Winged Bean Seeds: You can find these online or at specialty seed suppliers. Make sure to choose a variety that’s suited to your climate.
* Trellis or Support Structure: Winged beans are climbers, so they need something to grow on. A trellis, fence, or even a sturdy bamboo structure will work. I personally prefer a trellis made of sturdy metal.
* Well-Draining Soil: Winged beans prefer well-draining soil that’s rich in organic matter.
* Compost or Aged Manure: Adding compost or aged manure to your soil will provide essential nutrients for healthy growth.
* Watering Can or Hose: Regular watering is crucial, especially during dry periods.
* Gardening Gloves: Protect your hands from dirt and potential irritants.
* Optional:
* Seed starting trays and potting mix (if you want to start seeds indoors).
* Inoculant for legumes (to help with nitrogen fixation).
Step-by-Step Guide to Growing Winged Beans
Now for the fun part! Here’s a detailed guide to growing your own winged beans, from seed to harvest.
1. Starting Seeds (Optional)
While you can directly sow winged bean seeds into the ground, starting them indoors gives them a head start, especially in cooler climates.
1. Soak the Seeds: Before planting, soak the seeds in warm water for 24 hours. This helps soften the seed coat and improves germination.
2. Prepare Seed Starting Trays: Fill seed starting trays with a good quality potting mix.
3. Plant the Seeds: Plant the seeds about 1 inch deep in the potting mix.
4. Water Gently: Water the trays gently to moisten the soil.
5. Provide Warmth and Light: Place the trays in a warm location with plenty of sunlight or under grow lights. A temperature of around 70-75°F (21-24°C) is ideal.
6. Keep the Soil Moist: Keep the soil consistently moist, but not waterlogged.
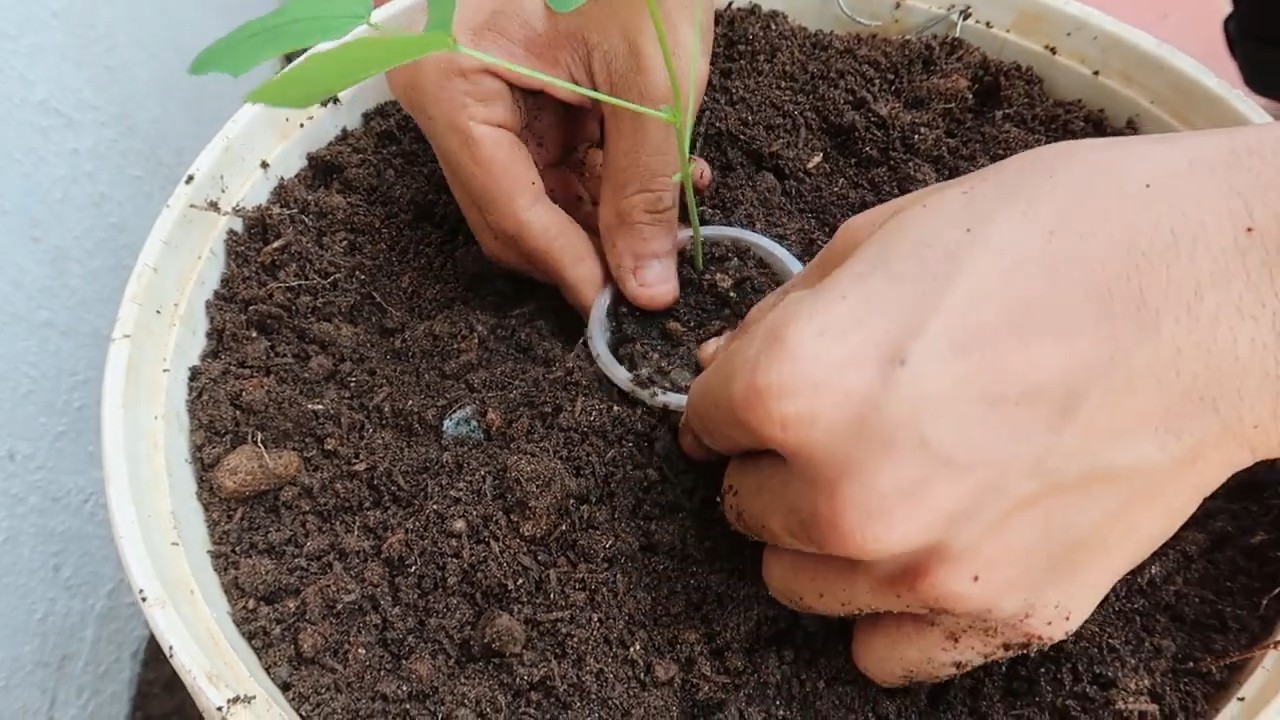
7. Transplant Seedlings: Once the seedlings have developed a few sets of true leaves and the weather has warmed up (after the last frost), they’re ready to be transplanted outdoors.
2. Preparing the Garden Bed
Whether you’re starting seeds indoors or directly sowing, preparing the garden bed is essential for success.
1. Choose a Sunny Location: Winged beans need at least 6-8 hours of sunlight per day.
2. Prepare the Soil: Loosen the soil to a depth of at least 12 inches. Remove any rocks, weeds, or debris.
3. Amend the Soil: Incorporate plenty of compost or aged manure into the soil to improve its fertility and drainage. I usually add a generous layer, about 2-3 inches thick.
4. Install the Trellis: Before planting, install your trellis or support structure. Make sure it’s sturdy enough to support the weight of the mature plants.
5. Optional: If you’re using an inoculant for legumes, apply it to the soil according to the package instructions.
3. Planting Winged Bean Seeds or Seedlings
Now it’s time to get those winged beans in the ground!
1. Direct Sowing: If you’re directly sowing seeds, plant them about 1 inch deep and 4-6 inches apart.
2. Transplanting Seedlings: If you’re transplanting seedlings, dig holes that are slightly larger than the root balls. Gently remove the seedlings from the trays and place them in the holes. Backfill with soil and water thoroughly. Space the seedlings about 4-6 inches apart.
3. Water Well: After planting, water the seeds or seedlings thoroughly.
4. Caring for Your Winged Bean Plants
Once your winged beans are planted, regular care is essential for healthy growth and abundant harvests.
1. Watering: Water your winged bean plants regularly, especially during dry periods. Aim to keep the soil consistently moist, but not waterlogged. I usually water deeply once or twice a week, depending on the weather.
2. Fertilizing: Winged beans don’t require heavy fertilization, but a light feeding with a balanced fertilizer every few weeks can help boost growth. Avoid over-fertilizing, as this can lead to excessive foliage growth at the expense of pod production.
3. Weeding: Keep the garden bed free of weeds, as they can compete with your winged bean plants for nutrients and water.
4. Training the Vines: As the winged bean vines grow, gently train them to climb the trellis or support structure. You may need to tie them to the trellis initially, but they will eventually cling on their own.
5. Pest and Disease Control: Winged beans are generally resistant to pests and diseases, but keep an eye out for common garden pests like aphids and bean beetles. If you notice any problems, treat them promptly with an appropriate organic insecticide or fungicide. I’ve found that a strong spray of water can often dislodge aphids.
5. Harvesting Winged Beans
Harvesting is the most rewarding part of growing winged beans!
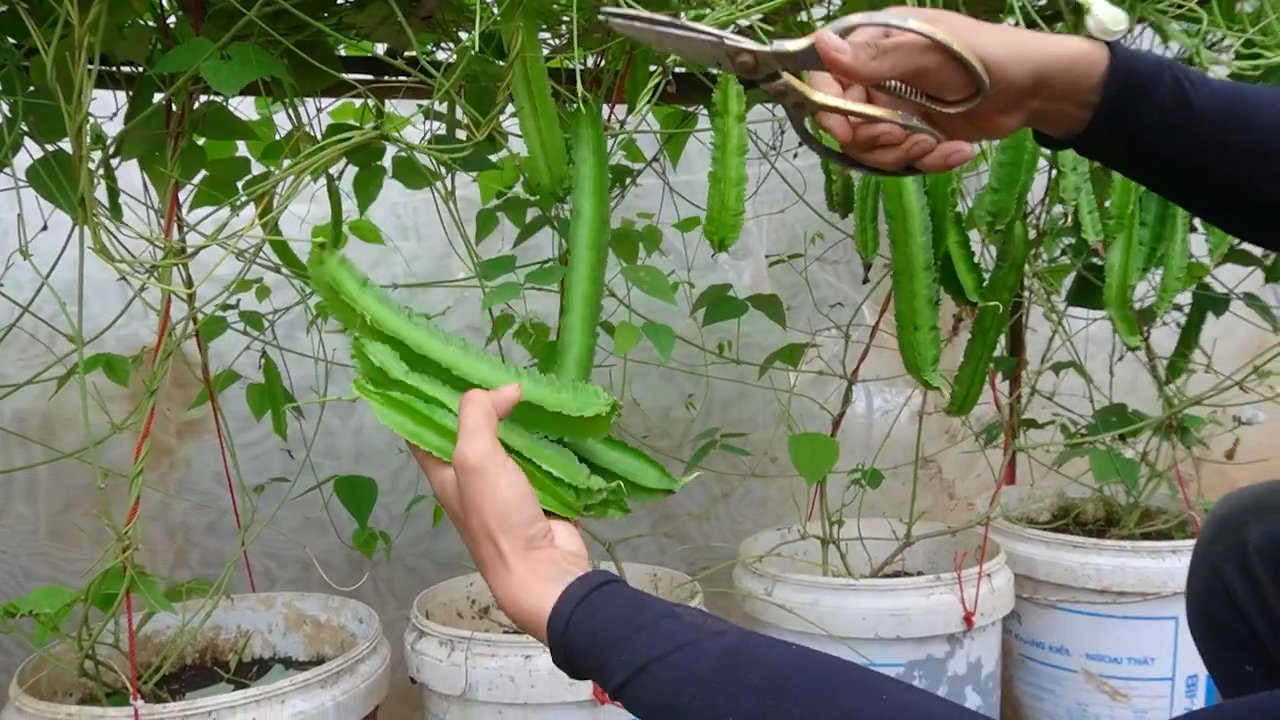
1. Harvesting Pods: The pods are ready to harvest when they are young and tender, typically about 6-8 inches long. Harvest them regularly to encourage continued production. Use scissors or pruning shears to cut the pods from the vine.
2. Harvesting Leaves: The leaves can be harvested at any time and used like spinach.
3. Harvesting Flowers: The flowers are also edible and can be added to salads or used as a garnish.
4. Harvesting Seeds: If you want to save seeds for next year, allow some of the pods to mature and dry on the vine. Once the pods are dry and brittle, you can harvest the seeds.
5. Harvesting Tubers: The tubers can be harvested after the plant has died back in the fall. They can be eaten raw or cooked.
Troubleshooting Common Problems
Even with the best care, you might encounter a few challenges when growing winged beans. Here are some common problems and how to address them:
* Poor Germination: If your seeds aren’t germinating, make sure the soil is warm enough and that you’re not overwatering. Soaking the seeds before planting can also help.
* Slow Growth: Slow growth can be caused by a lack of sunlight, poor soil, or insufficient watering. Make sure your plants are getting enough sunlight and that the soil is well-draining and fertile.
* Yellowing Leaves: Yellowing leaves can indicate a nutrient deficiency or overwatering. Check the soil drainage and consider adding a balanced fertilizer.
* Pest Infestations: Keep an eye out for common garden pests and treat them promptly with an appropriate organic insecticide.
Enjoying Your Harvest
Now that you’ve harvested your winged beans, it’s time to enjoy the fruits (or rather, pods) of your labor! Winged beans are incredibly versatile and can be used in a variety of dishes.
* Stir-fries:
Conclusion
So, there you have it! Growing winged beans at home is not just a gardening project; it’s an investment in your health, your wallet, and a more sustainable lifestyle. We’ve explored the simple steps to cultivate this nutritional powerhouse right in your backyard, transforming your garden into a source of fresh, delicious, and versatile food.
Why is this DIY trick a must-try? Because it empowers you to take control of your food source. You’re not reliant on grocery store availability or inflated prices. You’re cultivating a crop that’s packed with protein, vitamins, and minerals, all while reducing your carbon footprint. Plus, the unique flavor and texture of homegrown winged beans are simply unmatched by anything you can buy in a store. The satisfaction of harvesting your own food and knowing exactly where it came from is an experience that’s hard to beat.
But the benefits don’t stop there. Winged beans are incredibly versatile in the kitchen. You can enjoy them raw in salads, stir-fried, steamed, roasted, or even added to soups and stews. The possibilities are endless!
Ready to take your winged bean cultivation to the next level? Consider these variations and suggestions:
* Vertical Gardening: Winged beans are natural climbers, making them perfect for vertical gardens. Use trellises, fences, or even balconies to maximize your space and create a beautiful green wall.
* Companion Planting: Plant winged beans alongside other beneficial plants like corn or sunflowers. These taller plants can provide support for the beans to climb, while the beans can help fix nitrogen in the soil, benefiting their companions.
* Seed Saving: Once your winged beans mature, save some of the seeds for future planting. This ensures a continuous supply of seeds and allows you to adapt the beans to your specific climate and growing conditions.
* Different Varieties: Explore different varieties of winged beans to find the ones that best suit your taste and climate. Some varieties are more heat-tolerant, while others may have different pod shapes or colors.
* Experiment with Recipes: Don’t be afraid to get creative in the kitchen! Winged beans can be used in a wide range of dishes, from traditional Asian cuisine to modern fusion creations.
We’re confident that once you experience the joy of growing your own winged beans, you’ll be hooked. It’s a rewarding and sustainable way to add fresh, nutritious food to your diet while saving money and connecting with nature.
So, what are you waiting for? Grab some seeds, prepare your garden, and embark on this exciting gardening adventure. We encourage you to try this DIY trick and share your experiences with us. Tell us about your successes, your challenges, and your favorite ways to enjoy your homegrown winged beans. Let’s build a community of winged bean enthusiasts and spread the word about this amazing plant! Share your photos and stories on social media using #GrowWingedBeans and let’s inspire others to join the movement. Happy gardening!
Frequently Asked Questions (FAQ)
What exactly are winged beans, and why should I grow them?
Winged beans (Psophocarpus tetragonolobus) are a legume native to Southeast Asia, known for their unique four-sided pods that resemble wings. They are a nutritional powerhouse, packed with protein, fiber, vitamins (especially vitamin C and folate), and minerals (like iron and calcium). Growing them yourself allows you to access fresh, organic produce at a fraction of the cost of buying them in stores. Plus, they are a sustainable crop that can improve soil health.
How difficult is it to grow winged beans?
Winged beans are relatively easy to grow, especially in warm climates. They require well-drained soil, plenty of sunlight (at least 6-8 hours per day), and a support structure like a trellis or fence to climb on. With a little care and attention, even beginner gardeners can successfully grow winged beans.
When is the best time to plant winged beans?
The best time to plant winged beans is after the last frost in spring, when the soil has warmed up to at least 65°F (18°C). In warmer climates, you can plant them earlier in the spring or even in the fall for a winter harvest.
What kind of soil do winged beans need?
Winged beans prefer well-drained soil that is rich in organic matter. Amend your soil with compost or aged manure before planting to improve its fertility and drainage. A slightly acidic to neutral pH (6.0-7.0) is ideal.
How much water do winged beans need?
Winged beans need consistent moisture, especially during flowering and pod development. Water deeply and regularly, but avoid overwatering, which can lead to root rot. Mulching around the plants can help retain moisture in the soil.
Do winged beans need fertilizer?
Winged beans are legumes, which means they can fix nitrogen in the soil. However, they can still benefit from a light application of fertilizer, especially if your soil is poor. Use a balanced fertilizer or one that is higher in phosphorus and potassium than nitrogen. Avoid over-fertilizing, as this can lead to excessive foliage growth at the expense of pod production.
How long does it take for winged beans to mature?
Winged beans typically take 90-120 days to mature, depending on the variety and growing conditions. You can start harvesting the pods when they are young and tender, usually about 6-8 inches long.
What are some common pests and diseases that affect winged beans?
Winged beans are generally resistant to pests and diseases, but they can be susceptible to aphids, spider mites, and fungal diseases like powdery mildew. Monitor your plants regularly and take action if you notice any signs of infestation or disease. Use organic pest control methods like insecticidal soap or neem oil to control pests. Ensure good air circulation around the plants to prevent fungal diseases.
Can I eat the entire winged bean plant?
Yes, almost all parts of the winged bean plant are edible, including the pods, leaves, flowers, seeds, and tubers. The young pods are the most commonly eaten part, but the leaves can be used in salads or cooked like spinach, the flowers can be added to salads or used as a garnish, the seeds can be roasted or ground into flour, and the tubers can be cooked like potatoes.
How do I store winged beans?
Fresh winged bean pods can be stored in the refrigerator for up to a week. For longer storage, you can blanch and freeze them. The seeds can be dried and stored in an airtight container.
Can I grow winged beans in containers?
Yes, you can grow winged beans in containers, but you will need a large container (at least 10 gallons) and a sturdy trellis or support structure. Make sure the container has good drainage and use a high-quality potting mix.
Are there any specific varieties of winged beans that are recommended for home gardens?
Some popular varieties of winged beans for home gardens include ‘Chimbu’, ‘Daylight’, and ‘UPS 122’. These varieties are known for their high yields, good flavor, and adaptability to different growing conditions.
How can I save seeds from my winged bean plants?
To save seeds from your winged bean plants, allow some of the pods to mature and dry on the vine. Once the pods are completely dry, harvest them and remove the seeds. Store the seeds in an airtight container in a cool, dry place.
What are some creative ways to use winged beans in cooking?
Winged beans can be used in a wide variety of dishes. Try them stir-fried with vegetables and tofu, added to curries or stews, or blanched and served as a side dish with a vinaigrette. You can also use them in salads, soups, and even desserts. Get creative and experiment with different flavors and textures to find your favorite ways to enjoy winged beans.

Leave a Comment