
Grow Yellow Habanero Peppers, and unlock a world of fiery flavor right in your own backyard! Have you ever dreamed of adding a vibrant splash of sunshine and intense heat to your culinary creations? Well, get ready to turn that dream into reality with these simple, yet effective, DIY tricks for cultivating your very own yellow habanero peppers.
The habanero pepper, with its origins tracing back to the Amazon basin, has a rich history steeped in culinary tradition. From ancient Mayan cuisine to modern-day hot sauces, this pepper has captivated taste buds for centuries. But you don’t need to be a seasoned gardener to enjoy the fruits (or rather, peppers!) of your labor.
Let’s face it, store-bought peppers can be expensive and often lack the freshness and zing of homegrown produce. Plus, there’s something incredibly satisfying about nurturing a plant from seed to harvest. That’s where these DIY hacks come in. I’m going to share my secrets to successfully grow yellow habanero peppers, even if you’re a complete beginner. From seed starting to pest control, I’ll guide you through every step of the process, ensuring you have a bountiful harvest of these fiery gems. Get ready to spice up your life, one pepper at a time!
Growing Yellow Habanero Chilis Yourself: A Comprehensive DIY Guide
Hello dear chili enthusiasts! I’m so excited to guide you today through the process of growing your own bright yellow Habanero chilis. These little fireballs are not only incredibly tasty but also a great addition to any garden or balcony. Don’t worry, it’s easier than you think! Let’s get started!
What You Need: The Ingredients for Your Chili Adventure
Before we begin, here is a list of the things you’ll need:
- Habanero chili seeds: Get high-quality seeds from a trusted supplier. Yellow Habanero seeds are available online or in well-stocked garden centers.
- Seedling pots or trays: Small pots or trays with good drainage are ideal for starting seeds.
- Seed starting mix: This is lighter and lower in nutrients than regular potting soil and promotes germination.
- Potting soil: Later, you will need potting soil for larger pots or the garden.
- Fertilizer: A balanced liquid fertilizer for vegetables is perfect.
- Planters: Pots with at least a 20 cm diameter or a bed in the garden.
- Spray bottle: For moistening the soil.
- Plant lamp (optional): If you want to start early in the year or have little sunlight.
- Patience: Chili plants need time and love!
Phase 1: Starting Seeds – The Foundation for Your Chili Harvest
Starting seeds is a crucial step to get healthy and strong chili plants. I recommend starting the seeds about 8-10 weeks before the last expected frost.
- Prepare seeds (optional, but recommended): To speed up germination, you can soak the seeds in lukewarm water for 24 hours. This helps to soften the hard seed coat.
- Fill seedling pots: Fill the seedling pots with seed starting mix. Press the soil down lightly.
- Sow seeds: Place 2-3 seeds per pot about 0.5 cm deep into the soil.
- Cover and moisten: Cover the seeds with a thin layer of soil and moisten the soil carefully with a spray bottle. The soil should be damp, but not wet.
- Provide warmth: Habanero chilis need warmth to germinate. A temperature of 25-30°C is ideal. You can place the pots on a heating mat or in a warm place in the house.
- Maintain moisture: Cover the pots with plastic wrap or a clear lid to keep the humidity high. Air out the pots briefly every day to prevent mold.
- Wait and watch: Germination can take 1-3 weeks. Keep the soil moist and wait patiently. Once the first seedlings appear, remove the cover.
- Provide light: Place the seedlings in a bright spot. If you have little sunlight, use a plant lamp. The plants need at least 12 hours of light per day.
- Thinning: Once the seedlings have 2-3 true leaves (not just the seed leaves), you can thin them out. This means you keep only the strongest plant per pot and carefully remove the others.
Phase 2: Repotting and Care – Give Your Chilis Room to Grow
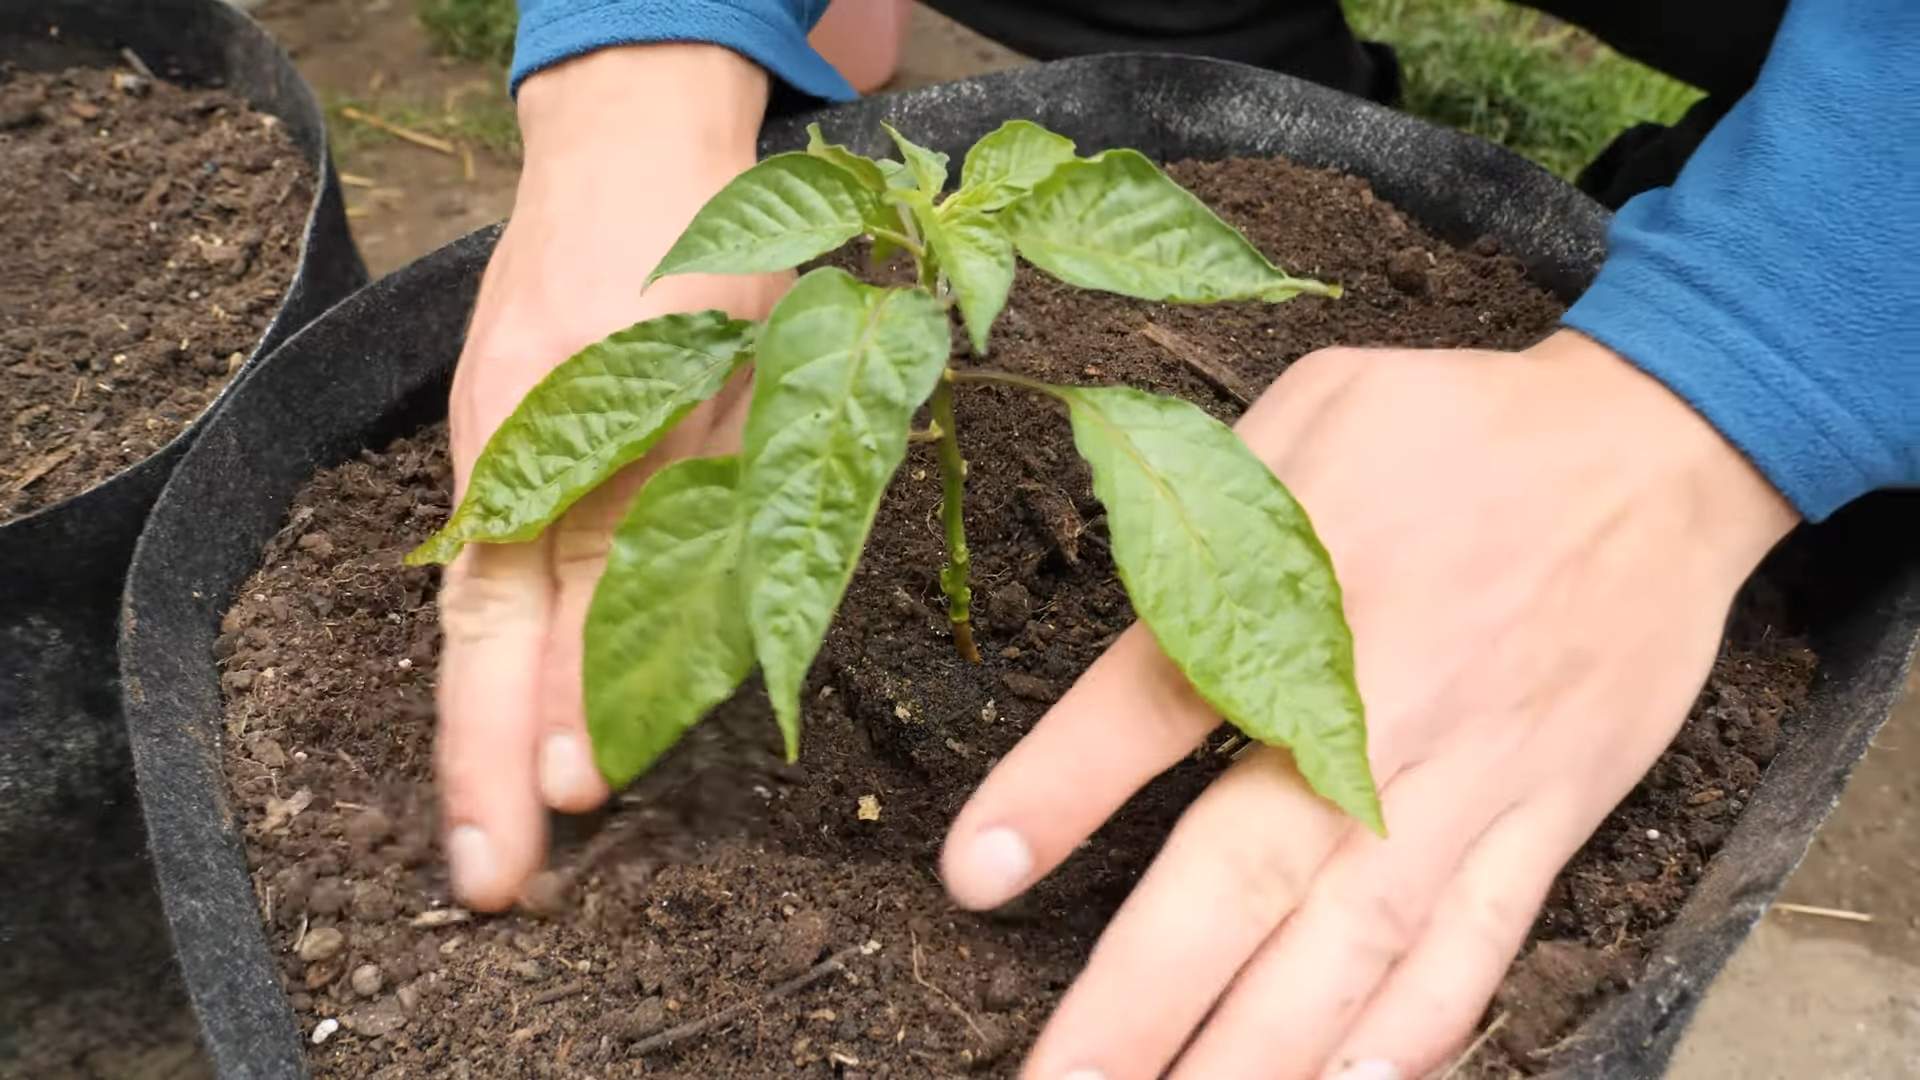
Once your chili plants have grown a bit larger, it’s time to repot them.
- When to repot?: You should repot when the roots grow out of the drainage holes of the seedling pots or the plants have clearly become too large for the pots.
- Prepare larger pots: Fill larger pots (at least 10 cm in diameter) with potting soil.
- Carefully remove plants: Gently loosen the plants from the seedling pots. Be careful not to damage the roots.
- Planting: Place the plants in the new pots and fill the pots with soil. Press the soil down lightly.
- Watering: Water the plants thoroughly after repotting.
- Continuing care: Place the plants in a bright spot and water them regularly. Fertilize them every 2-3 weeks with a liquid fertilizer for vegetables.
Phase 3: Planting Out – Off to the Outdoors (or in a Larger Pot)
When temperatures rise and there is no more danger of frost, your chili plants can move outdoors.
- Hardening off: Before you plant the plants outdoors, you should harden them off. This means you slowly acclimate them to the outdoor conditions. Place the plants outside for a few hours per day and extend the time each day.
- Choose a location: Choose a sunny location with well-draining soil. Habanero chilis need at least 6 hours of sun per day.
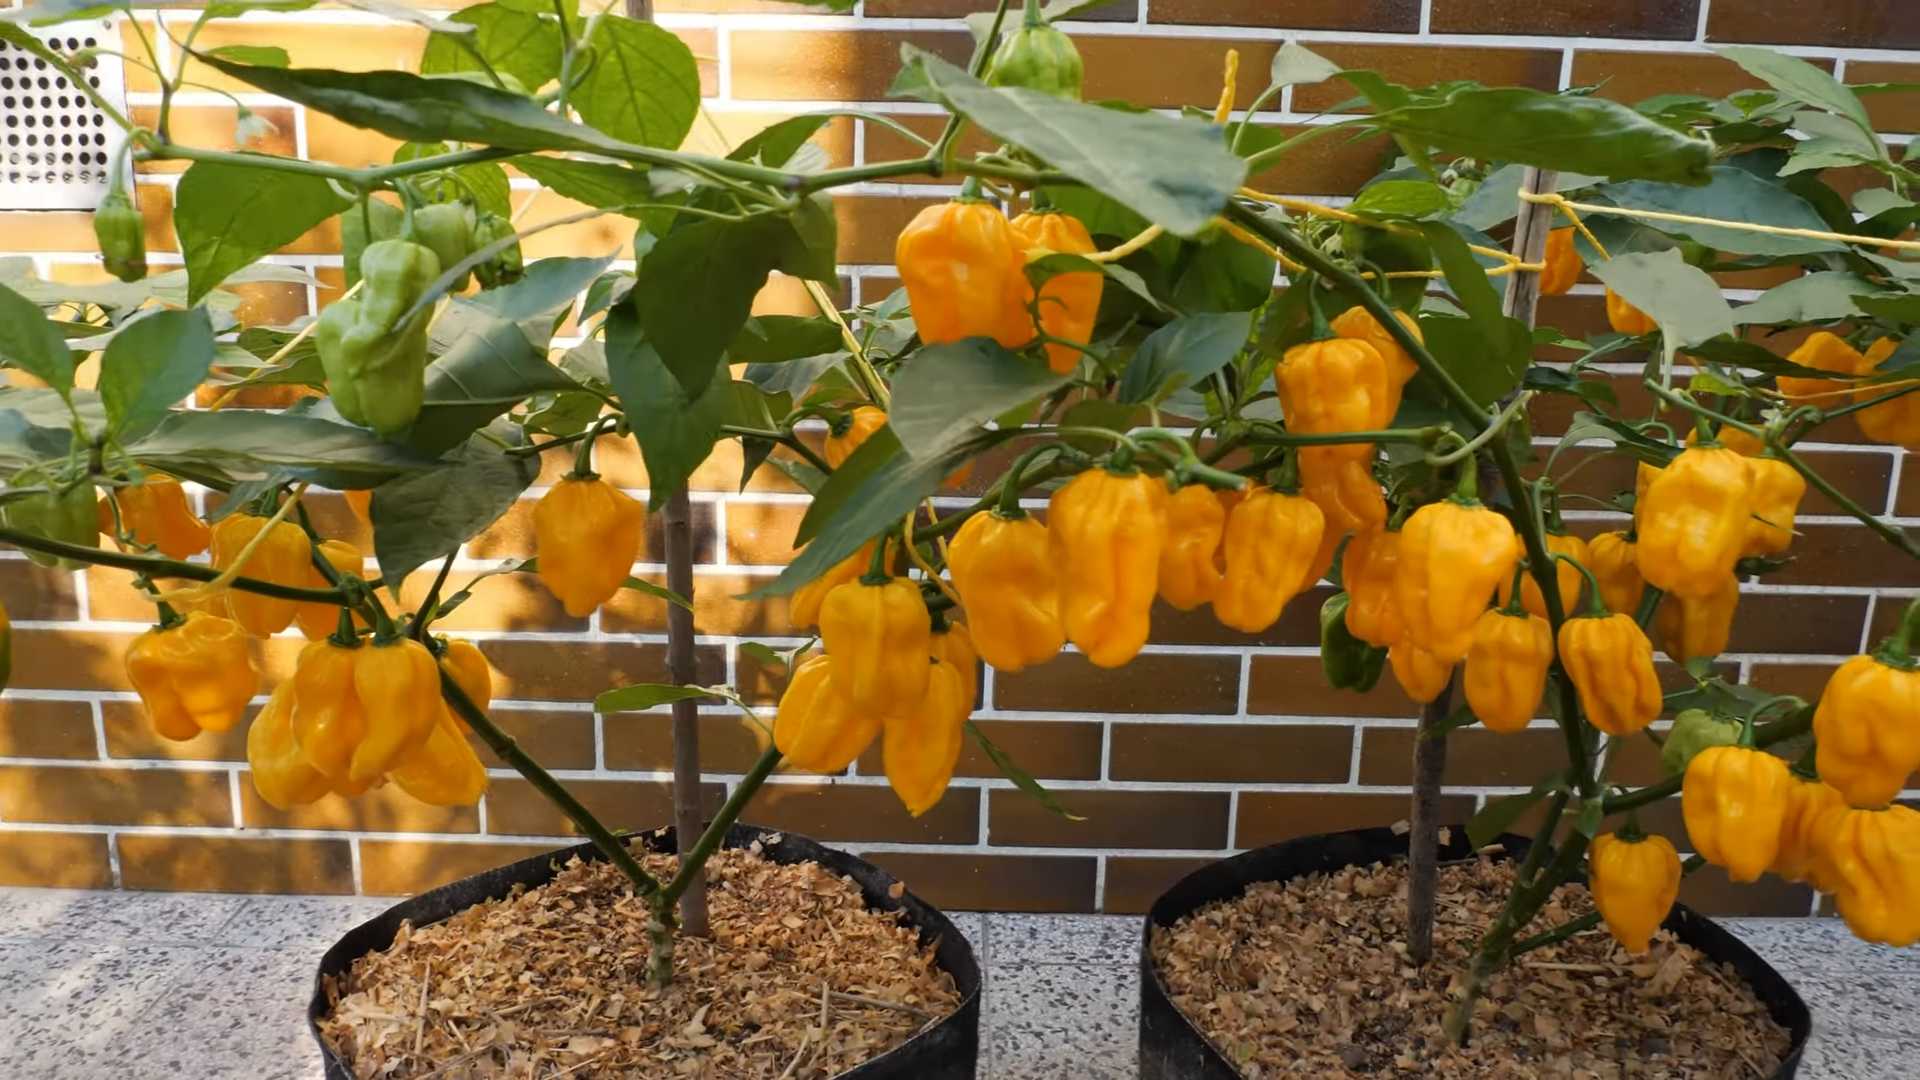
- Prepare planters or bed: If you are planting the chilis in pots, choose pots with at least a 20 cm diameter. If you are planting them in a bed, loosen the soil and enrich it with compost.
- Planting out: Plant the chilis with a spacing of about 45 cm from each other.
- Watering: Water the plants thoroughly after planting out.
- Staking (optional): As the plants get larger and bear many fruits, it may be useful to support them to prevent them from tipping over.
Phase 4: Outdoor Care – Keeping the Chili Harvest in Mind
Outdoor care is crucial for a bountiful harvest.
- Watering: Water the plants regularly, especially during dry weather. Make sure the soil does not dry out, but avoid waterlogging.
- Fertilizing: Fertilize the plants every 2-3 weeks with a liquid fertilizer for vegetables.
- Pests and diseases: Watch out for pests like aphids or spider mites. If necessary, you can use organic pesticides.
- Pruning suckers (optional): Some chili growers remove the side shoots (suckers) to concentrate the plant’s energy on fruit production. However, this is not strictly necessary.
- Harvesting: The yellow Habanero chilis are ripe when they have a bright yellow color and can be easily detached from the stem. Wear gloves when harvesting to avoid skin irritation.
Additional Tips for Chili Success
Patience: Chili plants need time to grow and bear fruit. Be patient and don’t give up!
Pollination: Chili plants are self-pollinating, but you can assist pollination by gently shaking the flowers or using a paintbrush to transfer pollen from one flower to another.
Overwintering: If you live in a region with cold winters, you can overwinter your chili plants. Cut the plants back in the fall and place them in a bright, cool place (approx. 10-15°C). Water them only sparingly. In the spring, you can repot them in fresh soil and move them to a warmer place.
Conclusion
So, there you have it – a comprehensive guide to successfully growing your own vibrant yellow habanero peppers! We’ve covered everything from seed selection and germination to transplanting, nurturing, and harvesting these fiery little gems. But why should you embark on this journey of DIY pepper cultivation?
The answer is simple: control, quality, and unparalleled satisfaction. When you grow your own yellow habaneros, you have complete control over the growing environment, ensuring that your peppers are free from harmful pesticides and herbicides. You can choose organic methods, tailor the soil composition to perfection, and provide the precise amount of sunlight and water your plants need to thrive. This level of control translates directly into superior quality peppers – bursting with flavor and heat that you just can’t find in store-bought varieties.
Beyond the practical benefits, there’s an undeniable sense of accomplishment that comes with nurturing a plant from seed to harvest. Watching your yellow habanero peppers ripen on the vine, knowing that you played a direct role in their creation, is an incredibly rewarding experience. Plus, you’ll have a constant supply of fresh, flavorful peppers to spice up your culinary creations.
But the fun doesn’t stop there! Feel free to experiment with different growing techniques. Try hydroponics for faster growth, or explore companion planting to deter pests and improve yields. You can also experiment with different soil amendments to fine-tune the flavor and heat of your peppers. Consider growing your yellow habaneros in containers, allowing you to move them indoors during colder months and extend your growing season.
Don’t be afraid to get creative! You can even try cross-pollinating your yellow habaneros with other pepper varieties to create your own unique hybrids. Imagine the possibilities – a yellow habanero with the fruity aroma of a Scotch bonnet, or a pepper with the heat of a ghost pepper but the vibrant color of a yellow habanero.
Now, it’s your turn to put these tips into action. Start your seeds, prepare your garden, and get ready to experience the joy of growing your own yellow habanero peppers. We’re confident that you’ll be amazed by the results.
We encourage you to share your experiences with us! Post photos of your pepper plants, share your favorite recipes using your homegrown yellow habaneros, and let us know what challenges you faced and how you overcame them. Your insights can help other aspiring pepper growers and contribute to a thriving community of DIY enthusiasts.
Growing your own yellow habanero peppers is more than just a gardening project; it’s a journey of discovery, a celebration of flavor, and a testament to the power of DIY. So, grab your seeds, get your hands dirty, and prepare to be amazed by the fiery fruits of your labor!
Frequently Asked Questions (FAQ)
What is the ideal soil pH for growing yellow habanero peppers?
Yellow habanero peppers thrive in slightly acidic soil with a pH between 6.0 and 6.8. You can test your soil’s pH using a soil testing kit available at most garden centers. If your soil is too alkaline, you can amend it with sulfur or peat moss to lower the pH. If it’s too acidic, you can add lime to raise the pH. Maintaining the correct pH level ensures that your pepper plants can effectively absorb essential nutrients from the soil.
How often should I water my yellow habanero pepper plants?
Watering frequency depends on several factors, including the weather, soil type, and the size of your plants. Generally, you should water your yellow habanero pepper plants deeply whenever the top inch of soil feels dry to the touch. Avoid overwatering, as this can lead to root rot. During hot, dry weather, you may need to water your plants daily. In cooler, wetter weather, you may only need to water them every few days. Using a moisture meter can help you determine the moisture level of the soil and avoid over or under-watering.
What are some common pests and diseases that affect yellow habanero peppers, and how can I prevent them?
Common pests that affect yellow habanero peppers include aphids, spider mites, whiteflies, and pepper weevils. Diseases include blossom-end rot, fungal leaf spot, and powdery mildew. To prevent these problems, start by choosing disease-resistant varieties of yellow habanero peppers. Practice good garden hygiene by removing weeds and debris that can harbor pests and diseases. Use organic pest control methods, such as insecticidal soap or neem oil, to control pests. Ensure good air circulation around your plants to prevent fungal diseases. Blossom-end rot is caused by calcium deficiency, so make sure your soil is rich in calcium or amend it with calcium supplements.
How long does it take for yellow habanero peppers to ripen?
Yellow habanero peppers typically take 80-100 days to ripen after transplanting. The peppers will start green and gradually turn yellow as they mature. The exact ripening time depends on the variety, growing conditions, and climate. Be patient and allow the peppers to fully ripen on the vine for the best flavor and heat.
Can I grow yellow habanero peppers indoors?
Yes, you can grow yellow habanero peppers indoors, but you’ll need to provide them with adequate light and warmth. Use grow lights to supplement natural sunlight, especially during the winter months. Choose a sunny location for your plants, such as a south-facing window. Use a well-draining potting mix and fertilize your plants regularly. Indoor-grown peppers may not be as productive as those grown outdoors, but you can still harvest a decent crop.
What is the Scoville Heat Unit (SHU) rating of yellow habanero peppers?
Yellow habanero peppers typically have a Scoville Heat Unit (SHU) rating of 100,000 to 350,000. This makes them significantly hotter than jalapeño peppers, which have a SHU rating of 2,500 to 8,000. The heat level can vary depending on the growing conditions and the specific variety of yellow habanero. Always handle yellow habanero peppers with care and avoid touching your eyes or skin after handling them.
How should I store my harvested yellow habanero peppers?
You can store your harvested yellow habanero peppers in several ways. Fresh peppers can be stored in the refrigerator for up to two weeks. You can also dry them by stringing them together and hanging them in a well-ventilated area. Dried peppers can be stored in an airtight container for several months. Another option is to pickle or ferment your peppers. Pickled peppers can be stored in the refrigerator for several months, while fermented peppers can be stored at room temperature. You can also freeze your peppers, but they may lose some of their texture and flavor.
What are some creative ways to use my homegrown yellow habanero peppers?
The possibilities are endless! You can use your homegrown yellow habanero peppers to make hot sauce, salsa, chili, and other spicy dishes. They can also be used to add heat and flavor to soups, stews, and stir-fries. Try adding them to marinades for grilled meats or vegetables. You can also use them to make pepper jelly or infused oils. Be creative and experiment with different recipes to find your favorite ways to use your yellow habanero peppers. Remember to use caution when handling and cooking with these peppers, as they are very hot.
How can I save seeds from my yellow habanero peppers for future planting?
Saving seeds from your yellow habanero peppers is a great way to ensure a continuous supply of these fiery peppers. Choose peppers that are fully ripe and healthy. Cut the peppers open and remove the seeds. Spread the seeds out on a paper towel and allow them to dry completely. Once the seeds are dry, store them in an airtight container in a cool, dark, and dry place. Label the container with the variety and date. The seeds should remain viable for several years.
What are some companion plants that can benefit yellow habanero peppers?
Companion planting can help to improve the growth and yield of your yellow habanero peppers. Some beneficial companion plants include basil, tomatoes, carrots, onions, and garlic. Basil helps to repel pests and improve the flavor of the peppers. Tomatoes provide shade and support. Carrots attract beneficial insects that prey on pests. Onions and garlic deter pests and diseases. Avoid planting yellow habanero peppers near brassicas, such as cabbage and broccoli, as they can compete for nutrients.
Leave a Comment