
Growing Bush Beans in Containers is easier than you might think! Have you ever dreamed of stepping outside your door and harvesting fresh, crisp beans for dinner? I know I have! For centuries, cultivating beans has been a cornerstone of diets worldwide, from ancient civilizations in the Americas to bustling modern cities. But what if you don’t have a sprawling backyard? That’s where container gardening comes to the rescue!
Many people shy away from gardening, thinking it requires acres of land and hours of back-breaking work. But the truth is, with a few clever tricks and a little DIY spirit, you can enjoy a bountiful harvest of bush beans right on your patio, balcony, or even a sunny windowsill. This article is packed with simple, effective techniques to help you succeed.
Imagine the satisfaction of nurturing your own food, knowing exactly where it came from and what went into it. Plus, growing bush beans in containers is a fantastic way to save money on groceries, reduce your carbon footprint, and add a touch of green to your living space. So, grab your gardening gloves, and let’s get started! I’m excited to share my favorite tips and tricks for a thriving container bean garden.
Growing Bush Beans in Containers: A Beginner’s Guide
Hey there, fellow gardening enthusiasts! I’m so excited to share my experience with growing bush beans in containers. It’s a fantastic way to enjoy fresh, homegrown beans even if you don’t have a sprawling backyard. Trust me, it’s easier than you think, and the reward of snapping those crisp, delicious beans right off the plant is totally worth it. So, let’s dive in!
Choosing the Right Bush Bean Variety
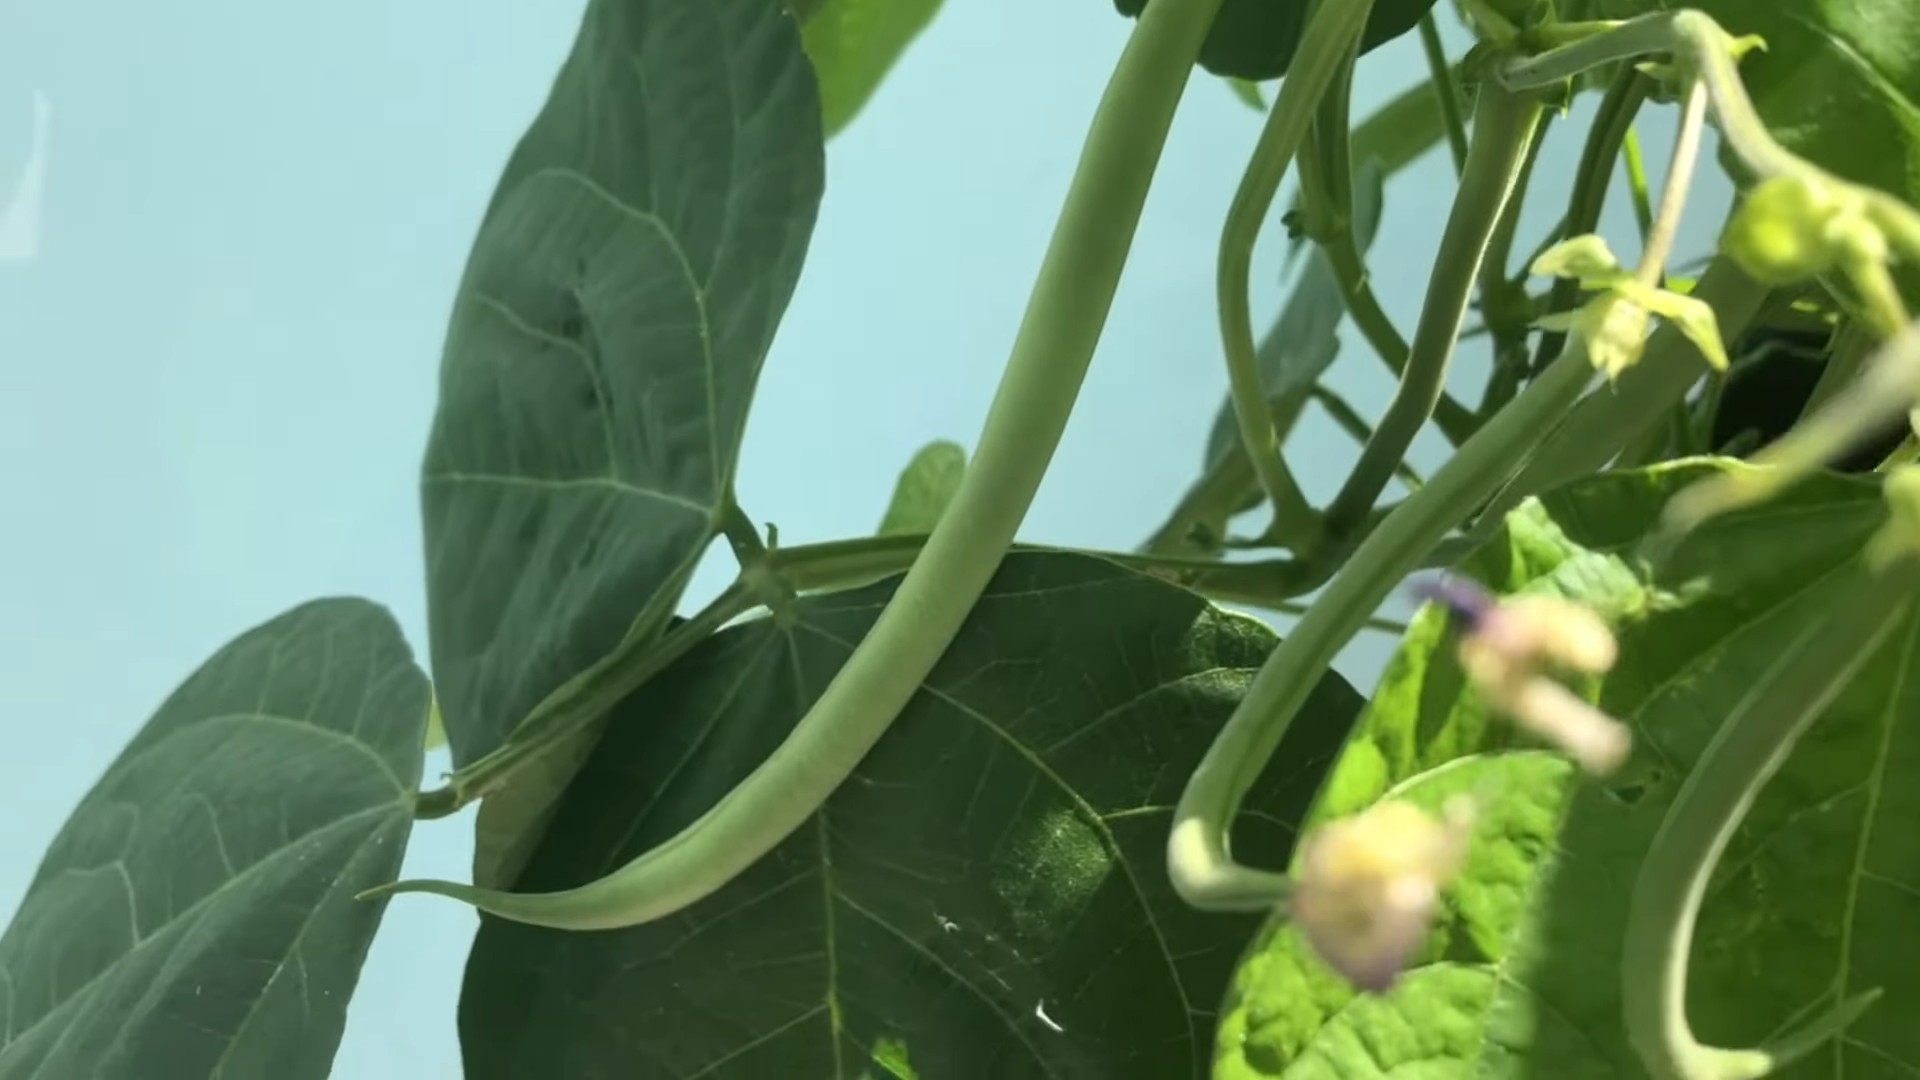
First things first, you need to pick the right bush bean variety. Unlike pole beans that climb, bush beans stay compact, making them perfect for container gardening. Here are a few of my favorites:
* Blue Lake Bush: A classic choice, known for its high yields and excellent flavor.
* Contender: An early producer, great if you’re impatient like me! It’s also very heat-tolerant.
* Provider: Another reliable variety that’s disease-resistant and produces abundant crops.
* Derby: A stringless variety with a great taste and texture.
Gathering Your Supplies
Before we get our hands dirty, let’s make sure we have everything we need. This is my go-to list:
* Containers: Choose containers that are at least 12 inches deep and 12 inches in diameter. Bush beans need room for their roots to spread. I prefer using plastic or resin containers because they’re lightweight and retain moisture well, but terracotta pots work too, just be mindful of watering more frequently.
* Potting Mix: Don’t use garden soil! It’s too heavy and compacts easily in containers. Opt for a high-quality, well-draining potting mix. I usually go for a mix that contains peat moss, perlite, and vermiculite.
* Bean Seeds: Of course! Make sure they’re fresh and from a reputable source.
* Watering Can or Hose: For keeping your beans hydrated.
* Fertilizer: A balanced, slow-release fertilizer or a liquid fertilizer specifically formulated for vegetables.
* Optional: A small trellis or support system. While bush beans don’t climb, they can sometimes get a bit floppy, especially when loaded with beans.
* Gardening Gloves: To keep your hands clean and protected.
Planting Your Bush Beans
Now for the fun part! Here’s how I plant my bush beans in containers:
1. Prepare the Containers: Fill your containers with the potting mix, leaving about an inch or two of space at the top. Gently pat down the soil.
2. Sow the Seeds: Plant the bean seeds about 1 inch deep and 2-3 inches apart. I usually plant 4-5 seeds per container, depending on the size.
3. Water Thoroughly: After planting, water the containers gently but thoroughly until the water drains out of the bottom. This helps settle the soil and ensures the seeds have enough moisture to germinate.
4. Find a Sunny Spot: Bush beans need at least 6-8 hours of sunlight per day. Place your containers in a sunny location, like a patio, balcony, or even a sunny windowsill if you’re starting them indoors.
5. Wait for Germination: Be patient! Bean seeds usually germinate within 7-14 days, depending on the temperature and moisture levels. Keep the soil consistently moist but not waterlogged during this time.
Caring for Your Bush Bean Plants
Once your bean seedlings emerge, it’s time to provide them with the care they need to thrive.
1. Watering: Water your bean plants regularly, especially during hot, dry weather. Check the soil moisture by sticking your finger about an inch deep. If it feels dry, it’s time to water. Avoid overwatering, as this can lead to root rot. I usually water in the morning to allow the foliage to dry before nightfall, which helps prevent fungal diseases.
2. Fertilizing: Feed your bean plants every 2-3 weeks with a balanced fertilizer or a liquid fertilizer formulated for vegetables. Follow the instructions on the fertilizer package. I like to use a fertilizer that’s rich in phosphorus, as this promotes strong root growth and abundant flowering.
3. Support: While bush beans are relatively sturdy, they can sometimes benefit from a little support, especially when they’re loaded with beans. You can use small stakes or a tomato cage to keep them upright.
4. Pest Control: Keep an eye out for common bean pests like aphids, bean beetles, and spider mites. If you spot any pests, you can try spraying them with insecticidal soap or neem oil. I prefer to use organic pest control methods whenever possible.
5. Weeding: Keep your containers free of weeds, as they can compete with your bean plants for nutrients and water. Gently pull out any weeds that you see.
6. Pruning: Bush beans don’t typically require pruning, but you can remove any yellowing or dead leaves to improve air circulation and prevent disease.
Harvesting Your Bush Beans
This is the moment we’ve been waiting for! Bush beans are usually ready to harvest about 50-60 days after planting.
1. Check for Readiness: The beans should be firm, plump, and snap easily when bent. They should also be the right size for the variety you’re growing.
2. Harvest Regularly: Harvest your beans regularly, about every 2-3 days, to encourage continued production. The more you harvest, the more beans your plants will produce.
3. Pick Carefully: Gently snap the beans off the plant, being careful not to damage the stems or leaves.
4. Enjoy Your Harvest: Freshly harvested bush beans are delicious steamed, sautéed, or added to salads and soups. You can also freeze or can them for later use.
Troubleshooting Common Problems
Even with the best care, you might encounter a few problems along the way. Here are some common issues and how to address them:
* Yellowing Leaves: This could be a sign of overwatering, underwatering, nutrient deficiency, or disease. Check the soil moisture, fertilize your plants, and look for any signs of pests or diseases.
* Lack of Flowers or Beans: This could be due to insufficient sunlight, poor pollination, or nutrient deficiency. Make sure your plants are getting enough sunlight, consider hand-pollinating the flowers, and fertilize your plants with a fertilizer that’s rich in phosphorus.
* Pest Infestations: As mentioned earlier, keep an eye out for common bean pests and treat them with insecticidal soap or neem oil.
* Diseases: Bean plants can be susceptible to fungal diseases like powdery mildew and rust. To prevent these diseases, provide good air circulation, avoid overwatering, and water in the morning. If you spot any signs of disease, remove the affected leaves and treat the plants with a fungicide.
Extending Your Harvest
Want to keep those beans coming? Here are a few tips for extending your harvest:
* Succession Planting: Plant a new batch of bean seeds every 2-3 weeks to ensure a continuous harvest throughout the growing season.
* Deadheading: Remove any spent flowers to encourage the plants to produce more beans.
* Provide Shade: During the hottest part of the summer, provide your bean plants with some shade to prevent them from getting stressed.
Additional Tips and Tricks
Here are a few extra tips that I’ve learned over the years:
* Soak the Seeds: Before planting, soak the bean seeds in water for 12-24 hours to improve germination rates.
* Use Companion Planting: Plant your bush beans alongside other beneficial plants like marigolds, nasturtiums, or rosemary to deter pests and attract pollinators.
* Rotate Your Crops: If you’re growing beans in the same containers year after year, rotate your crops to prevent soilborne diseases.
* Have Fun! Gardening should be enjoyable. Don’t be afraid to experiment and try new things.
Growing bush beans in containers is a rewarding experience that anyone can enjoy. With a little bit of planning and care, you can have a bountiful harvest of fresh, delicious beans right at your fingertips. Happy gardening!

Conclusion
So, there you have it! Growing bush beans in containers is not only achievable but also incredibly rewarding. It’s a fantastic way to enjoy fresh, homegrown vegetables, even if you’re short on space or lack a traditional garden. This DIY project brings the joy of gardening to your doorstep, balcony, or patio, offering a connection to nature and a delicious harvest.
Why is this a must-try? Because it’s simple, cost-effective, and yields tangible results. Imagine stepping outside and picking your own crisp, tender bush beans for a salad, side dish, or snack. The flavor is undeniably superior to store-bought varieties, and you have complete control over the growing process, ensuring they’re free from unwanted chemicals. Plus, the vibrant green foliage of the bean plants adds a touch of beauty to your outdoor space.
But the benefits extend beyond just the taste and convenience. Gardening, even on a small scale, is a therapeutic activity that can reduce stress, improve your mood, and provide a sense of accomplishment. Watching your bush beans sprout, grow, and produce is a truly satisfying experience.
Looking for variations? Consider these ideas to personalize your container gardening adventure:
* Succession Planting: Plant new seeds every few weeks to ensure a continuous harvest throughout the growing season.
* Companion Planting: Plant marigolds or nasturtiums alongside your bush beans to deter pests and attract beneficial insects.
* Vertical Gardening: While bush beans are naturally compact, you can still provide a small trellis or support structure for them to climb slightly, maximizing space and adding visual interest.
* Variety Selection: Experiment with different varieties of bush beans, such as Blue Lake, Contender, or Provider, to find your favorites. Each variety offers a unique flavor and texture.
* Container Size: While we’ve recommended a specific size, don’t be afraid to experiment. Just ensure the container is large enough to accommodate the root system and provide adequate drainage.
* Fertilizer Options: Explore different organic fertilizer options, such as compost tea or fish emulsion, to nourish your plants and promote healthy growth.
We’re confident that you’ll find growing bush beans in containers to be a delightful and fulfilling experience. Don’t be intimidated if you’re a beginner. This project is very forgiving, and even a small harvest is a victory.
So, grab your seeds, potting mix, and containers, and get started today! We encourage you to try this DIY trick and share your experiences with us. Post photos of your container gardens, share your tips and tricks, and let us know what varieties of bush beans you’re growing. We can’t wait to see your success! Happy gardening!
FAQ
What is the best type of container for growing bush beans?
The ideal container for growing bush beans should be at least 12 inches in diameter and 12 inches deep. This size provides enough space for the root system to develop properly. Choose a container made from plastic, terracotta, or even a repurposed bucket, as long as it has adequate drainage holes. Good drainage is crucial to prevent root rot. Dark-colored containers can heat up quickly in direct sunlight, so consider using lighter colors or placing them in a partially shaded area.
How often should I water my container-grown bush beans?
Watering frequency depends on several factors, including the weather, the type of container, and the potting mix. Generally, you should water your bush beans when the top inch of soil feels dry to the touch. During hot, dry weather, you may need to water them daily. Avoid overwatering, as this can lead to root rot. A good rule of thumb is to water deeply until water drains out of the drainage holes. Check the soil moisture regularly, especially during the hottest part of the day.
What kind of soil is best for growing bush beans in containers?
Use a high-quality potting mix specifically formulated for containers. Avoid using garden soil, as it can become compacted in containers and hinder drainage. A good potting mix should be lightweight, well-draining, and contain a blend of peat moss, perlite, and vermiculite. You can also amend the potting mix with compost to provide additional nutrients. Look for potting mixes that are specifically designed for vegetables or raised beds.
How much sunlight do bush beans need?
Bush beans require at least 6-8 hours of direct sunlight per day to thrive. Choose a location for your containers that receives plenty of sunlight. If you live in a particularly hot climate, some afternoon shade can be beneficial to prevent the plants from overheating. If you don’t have a sunny spot, you can supplement with grow lights. Rotate the containers regularly to ensure that all sides of the plants receive adequate sunlight.
Do I need to fertilize my container-grown bush beans?
Yes, bush beans benefit from regular fertilization, especially when grown in containers. Use a balanced fertilizer with an NPK ratio of 10-10-10 or 5-10-5. Apply the fertilizer according to the package instructions, typically every 2-3 weeks. You can also use organic fertilizers, such as compost tea or fish emulsion. Avoid over-fertilizing, as this can lead to excessive foliage growth and reduced bean production.
What are some common pests and diseases that affect bush beans, and how can I prevent them?
Common pests that affect bush beans include aphids, bean beetles, and spider mites. Diseases include powdery mildew and bean rust. To prevent these problems, inspect your plants regularly for signs of pests or diseases. Remove any affected leaves or plants immediately. You can also use insecticidal soap or neem oil to control pests. Ensure good air circulation around the plants to prevent fungal diseases. Avoid overhead watering, as this can create a humid environment that promotes disease.
When should I harvest my bush beans?
Bush beans are typically ready to harvest about 50-60 days after planting. Harvest them when the pods are firm, plump, and about the size of a pencil. Pick them regularly to encourage continued production. Overripe beans will become tough and stringy. Use scissors or pruning shears to harvest the beans, being careful not to damage the plant.
Can I grow bush beans indoors?
While it’s possible to grow bush beans indoors, it can be challenging to provide them with the necessary sunlight and growing conditions. If you want to try growing them indoors, choose a sunny window or use grow lights. Ensure that the plants receive at least 6-8 hours of light per day. You may also need to hand-pollinate the flowers to ensure bean production.
What are some good companion plants for bush beans?
Good companion plants for bush beans include marigolds, nasturtiums, carrots, cucumbers, and rosemary. Marigolds and nasturtiums deter pests, while carrots and cucumbers improve soil health. Rosemary can also help repel bean beetles. Avoid planting bush beans near onions or garlic, as these can inhibit their growth.
How do I save seeds from my bush beans for next year?
To save seeds from your bush beans, allow some of the pods to dry completely on the plant. Once the pods are dry and brittle, remove the seeds and store them in an airtight container in a cool, dry place. Label the container with the variety and date. Before planting, test the germination rate by placing a few seeds on a damp paper towel. If most of the seeds sprout, they are viable for planting.

Leave a Comment