
Growing Cauliflower at Home might seem daunting, conjuring images of sprawling farms and expert gardeners. But what if I told you that you could cultivate this nutritious and delicious vegetable right in your own backyard, or even on your balcony? Forget those expensive grocery store prices and bland, pre-packaged florets! This DIY guide is your secret weapon to unlocking the joys of homegrown cauliflower, bursting with flavor and freshness.
Cauliflower, a member of the Brassica family, has a rich history dating back to ancient times. Originating in the Mediterranean region, it was a prized vegetable in Roman gardens and gradually spread throughout Europe. For centuries, it has been cultivated and enjoyed for its unique taste and health benefits. Now, you can participate in this long tradition by bringing this culinary delight to your own table.
Why should you bother with the effort of growing cauliflower at home? Well, for starters, you’ll have access to the freshest, most flavorful cauliflower imaginable. Store-bought varieties often lack the vibrant taste of homegrown produce. More importantly, you’ll know exactly what went into growing your cauliflower – no harmful pesticides or chemicals! Plus, growing cauliflower at home is incredibly rewarding. There’s nothing quite like the satisfaction of harvesting your own food and sharing it with family and friends. So, let’s dive in and discover the simple tricks and hacks that will transform you into a cauliflower-growing pro!
Growing Cauliflower Yourself: Your Comprehensive DIY Guide
Hey garden friends! Have you ever wondered how you can grow that crisp, versatile, and healthy cauliflower right in your garden? I have, and after a few trials and errors, I’ve developed a process that really works. In this article, I’ll share my experiences and give you a detailed guide on how to successfully grow your own cauliflower. It’s easier than you think!
What you need: The right preparation is everything
Before we get started, it’s important that we have everything we need. Here is a list of the most important things:
- Cauliflower seeds or young plants: I recommend starting with young plants, especially if you are a beginner. It saves time and increases the chances of success.
- Good soil: Cauliflower loves nutrient-rich, well-draining soil. Compost is your best friend!
- Garden tools: Spade, rake, watering can or garden hose.
- Fertilizer: A balanced fertilizer is important to provide the cauliflower with the necessary nutrients.
- Mulch: Helps to retain moisture and suppress weeds.
- Pest protection: Slug pellets or nets to protect the young plants.
The right time: When is the best planting time?
Timing is crucial for success. Cauliflower likes it cool, so spring and fall are the best times to plant.
- Spring planting: Plant the young plants 2-4 weeks before the last expected frost.
- Fall planting: Plant the young plants 6-8 weeks before the first expected frost.
Step-by-Step Guide: How to plant your cauliflower
Now let’s get down to it! Here is a detailed guide on how to plant your cauliflower:
1. Preparing the soil:
- Loosen the soil with a spade and remove stones and weeds.
- Mix plenty of compost into the soil to enrich it with nutrients.
- Make sure the soil is well-draining. Cauliflower does not like waterlogging.
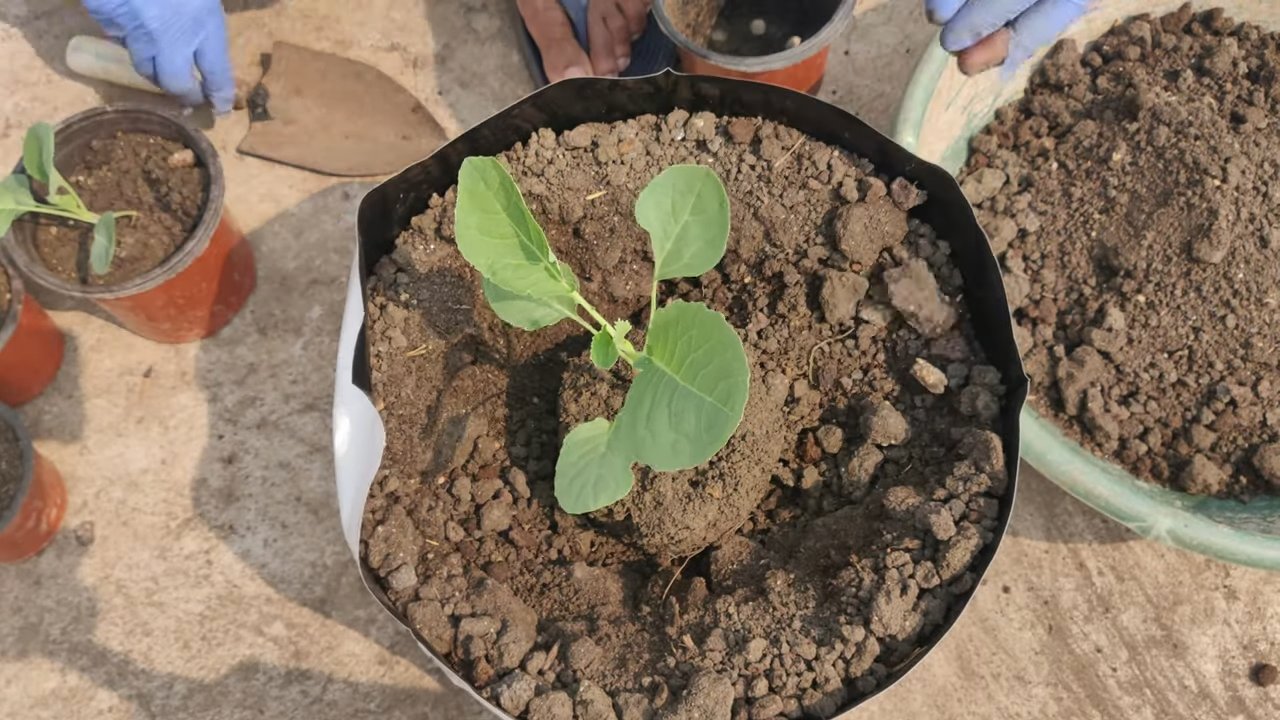
2. Digging planting holes:
- Dig holes that are slightly larger than the root balls of the young plants.
- Keep a distance of about 45-60 cm (18-24 inches) between the plants.
- The rows should be about 75-90 cm (30-36 inches) apart.
3. Placing the young plants:
- Carefully remove the young plants from their pots.
- Gently loosen the roots if they are heavily root-bound.
- Place the plants in the holes and fill them with soil.
- Press the soil down lightly.
4. Watering:
- Water the plants thoroughly after you have planted them.
- Make sure the soil is moist, but not wet.
5. Mulching:
- Apply a layer of mulch around the plants to retain moisture and suppress weeds.
- Use straw, wood chips, or grass clippings as mulch material.
6. Fertilizing:
- Fertilize the plants about 2-3 weeks after planting with a balanced fertilizer.
- Follow the instructions on the fertilizer package.
Caring for the cauliflower: How to keep it healthy and strong
Care is just as important as planting itself. Here are some tips on how to keep your cauliflower healthy and strong:
- Regular watering: Cauliflower needs regular water, especially during dry periods. Make sure the soil is always moist.
- Weed control: Regularly remove weeds to prevent them from taking nutrients and water from the cauliflower.
- Pest control: Watch out for pests like slugs, caterpillars, and cabbage root flies. Use slug pellets or nets if necessary.
- Fertilizing: Fertilize the plants every 2-3 weeks with a balanced fertilizer.
- Blanching the cauliflower (Optional): When the cauliflower head reaches about the size of a tennis ball, you can blanch it to keep it white. To do this, tie the outer leaves around the head to protect it from sunlight.
Pests and Diseases: What to do when problems arise?
Unfortunately, cauliflower is not immune to pests and diseases. Here are some common problems and how you can combat them:
- Cabbage root flies: The larvae of the cabbage root fly feed on the roots of the plants. Protect the plants with nets or use insecticides.
- Caterpillars: Caterpillars can eat the leaves of the cauliflower. Pick them off or use biological insecticides.
- Slugs: Slugs love young cauliflower plants. Use slug pellets or pick them off.
- Clubroot: A fungal disease that affects the roots. Ensure good soil drainage and use resistant varieties.
- Downy mildew: A fungal disease that appears as yellow spots on the leaves. Ensure good air circulation and use fungicides.
Harvest time: When is the cauliflower ripe?
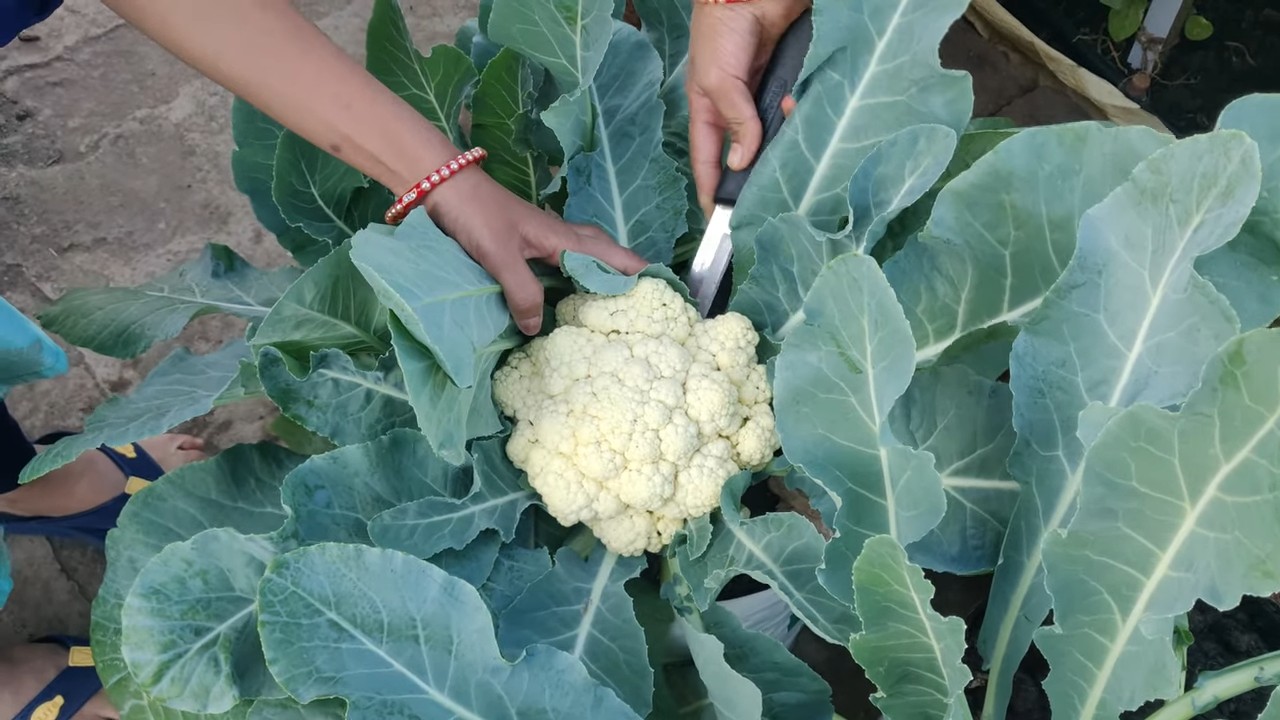
The harvest is the reward for your efforts! The cauliflower is ripe when the head is firm and compact and has reached a size of about 15-20 cm (6-8 inches).
- Harvesting method: Cut the head with a sharp knife, but leave a few leaves on the stalk.
- Storage: Cauliflower can be stored in the refrigerator for about a week.
Additional tips for success
Here are a few more additional tips that will help you grow your cauliflower successfully:
- Choose the right variety: There are many different cauliflower varieties that differ in their ripening time and taste. Find out which variety is best for your region.
- Pay attention to the soil pH: Cauliflower prefers slightly acidic soil with a pH of 6.0 to 7.0.
- Practice crop rotation: Do not plant cauliflower in the same spot every year to prevent diseases.
- Observe your plants: Watch for signs of pests or diseases and act early.
Conclusion: It’s easier than you think!
Growing your own cauliflower is a rewarding experience. With the right preparation, care, and a little patience, you can harvest your own fresh and healthy cauliflower. I hope this guide has helped and inspired you to try it yourself. Good luck and have fun gardening
Conclusion
So, there you have it! Growing cauliflower at home, while it might seem daunting at first, is an incredibly rewarding experience that brings the freshest, most flavorful produce right to your table. We’ve walked through the entire process, from selecting the right variety and preparing your soil to nurturing your plants and harvesting your beautiful heads of cauliflower.
Why is this DIY trick a must-try? Simply put, the taste difference between homegrown cauliflower and store-bought is undeniable. The subtle sweetness and crisp texture of a freshly harvested head are unparalleled. Beyond the superior flavor, you also gain complete control over the growing process. You can choose organic methods, avoid harmful pesticides, and ensure your cauliflower is grown with the utmost care. Plus, there’s an immense satisfaction in nurturing a plant from seed to harvest, knowing you’ve created something delicious and healthy with your own two hands.
But the journey doesn’t have to end with the basic white cauliflower. Feel free to experiment! Try growing colorful varieties like purple, orange, or green cauliflower for a visually stunning and equally delicious addition to your meals. Consider succession planting, staggering your planting dates to ensure a continuous harvest throughout the growing season. You can also explore different companion planting techniques, pairing your cauliflower with herbs like rosemary or thyme to deter pests and enhance flavor. For those with limited space, dwarf varieties of cauliflower are perfect for container gardening.
Don’t be afraid to get your hands dirty and embrace the learning process. Every garden is unique, and you’ll undoubtedly encounter challenges along the way. But with a little patience, persistence, and the knowledge you’ve gained from this guide, you’ll be well on your way to enjoying a bountiful harvest of homegrown cauliflower.
We wholeheartedly encourage you to give this DIY trick a try. The benefits are numerous, from the superior taste and quality of your produce to the satisfaction of growing your own food. And most importantly, don’t forget to share your experience! We’d love to hear about your successes, challenges, and any unique tips or tricks you discover along the way. Post pictures of your beautiful cauliflower heads, share your favorite recipes, and connect with other gardening enthusiasts. Let’s build a community of home gardeners who are passionate about growing their own food and enjoying the fruits (or vegetables!) of their labor. So, grab your seeds, prepare your soil, and get ready to embark on a delicious and rewarding gardening adventure. Happy growing!
Frequently Asked Questions (FAQ)
Q: What is the best time of year to start growing cauliflower?
A: The best time to start growing cauliflower depends on your climate. Cauliflower thrives in cool weather, so it’s generally recommended to plant it in the spring for a fall harvest or in the late summer for a winter harvest in milder climates. For spring planting, start seeds indoors 6-8 weeks before the last expected frost. For fall planting, start seeds outdoors in mid-summer, ensuring they have enough time to mature before the first frost. Check your local frost dates to determine the optimal planting time for your region.
Q: What kind of soil is best for growing cauliflower?
A: Cauliflower prefers well-drained, fertile soil that is rich in organic matter. The ideal soil pH is between 6.0 and 7.0. Before planting, amend your soil with compost, aged manure, or other organic materials to improve drainage and fertility. Cauliflower is a heavy feeder, so it’s important to provide it with plenty of nutrients. Consider adding a slow-release fertilizer at planting time to ensure a steady supply of nutrients throughout the growing season.
Q: How much sunlight does cauliflower need?
A: Cauliflower requires at least 6 hours of direct sunlight per day to thrive. Choose a planting location that receives full sun for optimal growth and head development. If you live in a particularly hot climate, providing some afternoon shade can help prevent the cauliflower from bolting (going to seed prematurely).
Q: How often should I water my cauliflower plants?
A: Cauliflower needs consistent moisture to grow properly. Water deeply and regularly, especially during dry periods. Aim to keep the soil consistently moist but not waterlogged. Mulching around the plants can help retain moisture and suppress weeds. Check the soil moisture regularly and adjust your watering schedule accordingly.
Q: What are some common pests and diseases that affect cauliflower?
A: Cauliflower is susceptible to several pests and diseases, including cabbage worms, aphids, flea beetles, clubroot, and black rot. Regularly inspect your plants for signs of infestation or disease. Use organic pest control methods, such as handpicking pests, using insecticidal soap, or applying Bacillus thuringiensis (Bt) for cabbage worms. To prevent diseases, practice crop rotation, ensure good air circulation, and avoid overhead watering. If you encounter a serious disease problem, consider using a fungicide specifically labeled for cauliflower.
Q: How do I know when my cauliflower is ready to harvest?
A: Cauliflower is ready to harvest when the head is firm, compact, and reaches the desired size. The size of the head will vary depending on the variety, but generally, a head that is 6-8 inches in diameter is ready for harvest. Check the head regularly as it develops, as it can quickly become overripe and lose its quality. To harvest, cut the head from the plant with a sharp knife, leaving a few leaves attached to protect the head.
Q: My cauliflower is bolting (going to seed). What can I do?
A: Bolting is a common problem with cauliflower, especially in hot weather. Once cauliflower bolts, the head becomes loose and bitter. Unfortunately, there’s not much you can do to reverse bolting. To prevent bolting, choose heat-tolerant varieties, provide afternoon shade, and ensure consistent watering. If your cauliflower does bolt, you can still harvest the leaves and use them in salads or stir-fries.
Q: Can I grow cauliflower in containers?
A: Yes, you can grow cauliflower in containers, especially dwarf varieties. Choose a large container that is at least 12 inches in diameter and depth. Use a well-draining potting mix and provide regular watering and fertilization. Container-grown cauliflower may require more frequent watering than plants grown in the ground.
Q: How can I blanch my cauliflower head?
A: Blanching is the process of covering the developing cauliflower head to prevent it from turning yellow or brown. To blanch cauliflower, simply tie the outer leaves together over the head when it reaches about 3 inches in diameter. Use twine or rubber bands to secure the leaves. Blanching is not necessary for all varieties of cauliflower, but it can help to produce a whiter, more attractive head.
Q: What are some creative ways to use homegrown cauliflower?
A: Homegrown cauliflower is incredibly versatile and can be used in a variety of dishes. You can roast it, steam it, grill it, or use it in soups, stews, and stir-fries. Cauliflower rice is a healthy and delicious alternative to traditional rice. You can also use cauliflower to make pizza crust, mashed potatoes, or even a creamy sauce. Don’t be afraid to experiment and try new recipes! The possibilities are endless.

Leave a Comment