
Growing Chili Peppers at home can be incredibly rewarding, adding a fiery kick to your meals and a vibrant splash of color to your garden. Have you ever dreamed of harvesting your own batch of scorching habaneros or sweet bell peppers right from your backyard? Well, you’re in the right place! This isn’t just another gardening guide; it’s your personal roadmap to becoming a chili pepper pro, filled with easy DIY tricks and hacks that even a beginner can master.
The history of chili peppers is as rich and spicy as the peppers themselves! Originating in South America thousands of years ago, they’ve been cultivated and enjoyed by cultures worldwide. From the ancient Aztecs using them in rituals to their current status as a global culinary staple, chili peppers have a fascinating story to tell. But beyond their historical significance, growing chili peppers offers a practical solution for anyone looking to add fresh, organic produce to their diet without breaking the bank.
Let’s face it, store-bought peppers can be expensive and sometimes lack the intense flavor we crave. Plus, there’s nothing quite like the satisfaction of nurturing a plant from seed to harvest. In this article, I’ll share my favorite DIY tricks for maximizing your chili pepper yield, protecting your plants from pests, and even creating your own unique pepper varieties. Get ready to unleash your inner gardener and spice up your life, one chili pepper at a time!

Growing Chili Peppers: From Seed to Sizzling Harvest!
Hey there, fellow spice enthusiasts! I’m so excited to share my tried-and-true method for growing chili peppers at home. Whether you’re a seasoned gardener or a complete newbie, this guide will walk you through every step, from sprouting those tiny seeds to harvesting a fiery bounty. Get ready to add some serious heat to your kitchen!
Choosing Your Chili Pepper Variety
Before we dive into the nitty-gritty, let’s talk about choosing the right chili pepper for you. The world of chili peppers is vast and varied, ranging from mild and sweet to face-meltingly hot. Consider your taste preferences and the climate you live in.
* Mild Peppers: If you’re just starting out or prefer a gentle kick, consider varieties like Anaheim, Poblano, or Shishito. These are great for stuffing, roasting, or adding a subtle flavor to your dishes.
* Medium Peppers: For a bit more heat, try Jalapeño, Serrano, or Cayenne peppers. These are versatile and can be used in salsas, sauces, and stir-fries.
* Hot Peppers: If you’re a true chili head, you might want to venture into the realm of Habanero, Scotch Bonnet, or even Ghost peppers. Be warned – these pack a serious punch!
* Consider your climate: Some peppers thrive in warmer climates, while others are more tolerant of cooler temperatures. Do some research to find varieties that are well-suited to your region.
Starting Your Chili Pepper Seeds Indoors
Starting your chili pepper seeds indoors is crucial, especially if you live in a region with a shorter growing season. This gives your plants a head start and ensures a more abundant harvest. I usually start my seeds about 6-8 weeks before the last expected frost.
What You’ll Need:
* Chili pepper seeds
* Seed starting trays or small pots
* Seed starting mix (a light, well-draining soil)
* Spray bottle
* Heat mat (optional, but highly recommended)
* Grow light (optional, but beneficial)
Step-by-Step Instructions:
1. Prepare your seed starting trays or pots: Fill your chosen containers with seed starting mix, leaving about half an inch of space at the top. Gently tap the containers to settle the soil.
2. Sow the seeds: Make a small indentation (about ¼ inch deep) in the center of each container. Place 2-3 seeds in each indentation. This increases the chances of at least one seed germinating.
3. Cover the seeds: Gently cover the seeds with a thin layer of seed starting mix.
4. Water the seeds: Use a spray bottle to thoroughly moisten the soil. Avoid overwatering, as this can lead to fungal diseases.
5. Provide warmth: Place the seed starting trays or pots on a heat mat. Chili pepper seeds germinate best at temperatures between 75-85°F (24-29°C).
6. Provide light: If you’re using a grow light, position it a few inches above the seed starting trays or pots. If you’re relying on natural light, place the containers in a sunny window.
7. Maintain moisture: Keep the soil consistently moist, but not soggy. Check the soil daily and mist with a spray bottle as needed.
8. Wait for germination: Chili pepper seeds can take anywhere from 7 to 21 days to germinate, depending on the variety and growing conditions. Be patient!
9. Thin the seedlings: Once the seedlings have emerged and developed their first true leaves (the second set of leaves), thin them out by snipping off the weaker seedlings at the soil line. Leave only the strongest seedling in each container.
Transplanting Your Chili Pepper Seedlings
Once your chili pepper seedlings have grown to a decent size (about 4-6 inches tall) and the danger of frost has passed, it’s time to transplant them outdoors.
What You’ll Need:
* Your chili pepper seedlings
* Gardening gloves
* Trowel or shovel
* Well-draining soil
* Compost or other organic matter
* Watering can or hose
* Mulch (optional)
* Stakes or cages (optional, for taller varieties)
Step-by-Step Instructions:
1. Harden off the seedlings: Before transplanting, you need to acclimate your seedlings to the outdoor environment. This process is called “hardening off.” For about a week before transplanting, gradually expose the seedlings to increasing amounts of sunlight and outdoor temperatures. Start by placing them in a sheltered spot for an hour or two each day, and gradually increase the time they spend outdoors.
2. Prepare the planting site: Choose a sunny location with well-draining soil. Chili peppers need at least 6-8 hours of sunlight per day. Amend the soil with compost or other organic matter to improve its ferti
Hey there, fellow spice enthusiasts! I’m so excited to share my tried-and-true method for growing chili peppers at home. Whether you’re a seasoned gardener or a complete newbie, this guide will walk you through every step, from sprouting those tiny seeds to harvesting a fiery bounty. Get ready to add some serious heat to your kitchen!
Choosing Your Chili Pepper Variety
Before we dive into the nitty-gritty, let’s talk about choosing the right chili pepper for you. The world of chili peppers is vast and varied, ranging from mild and sweet to face-meltingly hot. Consider your taste preferences and the climate you live in.
* Mild Peppers: If you’re just starting out or prefer a gentle kick, consider varieties like Anaheim, Poblano, or Shishito. These are great for stuffing, roasting, or adding a subtle flavor to your dishes.
* Medium Peppers: For a bit more heat, try Jalapeño, Serrano, or Cayenne peppers. These are versatile and can be used in salsas, sauces, and stir-fries.
* Hot Peppers: If you’re a true chili head, you might want to venture into the realm of Habanero, Scotch Bonnet, or even Ghost peppers. Be warned – these pack a serious punch!
* Consider your climate: Some peppers thrive in warmer climates, while others are more tolerant of cooler temperatures. Do some research to find varieties that are well-suited to your region.
Starting Your Chili Pepper Seeds Indoors
Starting your chili pepper seeds indoors is crucial, especially if you live in a region with a shorter growing season. This gives your plants a head start and ensures a more abundant harvest. I usually start my seeds about 6-8 weeks before the last expected frost.
What You’ll Need:
* Chili pepper seeds
* Seed starting trays or small pots
* Seed starting mix (a light, well-draining soil)
* Spray bottle
* Heat mat (optional, but highly recommended)
* Grow light (optional, but beneficial)
Step-by-Step Instructions:
1. Prepare your seed starting trays or pots: Fill your chosen containers with seed starting mix, leaving about half an inch of space at the top. Gently tap the containers to settle the soil.
2. Sow the seeds: Make a small indentation (about ¼ inch deep) in the center of each container. Place 2-3 seeds in each indentation. This increases the chances of at least one seed germinating.
3. Cover the seeds: Gently cover the seeds with a thin layer of seed starting mix.
4. Water the seeds: Use a spray bottle to thoroughly moisten the soil. Avoid overwatering, as this can lead to fungal diseases.
5. Provide warmth: Place the seed starting trays or pots on a heat mat. Chili pepper seeds germinate best at temperatures between 75-85°F (24-29°C).
6. Provide light: If you’re using a grow light, position it a few inches above the seed starting trays or pots. If you’re relying on natural light, place the containers in a sunny window.
7. Maintain moisture: Keep the soil consistently moist, but not soggy. Check the soil daily and mist with a spray bottle as needed.
8. Wait for germination: Chili pepper seeds can take anywhere from 7 to 21 days to germinate, depending on the variety and growing conditions. Be patient!
9. Thin the seedlings: Once the seedlings have emerged and developed their first true leaves (the second set of leaves), thin them out by snipping off the weaker seedlings at the soil line. Leave only the strongest seedling in each container.
Transplanting Your Chili Pepper Seedlings
Once your chili pepper seedlings have grown to a decent size (about 4-6 inches tall) and the danger of frost has passed, it’s time to transplant them outdoors.
What You’ll Need:
* Your chili pepper seedlings
* Gardening gloves
* Trowel or shovel
* Well-draining soil
* Compost or other organic matter
* Watering can or hose
* Mulch (optional)
* Stakes or cages (optional, for taller varieties)
Step-by-Step Instructions:
1. Harden off the seedlings: Before transplanting, you need to acclimate your seedlings to the outdoor environment. This process is called “hardening off.” For about a week before transplanting, gradually expose the seedlings to increasing amounts of sunlight and outdoor temperatures. Start by placing them in a sheltered spot for an hour or two each day, and gradually increase the time they spend outdoors.
2. Prepare the planting site: Choose a sunny location with well-draining soil. Chili peppers need at least 6-8 hours of sunlight per day. Amend the soil with compost or other organic matter to improve its fertility and drainage.
3. Dig the planting holes: Dig holes that are slightly larger than the root balls of your seedlings. Space the holes about 18-24 inches apart, depending on the variety of chili pepper.
4. Carefully remove the seedlings from their containers: Gently squeeze the sides of the containers to loosen the soil. Carefully lift the seedlings out, being careful not to damage the roots.
5. Plant the seedlings: Place the seedlings in the planting holes, making sure the top of the root ball is level with the surrounding soil.
6. Fill in the holes: Fill in the holes with soil, gently firming it around the seedlings.
7. Water thoroughly: Water the seedlings thoroughly after planting.
8. Add mulch (optional): Apply a layer of mulch around the base of the plants to help retain moisture, suppress weeds, and regulate soil temperature.
9. Stake or cage the plants (optional): For taller varieties of chili peppers, you may want to provide support with stakes or cages. This will help prevent the plants from toppling over in strong winds or when they are laden with fruit.
Caring for Your Chili Pepper Plants
Once your chili pepper plants are established, it’s important to provide them with the proper care to ensure a healthy and productive harvest.
Watering:
* Water your chili pepper plants regularly, especially during hot, dry weather. Aim to keep the soil consistently moist, but not soggy.
* Water deeply and less frequently, rather than shallowly and more often. This encourages the roots to grow deeper and makes the plants more drought-tolerant.
* Avoid watering the foliage, as this can lead to fungal diseases. Water at the base of the plants instead.
Fertilizing:
* Chili peppers are heavy feeders and benefit from regular fertilization.
* Use a balanced fertilizer (e.g., 10-10-10) or a fertilizer specifically formulated for peppers and tomatoes.
* Fertilize every 2-3 weeks during the growing season.
* Avoid over-fertilizing, as this can lead to excessive foliage growth and reduced fruit production.
Pest and Disease Control:
* Keep an eye out for common chili pepper pests, such as aphids, spider mites, and whiteflies.
* Inspect your plants regularly and take action promptly if you notice any signs of infestation.
* Use insecticidal soap or neem oil to control pests.
* Prevent fungal diseases by providing good air circulation, avoiding overwatering, and removing any infected leaves.
Pruning:
* Pruning chili pepper plants is not always necessary, but it can help improve air circulation, promote bushier growth, and increase fruit production.
* Remove any suckers (small shoots that grow from the base of the plant) to encourage the plant to focus its energy on producing fruit.
* Pinch off the tips of the branches to encourage branching and bushier growth.
Harvesting Your Chili Peppers
The moment you’ve been waiting for! Harvesting your chili peppers is the most rewarding part of the process.
When to Harvest:
* The timing of the harvest depends on the variety of chili pepper and your personal preference.
* Most chili peppers are ready to harvest when they have reached their mature size and color.
* Some peppers, like Jalapeños, can be harvested when they are still green, while others, like Habaneros, are best harvested when they are fully ripe and have turned their mature color (usually red, orange, or yellow).
* The longer you leave the peppers on the plant, the hotter they will become.
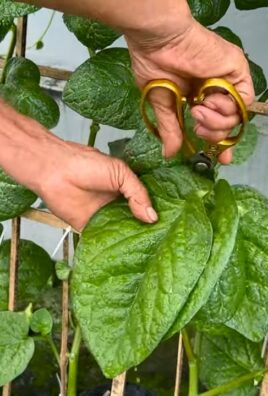
How to Harvest:
* Use pruning shears or scissors to cut the peppers from the plant.
* Leave a small piece of stem attached to the pepper.
* Handle the peppers with care, as some varieties can be very hot and can irritate your skin. Wear gloves if necessary.
Storing Your Chili Peppers:
* Fresh chili peppers can be stored in the refrigerator for up to a week.
*
Conclusion
So, there you have it! Mastering the art of growing chili peppers at home is not only achievable but incredibly rewarding. We’ve explored a simple yet effective DIY trick that can significantly boost your pepper production, leading to a bountiful harvest of fiery goodness. This isn’t just about saving a few dollars; it’s about connecting with your food, understanding the growing process, and experiencing the unparalleled satisfaction of nurturing something from seed to table.
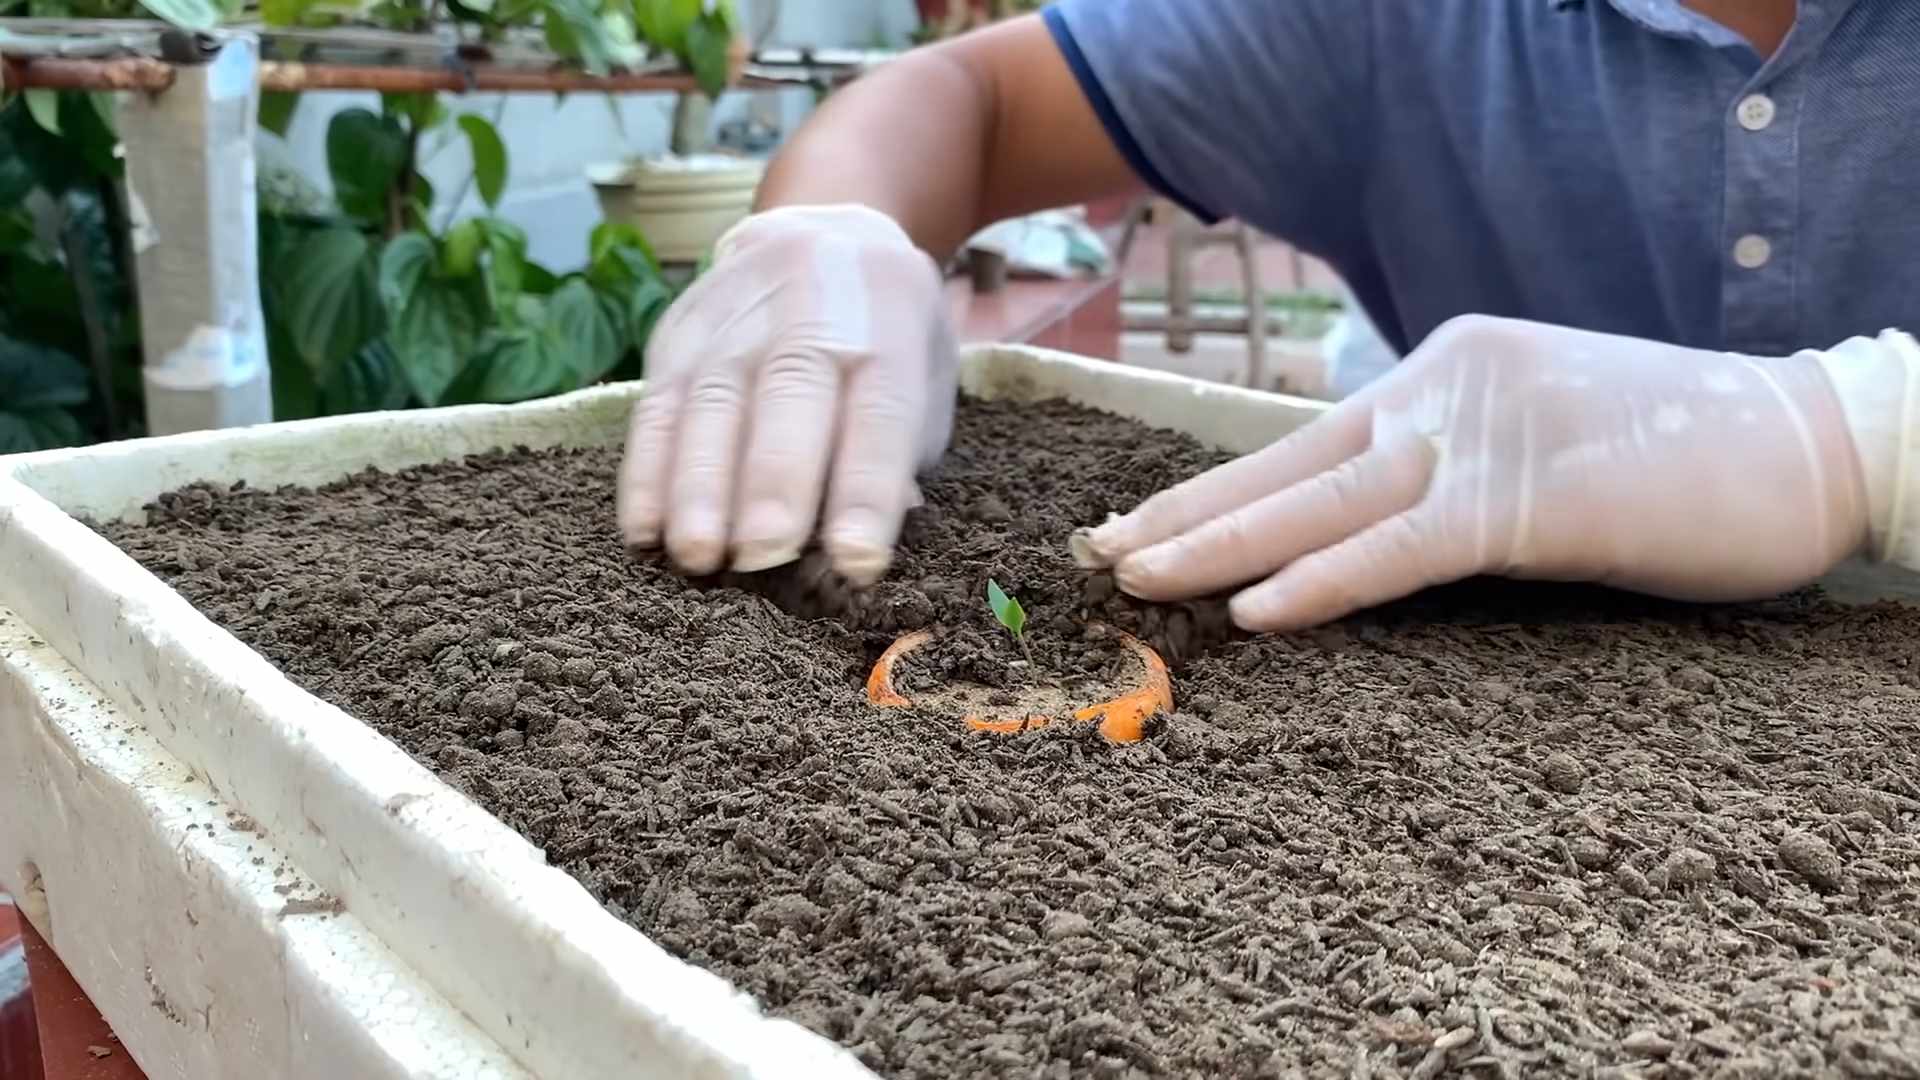
Why is this DIY trick a must-try? Because it addresses a fundamental need for chili peppers: optimal nutrient availability. By creating a slow-release fertilizer using readily available materials, you’re ensuring your plants receive a steady stream of essential elements, promoting vigorous growth, abundant flowering, and ultimately, a profusion of peppers. This method is also environmentally friendly, reducing your reliance on synthetic fertilizers and minimizing potential harm to the surrounding ecosystem.
But don’t stop there! Experimentation is key to unlocking the full potential of your chili pepper garden. Consider these variations to tailor the DIY trick to your specific needs and preferences:
* Compost Tea Boost: Soak your DIY fertilizer mixture in water for a few days to create a nutrient-rich compost tea. Use this tea to water your chili pepper plants for an extra boost of essential nutrients.
* Adjust the Ratio: Depending on your soil type and the specific needs of your chili pepper variety, you can adjust the ratio of ingredients in your DIY fertilizer. For example, if your soil is already rich in phosphorus, you might reduce the amount of bone meal.
* Different Organic Materials: Explore other organic materials that are rich in nutrients, such as coffee grounds, banana peels, or eggshells. These can be added to your DIY fertilizer mixture to provide a wider range of essential elements.
* Hydroponic Adaptation: While this trick is designed for soil-based growing, you can adapt it for hydroponic systems by carefully monitoring the nutrient levels and adjusting the concentration of the DIY fertilizer solution.
Growing chili peppers is a journey of discovery, and this DIY trick is just one step along the way. We encourage you to embrace the challenge, experiment with different techniques, and find what works best for you and your plants. The rewards are well worth the effort: fresh, flavorful chili peppers that you can use to spice up your favorite dishes, share with friends and family, or even sell at your local farmers market.
Now, it’s your turn! Give this DIY trick a try and see the difference it makes in your chili pepper garden. We’re confident that you’ll be amazed by the results. Don’t forget to share your experiences with us in the comments below. We’d love to hear about your successes, your challenges, and any variations you’ve tried. Together, we can learn and grow a community of passionate chili pepper enthusiasts. Happy growing!
Frequently Asked Questions (FAQ)
What exactly is the DIY trick you’re referring to?
The DIY trick involves creating a slow-release fertilizer using readily available organic materials. While the specific recipe may vary, it typically includes ingredients like bone meal (for phosphorus), Epsom salts (for magnesium), and other organic matter to provide a balanced supply of nutrients to your chili pepper plants over time. This method helps to ensure consistent growth and abundant pepper production.
Why is slow-release fertilizer better than liquid fertilizer?
Both slow-release and liquid fertilizers have their advantages. Liquid fertilizers provide a quick boost of nutrients, which can be beneficial during periods of rapid growth or nutrient deficiencies. However, they can also be easily washed away by rain or overwatering, requiring frequent applications. Slow-release fertilizers, on the other hand, provide a steady supply of nutrients over a longer period, reducing the need for frequent applications and minimizing the risk of nutrient imbalances. This is particularly beneficial for chili peppers, which require a consistent supply of nutrients throughout their growing season.
How often should I apply this DIY fertilizer?
The frequency of application will depend on the specific recipe you’re using and the needs of your chili pepper plants. As a general guideline, you can apply the DIY fertilizer at planting time and then again every 4-6 weeks throughout the growing season. However, it’s important to monitor your plants for signs of nutrient deficiencies, such as yellowing leaves or stunted growth, and adjust the frequency of application accordingly.
Can I use this DIY fertilizer for other plants besides chili peppers?
Yes, this DIY fertilizer can be used for other plants that benefit from a balanced supply of nutrients, such as tomatoes, peppers, and eggplants. However, it’s important to consider the specific needs of each plant and adjust the ratio of ingredients accordingly. For example, plants that require more nitrogen may benefit from the addition of blood meal or other nitrogen-rich organic materials.
What if I don’t have access to all the ingredients listed in the recipe?
Don’t worry! The beauty of this DIY trick is that it’s flexible and adaptable. You can substitute ingredients based on what’s available to you. For example, if you don’t have bone meal, you can use rock phosphate or other sources of phosphorus. If you don’t have Epsom salts, you can use other sources of magnesium, such as dolomite lime. The key is to understand the nutritional needs of your chili pepper plants and choose ingredients that provide those nutrients.
My chili pepper plants are already growing well. Do I still need to use this DIY fertilizer?
Even if your chili pepper plants are already growing well, using this DIY fertilizer can help to further boost their growth and productivity. By providing a consistent supply of essential nutrients, you can ensure that your plants have everything they need to thrive and produce an abundant harvest of peppers. Think of it as giving your plants a little extra TLC to help them reach their full potential.
Is this DIY fertilizer safe for organic gardening?
Yes, as long as you use organic materials, this DIY fertilizer is safe for organic gardening. Be sure to choose ingredients that are certified organic to avoid any potential contamination from synthetic fertilizers or pesticides. This will help to ensure that your chili peppers are grown in a healthy and sustainable way.
How do I know if my chili pepper plants have a nutrient deficiency?
Nutrient deficiencies can manifest in various ways, depending on the specific nutrient that’s lacking. Some common signs of nutrient deficiencies in chili pepper plants include yellowing leaves (chlorosis), stunted growth, leaf curling, and blossom end rot. If you suspect that your plants have a nutrient deficiency, it’s important to identify the specific nutrient that’s lacking and adjust your fertilization accordingly.
Can I use too much of this DIY fertilizer?
Yes, it’s possible to over-fertilize your chili pepper plants, even with organic fertilizers. Over-fertilization can lead to nutrient imbalances, salt buildup in the soil, and even plant death. It’s important to follow the recommended application rates and monitor your plants for signs of over-fertilization, such as leaf burn or wilting. If you suspect that you’ve over-fertilized your plants, you can flush the soil with water to remove excess nutrients.
What’s the best way to store leftover DIY fertilizer?
Store leftover DIY fertilizer in an airtight container in a cool, dry place. This will help to prevent the fertilizer from clumping or losing its effectiveness. Be sure to label the container with the date and ingredients so you know what it is and when it was made. Properly stored, your DIY fertilizer should last for several months.
Leave a Comment