
Growing Cucumbers Indoors might seem like a challenge reserved for seasoned gardeners, but trust me, with a few clever tricks and a dash of DIY spirit, you can be harvesting crisp, refreshing cucumbers right from the comfort of your home! Forget those bland, store-bought cucumbers – imagine the satisfaction of biting into a homegrown beauty, bursting with flavor and sunshine (even if that sunshine is coming from a grow light!).
For centuries, humans have cultivated cucumbers, tracing their origins back to India. Historically, they were prized for their cooling properties and nutritional value. Now, we’re bringing this ancient practice into the modern home! Why? Because access to fresh, healthy produce shouldn’t be limited by the seasons or your outdoor space. Plus, there’s something incredibly rewarding about nurturing a plant from seed to harvest.
This DIY guide is your key to unlocking the secrets of successful indoor cucumber cultivation. I’ll walk you through everything from selecting the right varieties and setting up your growing environment to mastering pollination techniques and troubleshooting common problems. Whether you’re a beginner or a seasoned green thumb, these tips will empower you to enjoy a bountiful harvest of growing cucumbers indoors, all year round. So, grab your gardening gloves, and let’s get started!
Growing Cucumbers Indoors: Your Comprehensive DIY Guide
Hey plant friends! Have you ever dreamed of harvesting crisp, fresh cucumbers in the middle of winter? Or maybe you just don’t have a garden, but the longing for homegrown vegetables is strong? Then you’ve come to the right place! I’ll show you how to successfully grow cucumbers in your own four walls. It’s easier than you think, I promise!
What you need: The Right Equipment
Before we get started, let’s make sure you have everything you need. Here is a list of the most important things:
- Good cucumber seeds: Choose varieties that are specially suited for growing in pots. “Bush Champion,” “Spacemaster,” or “Patio Snacker” are good options.
- Starter pots: Small pots or seed trays for germination.
- Larger pots: At least 20 liters (5 gallons) in volume per plant.
- High-quality potting soil: A well-draining mixture is important.
- Grow light: Essential, especially in winter or with low daylight.
- Support/Trellis: Cucumbers are climbing plants and need support.
- Liquid fertilizer: For vegetables, preferably organic.
- Spray bottle: For moistening the leaves.
- Patience: And a little love!
Step-by-Step Guide: From Sowing to Harvest
Okay, now let’s get down to it! Follow these steps to successfully grow your cucumbers:
1. Sowing: The Start of a Cucumber’s Life
- Prepare the starter pots: Fill the starter pots with potting soil and moisten them lightly.
- Sow the seeds: Place 1-2 seeds per pot about 1-2 cm (0.5-1 inch) deep in the soil.
- Cover and moisten: Cover the seeds lightly with soil and spray them gently with water.
- The right location: Place the pots in a warm, bright spot. A temperature of 20-25°C (68-77°F) is ideal.
- Patience is key: The first seedlings should sprout within 5-10 days.
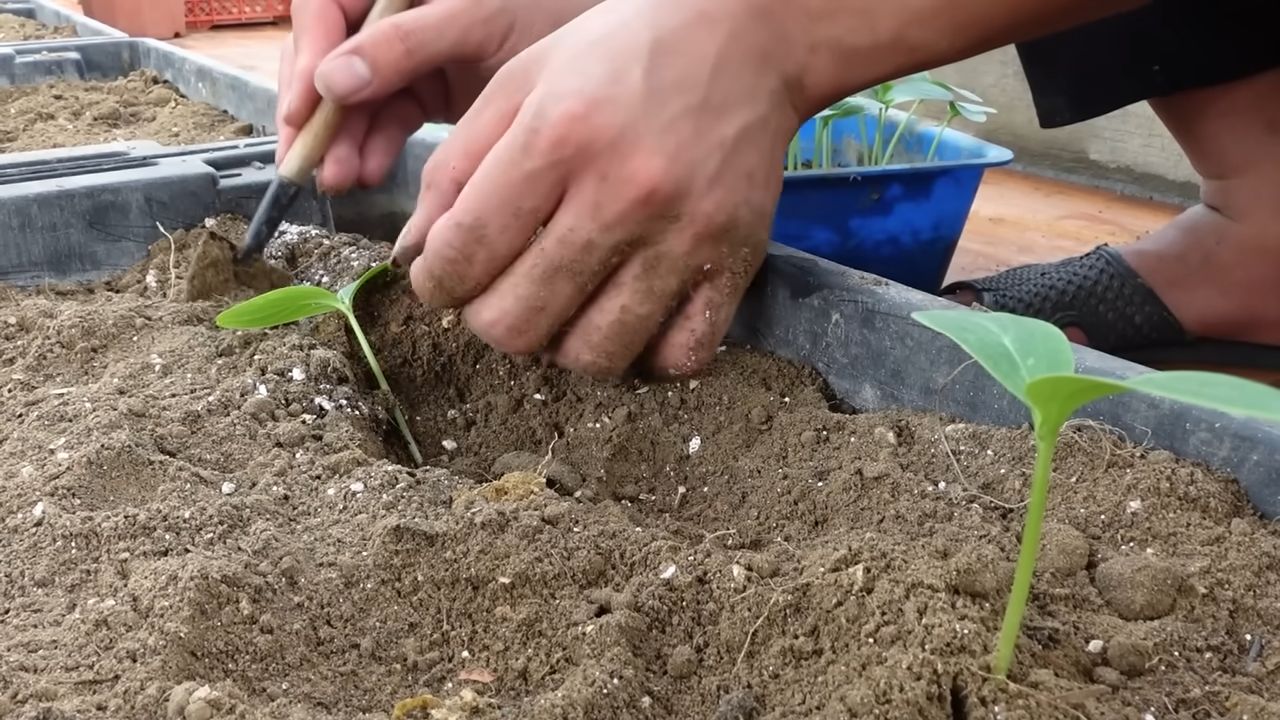
2. Pricking Out: Giving the Little Cucumbers More Space
Once the seedlings have developed their first true leaves (in addition to the initial seed leaves), it’s time to prick them out.
- Prepare the larger pots: Fill the larger pots with potting soil.
- Careful removal: Gently lift the small cucumber plants out of the starter pots. Be careful not to damage the roots.
- Planting: Place each plant in one of the larger pots. The top of the root ball should be level with the soil surface.
- Watering in: Water the plants gently.
3. The Right Location: Light, Air, and Love
- Brightness is key: Cucumbers need a lot of light, at least 6-8 hours per day. If you don’t have enough daylight, use a grow light.
- The right temperature: The ideal temperature is between 20 and 25°C (68-77°F). Avoid drafts and sudden temperature changes.
- Humidity: Cucumbers like high humidity. Spray the leaves regularly with water, especially when the air is dry.
- Attach a trellis: As soon as the plants get bigger, they will need a support. You can use a bamboo stick, a trellis, or a climbing net.
4. Watering and Fertilizing: So the Cucumbers Grow and Thrive
- Water correctly: Water the cucumbers regularly, but avoid waterlogging. The soil should always be slightly moist.
- Fertilize correctly: Start fertilizing about 2 weeks after pricking out. Use a liquid fertilizer for vegetables and follow the instructions on the package. Fertilize about every 2 weeks.
- Watch for signs: Look for signs of over- or under-fertilizing. Yellow leaves can indicate a nutrient deficiency, while burnt leaf tips can indicate too much fertilizer.
5. Pollination: The Key to a Cucumber Harvest
Cucumbers are monoecious, meaning they have both male and female flowers on the same plant. You can recognize the female flowers by the small, undeveloped fruit directly behind the blossom. Outdoors, cucumbers are pollinated by insects. Since we are growing them indoors, we have to lend a hand.
- The right time: It’s best to pollinate the flowers in the morning when they are open.
- The method: Take a small paintbrush or cotton swab and transfer pollen from the male flowers (those without the undeveloped fruit) to the female flowers.
- Repetition: Repeat the pollination on several consecutive days to ensure that all female flowers are pollinated.
- Alternatively: You can also gently pick a male flower and dab its stamens directly onto the stigma of the female flower.
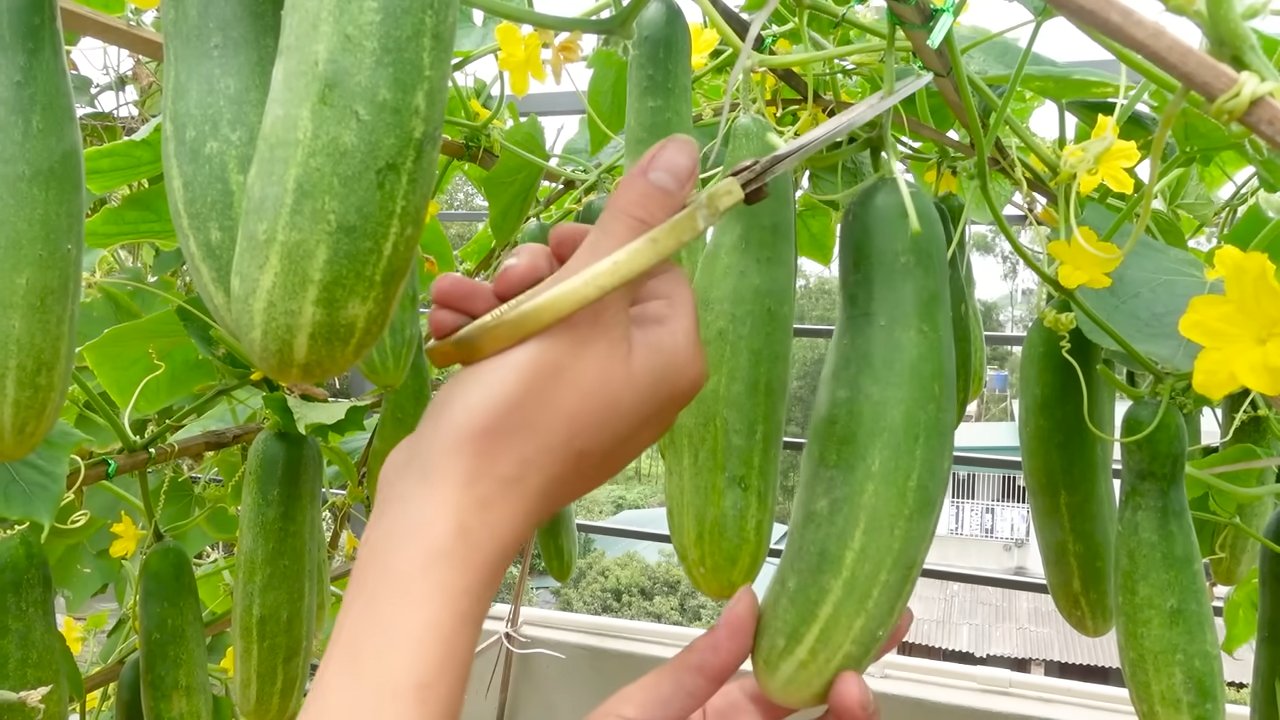
6. Harvest Time: The Reward for Your Effort
- The right time: The harvest time depends on the variety. As a rule, cucumbers are ready for harvest when they have reached the desired size and can be easily detached from the stem.
- Harvest carefully: Cut the cucumbers with a sharp knife or scissors.
- Harvest regularly: Harvest the cucumbers regularly to encourage the production of new fruits.
Common Problems and Solutions: What to do when something goes wrong?
Even when growing cucumbers indoors, problems can occur. Here are some common problems and how you can solve them:
- Yellow leaves: Can indicate a nutrient deficiency, overwatering, or too little light. Check your watering and fertilizing habits and make sure the plants are getting enough light.
- Pests: Spider mites, aphids, or whiteflies can occur. Spray the plants with a mild soap solution or use a biological pesticide.
- Fruit rot: Can be caused by too high humidity or poor ventilation. Ensure good ventilation and avoid spraying the leaves too much.
- No fruit: Can indicate a lack of pollination. Make sure you are pollinating the flowers regularly.
Additional Tips and Tricks: For Even More Success
- Rotate the pots regularly: So that all sides of the plants receive even light.
- Remove side shoots: To concentrate the plant’s energy on the main shoots and fruits.
- Use rainwater: If possible, as it contains less lime than tap water.
- Observe your plants closely: The better you know your plants, the faster you will recognize problems and be able to fix them.
Variety Recommendations for Indoor Cultivation
As mentioned, certain cucumber varieties are better suited for growing in pots than others. Here are some of my favorites:
Patio Snacker: A mini-cucumber that is perfect for growing on the balcony or terrace.
Bush Champion: A compact variety that requires little space and produces many fruits.
Spacemaster: Another compact variety that is well-suited for growing in pots.
Conclusion
So, there you have it! Growing cucumbers indoors might seem like a daunting task, but with the right knowledge and a little dedication, you can enjoy fresh, crisp cucumbers straight from your home, regardless of the season. This DIY approach to cucumber cultivation offers a multitude of benefits, from controlling pests and diseases to extending your growing season and enjoying the satisfaction of nurturing your own food.
Why is this a must-try? Because it empowers you to take control of your food source, ensuring you have access to healthy, delicious cucumbers free from harmful pesticides. Imagine the joy of adding freshly picked cucumbers to your salads, sandwiches, or even enjoying them as a refreshing snack. Plus, it’s a fantastic way to connect with nature, even when you’re indoors.
But the journey doesn’t end here! Feel free to experiment with different cucumber varieties. Bush varieties like Spacemaster or Salad Bush are particularly well-suited for indoor growing due to their compact size. You could also try different potting mixes to see what works best for your growing environment. Consider adding companion plants like marigolds or basil to your indoor garden to deter pests and enhance the flavor of your cucumbers. Another variation is to explore hydroponic systems for growing cucumbers indoors, which can be a highly efficient and space-saving method.
Don’t be afraid to tweak the watering schedule based on your specific climate and the needs of your plants. Remember to monitor your cucumbers regularly for any signs of pests or diseases and take prompt action to address any issues.
We wholeheartedly encourage you to embark on this rewarding adventure of growing cucumbers indoors. It’s a fantastic way to add fresh produce to your diet, connect with nature, and learn new skills. Once you’ve tried it, we’d love to hear about your experience! Share your tips, tricks, and photos in the comments below. Let’s create a community of indoor cucumber growers and learn from each other’s successes and challenges. Your insights could be invaluable to someone just starting out. Happy growing!
Frequently Asked Questions (FAQ)
1. What are the best cucumber varieties for indoor growing?
Choosing the right cucumber variety is crucial for successful indoor cultivation. Bush or compact varieties are generally preferred because they require less space and are easier to manage. Some excellent choices include:
* **Spacemaster:** A popular bush variety known for its high yield and disease resistance.
* **Salad Bush:** Another compact variety that produces delicious, crisp cucumbers perfect for salads.
* **Bush Champion:** A reliable and productive bush variety that’s well-suited for container gardening.
* **Patio Snacker:** A small, prolific variety ideal for growing in pots on patios or indoors.
* **Miniature White:** A unique variety that produces small, white cucumbers with a mild flavor.
When selecting a variety, consider factors such as fruit size, disease resistance, and days to maturity. Read reviews and consult with local gardening experts to find the best option for your specific growing conditions.
2. How much light do indoor cucumbers need?
Cucumbers are sun-loving plants and require at least 6-8 hours of direct sunlight per day to thrive. If you don’t have a sunny window, you’ll need to supplement with artificial lighting. Grow lights, such as LED or fluorescent lights, are an excellent option. Position the lights about 6-12 inches above the plants and keep them on for 14-16 hours per day. Monitor your plants closely and adjust the lighting as needed. Signs of insufficient light include leggy growth, pale leaves, and reduced fruit production.
3. What type of soil is best for growing cucumbers indoors?
Cucumbers prefer well-draining, nutrient-rich soil. A good potting mix for indoor cucumbers should contain a blend of peat moss, perlite, and vermiculite. You can also add compost or other organic matter to improve soil fertility and drainage. Avoid using garden soil, as it can be too heavy and may contain pests or diseases. Ensure that your containers have drainage holes to prevent waterlogging, which can lead to root rot.
4. How often should I water my indoor cucumber plants?
Watering frequency depends on several factors, including the size of your container, the type of soil, and the ambient temperature. Generally, you should water your cucumber plants when the top inch of soil feels dry to the touch. Water deeply until water drains out of the drainage holes. Avoid overwatering, as this can lead to root rot. During hot weather, you may need to water more frequently. Check the soil moisture regularly and adjust your watering schedule accordingly.
5. How do I pollinate my indoor cucumber plants?
Cucumbers are typically pollinated by bees, but since you’re growing them indoors, you’ll need to hand-pollinate them. This is a simple process that involves transferring pollen from the male flowers to the female flowers. Male flowers have a long, thin stem, while female flowers have a small cucumber-like structure at the base. Use a small paintbrush or cotton swab to collect pollen from the male flowers and gently brush it onto the stigma of the female flowers. Repeat this process every day for several days to ensure successful pollination. You can also use a small electric toothbrush to vibrate the male flower and release the pollen.
6. What are some common pests and diseases that affect indoor cucumbers?
Indoor cucumbers can be susceptible to pests such as aphids, spider mites, and whiteflies. Regularly inspect your plants for signs of infestation and take action promptly. You can control pests by spraying your plants with insecticidal soap or neem oil. Diseases such as powdery mildew and fungal infections can also affect indoor cucumbers. Ensure good air circulation around your plants and avoid overwatering to prevent these diseases. If you notice any signs of disease, remove the affected leaves and treat your plants with a fungicide.
7. How do I fertilize my indoor cucumber plants?
Cucumbers are heavy feeders and require regular fertilization to produce abundant fruit. Use a balanced fertilizer with a ratio of 10-10-10 or 14-14-14. Apply the fertilizer according to the package instructions. You can also use a liquid fertilizer every 2-3 weeks. Avoid over-fertilizing, as this can lead to nutrient burn. Monitor your plants closely and adjust the fertilization schedule as needed.
8. How long does it take for cucumbers to mature indoors?
The time it takes for cucumbers to mature depends on the variety and growing conditions. Generally, cucumbers will be ready to harvest about 50-70 days after planting. Check the seed packet or plant tag for specific information on the maturity date of your chosen variety. Harvest cucumbers when they are the desired size and color. Regular harvesting will encourage the plant to produce more fruit.
9. Can I grow cucumbers indoors year-round?
Yes, you can grow cucumbers indoors year-round, provided you have adequate light, temperature, and humidity. Use grow lights to supplement natural light during the winter months. Maintain a consistent temperature of 70-80°F (21-27°C) and provide adequate humidity. With proper care, you can enjoy fresh cucumbers from your indoor garden throughout the year.
10. What are some tips for maximizing cucumber yield indoors?
To maximize cucumber yield indoors, consider the following tips:
* Choose a high-yielding variety.
* Provide adequate light and nutrients.
* Hand-pollinate your plants regularly.
* Prune your plants to encourage branching and fruit production.
* Provide support for your plants to climb.
* Harvest cucumbers regularly to encourage further fruit production.
* Monitor your plants for pests and diseases and take action promptly.
* Maintain consistent temperature and humidity levels.
* Rotate your crops to prevent soilborne diseases.
* Consider using a hydroponic system for increased efficiency.


Leave a Comment