
Growing Parsley Indoors Beginner? Absolutely! Imagine fresh, vibrant parsley, bursting with flavor, right at your fingertips, no matter the season. Forget those sad, wilted bunches from the grocery store! This isn’t just about having a pretty herb on your windowsill; it’s about unlocking a world of culinary possibilities and connecting with nature, even within the cozy confines of your home.
Parsley, with its bright green leaves, has been a culinary staple for centuries. The ancient Greeks crowned victors with parsley wreaths, symbolizing triumph and celebration. Today, while we might not be awarding parsley crowns, we can certainly celebrate the joy of fresh, homegrown herbs. But let’s face it, not everyone has a sprawling garden or the perfect outdoor climate. That’s where the magic of indoor gardening comes in!
I know what you’re thinking: “I have a black thumb!” Trust me, I’ve been there. But growing parsley indoors for beginners is surprisingly easy, and I’m here to guide you through every step. This DIY guide will equip you with simple, effective tricks and hacks to cultivate thriving parsley plants inside, even if you’ve never grown anything before. Say goodbye to expensive store-bought herbs and hello to fresh, flavorful parsley whenever you need it. Let’s get started and transform your kitchen into a mini herb garden!
Growing Parsley Indoors: A Beginner-Friendly Guide
Hello dear garden friends! Are you also tired of buying expensive, wilting parsley from the supermarket in winter? Me too! That’s why today I’m showing you how you can easily grow your own parsley indoors. It’s easier than you think, and you’ll always have fresh herbs on hand. Let’s get started!
What You Need:
- Parsley seeds or a parsley plant: Seeds are cheaper, but a plant is faster. For beginners, I recommend a plant.
- A pot with drainage holes: The size depends on whether you’re using seeds or a plant. For a plant, it should be at least 15 cm (6 inches) in diameter.
- High-quality potting soil: A special herb soil is best.
- A sunny location: Parsley loves light! A south-facing window is ideal.
- A watering can or spray bottle: For watering.
- (Optional) Liquid fertilizer for herbs: For a lush harvest.
- (Optional) Seed starting pots and seed starting mix: If you’re starting with seeds.
Growing Parsley from Seed (Optional, but Worthwhile!)
If you decide to grow from seed, you’ll need a bit more patience, but it’s also very rewarding. Here’s how I do it:
- Prepare the seeds: Parsley seeds can sometimes be slow to germinate. To speed up the process, I like to soak them in lukewarm water for 24 hours. This helps to soften the hard shell.
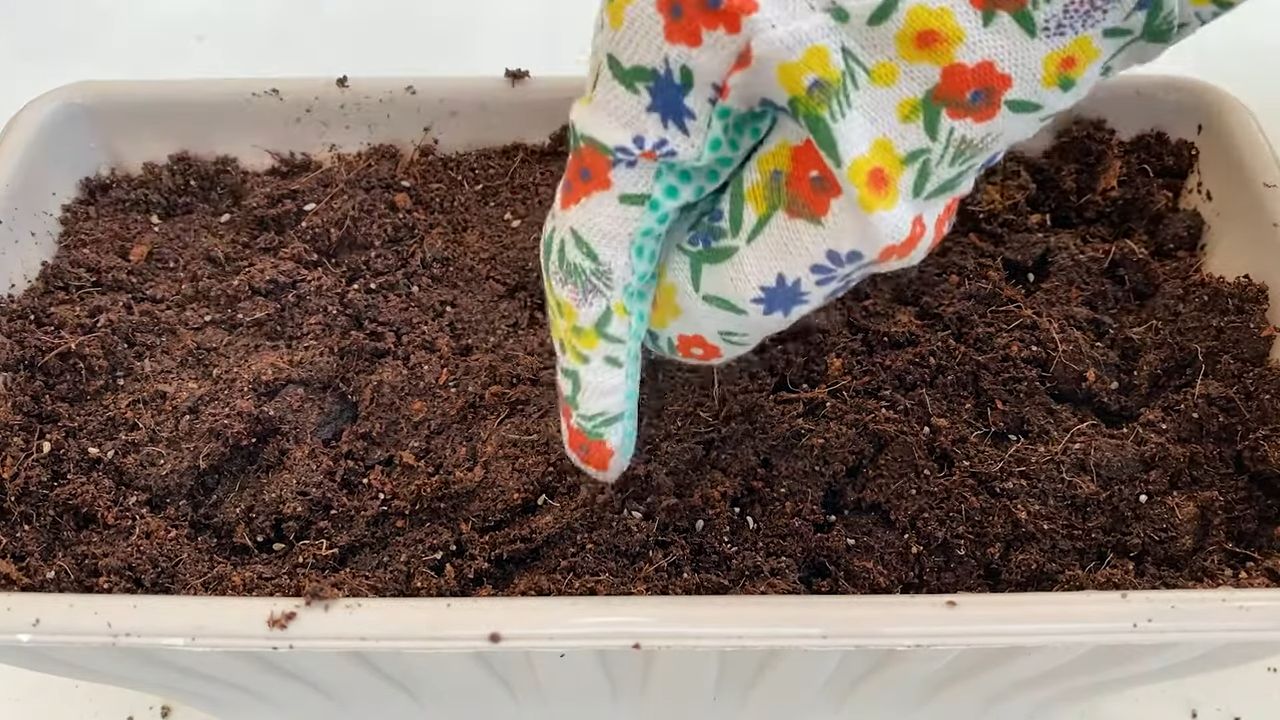
- Sowing: Fill your seed starting pots with seed starting mix. Lightly moisten the soil. Distribute the seeds evenly on the surface and cover them with a thin layer of soil (about 0.5 cm / ¼ inch).
- Maintain moisture: Gently spray the soil with water to keep it moist. Cover the seed starting pots with plastic wrap or a mini-greenhouse to increase humidity.
- Keep it warm and bright: Place the seed starting pots in a warm and bright place, but not in direct sun. A temperature of 20-25°C (68-77°F) is ideal.
- Be patient: Parsley seeds take some time to germinate. It can take 2-4 weeks for the first seedlings to appear. Keep the soil moist, but not wet, during this time. Ventilate the seed pots regularly to prevent mold.
- Pricking out: Once the seedlings are large enough (about 5 cm / 2 inches high and with a few true leaves), you can transplant them into larger pots. Choose a pot that is at least 10 cm (4 inches) in diameter for this.
Planting Parsley (for purchased plants or started seeds)
If you’ve bought a parsley plant or have started your seeds, planting is the next step.
- Prepare the pot: Choose a pot with drainage holes that is large enough for your plant. Fill the pot with high-quality potting soil, preferably herb soil.
- Carefully remove the plant from the old pot: Gently squeeze the pot to loosen the soil. Hold the plant by the stem and carefully pull it out. Be careful not to damage the roots.
- Planting: Place the parsley plant in the new pot. The top of the root ball should be level with the soil surface. Fill the pot with soil and press it down lightly.
- Watering: Water the plant thoroughly until water runs out of the drainage holes.
Caring for Parsley Indoors
Now comes the most important part: the right care to help your parsley thrive.
- Location: Parsley needs a lot of light. Place the pot in a sunny spot, ideally a south-facing window. If your parsley doesn’t get enough light, the leaves will become pale and the plant will be susceptible to diseases. In winter, a grow light can help.
- Watering: Parsley likes it moist, but not wet. Water regularly, but avoid waterlogging. The soil should feel slightly damp. Check the moisture of the soil by sticking your finger about 2 cm (1 inch) deep into it. If it feels dry, it’s time to water.
- Fertilizing: Parsley is a heavy feeder. Fertilize it regularly with a liquid fertilizer for herbs. I fertilize my parsley every two weeks during the growing season (spring and summer). In winter, I reduce fertilizing to once a month.
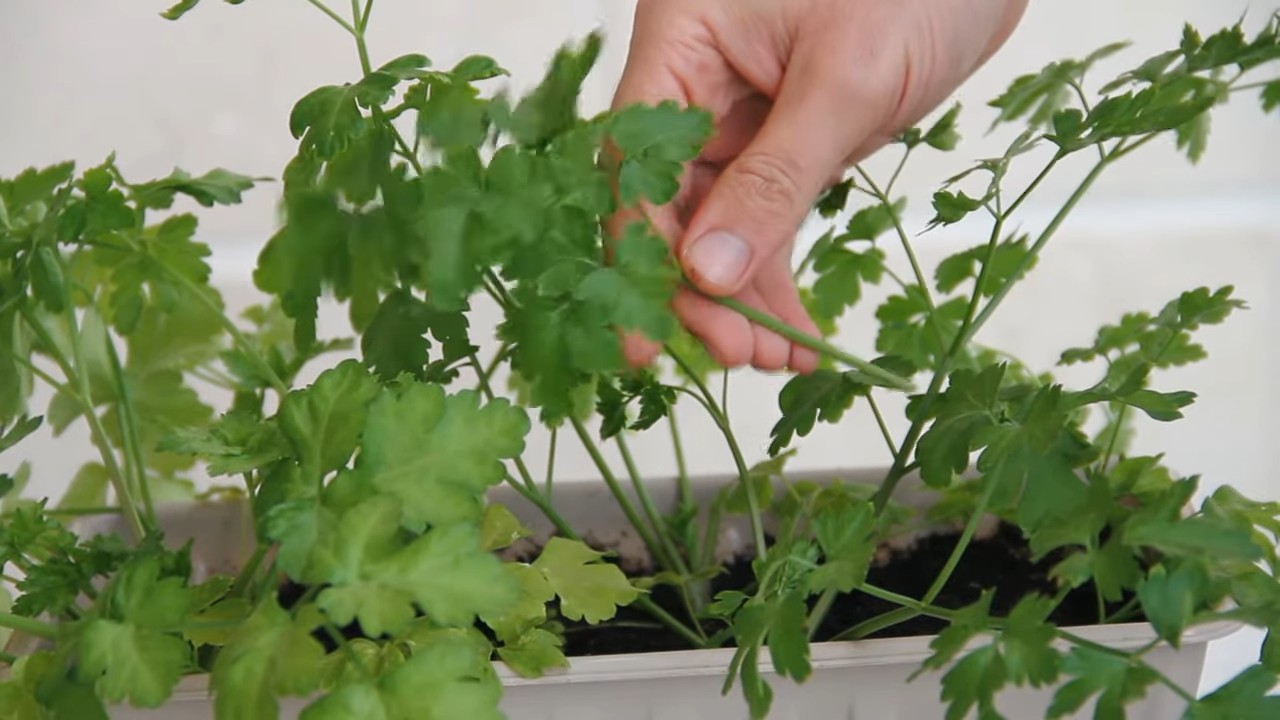
- Harvesting: Harvest the parsley regularly to stimulate growth. Cut the outer leaves instead of the entire plant. This allows the plant to continue growing and produce new leaves.
- Pests and Diseases: Watch out for pests like aphids or spider mites. If infested, you can treat the plant with a mild insecticide or a soap solution. Also, watch for signs of fungal diseases, such as powdery mildew. Ensure good ventilation and avoid waterlogging to prevent fungal diseases.
Variety Choice: Flat-leaf or Curly Parsley?
There are two main varieties of parsley: flat-leaf and curly. Both are easy to grow, but they have different tastes and uses.
- Flat-leaf parsley (Italian parsley): Has a stronger, more pungent flavor. It is ideal for soups, sauces, salads, and as a garnish. I personally prefer flat-leaf parsley because it is more aromatic.
- Curly parsley: Has a milder taste and is often used as a garnish. It is also a good choice for people who find the taste of flat-leaf parsley too intense.
Common Problems and Solutions
Problems can also arise when growing parsley indoors. Here are some common issues and how to solve them:
- Yellow leaves: Can be caused by overwatering, nutrient deficiency, or too little light. Check your watering, fertilize the plant, and move it to a brighter location.
- Wilting leaves: Can be caused by underwatering or too much heat. Water the plant thoroughly and move it to a cooler location.
- Pests: Aphids and spider mites are common pests. Treat the plant with a mild insecticide or a soap solution.
- Fungal diseases: Powdery mildew is a common fungal disease. Ensure good ventilation and avoid waterlogging.
Additional Tips for a Lush Parsley Harvest
- Rotate the pot regularly: So that all sides of the plant get even light.
- Remove yellow or brown leaves: To keep the plant healthy.
- Use rainwater for watering: Rainwater is softer than tap water and does not contain harmful chemicals.
- Collect parsley seeds: If your parsley flowers, you can collect the seeds and sow them again the following year.
I hope this guide helps you to grow your own parsley indoors. It’s a rewarding project that provides you with fresh herbs all year round. Happy gardening
Conclusion
So, there you have it! Growing parsley indoors, even for a complete beginner, is not only achievable but also incredibly rewarding. Forget those sad, wilted bunches from the grocery store – imagine having fresh, vibrant parsley readily available to elevate your culinary creations, no matter the season. This simple DIY trick transforms your kitchen into a miniature herb garden, offering a constant supply of this versatile herb.
Why is this a must-try? Because it’s economical, sustainable, and undeniably delicious. Think about the money you’ll save by not constantly buying parsley. Consider the environmental impact of reducing your reliance on commercially grown and transported herbs. And most importantly, savor the unparalleled flavor of freshly harvested parsley, bursting with aroma and vitality. The difference between store-bought and homegrown is truly remarkable.
But the beauty of this DIY project lies in its adaptability. Feel free to experiment with different varieties of parsley. Curly parsley adds a decorative touch, while flat-leaf (Italian) parsley boasts a more robust flavor. You can also try growing other herbs alongside your parsley, creating a miniature indoor herb garden. Consider companions like chives, oregano, or thyme, all of which thrive in similar conditions. Just be mindful of spacing and ensure each plant receives adequate light and airflow.
Don’t be afraid to get creative with your containers, too. While a standard pot works perfectly well, you can repurpose old teacups, mason jars, or even create a vertical herb garden using recycled materials. The possibilities are endless! The key is to ensure proper drainage and choose a container that complements your kitchen décor.
We wholeheartedly encourage you to embark on this simple yet satisfying journey of growing parsley indoors. It’s a fantastic way to connect with nature, enhance your cooking, and add a touch of green to your home. It’s a small investment of time and effort that yields significant returns in flavor, freshness, and overall well-being.
Once you’ve experienced the joy of harvesting your own parsley, we’re confident you’ll be hooked. So, grab a pot, some soil, and a packet of parsley seeds, and get started today! And most importantly, we want to hear about your experience. Share your tips, tricks, and triumphs in the comments below. Let’s create a community of indoor herb gardeners and inspire others to embrace the joys of homegrown goodness. We are eager to see your parsley growing success!
Frequently Asked Questions (FAQ)
What kind of soil is best for growing parsley indoors?
Parsley thrives in well-draining, nutrient-rich soil. A good quality potting mix specifically formulated for herbs or vegetables is ideal. You can also create your own mix by combining equal parts of potting soil, compost, and perlite or vermiculite. The compost provides essential nutrients, while the perlite or vermiculite improves drainage and aeration. Avoid using garden soil, as it can be too heavy and may contain pests or diseases.
How much sunlight does indoor parsley need?
Parsley needs at least 6-8 hours of direct sunlight per day to thrive. A south-facing window is usually the best option. If you don’t have a sunny window, you can supplement with a grow light. Place the grow light a few inches above the parsley plants and keep it on for 12-14 hours per day. Insufficient light will result in leggy, weak growth and a less flavorful herb.
How often should I water my indoor parsley?
Water parsley regularly, keeping the soil consistently moist but not waterlogged. Check the soil moisture by sticking your finger about an inch deep. If the soil feels dry, it’s time to water. Water deeply, allowing excess water to drain out of the bottom of the pot. Avoid overwatering, as this can lead to root rot. During the winter months, when growth slows down, you may need to water less frequently.
How often should I fertilize my indoor parsley?
Parsley benefits from regular fertilization, especially when grown in containers. Use a balanced liquid fertilizer diluted to half strength every 2-3 weeks during the growing season (spring and summer). Avoid over-fertilizing, as this can burn the roots. You can also use a slow-release fertilizer at planting time.
How do I harvest parsley from my indoor plant?
Harvest parsley by snipping off the outer stems near the base of the plant. This encourages new growth from the center. Avoid cutting off more than one-third of the plant at a time. Regular harvesting will keep your parsley plant bushy and productive. You can use scissors or your fingers to harvest the leaves.
Why is my indoor parsley turning yellow?
Yellowing leaves can be caused by several factors, including overwatering, underwatering, nutrient deficiencies, or pests. Check the soil moisture and adjust your watering accordingly. If the soil is consistently dry, water more frequently. If the soil is waterlogged, allow it to dry out slightly before watering again. Fertilize your parsley with a balanced fertilizer to address any nutrient deficiencies. Inspect the plant for pests, such as aphids or spider mites, and treat accordingly.
How long will my indoor parsley plant last?
Parsley is a biennial plant, meaning it typically lives for two years. However, when grown indoors, it may not flower and set seed in the second year. With proper care, your indoor parsley plant can last for several months or even a year. To prolong its life, provide adequate light, water, and nutrients, and harvest regularly.
Can I grow parsley from seed indoors?
Yes, you can easily grow parsley from seed indoors. Start seeds indoors 6-8 weeks before the last expected frost. Sow seeds about ¼ inch deep in a seed-starting mix. Keep the soil moist and warm (around 70-75°F). Germination can take up to 2-3 weeks. Once the seedlings have developed a few sets of true leaves, transplant them into individual pots.
What are some common pests that affect indoor parsley?
Common pests that can affect indoor parsley include aphids, spider mites, and whiteflies. Inspect your plants regularly for signs of infestation. If you find pests, you can try washing them off with a strong stream of water or using insecticidal soap or neem oil.
Can I dry my homegrown parsley?
Yes, you can dry your homegrown parsley to preserve it for later use. There are several ways to dry parsley, including air drying, oven drying, and using a dehydrator. To air dry parsley, tie the stems together and hang them upside down in a cool, dry, and well-ventilated place. To oven dry parsley, spread the leaves on a baking sheet and bake at a low temperature (around 170°F) for several hours, until they are completely dry. A dehydrator is the most efficient way to dry parsley, as it provides consistent heat and airflow. Once the parsley is dry, store it in an airtight container in a cool, dark place.

Leave a Comment