
Growing Peanuts at Home might sound like a whimsical dream reserved for sprawling farms, but I’m here to tell you it’s an achievable and incredibly rewarding project, even in a small garden or container! Imagine the satisfaction of harvesting your own homegrown peanuts, bursting with fresh, nutty flavor, ready to be roasted, boiled, or transformed into creamy peanut butter. Forget the store-bought stuff; this is the real deal!
Peanuts, also known as groundnuts, have a rich history, dating back thousands of years to South America. They’ve been a staple food source and a symbol of prosperity in many cultures. Today, they’re enjoyed worldwide, but the experience of nurturing your own peanut plants and witnessing the unique way they develop underground is something truly special.
Why should you try this DIY project? Well, for starters, it’s a fantastic way to connect with nature and learn about the fascinating life cycle of a plant. Plus, growing peanuts at home allows you to control the quality of your food, ensuring it’s free from harmful pesticides and additives. But more than that, it’s just plain fun! Who wouldn’t want to impress their friends and family with a homegrown peanut harvest? So, let’s dive into the secrets of successfully cultivating these delicious legumes in your own backyard!
Erdnüsse zu Hause anbauen: Dein DIY-Leitfaden für eine erfolgreiche Ernte
Hallo liebe Gartenfreunde! Habt ihr euch jemals gefragt, ob man Erdnüsse auch im eigenen Garten oder sogar im Topf anbauen kann? Die Antwort ist: Ja, absolut! Es ist ein super spannendes Projekt, das nicht nur Spaß macht, sondern euch auch mit leckeren, selbstgezogenen Erdnüssen belohnt. Ich zeige euch, wie es geht!
Was du für den Erdnussanbau brauchst
Bevor wir loslegen, hier eine Liste mit allem, was du benötigst:
* Erdnüsse: Am besten ungeröstete, unbehandelte Erdnüsse aus dem Bioladen oder Gartencenter. Geröstete Erdnüsse keimen leider nicht.
* Töpfe oder Beet: Je nachdem, ob du im Topf oder im Garten anbauen möchtest. Töpfe sollten mindestens 30 cm tief sein.
* Erde: Lockere, gut durchlässige Erde. Eine Mischung aus Gartenerde, Kompost und Sand ist ideal.
* Sonnenlicht: Erdnüsse lieben die Sonne! Wähle einen sonnigen Standort.
* Wasser: Regelmäßiges Gießen ist wichtig, besonders während der Blütezeit.
* Geduld: Erdnüsse brauchen Zeit, um zu wachsen. Sei geduldig und beobachte sie aufmerksam.
* Optional: Mulch (z.B. Stroh oder Rasenschnitt) zur Feuchtigkeitsspeicherung und Unkrautunterdrückung.
Schritt-für-Schritt-Anleitung: Erdnüsse säen und pflegen
Hier kommt die detaillierte Anleitung, damit bei deinem Erdnussanbau nichts schiefgeht:
1. Die Vorbereitung: Erdnüsse vorkeimen (optional)
Obwohl es nicht zwingend notwendig ist, empfehle ich, die Erdnüsse vorzukiemen. Das beschleunigt den Keimprozess und erhöht die Erfolgschancen.
1. Erdnüsse einweichen: Lege die Erdnüsse für 24 Stunden in lauwarmes Wasser. Das weicht die Schale auf und erleichtert das Keimen.
2. Auf Küchenpapier legen: Lege ein paar Blätter feuchtes Küchenpapier in eine flache Schale oder einen Teller.
3. Erdnüsse verteilen: Verteile die eingeweichten Erdnüsse auf dem Küchenpapier. Achte darauf, dass sie nicht zu eng liegen.
4. Mit Küchenpapier bedecken: Bedecke die Erdnüsse mit einem weiteren Blatt feuchten Küchenpapiers.
5. Warm stellen: Stelle die Schale an einen warmen Ort (z.B. auf die Heizung oder in die Nähe eines Fensters).
6. Feucht halten: Kontrolliere das Küchenpapier täglich und befeuchte es bei Bedarf mit einer Sprühflasche.
7. Warten: Nach ein paar Tagen sollten die Erdnüsse kleine Wurzeln bilden.
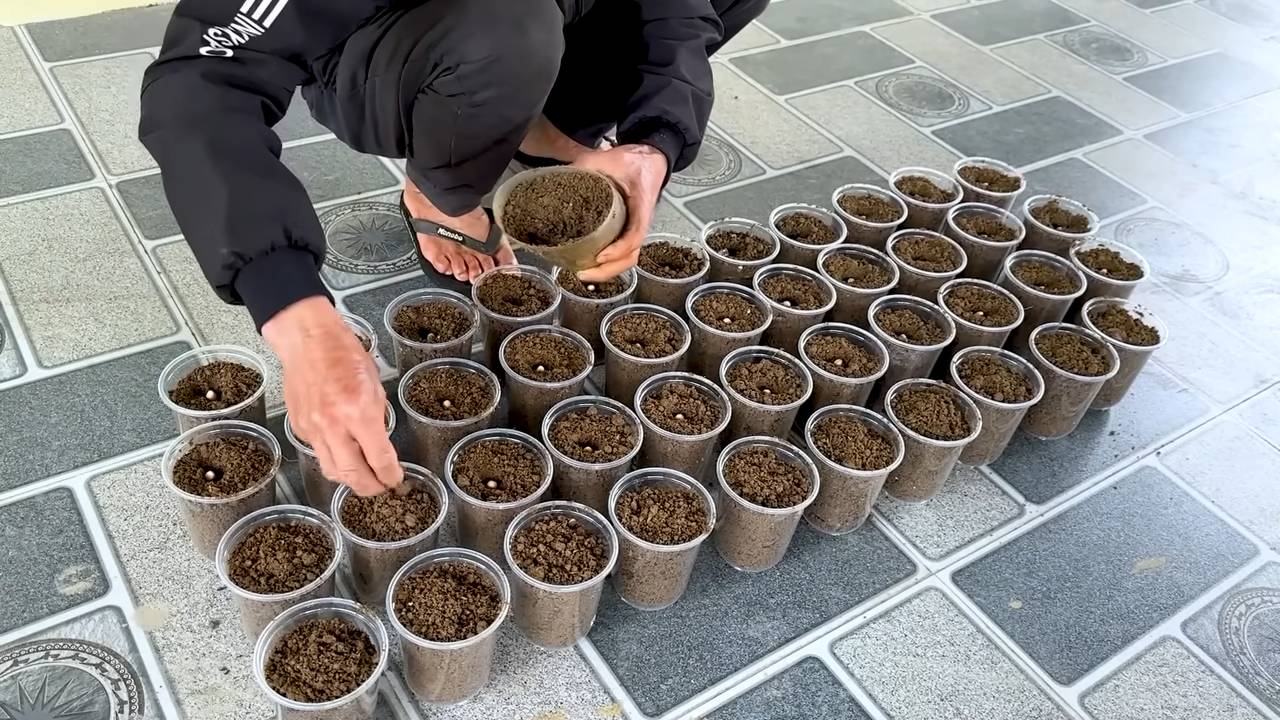
2. Aussaat: Erdnüsse in die Erde bringen
Jetzt geht es ans Eingemachte! Egal ob im Topf oder im Beet, die Aussaat ist ein wichtiger Schritt.
1. Topf oder Beet vorbereiten: Fülle den Topf oder das Beet mit der vorbereiteten Erde. Die Erde sollte locker und gut durchlässig sein.
2. Löcher graben: Grabe kleine Löcher (ca. 3-5 cm tief) im Abstand von etwa 15-20 cm.
3. Erdnüsse einsetzen: Setze in jedes Loch eine vorgekeimte oder unbehandelte Erdnuss ein. Achte darauf, dass die Wurzel nach unten zeigt (falls vorgekeimt).
4. Mit Erde bedecken: Bedecke die Erdnüsse mit Erde und drücke sie leicht an.
5. Gießen: Gieße die Erde vorsichtig an, sodass sie gut durchfeuchtet ist.
3. Pflege: Erdnüsse hegen und pflegen
Die Pflege ist entscheidend für eine reiche Ernte. Hier sind die wichtigsten Punkte:
1. Gießen: Gieße die Erdnüsse regelmäßig, besonders während der Blütezeit. Die Erde sollte immer leicht feucht sein, aber nicht nass. Vermeide Staunässe.
2. Sonnenlicht: Stelle sicher, dass die Erdnüsse ausreichend Sonnenlicht bekommen. Mindestens 6 Stunden Sonne pro Tag sind ideal.
3. Unkraut entfernen: Entferne regelmäßig Unkraut, das um die Erdnusspflanzen wächst. Unkraut konkurriert mit den Erdnüssen um Nährstoffe und Wasser.
4. Mulchen (optional): Bedecke die Erde um die Erdnusspflanzen mit Mulch (z.B. Stroh oder Rasenschnitt). Das hilft, die Feuchtigkeit im Boden zu halten und Unkraut zu unterdrücken.
5. Düngen (optional): Wenn die Erdnusspflanzen nicht gut wachsen, kannst du sie mit einem organischen Dünger düngen. Achte darauf, einen Dünger zu verwenden, der wenig Stickstoff enthält, da zu viel Stickstoff das Wachstum der Blätter fördert, aber die Erdnussproduktion beeinträchtigt.
6. Beobachten: Beobachte die Erdnusspflanzen regelmäßig auf Schädlinge oder Krankheiten. Bei Bedarf kannst du biologische Schädlingsbekämpfungsmittel einsetzen.
4. Die Blütezeit: Ein besonderes Schauspiel
Die Blütezeit der Erdnüsse ist ein faszinierendes Schauspiel. Die kleinen gelben Blüten sind nicht nur hübsch anzusehen, sondern auch entscheidend für die Erdnussproduktion.
1. Blüten beobachten: Die Erdnusspflanzen bilden kleine gelbe Blüten. Diese Blüten sind selbstbestäubend.
2. “Pegging”: Nach der Bestäubung bilden die Blüten sogenannte “Pegs”. Das sind kleine Stiele, die sich in die Erde bohren. An den Enden dieser Pegs entwickeln sich die Erdnüsse.
3. Erde anhäufeln: Wenn die Pegs in die Erde wachsen, kannst du etwas Erde um die Pflanzen anhäufeln. Das fördert die Entwicklung der Erdnüsse.
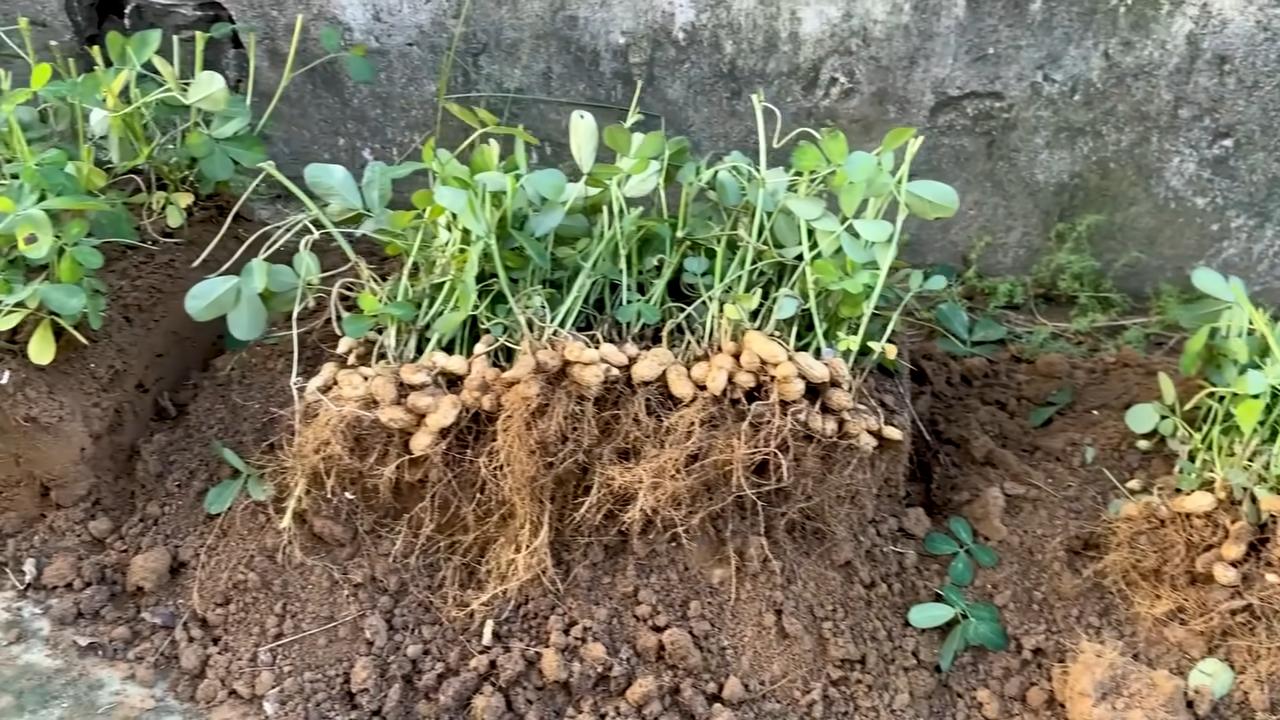
5. Die Ernte: Der Lohn der Mühe
Nach etwa 4-5 Monaten ist es endlich soweit: Die Erdnüsse sind reif und können geerntet werden.
1. Reife erkennen: Die Blätter der Erdnusspflanzen werden gelb und trocken. Das ist ein Zeichen dafür, dass die Erdnüsse reif sind.
2. Pflanzen ausgraben: Grabe die Erdnusspflanzen vorsichtig aus. Am besten geht das mit einer Grabegabel.
3. Erdnüsse ernten: Schüttle die Erde von den Erdnüssen ab und trenne sie von den Pflanzen.
4. Trocknen: Lege die Erdnüsse zum Trocknen an einen warmen, trockenen Ort. Das kann im Garten, auf dem Balkon oder im Haus sein.
5. Lagern: Lagere die getrockneten Erdnüsse an einem kühlen, trockenen Ort. So halten sie sich mehrere Monate.
Zusätzliche Tipps und Tricks für den Erdnussanbau
Hier noch ein paar zusätzliche Tipps, die dir helfen können, deinen Erdnussanbau noch erfolgreicher zu gestalten:
* Wähle die richtige Sorte: Es gibt verschiedene Erdnusssorten. Informiere dich, welche Sorte für dein Klima und deine Anbaubedingungen am besten geeignet ist.
* Boden verbessern: Erdnüsse bevorzugen lockere, gut durchlässige Erde. Verbessere den Boden vor der Aussaat mit Kompost oder Sand.
* Schädlinge bekämpfen: Achte auf Schädlinge wie Blattläuse oder Raupen. Bei Bedarf kannst du biologische Schädlingsbekämpfungsmittel einsetzen.
* Krankheiten vorbeugen: Achte auf Anzeichen von Krankheiten wie Pilzbefall. Sorge für eine gute Belüftung und vermeide Staunässe.
* Experimentiere: Probiere verschiedene Anbaumethoden aus und finde heraus, was für dich am besten funktioniert.
Häufige Fehler beim Erdnussanbau (und wie du sie vermeidest)
Damit du nicht in die typischen Fallen tappst, hier eine Liste mit häufigen Fehlern und wie du sie vermeidest:
* Falsche Erdnüsse verwenden: Verwende nur ungeröstete, unbehandelte Erdnüsse. Geröstete Erdnüsse keimen nicht.
* Zu tiefe
Conclusion
So, there you have it! Growing peanuts at home is not only achievable, but it’s also a deeply rewarding experience. From the initial wonder of planting a humble seed to the triumphant moment of harvesting your own homegrown peanuts, the journey is filled with learning, connection to nature, and the unparalleled satisfaction of enjoying the fruits (or rather, nuts!) of your labor.
Why is this DIY trick a must-try? Because it offers a unique opportunity to connect with your food source, understand the growing process, and enjoy peanuts that are fresher and potentially more flavorful than anything you can buy in a store. Imagine the bragging rights when you serve a bowl of roasted peanuts that you nurtured from seed to snack! Beyond the novelty, growing peanuts is a fantastic educational activity for children, teaching them about plant life cycles and the importance of sustainable food practices. It’s also a surprisingly low-maintenance project, requiring minimal effort once the plants are established.
But the benefits don’t stop there. By growing your own peanuts, you have complete control over the growing conditions and can avoid the use of harmful pesticides and herbicides. This means you can enjoy peanuts that are not only delicious but also healthier for you and the environment. Plus, peanut plants are nitrogen-fixing, meaning they enrich the soil as they grow, making them a valuable addition to any garden.
Ready to take your peanut growing to the next level? Consider experimenting with different peanut varieties. Virginia peanuts are known for their large size and are ideal for roasting, while Spanish peanuts are smaller and sweeter, perfect for peanut butter. Runner peanuts are commonly used in commercial peanut butter production and are a good all-around choice. You can also try growing peanuts in containers if you have limited space. Just make sure to choose a large container with good drainage.
Another variation to consider is the roasting process. While oven roasting is the most common method, you can also try roasting peanuts in a skillet or even on the grill for a smoky flavor. Experiment with different seasonings, such as salt, pepper, garlic powder, or chili powder, to create your own signature peanut blend.
We wholeheartedly encourage you to embark on this peanut-growing adventure. It’s a fun, educational, and ultimately delicious experience that you won’t regret. Don’t be afraid to get your hands dirty, embrace the challenges, and celebrate the successes. And most importantly, share your experience with us! We’d love to hear about your peanut-growing journey, see photos of your plants, and learn any tips or tricks you’ve discovered along the way. Share your stories and photos on social media using #HomegrownPeanuts and let’s create a community of peanut enthusiasts! So, get those seeds in the ground and prepare to enjoy the unparalleled taste of homegrown peanuts.
Frequently Asked Questions (FAQ)
What is the best time to plant peanuts?
The ideal time to plant peanuts is after the last frost when the soil temperature has warmed to at least 65 degrees Fahrenheit (around 18 degrees Celsius). This typically falls in late spring or early summer, depending on your climate. Planting too early in cold soil can hinder germination and lead to poor growth. Check your local weather forecasts and historical data to determine the best planting window for your region. If you’re unsure, it’s always better to err on the side of planting a little later rather than too early.
How much space do peanut plants need?
Peanut plants need adequate space to spread and develop their underground pods. A good rule of thumb is to space plants about 6-8 inches apart in rows that are 2-3 feet apart. This allows for sufficient sunlight penetration, air circulation, and room for the plants to expand. If you’re growing peanuts in containers, choose a large container that is at least 18 inches in diameter and 12 inches deep for each plant. Overcrowding can lead to stunted growth and reduced yields.
What type of soil is best for growing peanuts?
Peanuts thrive in well-drained, sandy loam soil that is rich in organic matter. The soil should be loose and friable to allow the developing pods to easily penetrate the ground. Avoid heavy clay soils, as they can become compacted and restrict pod development. Before planting, amend the soil with compost or other organic matter to improve drainage and fertility. A slightly acidic to neutral soil pH (around 6.0 to 7.0) is ideal. You can test your soil pH using a home testing kit or by sending a sample to a local agricultural extension office.
How often should I water peanut plants?
Peanut plants need consistent moisture, especially during flowering and pod development. Water deeply and regularly, aiming to keep the soil consistently moist but not waterlogged. Avoid overhead watering, as this can promote fungal diseases. Instead, water at the base of the plants using a soaker hose or drip irrigation system. The frequency of watering will depend on your climate, soil type, and rainfall. As a general guideline, water every 2-3 days during dry periods. Reduce watering as the plants mature and the pods begin to ripen.
How do I know when my peanuts are ready to harvest?
Determining the right time to harvest peanuts is crucial for optimal flavor and yield. The best indicator is the maturity of the pods. About 120-150 days after planting, dig up a few plants and check the pods. The inside of the shells should be dark brown or tan, and the kernels should be plump and well-formed. If the shells are still white or the kernels are small and underdeveloped, the peanuts are not yet ready to harvest. Another sign is yellowing of the foliage. Once most of the plants show these signs, it’s time to harvest.
What are some common pests and diseases that affect peanut plants?
Peanut plants can be susceptible to various pests and diseases, including aphids, spider mites, leaf spot, and root rot. Regularly inspect your plants for signs of infestation or disease. Aphids and spider mites can be controlled with insecticidal soap or neem oil. Leaf spot can be prevented by ensuring good air circulation and avoiding overhead watering. Root rot is often caused by poorly drained soil. To prevent root rot, ensure your soil is well-draining and avoid overwatering. Crop rotation can also help reduce the risk of soilborne diseases.
Can I grow peanuts in containers?
Yes, you can successfully grow peanuts in containers, especially if you have limited garden space. Choose a large container that is at least 18 inches in diameter and 12 inches deep. Fill the container with a well-draining potting mix that is rich in organic matter. Plant 2-3 peanut seeds per container and water regularly. Make sure the container receives at least 6-8 hours of sunlight per day. Container-grown peanuts may require more frequent watering and fertilization than those grown in the ground.
How do I cure and store my harvested peanuts?
After harvesting, peanuts need to be properly cured to develop their full flavor and prevent spoilage. Gently shake off any excess soil and allow the plants to dry in a well-ventilated area for several days. Once the plants are dry, pick the peanuts from the vines and spread them out in a single layer on a screen or tray. Allow the peanuts to air dry for 2-3 weeks, turning them occasionally to ensure even drying. Store the cured peanuts in a cool, dry place in airtight containers. Properly cured and stored peanuts can last for several months. You can also freeze peanuts for longer storage.
Can I eat the peanut leaves?
Yes, peanut leaves are edible and can be used in various culinary applications. They are a good source of protein and fiber. Young, tender leaves are best for eating raw in salads or as a garnish. Older leaves can be cooked like spinach or other leafy greens. Peanut leaves have a slightly nutty flavor that complements many dishes. However, it’s important to ensure that the leaves are free from pesticides or other contaminants before consuming them.
What are the nutritional benefits of homegrown peanuts?
Homegrown peanuts offer numerous nutritional benefits. They are an excellent source of protein, healthy fats, fiber, vitamins, and minerals. Peanuts are rich in monounsaturated fats, which are beneficial for heart health. They also contain vitamin E, magnesium, phosphorus, and potassium. The fiber in peanuts helps promote digestive health and can help regulate blood sugar levels. Eating peanuts in moderation can contribute to a healthy and balanced diet. Growing your own peanuts allows you to enjoy these nutritional benefits while also avoiding the additives and preservatives that are often found in commercially processed peanuts.
Leave a Comment