
Growing Peas at Home can feel like a distant dream if you’re picturing sprawling fields, but I’m here to tell you it’s totally achievable, even if you only have a small balcony or patio! Have you ever tasted a pea straight from the pod, still warm from the sun? The sweetness is unparalleled, a flavor you just can’t find in store-bought varieties. That’s the magic we’re chasing in this DIY guide.
Peas have a rich history, dating back thousands of years. They were a staple food in ancient civilizations, providing essential nutrients. In fact, did you know that Gregor Mendel, the father of genetics, conducted his groundbreaking experiments using pea plants? Talk about a legacy!
But beyond the historical significance, growing peas at home offers so much more. In today’s world, knowing where your food comes from is increasingly important. Plus, let’s be honest, fresh peas from the garden are just plain delicious! This DIY guide will provide you with simple, effective tricks and hacks to ensure a bountiful harvest, regardless of your gardening experience. I’ll walk you through everything from choosing the right varieties to dealing with common pests, so you can enjoy the satisfaction of nurturing your own pea patch. Get ready to experience the joy of homegrown goodness!
Growing Peas at Home: A Beginner’s Guide to Sweet Success
Okay, so you want to grow peas at home? Awesome! Peas are one of the most rewarding vegetables to grow, especially for beginners. They’re relatively easy, they don’t take up a ton of space, and the taste of fresh, homegrown peas is just unbeatable. I’m going to walk you through everything you need to know to get started, from choosing the right variety to harvesting your delicious crop.
Choosing Your Pea Variety
First things first, let’s talk about pea varieties. There are a few main types, and your choice will depend on your preferences and growing space.
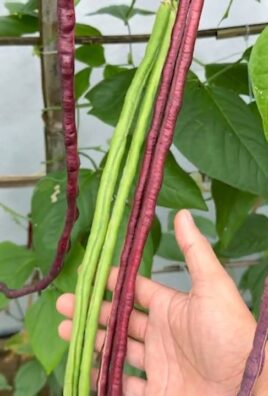
* **Shelling Peas (English Peas):** These are the classic peas you probably think of. You shell them to get the sweet, round peas inside. Popular varieties include ‘Little Marvel’ and ‘Green Arrow’.
* **Snap Peas:** These are my personal favorite! You eat the whole pod, shell and all. They’re crisp, sweet, and perfect for snacking or stir-fries. ‘Sugar Snap’ is a well-known and reliable variety.
* **Snow Peas:** Similar to snap peas, but the pods are flatter and thinner. They’re also eaten whole and are great in Asian-inspired dishes. ‘Oregon Sugar Pod’ is a popular choice.
Consider the following when choosing:
* **Days to Maturity:** This tells you how long it will take from planting to harvest. Choose varieties that fit your growing season.
* **Plant Height:** Some pea varieties are bush types, which stay relatively short, while others are vining types that can climb several feet. Vining types will need support.
* **Disease Resistance:** Look for varieties that are resistant to common pea diseases like powdery mildew.
Preparing the Soil and Planting
Peas prefer well-drained soil that’s rich in organic matter. Here’s how to get your soil ready:
* **Soil Testing:** It’s always a good idea to test your soil to see what nutrients it might be lacking. You can get a soil testing kit at most garden centers.
* **Amendments:** Based on your soil test results, amend your soil with compost, aged manure, or other organic matter. Peas like a slightly acidic to neutral pH (around 6.0 to 7.0).
* **Location, Location, Location:** Choose a spot that gets at least 6-8 hours of sunlight per day. Peas need plenty of sun to thrive.
Now for the planting!
1. **Timing is Key:** Peas are a cool-season crop, so you’ll want to plant them in early spring, as soon as the soil is workable. In warmer climates, you can also plant them in the fall for a winter harvest. I usually aim to plant mine about 4-6 weeks before the last expected frost.
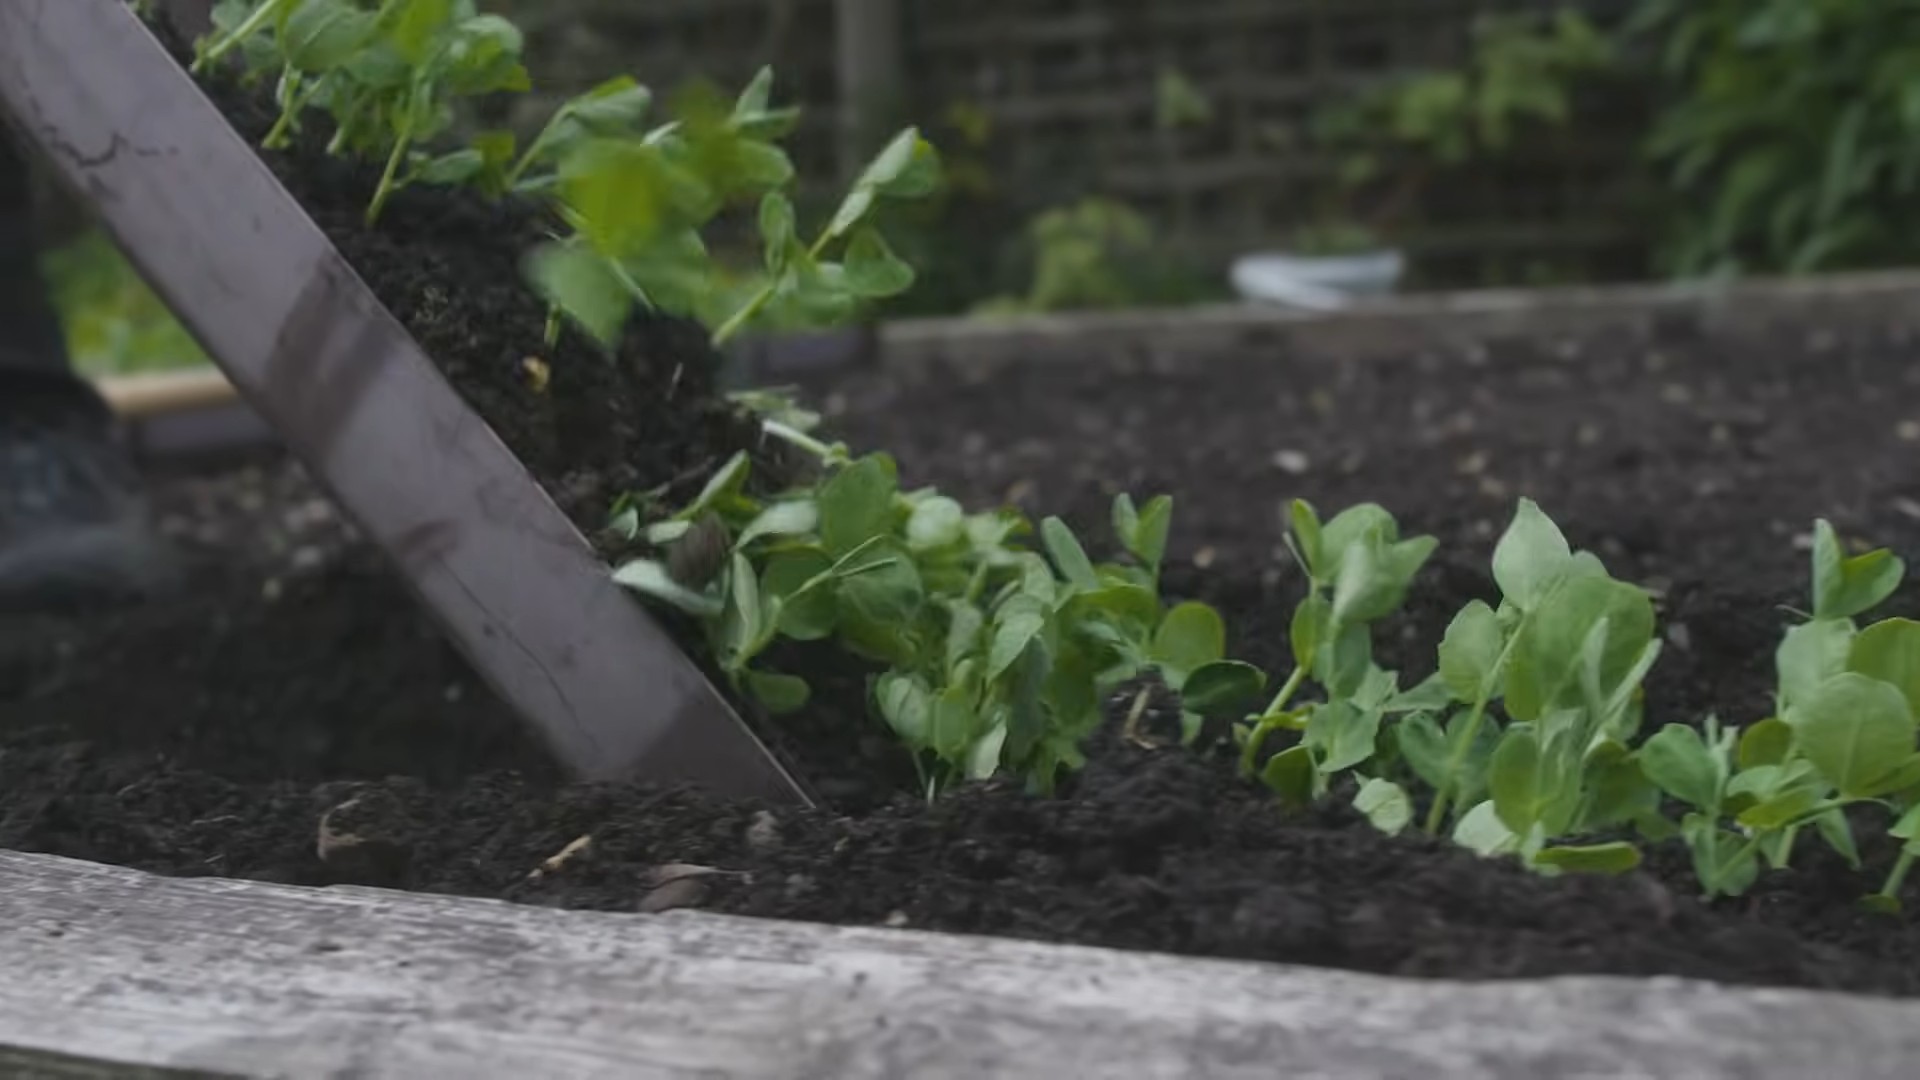
2. **Direct Sowing:** Peas are best direct-sown, meaning you plant the seeds directly into the ground. They don’t transplant well.
3. **Soaking the Seeds:** Before planting, soak the pea seeds in water for 12-24 hours. This will help them germinate faster.
4. **Planting Depth and Spacing:** Plant the seeds about 1 inch deep and 1-2 inches apart. If you’re planting in rows, space the rows about 18-24 inches apart.
5. **Watering:** After planting, water the soil gently but thoroughly. Keep the soil consistently moist until the seeds germinate.
Providing Support for Your Peas
Most pea varieties, especially vining types, need some kind of support to climb on. This helps keep the plants off the ground, improves air circulation, and makes harvesting easier.
Here are a few options for pea supports:
* **Trellises:** You can buy pre-made trellises or build your own. A simple A-frame trellis made from wood or bamboo poles works well.
* **Fences:** If you have a fence, you can train your peas to climb on it.
* **Netting:** Garden netting is a lightweight and inexpensive option. You can attach it to stakes or a frame.
* **Pea Brush:** This is a traditional method that involves using branches from trees or shrubs as support.
1. **Install Support Early:** It’s best to install your support system when you plant the seeds, so you don’t disturb the plants later.
2. **Guide the Vines:** As the pea plants grow, gently guide the vines onto the support. They’ll eventually start to climb on their own.
Caring for Your Pea Plants
Once your pea plants are established, here’s how to keep them happy and healthy:
* **Watering:** Peas need consistent moisture, especially during flowering and pod development. Water deeply whenever the top inch of soil feels dry. Avoid overhead watering, which can promote disease.
* **Weeding:** Keep the area around your pea plants free of weeds. Weeds compete for nutrients and water.
* **Fertilizing:** Peas are legumes, which means they can fix nitrogen from the air in the soil. However, they still benefit from a little fertilizer. Use a balanced fertilizer or one that’s specifically formulated for vegetables. I like to use a liquid seaweed fertilizer every few weeks.
* **Pest Control:** Peas can be susceptible to a few pests, such as aphids and pea weevils. Check your plants regularly for signs of infestation. You can usually control aphids with a strong spray of water or insecticidal soap. For pea weevils, you may need to use a pesticide.
* **Disease Prevention:** To prevent diseases, make sure your plants have good air circulation and avoid overhead watering. If you notice any signs of disease, such as powdery mildew, remove the affected leaves and treat the plants with a fungicide.
Harvesting Your Peas
This is the best part! Harvesting your peas at the right time is crucial for getting the best flavor and texture.
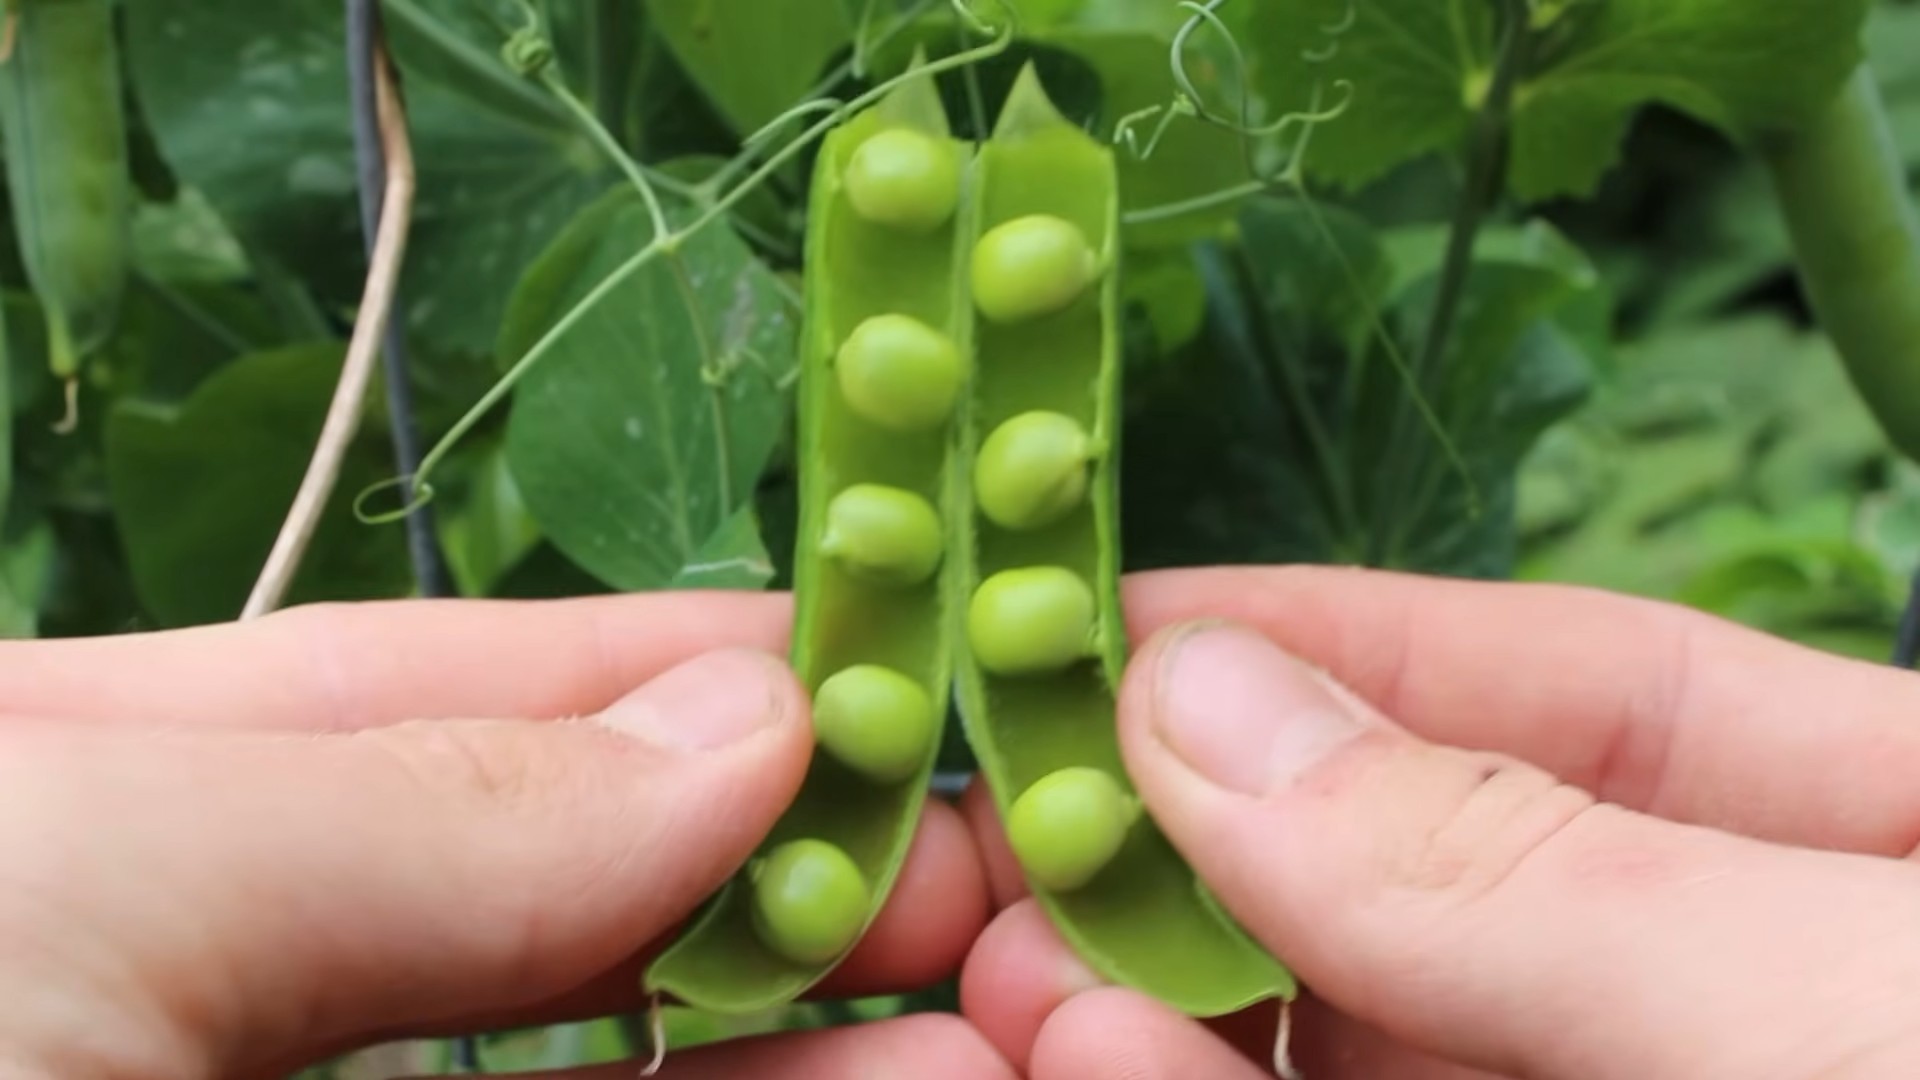
* **Shelling Peas:** Harvest when the pods are plump and full, but still tender. The peas inside should be well-formed but not too hard.
* **Snap Peas:** Harvest when the pods are plump and crisp, but before the peas inside get too large. The pods should snap easily when bent.
* **Snow Peas:** Harvest when the pods are flat and thin, before the peas inside develop. The pods should be tender and translucent.
1. **Pick Regularly:** Harvest your peas regularly, every few days, to encourage continued production.
2. **Gentle Harvesting:** Gently twist or snip the pods off the vine. Avoid pulling on the plants, which can damage them.
3. **Taste Test:** The best way to know if your peas are ready is to taste them! They should be sweet and tender.
Troubleshooting Common Pea Problems
Even with the best care, you might encounter a few problems when growing peas. Here are some common issues and how to deal with them:
* **Poor Germination:** If your pea seeds aren’t germinating, it could be due to cold soil, poor soil drainage, or old seeds. Make sure the soil is warm enough (at least 40°F) and well-drained. Use fresh seeds for best results.
* **Yellowing Leaves:** Yellowing leaves can be a sign of nutrient deficiency, overwatering, or disease. Check your soil pH and nutrient levels. Make sure the soil is well-drained and avoid overwatering.
* **Powdery Mildew:** This is a common fungal disease that causes a white, powdery coating on the leaves. Improve air circulation and treat the plants with a fungicide.
* **Aphids:** These tiny insects can suck the sap from your pea plants, causing them to weaken and yellow. Control aphids with a strong spray of water or insecticidal soap.
* **Pea Weevils:** These pests lay their eggs in the pea pods, and the larvae feed on the peas inside. Use a pesticide to control pea weevils.
Enjoying Your Homegrown Peas
Now that you’ve harvested your delicious peas, it’s time to enjoy them! Freshly picked peas are amazing eaten raw, straight from the garden. You can also use them in a variety of dishes, such as:
* **Salads:** Add peas to salads for a burst of sweetness and freshness.
* **Soups:** Peas are a classic ingredient in pea soup.
* **Stir-fries:** Snap peas and snow peas are perfect for stir-fries.
* **Pasta Dishes:** Toss peas with pasta, butter, and Parmesan cheese for a simple and delicious meal.
* **Side Dishes:** Steam or sauté peas and serve them as a side dish.
You can also freeze your peas to enjoy them later. Simply blanch them in boiling water for a few minutes, then cool them in ice water. Drain well and freeze in freezer bags or containers.
Growing peas at home is a rewarding experience that anyone can enjoy. With a little planning and care, you can have a bountiful harvest of sweet, delicious peas. Happy gardening!
Conclusion
So, there you have it! Growing peas at home, especially with this simple DIY trick, is not just a rewarding experience; it’s a gateway to fresher, sweeter, and more flavorful peas than you’ll ever find at the grocery store. Forget those bland, often starchy peas that have traveled miles – imagine popping open a pod warm from the sun and enjoying the burst of natural sweetness. This isn’t just about gardening; it’s about connecting with your food source and enjoying the fruits (or rather, vegetables!) of your labor.
This DIY method, focusing on [mention the specific DIY trick from the main article, e.g., “using recycled toilet paper rolls as starter pots”], offers several key advantages. It minimizes root disturbance during transplanting, leading to healthier, more vigorous plants. It’s also incredibly cost-effective and environmentally friendly, repurposing materials that would otherwise end up in the trash. Plus, it’s a fantastic project for getting kids involved in gardening, teaching them about sustainability and the wonders of nature.
But don’t stop there! Feel free to experiment with different pea varieties. Consider trying snow peas for their edible pods, snap peas for their plump, juicy sweetness, or classic garden peas for shelling. You can also adjust the DIY trick to suit your specific needs and resources. Perhaps you’ll find that using egg cartons works even better for you, or maybe you’ll discover a unique way to support your pea vines as they climb. The possibilities are endless!
Growing peas at home is an incredibly satisfying endeavor, and this DIY trick makes it even more accessible and enjoyable. We wholeheartedly encourage you to give it a try. Plant a few seeds, nurture your seedlings, and watch as your garden transforms into a pea-producing paradise.
And most importantly, we want to hear about your experience! Share your photos, tips, and stories in the comments below. Let us know what worked for you, what challenges you faced, and any variations you tried. Together, we can create a community of pea-growing enthusiasts and learn from each other’s successes. Happy gardening!
Frequently Asked Questions (FAQs)
What is the best time to plant peas?
Peas are a cool-season crop, meaning they thrive in cooler temperatures. The best time to plant peas is typically in early spring, as soon as the soil is workable. In many regions, this is around February or March. You can also plant a fall crop of peas in late summer or early fall, about 6-8 weeks before the first expected frost. Check your local climate and frost dates to determine the optimal planting time for your area.
What kind of soil do peas need?
Peas prefer well-drained soil that is rich in organic matter. The ideal soil pH is between 6.0 and 7.5. Before planting, amend your soil with compost or well-rotted manure to improve its fertility and drainage. Avoid soils that are heavy clay or prone to waterlogging, as this can lead to root rot.
How much sunlight do peas need?
Peas need at least 6-8 hours of sunlight per day to thrive. Choose a planting location that receives full sun for the majority of the day. If you live in a particularly hot climate, some afternoon shade may be beneficial to prevent the plants from overheating.
How often should I water my pea plants?
Peas need consistent moisture to grow well. Water your pea plants regularly, especially during dry periods. Aim to keep the soil consistently moist but not waterlogged. A good rule of thumb is to water deeply once or twice a week, depending on the weather conditions. Mulching around the plants can help to retain moisture in the soil.
Do peas need support to grow?
Yes, most pea varieties are vining and need support to climb. Provide a trellis, fence, or other support structure for your pea plants to grow on. This will help to keep the plants off the ground, improve air circulation, and make harvesting easier. You can use a variety of materials for support, such as bamboo stakes, chicken wire, or netting.
What are some common pests and diseases that affect peas?
Some common pests that can affect peas include aphids, pea weevils, and slugs. Diseases that can affect peas include powdery mildew, root rot, and fusarium wilt. To prevent pests and diseases, practice good garden hygiene, such as removing plant debris and weeds. You can also use organic pest control methods, such as insecticidal soap or neem oil. Choose disease-resistant pea varieties whenever possible.
How do I know when my peas are ready to harvest?
The timing of harvest depends on the type of pea you are growing. Snow peas are ready to harvest when the pods are flat and the peas inside are just beginning to develop. Snap peas are ready to harvest when the pods are plump and the peas inside are fully formed but still tender. Garden peas are ready to harvest when the pods are plump and the peas inside are large and sweet. Harvest your peas regularly to encourage continued production.
Can I grow peas in containers?
Yes, you can grow peas in containers, especially bush varieties that don’t require as much support. Choose a large container with good drainage and fill it with a well-draining potting mix. Provide a small trellis or support structure for the plants to climb on. Water and fertilize your container-grown peas regularly.
What are the benefits of growing peas at home?
Growing peas at home offers several benefits, including:
* Fresher, sweeter, and more flavorful peas
* Reduced reliance on store-bought produce
* A fun and rewarding gardening experience
* A sustainable way to grow your own food
* An opportunity to connect with nature
How can I improve my pea harvest?
To improve your pea harvest, consider the following tips:
* Choose the right pea variety for your climate
* Plant your peas at the optimal time
* Prepare your soil properly
* Provide adequate sunlight and water
* Support your pea plants with a trellis or fence
* Protect your plants from pests and diseases
* Harvest your peas regularly
Can I save pea seeds for next year?
Yes, you can save pea seeds for next year. Allow some of your pea pods to dry completely on the vine. Once the pods are dry and brittle, shell the peas and store them in an airtight container in a cool, dry place. Label the container with the pea variety and the date.
Leave a Comment