
Growing potatoes in styrofoam might sound a little unconventional, but trust me, it’s a game-changer for home gardeners! Forget back-breaking digging and endless weeding; this DIY method offers a surprisingly easy and efficient way to harvest a bountiful crop of spuds right in your backyard (or even on your balcony!).
The concept of container gardening, in general, has been around for centuries, with roots tracing back to ancient civilizations who used pots and raised beds to cultivate food in limited spaces. But the modern twist of using styrofoam adds a layer of insulation and drainage that’s particularly beneficial for potatoes.
Why should you try this? Well, let’s be honest, traditional potato farming can be tough! It requires a lot of space, specific soil conditions, and a whole lot of effort. But with this simple DIY trick, growing potatoes in styrofoam eliminates many of those challenges. You’ll have better control over the growing environment, minimize pests and diseases, and enjoy a much easier harvest. Plus, it’s a fantastic way to recycle those styrofoam boxes that often end up in landfills. So, are you ready to ditch the digging and embrace a smarter way to grow your own delicious potatoes? Let’s get started!
Kartoffeln im Styroporbehälter anbauen: Eine einfache DIY-Anleitung
Hallo liebe Gartenfreunde! Habt ihr Lust, eure eigenen Kartoffeln anzubauen, aber wenig Platz? Dann ist diese DIY-Anleitung genau das Richtige für euch! Wir zeigen euch, wie ihr Kartoffeln in einem Styroporbehälter anbauen könnt – eine super einfache und platzsparende Methode. Ich habe das selbst ausprobiert und war begeistert vom Ergebnis!
Was ihr braucht:
* Ein großer Styroporbehälter (mindestens 50 Liter Volumen, idealerweise mit Löchern im Boden für die Drainage)
* Saatkartoffeln (am besten Bio-Qualität)
* Hochwertige Pflanzerde
* Kompost (optional, aber empfehlenswert)
* Gießkanne
* Messer oder Bohrer (falls der Behälter keine Löcher hat)
* Mulchmaterial (z.B. Stroh, Heu oder Rasenschnitt)
Warum Styropor?
Styroporbehälter haben einige Vorteile für den Kartoffelanbau:
* Isolierung: Styropor isoliert gut, was die Temperatur im Behälter stabil hält. Das ist besonders wichtig bei Temperaturschwankungen im Frühjahr und Herbst.
* Leichtgewicht: Auch wenn der Behälter mit Erde gefüllt ist, lässt er sich noch relativ leicht bewegen.
* Drainage: Styropor lässt sich leicht durchlöchern, um eine gute Drainage zu gewährleisten.
* Wiederverwendung: Viele Styroporbehälter werden weggeworfen. Hier habt ihr eine tolle Möglichkeit zur Wiederverwendung!
Schritt-für-Schritt-Anleitung:
1. Vorbereitung des Behälters
1. Reinigung: Zuerst solltet ihr den Styroporbehälter gründlich reinigen. Entfernt alle Etiketten und Rückstände.
2. Drainagelöcher: Überprüft, ob der Behälter bereits Drainagelöcher im Boden hat. Wenn nicht, bohrt oder schneidet ihr mit einem Messer mehrere Löcher (ca. 1 cm Durchmesser) in den Boden. Diese sind wichtig, damit überschüssiges Wasser ablaufen kann und die Kartoffeln nicht faulen. Ich habe etwa 6-8 Löcher in meinen Behälter gemacht.
3. Standortwahl: Sucht einen sonnigen Standort für euren Kartoffelbehälter. Kartoffeln brauchen mindestens 6 Stunden Sonne pro Tag, um gut zu wachsen.
2. Vorbereitung der Saatkartoffeln
1. Vorkeimen (optional): Um den Wachstumsprozess zu beschleunigen, könnt ihr die Saatkartoffeln vorkeimen lassen. Legt sie dazu etwa 2-3 Wochen vor dem Pflanzen an einen hellen, kühlen Ort (z.B. Kellerfenster). Die Kartoffeln sollten kleine, grüne Triebe bilden. Das Vorkeimen ist kein Muss, aber es kann den Ernteertrag erhöhen.
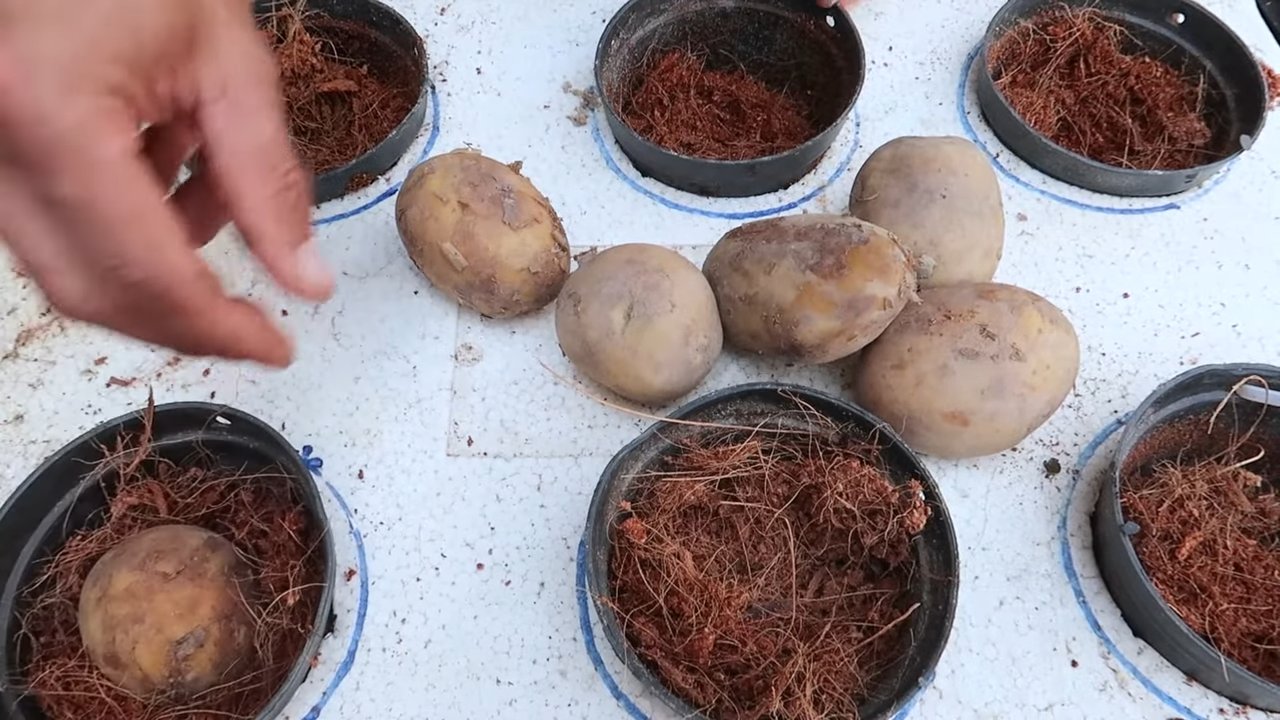
2. Schneiden (optional): Große Saatkartoffeln können in mehrere Stücke geschnitten werden. Achtet darauf, dass jedes Stück mindestens 2-3 “Augen” (Triebe) hat. Lasst die Schnittflächen vor dem Pflanzen ein paar Tage antrocknen, um Fäulnis zu vermeiden. Kleine Saatkartoffeln können im Ganzen gepflanzt werden.
3. Das Pflanzen der Kartoffeln
1. Erste Erdschicht: Füllt den Styroporbehälter mit einer etwa 15-20 cm hohen Schicht Pflanzerde. Mischt die Erde am besten mit etwas Kompost, um die Nährstoffversorgung der Kartoffeln zu verbessern.
2. Kartoffeln legen: Legt die Saatkartoffeln mit den Trieben nach oben auf die Erdschicht. Achtet darauf, dass die Kartoffeln genügend Abstand zueinander haben (ca. 20-25 cm). Bei einem großen Behälter könnt ihr mehrere Kartoffeln pflanzen.
3. Zweite Erdschicht: Bedeckt die Kartoffeln mit einer weiteren Schicht Erde (ca. 10 cm). Drückt die Erde leicht an.
4. Angießen: Gießt die Erde vorsichtig an, sodass sie gut durchfeuchtet ist. Vermeidet Staunässe.
4. Anhäufeln und Pflege
1. Anhäufeln: Sobald die Kartoffelpflanzen etwa 20 cm hoch gewachsen sind, müsst ihr sie anhäufeln. Das bedeutet, dass ihr die Pflanzen mit Erde bedeckt, sodass nur noch die obersten Blätter herausschauen. Das Anhäufeln fördert die Bildung von neuen Kartoffeln an den Stängeln.
2. Wiederholen: Wiederholt das Anhäufeln alle paar Wochen, sobald die Pflanzen wieder ein Stück gewachsen sind. Füllt den Behälter nach und nach mit Erde auf, bis er fast voll ist.
3. Gießen: Gießt die Kartoffelpflanzen regelmäßig, besonders während trockener Perioden. Die Erde sollte immer leicht feucht sein, aber nicht nass.
4. Düngen (optional): Wenn ihr möchtet, könnt ihr die Kartoffelpflanzen während der Wachstumsphase mit einem organischen Dünger düngen. Achtet darauf, dass der Dünger für Kartoffeln geeignet ist.
5. Mulchen: Eine Mulchschicht aus Stroh, Heu oder Rasenschnitt hilft, die Feuchtigkeit im Boden zu halten und Unkraut zu unterdrücken.
5. Schutz vor Schädlingen und Krankheiten
1. Kartoffelkäfer: Kartoffelkäfer sind die häufigsten Schädlinge an Kartoffelpflanzen. Sammelt die Käfer und ihre Larven regelmäßig ab. Ihr könnt auch biologische Schädlingsbekämpfungsmittel einsetzen.
2. Kraut- und Braunfäule: Kraut- und Braunfäule ist eine Pilzkrankheit, die besonders bei feuchtem Wetter auftritt. Achtet auf braune Flecken auf den Blättern und Stängeln. Entfernt befallene Pflanzenteile sofort und entsorgt sie im Hausmüll (nicht auf dem Kompost). Ihr könnt auch vorbeugend mit einem biologischen Fungizid behandeln.
3. Vorbeugung: Eine gute Belüftung der Pflanzen und ein sonniger Standort helfen, Krankheiten vorzubeugen.
6. Die Ernte
1. Erntezeitpunkt: Die Kartoffeln sind erntereif, wenn die Blätter der Pflanzen gelb werden und absterben. Das ist in der Regel etwa 3-4 Monate nach dem Pflanzen der Fall.
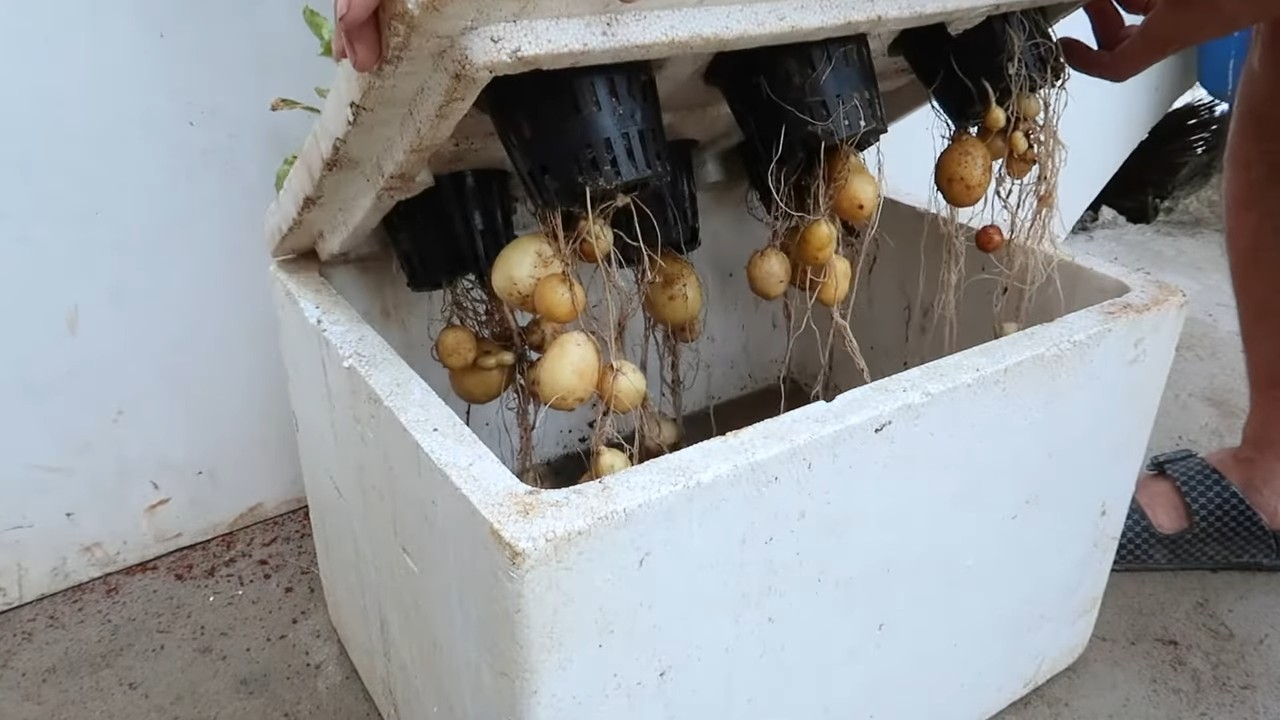
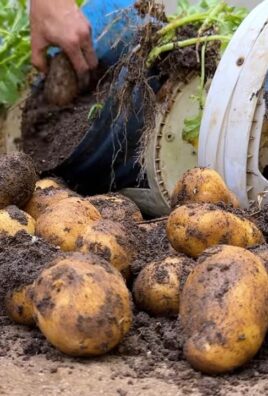
2. Ernten: Gießt die Erde vor der Ernte noch einmal gut an. Kippt den Styroporbehälter vorsichtig um und sammelt die Kartoffeln aus der Erde. Ihr könnt die Kartoffeln auch vorsichtig mit einer Grabegabel aus der Erde holen.
3. Lagerung: Lagert die Kartoffeln an einem kühlen, dunklen und trockenen Ort. Ideal ist ein Keller oder eine Speisekammer. Beschädigte Kartoffeln solltet ihr aussortieren und sofort verbrauchen.
Zusätzliche Tipps und Tricks:
* Sortenwahl: Wählt Kartoffelsorten, die für den Anbau im Behälter geeignet sind. Frühkartoffeln sind oft eine gute Wahl, da sie schneller reifen.
* Mehrere Behälter: Wenn ihr mehr Kartoffeln ernten möchtet, könnt ihr mehrere Styroporbehälter bepflanzen.
* Nachhaltigkeit: Verwendet am besten Bio-Saatkartoffeln und organische Dünger, um die Umwelt zu schonen.
* Kreativität: Bemalt den Styroporbehälter mit bunten Farben oder Mustern, um ihn optisch aufzuwerten.
Ich hoffe, diese Anleitung hilft euch dabei, eure eigenen Kartoffeln im Styroporbehälter anzubauen. Es ist wirklich eine tolle Möglichkeit, auch auf kleinem Raum frische Kartoffeln zu ernten. Viel Spaß beim Gärtnern! Und vergesst nicht, mir von euren Erfahrungen zu berichten! Ich bin gespannt auf eure Ergebnisse!
Conclusion
So, there you have it! Growing potatoes in styrofoam containers isn’t just a quirky gardening experiment; it’s a game-changer for anyone looking to maximize their yield, minimize space, and enjoy the unparalleled satisfaction of harvesting their own homegrown spuds. This method offers a unique blend of convenience and control, allowing you to nurture your potato plants in a way that traditional in-ground gardening simply can’t match.
Why is this DIY trick a must-try? Because it addresses several common gardening challenges head-on. Limited space? Styrofoam containers are your answer. Worried about soil quality? You have complete control over the growing medium. Battling pests and diseases? The contained environment makes management significantly easier. And let’s not forget the sheer joy of “harvesting” by simply tipping over the container and unearthing a treasure trove of fresh, delicious potatoes.
But the beauty of this method lies in its adaptability. Feel free to experiment with different potato varieties. Russets, Yukon Golds, fingerlings – each will thrive in its own way within the styrofoam confines. Consider adding companion plants like marigolds or basil to deter pests and enhance the overall health of your potato patch. You can also adjust the size of your styrofoam containers to suit your available space and desired yield. Smaller containers are perfect for balconies or patios, while larger ones can accommodate more plants and produce a more substantial harvest.
Don’t be afraid to get creative with your growing medium, too. While a standard mix of potting soil, compost, and perlite works wonders, you can tailor it to your specific needs and preferences. Adding bone meal can provide an extra boost of phosphorus for robust root development, while incorporating worm castings can enrich the soil with beneficial microbes and nutrients.
We wholeheartedly encourage you to give this DIY potato-growing method a try. It’s a rewarding experience that will connect you with nature, provide you with fresh, healthy food, and impress your friends and neighbors with your gardening prowess. Remember to document your journey, take photos of your progress, and share your experiences with the gardening community. Your insights and tips could inspire others to embark on their own potato-growing adventures.
And most importantly, don’t be discouraged if your first attempt isn’t perfect. Gardening is a learning process, and every mistake is an opportunity to grow (pun intended!). So, grab some styrofoam containers, gather your seed potatoes, and get ready to experience the magic of growing potatoes in styrofoam. You’ll be amazed at what you can achieve!
Now, let’s dive into some frequently asked questions to address any lingering concerns and provide you with even more confidence to tackle this exciting project.
Frequently Asked Questions (FAQ)
What kind of styrofoam container should I use?
Ideally, you want to use large, sturdy styrofoam containers that are at least 18 inches deep and 18 inches in diameter. The thicker the styrofoam, the better, as it will provide better insulation for the roots and be more durable over time. You can often find these containers at garden centers, nurseries, or even construction sites (ask if they have any discarded ones). Make sure the containers are clean and free of any harmful chemicals before using them. Avoid using containers that have been used to store toxic materials.
How many seed potatoes can I plant in one container?
This depends on the size of your container and the variety of potato you’re growing. As a general rule, you can plant 2-3 seed potatoes in a container that’s 18 inches in diameter. If you’re growing larger varieties like Russets, you might want to stick to just one or two plants per container to give them enough room to develop. Smaller varieties like fingerlings can be planted closer together.
What kind of soil should I use?
A well-draining potting mix is essential for growing potatoes in styrofoam containers. A good mix would consist of equal parts potting soil, compost, and perlite. The potting soil provides a base for the plants to grow in, the compost adds nutrients and improves drainage, and the perlite helps to aerate the soil and prevent it from becoming compacted. You can also add other amendments like bone meal or worm castings to further enrich the soil.
How often should I water my potato plants?
Water your potato plants regularly, especially during hot, dry weather. The soil should be kept consistently moist, but not waterlogged. Check the soil moisture by sticking your finger into the soil about an inch deep. If it feels dry, it’s time to water. Avoid overwatering, as this can lead to root rot.
How much sunlight do potato plants need?
Potato plants need at least 6-8 hours of sunlight per day to thrive. Choose a location that receives plenty of direct sunlight. If you’re growing your potatoes indoors, you may need to supplement with grow lights.
How do I “hill” the potatoes in a styrofoam container?
“Hilling” is the process of adding more soil around the stems of the potato plants as they grow. This encourages the plants to produce more potatoes along the buried stems. To hill your potatoes in a styrofoam container, simply add more soil to the container as the plants grow, burying the lower portion of the stems. You can do this every few weeks, or whenever the stems start to become exposed.
When do I harvest my potatoes?
You can start harvesting “new” potatoes (small, immature potatoes) about 2-3 weeks after the plants flower. To harvest new potatoes, simply reach into the container and carefully pull out a few potatoes. For mature potatoes, wait until the plants have died back and the foliage has turned yellow or brown. This usually takes about 80-100 days. Once the foliage has died back, stop watering the plants and let the soil dry out for a few days before harvesting. To harvest, simply tip over the container and carefully dig through the soil to find the potatoes.
Can I reuse the soil from my styrofoam containers?
Yes, you can reuse the soil from your styrofoam containers, but it’s important to amend it with fresh compost and nutrients before planting again. Over time, the soil will become depleted of nutrients, so adding compost will help to replenish them. You can also add other amendments like bone meal or worm castings to further enrich the soil.
What are some common pests and diseases that affect potato plants?
Some common pests that affect potato plants include aphids, potato beetles, and flea beetles. Common diseases include early blight, late blight, and potato scab. You can prevent these pests and diseases by practicing good gardening hygiene, such as removing weeds and debris from around the plants, and by using organic pest control methods like insecticidal soap or neem oil.
Can I grow potatoes in styrofoam in cold climates?
Yes, growing potatoes in styrofoam containers can actually be advantageous in colder climates. The styrofoam provides insulation for the roots, which can help to protect them from frost and cold temperatures. You can also move the containers indoors or to a sheltered location during periods of extreme cold.
Leave a Comment