
Growing pumpkins in soil bags might sound unconventional, but trust me, it’s a game-changer for any gardener, especially if you’re short on space or dealing with less-than-ideal soil conditions! Have you ever dreamed of carving your own homegrown jack-o’-lantern but thought you didn’t have the room? Well, dream no more! This DIY trick unlocks the possibility of pumpkin patch glory, even on a small balcony or patio.
Pumpkins, with their vibrant orange hues and association with autumn harvests, have a rich history. From their origins in Central America thousands of years ago to their integral role in modern-day Halloween celebrations, pumpkins have always held a special place in our hearts and cultures. But traditionally, growing these giants required sprawling gardens and lots of space.
That’s where this DIY hack comes in! Many of us struggle with poor soil quality, limited garden space, or simply the desire for a more contained and manageable growing environment. Growing pumpkins in soil bags offers a simple, effective solution to these challenges. I’m going to show you how to create the perfect pumpkin-growing environment, right in a bag! Get ready to impress your neighbors with your impressive pumpkin harvest – all thanks to this easy and rewarding DIY project.
Kürbisse im Pflanzsack ziehen: Eine einfache DIY-Anleitung
Hallo liebe Gartenfreunde! Habt ihr wenig Platz, aber trotzdem Lust auf eine reiche Kürbisernte? Dann habe ich genau das Richtige für euch: Kürbisse im Pflanzsack ziehen! Es ist einfacher als ihr denkt und eine tolle Möglichkeit, auch auf Balkonen, Terrassen oder kleinen Gärten leckere Kürbisse anzubauen. Ich zeige euch, wie es geht!
Was ihr für den Kürbisanbau im Pflanzsack braucht:
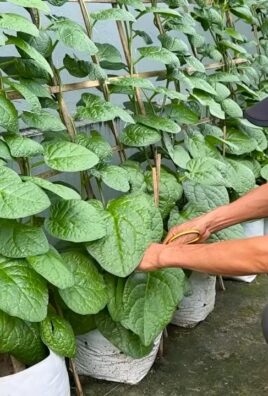
* Pflanzsäcke: Am besten eignen sich große, stabile Pflanzsäcke mit einem Volumen von mindestens 75 Litern. Je größer, desto besser, denn Kürbisse sind Starkzehrer und brauchen viel Platz für ihre Wurzeln. Ihr könnt gekaufte Pflanzsäcke verwenden oder sie aus alten Jutesäcken, stabilen Müllsäcken (mit Löchern für den Wasserabzug!) oder sogar alten Einkaufstüten (mehrlagig!) selber machen.
* Kürbissamen: Wählt eine Kürbissorte, die für den Anbau im Kübel geeignet ist. Kleinere Sorten wie Zierkürbisse, Hokkaido oder Butternut sind ideal. Riesenkürbisse sind zwar beeindruckend, aber brauchen sehr viel Platz und Nährstoffe.
* Erde: Eine hochwertige, nährstoffreiche Blumenerde ist die Basis für eine erfolgreiche Kürbisernte. Ihr könnt auch Kompost oder Gartenerde untermischen, um die Erde noch weiter aufzuwerten.
* Kompost oder organischer Dünger: Kürbisse sind hungrig! Kompost oder organischer Dünger versorgen sie mit den nötigen Nährstoffen.
* Gießkanne oder Gartenschlauch: Regelmäßiges Gießen ist wichtig, besonders an heißen Tagen.
* Mulchmaterial: Mulch (z.B. Stroh, Holzhackschnitzel oder Rasenschnitt) hilft, die Feuchtigkeit im Boden zu halten und Unkraut zu unterdrücken.
* Pflanzstäbe oder Rankhilfe: Je nach Kürbissorte kann eine Rankhilfe sinnvoll sein, um die Triebe zu stützen.
* Schere oder Messer: Zum Ausdünnen der Triebe und Entfernen von beschädigten Blättern.
* Geduld und Liebe: Das Wichtigste!
Schritt-für-Schritt-Anleitung: Kürbisse im Pflanzsack pflanzen
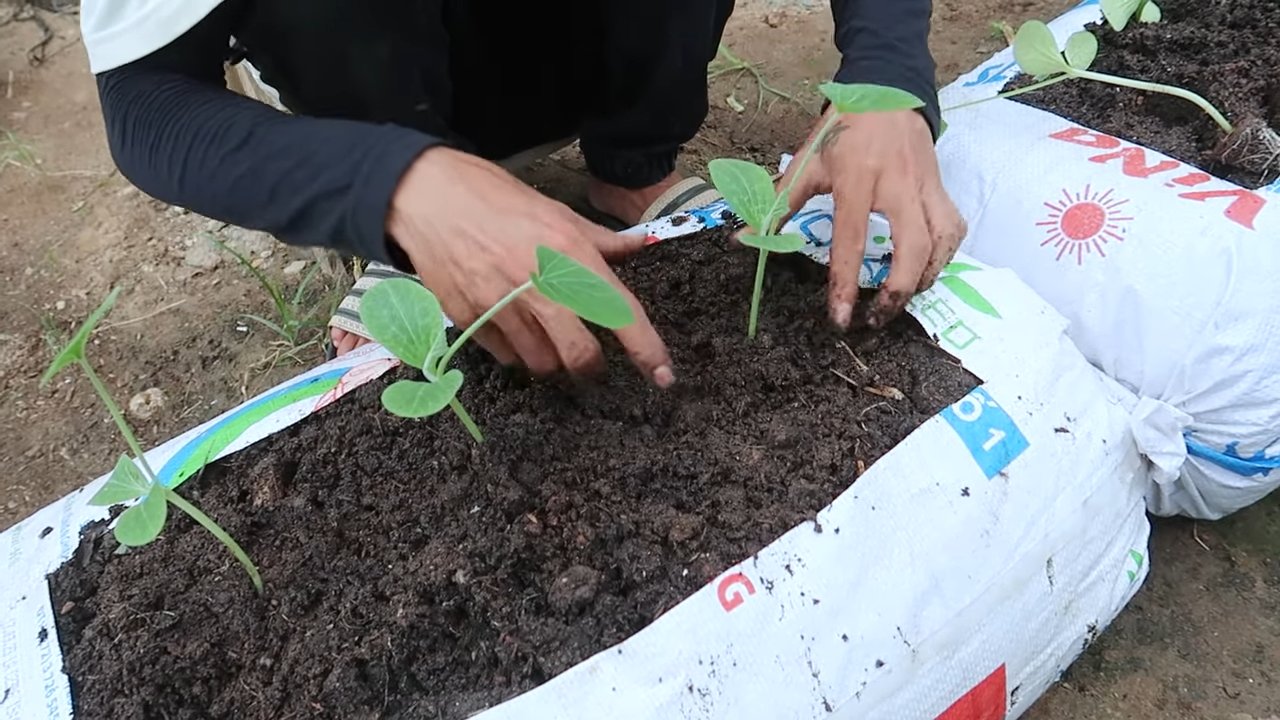
1. Pflanzsäcke vorbereiten: Füllt die Pflanzsäcke zu etwa zwei Dritteln mit Erde. Achtet darauf, dass die Erde locker und luftig ist. Wenn ihr alte Säcke verwendet, vergesst nicht, Löcher für den Wasserabzug zu machen.
2. Dünger hinzufügen: Mischt Kompost oder organischen Dünger unter die Erde. Die Menge richtet sich nach den Angaben auf der Verpackung des Düngers.
3. Samen aussäen: Drückt die Samen etwa 2-3 cm tief in die Erde. Pro Pflanzsack reichen 2-3 Samen. Wenn alle Samen keimen, könnt ihr später die schwächsten Pflanzen entfernen.
4. Angießen: Gießt die Erde vorsichtig an, sodass sie gut durchfeuchtet ist. Vermeidet Staunässe.
5. Standort wählen: Stellt die Pflanzsäcke an einen sonnigen und warmen Standort. Kürbisse lieben die Sonne!
6. Warten und pflegen: Jetzt heißt es warten und pflegen! Haltet die Erde feucht, aber nicht nass. Düngt die Pflanzen regelmäßig mit Kompost oder organischem Dünger.
Pflege der Kürbispflanzen im Pflanzsack
* Gießen: Kürbisse brauchen viel Wasser, besonders während der Blütezeit und Fruchtbildung. Gießt am besten morgens oder abends, um Verdunstung zu vermeiden. Achtet darauf, dass das Wasser direkt an die Wurzeln gelangt und nicht über die Blätter.
* Düngen: Düngt die Kürbispflanzen alle 2-3 Wochen mit Kompost oder organischem Dünger. Ihr könnt auch einen Flüssigdünger verwenden, der speziell für Kürbisse geeignet ist.
* Ausdünnen: Wenn mehrere Kürbisse an einer Pflanze wachsen, solltet ihr einige entfernen, damit die verbleibenden Früchte genügend Energie zum Wachsen haben. Lasst pro Pflanze maximal 2-3 Kürbisse reifen.
* Rankhilfe: Je nach Kürbissorte kann eine Rankhilfe sinnvoll sein, um die Triebe zu stützen. So vermeidet ihr, dass die Triebe abbrechen oder die Früchte auf dem Boden liegen.
* Mulchen: Mulch hilft, die Feuchtigkeit im Boden zu halten und Unkraut zu unterdrücken. Verteilt eine Schicht Stroh, Holzhackschnitzel oder Rasenschnitt um die Pflanzen.
* Schutz vor Schädlingen und Krankheiten: Achtet auf Schädlinge wie Schnecken, Blattläuse oder Mehltau. Bei Bedarf könnt ihr biologische Schädlingsbekämpfungsmittel einsetzen.
Spezielle Tipps für den Anbau im Pflanzsack
* Drainage: Achtet darauf, dass die Pflanzsäcke eine gute Drainage haben, damit sich kein Wasser staut.
* Stabilität: Große Kürbisse können die Pflanzsäcke zum Umkippen bringen. Stellt die Säcke an einen windgeschützten Ort oder befestigt sie an einer Wand oder einem Zaun.
* Bodenverbesserung: Mischt der Erde etwas Bentonit oder Zeolith bei. Diese Mineralien speichern Wasser und Nährstoffe und geben sie bei Bedarf an die Pflanzen ab.
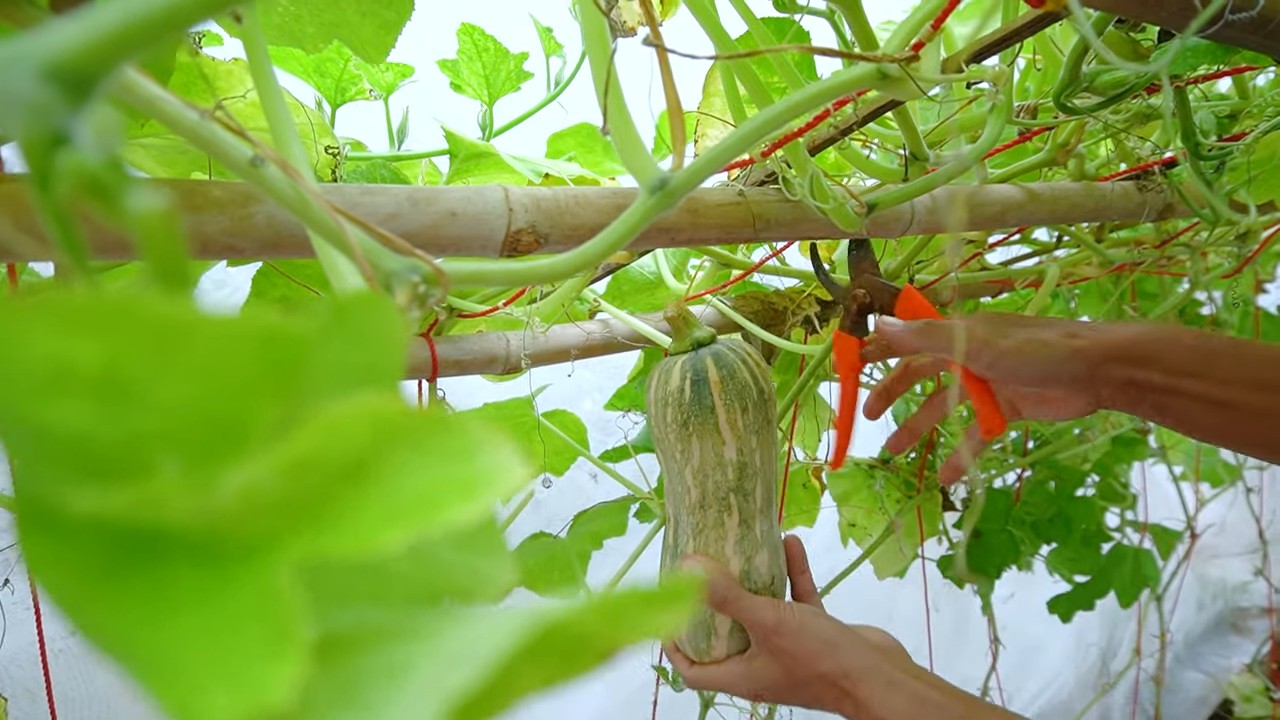
* Bestäubung: Kürbisse sind auf die Bestäubung durch Bienen und andere Insekten angewiesen. Wenn ihr wenig Insekten in eurem Garten habt, könnt ihr die Blüten auch von Hand bestäuben. Nehmt dazu einen Pinsel und übertragt den Pollen von den männlichen auf die weiblichen Blüten. Die weiblichen Blüten erkennt man an dem kleinen Fruchtansatz unterhalb der Blüte.
* Erntezeitpunkt: Der Erntezeitpunkt hängt von der Kürbissorte ab. Reife Kürbisse erkennt man daran, dass die Schale hart ist und der Stiel trocken und holzig. Klopft auf den Kürbis: Wenn er hohl klingt, ist er reif.
Häufige Probleme und Lösungen
* Gelbe Blätter: Gelbe Blätter können ein Zeichen für Nährstoffmangel sein. Düngt die Pflanzen mit einem geeigneten Dünger.
* Mehltau: Mehltau ist eine Pilzkrankheit, die sich durch einen weißen Belag auf den Blättern äußert. Entfernt befallene Blätter und behandelt die Pflanzen mit einem Fungizid.
* Schnecken: Schnecken können große Schäden an den Kürbispflanzen verursachen. Sammelt die Schnecken ab oder verwendet Schneckenkorn.
* Blattläuse: Blattläuse saugen den Pflanzensaft und schwächen die Pflanzen. Besprüht die Pflanzen mit einem Wasserstrahl oder verwendet ein biologisches Insektizid.
Ernte und Lagerung
Wenn die Kürbisse reif sind, könnt ihr sie ernten. Schneidet den Stiel mit einem scharfen Messer ab, lasst aber einen kleinen Stielansatz an der Frucht. Lagert die Kürbisse an einem kühlen, trockenen und gut belüfteten Ort. So halten sie sich mehrere Monate.
Kürbisse im Pflanzsack: Meine persönlichen Erfahrungen
Ich habe schon mehrere Jahre Kürbisse im Pflanzsack angebaut und bin begeistert! Es ist eine tolle Möglichkeit, auch auf kleinem Raum eine reiche Ernte zu erzielen. Ich habe festgestellt, dass die Pflanzen im Pflanzsack etwas mehr Pflege brauchen als im Beet, aber der Aufwand lohnt sich auf jeden Fall. Besonders wichtig ist regelmäßiges Gießen und Düngen. Ich verwende am liebsten Kompost und organischen Dünger, um die Pflanzen optimal zu versorgen.
Ich hoffe, diese Anleitung hat euch geholfen und inspiriert, eure eigenen Kürbisse im Pflanzsack anzubauen. Viel Erfolg und eine reiche Ernte! Lasst es euch schmecken!
Conclusion
So, there you have it! Growing pumpkins in soil bags is not just a viable alternative to traditional gardening; it’s a game-changer for those with limited space, challenging soil conditions, or simply a desire for a more controlled and manageable growing environment. We’ve walked you through the process, from selecting the right soil bag and pumpkin variety to nurturing your plants and anticipating that glorious harvest.
But why is this DIY trick a must-try? Let’s recap. First and foremost, it democratizes pumpkin growing. No longer do you need acres of fertile land to cultivate these autumnal beauties. A simple soil bag, readily available at most garden centers, becomes your personal pumpkin patch. Secondly, it offers unparalleled control. You dictate the soil composition, the watering schedule, and the sun exposure, minimizing the risks associated with unpredictable weather and poor soil quality. This control translates to healthier plants and, ultimately, bigger, more vibrant pumpkins.
Furthermore, growing pumpkins in soil bags is incredibly rewarding. There’s a unique satisfaction in watching a tiny seed transform into a sprawling vine laden with pumpkins, all within the confines of your own backyard, patio, or even balcony. It’s a project that connects you to nature, teaches you about plant life cycles, and provides a tangible sense of accomplishment.
Don’t be afraid to experiment with variations! Try different pumpkin varieties to see which thrive best in your soil bag setup. Consider adding companion plants like marigolds or nasturtiums to deter pests and attract pollinators. You could even create a tiered system of soil bags to maximize your growing space. For those aiming for truly gigantic pumpkins, remember that consistent watering, nutrient-rich feeding, and careful pruning are key, even within the controlled environment of a soil bag.
And speaking of nutrients, consider supplementing your soil with compost tea or organic fertilizers throughout the growing season. This will provide your pumpkins with the essential elements they need to reach their full potential. Remember to monitor your plants regularly for signs of pests or diseases, and take action promptly to prevent any problems from escalating.
The beauty of this method lies in its adaptability. Whether you’re a seasoned gardener or a complete novice, growing pumpkins in soil bags is an accessible and enjoyable project that promises a bountiful harvest. It’s a fantastic way to get kids involved in gardening, teaching them about where their food comes from and fostering a love for the natural world.
So, what are you waiting for? Grab a soil bag, select your favorite pumpkin seeds, and embark on this exciting gardening adventure. We’re confident that you’ll be amazed by the results. And most importantly, we want to hear about your experience! Share your photos, tips, and triumphs with us in the comments below. Let’s create a community of soil bag pumpkin growers and inspire others to embrace this innovative and rewarding method. Let us know what kind of pumpkin growing success you have!
Frequently Asked Questions (FAQ)
What size soil bag is best for growing pumpkins?
The ideal size soil bag for growing pumpkins depends on the variety you choose. For smaller pumpkin varieties like Jack Be Little or Sugar Pie, a 20-30 gallon bag should suffice. However, for larger varieties like Howden or Atlantic Giant, you’ll need a much larger bag, ideally 40 gallons or more. The key is to provide ample space for the roots to develop and support the weight of the growing pumpkin. Remember, the bigger the bag, the more room for root growth, and the potentially larger the pumpkin. Also, consider the weight of the bag when filled with soil and choose a location that can support it.
What type of soil should I use in the soil bag?
A well-draining, nutrient-rich soil mix is crucial for successful pumpkin growing. A good starting point is a mix of equal parts compost, topsoil, and peat moss or coco coir. Compost provides essential nutrients, topsoil provides structure, and peat moss or coco coir helps retain moisture. You can also add slow-release fertilizer to the mix to provide a steady supply of nutrients throughout the growing season. Avoid using heavy clay soil, as it can become waterlogged and suffocate the roots. Consider amending the soil with perlite or vermiculite to improve drainage and aeration.
How often should I water my pumpkin plants in soil bags?
Watering frequency depends on the weather conditions and the size of the soil bag. Generally, you should water deeply whenever the top inch of soil feels dry to the touch. During hot, dry weather, you may need to water daily or even twice a day. Avoid overwatering, as this can lead to root rot. A good rule of thumb is to water until you see water draining from the bottom of the bag. Mulching around the base of the plant can help retain moisture and reduce the need for frequent watering.
How much sunlight do pumpkins need?
Pumpkins are sun-loving plants and require at least 6-8 hours of direct sunlight per day. Choose a location for your soil bag that receives ample sunlight throughout the day. If you live in a particularly hot climate, some afternoon shade may be beneficial to prevent the plants from overheating. Insufficient sunlight can result in stunted growth and reduced fruit production.
Do I need to fertilize my pumpkin plants in soil bags?
Yes, pumpkins are heavy feeders and require regular fertilization to thrive. Start by incorporating slow-release fertilizer into the soil mix at planting time. Then, supplement with liquid fertilizer every 2-3 weeks throughout the growing season. Use a fertilizer that is high in phosphorus and potassium to promote fruit development. Avoid over-fertilizing, as this can lead to excessive foliage growth at the expense of fruit production. Compost tea is also a great organic option.
How do I prevent pests and diseases from attacking my pumpkin plants?
Regularly inspect your plants for signs of pests or diseases. Common pumpkin pests include squash bugs, squash vine borers, and aphids. Diseases include powdery mildew and downy mildew. Use organic pest control methods such as insecticidal soap or neem oil to control pests. Ensure good air circulation around the plants to prevent fungal diseases. Remove any infected leaves or fruit promptly to prevent the spread of disease. Companion planting with marigolds or nasturtiums can also help deter pests.
How do I know when my pumpkins are ripe?
Pumpkins are typically ripe when the skin is hard and resistant to scratching, and the stem is dry and brown. The color of the pumpkin should also be uniform and vibrant. You can also tap the pumpkin; a ripe pumpkin will sound hollow. Leave a few inches of stem attached when harvesting to prevent rot.
Can I reuse the soil bag for growing pumpkins next year?
While you can reuse the soil bag, it’s important to amend the soil with fresh compost and fertilizer before planting again. The soil may have become depleted of nutrients during the previous growing season. Consider rotating crops to prevent the buildup of soilborne diseases. Alternatively, you can use the soil for other less demanding plants.
What if my pumpkin vine is growing too long and taking over my yard?
Pumpkin vines can indeed become quite extensive. Pruning the vines can help control their growth and direct the plant’s energy towards fruit production. You can trim the ends of the vines, but avoid removing too many leaves, as they are essential for photosynthesis. You can also train the vines to grow in a specific direction or support them with a trellis.
Can I grow multiple pumpkin plants in one soil bag?
While it’s possible to grow multiple pumpkin plants in a very large soil bag (40+ gallons), it’s generally recommended to grow only one plant per bag, especially for larger varieties. Overcrowding can lead to competition for resources and reduced fruit production. If you choose to grow multiple plants, ensure that they have ample space to grow and that you provide adequate water and nutrients.
Leave a Comment