
Growing Purple Kohlrabi might sound intimidating, but trust me, it’s a surprisingly rewarding experience! Have you ever dreamt of strolling through your own backyard, plucking vibrant, otherworldly vegetables straight from the earth? Imagine the impressed looks on your friends’ faces when you serve up a dish featuring this unique and delicious ingredient, all grown with your own two hands. This isn’t just about gardening; it’s about connecting with nature, embracing sustainability, and adding a splash of purple pizzazz to your plate.
Kohlrabi, often called the “German turnip,” has a fascinating history, dating back to the Roman Empire. While the green variety is more common, the purple kohlrabi offers a visual treat and a slightly sweeter flavor. For centuries, it’s been a staple in European cuisine, prized for its versatility and nutritional value. But why should you bother growing purple kohlrabi yourself? In today’s world, where we’re increasingly conscious of where our food comes from, cultivating your own vegetables offers unparalleled control over quality and freshness. Plus, it’s a fantastic way to reduce your carbon footprint and enjoy the satisfaction of nurturing something from seed to table.
This DIY guide is your key to unlocking the secrets of successfully growing this unique vegetable. I’ll walk you through every step, from selecting the right seeds to harvesting your beautiful purple bounty. Whether you’re a seasoned gardener or a complete beginner, these tips and tricks will empower you to cultivate a thriving kohlrabi patch. Let’s get started and transform your garden into a vibrant, edible masterpiece!
Lila Kohlrabi selbst anbauen: Ein umfassender DIY-Leitfaden
Hallo liebe Gartenfreunde! Ich freue mich, euch heute in die faszinierende Welt des lila Kohlrabianbaus einzuführen. Kohlrabi ist nicht nur superlecker und vielseitig in der Küche, sondern auch relativ einfach anzubauen, selbst wenn ihr noch nicht so viel Erfahrung mit dem Gärtnern habt. Und lila Kohlrabi? Der ist ein echter Hingucker im Gemüsegarten und auf dem Teller! Lasst uns gemeinsam loslegen!
Was du für den Anbau von lila Kohlrabi brauchst:
* Saatgut: Wähle eine hochwertige Sorte lila Kohlrabi. Es gibt verschiedene Sorten, wie z.B. ‘Purple Vienna’ oder ‘Azur Star’.
* Anzuchterde: Für die Voranzucht im Haus oder Gewächshaus.
* Gartenerde: Gut vorbereitete, lockere und nährstoffreiche Erde für das Beet.
* Kompost oder organischer Dünger: Zur Verbesserung der Bodenqualität.
* Pflanzgefäße oder Anzuchtschalen: Für die Voranzucht.
* Gießkanne oder Bewässerungssystem: Für die regelmäßige Bewässerung.
* Gartengeräte: Spaten, Harke, Pflanzkelle.
* Schneckenkorn (optional): Zum Schutz der jungen Pflanzen vor Schnecken.
* Pflanzstäbe (optional): Zur Unterstützung der Pflanzen, falls nötig.
Der ultimative Leitfaden für den Anbau von lila Kohlrabi:
* Vorbereitung ist alles: Beginne mit der Auswahl des richtigen Standorts und der Vorbereitung des Bodens.
* Aussaat: Entscheide dich für die Voranzucht oder Direktsaat.
* Pflege: Achte auf die richtige Bewässerung, Düngung und den Schutz vor Schädlingen.
* Ernte: Ernte den Kohlrabi rechtzeitig, um die beste Qualität zu gewährleisten.
Phase 1: Die Voranzucht (optional, aber empfohlen)
Die Voranzucht im Haus oder Gewächshaus gibt deinen Kohlrabipflanzen einen Vorsprung und ermöglicht eine frühere Ernte. Ich persönlich finde, es lohnt sich!
1. Aussaat in Anzuchtschalen: Fülle Anzuchtschalen oder kleine Töpfe mit Anzuchterde. Drücke die Erde leicht an und säe die Kohlrabisamen etwa 1 cm tief. Bedecke die Samen mit Erde und gieße sie vorsichtig an.
2. Der richtige Standort: Stelle die Anzuchtschalen an einen hellen und warmen Ort. Eine Temperatur von 18-20°C ist ideal für die Keimung.
3. Feuchtigkeit ist wichtig: Halte die Erde gleichmäßig feucht, aber vermeide Staunässe. Besprühe die Erde bei Bedarf mit einer Sprühflasche.
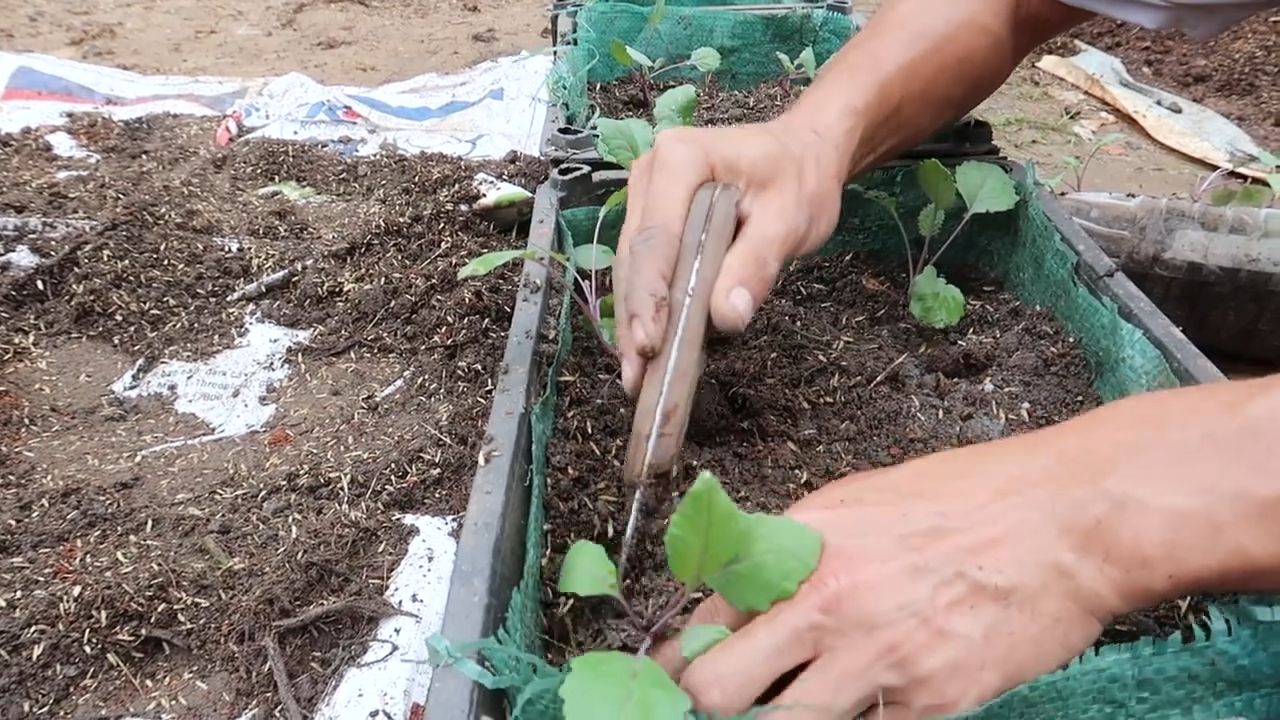
4. Pikieren: Sobald die Sämlinge 2-3 echte Blätter haben (nicht nur die Keimblätter), ist es Zeit zum Pikieren. Das bedeutet, dass du die kleinen Pflanzen vorsichtig aus den Anzuchtschalen nimmst und in größere Töpfe umpflanzt. Achte darauf, die Wurzeln nicht zu beschädigen.
5. Abhärten: Bevor du die Jungpflanzen ins Freie pflanzt, solltest du sie abhärten. Das bedeutet, dass du sie für einige Tage stundenweise nach draußen stellst, um sie an die Sonne und die kühleren Temperaturen zu gewöhnen.
Phase 2: Die Direktsaat (Alternative zur Voranzucht)
Wenn du keine Zeit oder Möglichkeit zur Voranzucht hast, kannst du den Kohlrabi auch direkt ins Beet säen.
1. Bodenvorbereitung: Lockere den Boden gründlich auf und entferne Unkraut. Arbeite Kompost oder organischen Dünger ein, um den Boden mit Nährstoffen anzureichern.
2. Aussaat: Ziehe Saatrillen mit einem Abstand von etwa 20-30 cm. Säe die Samen etwa 1 cm tief in die Rillen.
3. Bedecken und gießen: Bedecke die Samen mit Erde und gieße sie vorsichtig an.
4. Ausdünnen: Sobald die Sämlinge aufgegangen sind, solltest du sie ausdünnen, sodass die Pflanzen einen Abstand von etwa 15-20 cm haben. Das gibt den Pflanzen genügend Platz zum Wachsen.
Phase 3: Das Auspflanzen ins Beet
Egal ob du die Pflanzen vorgezogen oder direkt gesät hast, irgendwann ist der Zeitpunkt gekommen, sie ins Beet zu pflanzen.
1. Der richtige Zeitpunkt: Warte, bis keine Frostgefahr mehr besteht. In der Regel ist das ab Mitte Mai der Fall.
2. Pflanzabstand: Pflanze die Kohlrabipflanzen mit einem Abstand von etwa 20-30 cm in Reihen und 15-20 cm innerhalb der Reihe.
3. Pflanzloch: Grabe ein Pflanzloch, das etwas größer ist als der Wurzelballen der Pflanze.
4. Einsetzen: Setze die Pflanze vorsichtig in das Pflanzloch und fülle es mit Erde auf. Drücke die Erde leicht an.
5. Angießen: Gieße die Pflanzen nach dem Einpflanzen gründlich an.
Phase 4: Die Pflege des Kohlrabis
Die richtige Pflege ist entscheidend für eine reiche Ernte.
1. Bewässerung: Kohlrabi braucht regelmäßig Wasser, besonders während trockener Perioden. Achte darauf, dass der Boden immer leicht feucht ist. Vermeide aber Staunässe.
2. Düngung: Dünge den Kohlrabi regelmäßig mit Kompost oder organischem Dünger. Eine zusätzliche Düngung mit einem stickstoffbetonten Dünger kann das Wachstum fördern.
3. Unkrautbekämpfung: Halte das Beet unkrautfrei, um den Kohlrabi nicht unnötig Konkurrenz zu machen.
4. Schutz vor Schädlingen: Kohlrabi kann von verschiedenen Schädlingen befallen werden, wie z.B. Erdflöhen, Kohlweißlingen oder Schnecken. Kontrolliere die Pflanzen regelmäßig und bekämpfe Schädlinge bei Bedarf mit geeigneten Mitteln. Ich persönlich bevorzuge biologische Methoden. Schneckenkorn kann helfen, die jungen Pflanzen vor Schnecken zu schützen.
5. Bodenpflege: Lockere den Boden regelmäßig auf, um die Belüftung zu verbessern.
Phase 5: Die Ernte
Der Zeitpunkt der Ernte hängt von der Sorte und den Anbaubedingungen ab.
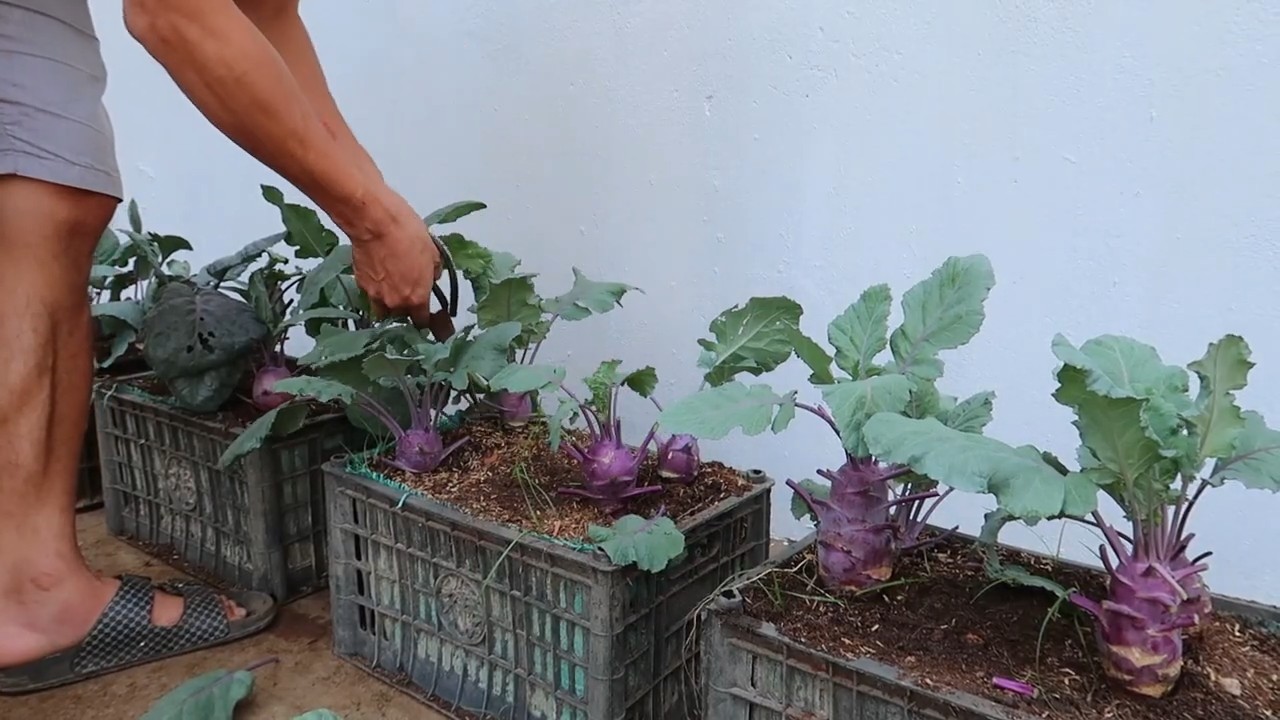
1. Der richtige Zeitpunkt: Ernte den Kohlrabi, wenn die Knollen etwa die Größe eines Tennisballs haben. Wenn du zu lange wartest, können die Knollen holzig werden.
2. Ernten: Schneide die Knolle mit einem scharfen Messer knapp über dem Boden ab.
3. Lagerung: Kohlrabi lässt sich im Kühlschrank einige Tage lagern. Du kannst ihn auch einfrieren, nachdem du ihn blanchiert hast.
Zusätzliche Tipps und Tricks:
* Mischkultur: Pflanze Kohlrabi in Mischkultur mit anderen Gemüsesorten, wie z.B. Salat, Radieschen oder Spinat. Das kann helfen, Schädlinge abzuwehren und den Boden zu verbessern.
* Fruchtfolge: Achte auf eine gute Fruchtfolge, um Krankheiten und Schädlinge zu vermeiden. Pflanze Kohlrabi nicht jedes Jahr am selben Standort.
* Sortenwahl: Experimentiere mit verschiedenen Sorten lila Kohlrabi, um die zu finden, die am besten zu deinen Bedingungen passen.
* Mulchen: Mulche das Beet mit Stroh oder Rasenschnitt, um den Boden feucht zu halten und Unkraut zu unterdrücken.
Ich hoffe, dieser umfassende Leitfaden hilft dir dabei, erfolgreich lila Kohlrabi anzubauen. Es ist wirklich ein lohnendes Projekt, das dir nicht nur leckeres Gemüse, sondern auch viel Freude bereiten wird. Viel Erfolg und happy gardening!
Conclusion
So, there you have it! Growing purple kohlrabi at home is not only achievable but also incredibly rewarding. From the vibrant color that adds a pop to your garden and plate to the crisp, slightly sweet flavor that elevates your culinary creations, this unique vegetable is a must-try for any home gardener or food enthusiast. We’ve walked you through the entire process, from selecting the right seeds and preparing your soil to nurturing your plants and harvesting your bounty.
But why is this DIY trick a must-try? Beyond the satisfaction of growing your own food, cultivating purple kohlrabi offers several compelling advantages. Firstly, you have complete control over the growing process, ensuring that your kohlrabi is free from harmful pesticides and chemicals. Secondly, homegrown kohlrabi often tastes significantly better than store-bought varieties, as it’s harvested at peak ripeness and hasn’t endured long transportation times. Finally, growing purple kohlrabi is simply a fun and educational experience, connecting you with nature and deepening your appreciation for the food you eat.
Don’t be afraid to experiment with variations! Consider companion planting your kohlrabi with herbs like dill or chamomile to deter pests and enhance flavor. You could also try succession planting, sowing seeds every few weeks to ensure a continuous harvest throughout the growing season. For those with limited space, purple kohlrabi thrives in containers, making it an excellent choice for balcony or patio gardens. If you are looking for a different flavor profile, try roasting the kohlrabi with a drizzle of olive oil and a sprinkle of your favorite herbs.
We wholeheartedly encourage you to embark on this gardening adventure and discover the joys of growing purple kohlrabi for yourself. It’s a fantastic way to add a unique and nutritious element to your diet while enjoying the therapeutic benefits of gardening.
Once you’ve harvested your first crop, we’d love to hear about your experience! Share your tips, tricks, and delicious kohlrabi recipes in the comments below. Let’s build a community of purple kohlrabi enthusiasts and inspire others to embrace the joys of homegrown goodness. Happy gardening!
Frequently Asked Questions (FAQ)
What are the best conditions for growing purple kohlrabi?
Purple kohlrabi thrives in cool weather, ideally with temperatures between 60°F and 75°F (15°C and 24°C). It requires at least six hours of sunlight per day and well-drained, fertile soil with a pH between 6.0 and 7.5. Consistent moisture is also crucial, so water regularly, especially during dry spells. Avoid overly hot conditions, as this can cause the kohlrabi to become woody and bitter.
How long does it take to grow purple kohlrabi from seed?
From seed to harvest, purple kohlrabi typically takes between 55 and 60 days. However, this can vary depending on the variety, growing conditions, and climate. Starting seeds indoors 4-6 weeks before the last expected frost can give you a head start and extend your growing season. Keep a close eye on your plants and harvest when the bulb reaches the desired size, typically around 2-3 inches in diameter.
What are some common pests and diseases that affect purple kohlrabi, and how can I prevent them?
Common pests that can affect purple kohlrabi include cabbage worms, aphids, flea beetles, and cabbage root maggots. To prevent these pests, consider using row covers to protect your plants, practicing crop rotation, and handpicking pests when you see them. Companion planting with herbs like rosemary or thyme can also help deter pests. Diseases like clubroot and black rot can also affect kohlrabi. To prevent these diseases, ensure good soil drainage, avoid overwatering, and use disease-resistant varieties.
How do I know when my purple kohlrabi is ready to harvest?
The ideal time to harvest purple kohlrabi is when the bulb reaches a diameter of about 2-3 inches. At this size, it will be tender and flavorful. If you wait too long, the bulb can become tough and woody. To harvest, simply cut the stem just above the bulb with a sharp knife. You can also harvest the leaves, which are edible and can be used in salads or cooked like spinach.
Can I grow purple kohlrabi in containers?
Yes, purple kohlrabi grows well in containers, making it a great option for those with limited space. Choose a container that is at least 12 inches deep and wide to allow the roots to develop properly. Use a high-quality potting mix and ensure that the container has good drainage. Water regularly and fertilize every few weeks with a balanced fertilizer. Place the container in a sunny location that receives at least six hours of sunlight per day.
What are some ways to use purple kohlrabi in cooking?
Purple kohlrabi is a versatile vegetable that can be used in a variety of dishes. It can be eaten raw, sliced thinly in salads or used as a crudité with dips. It can also be cooked in various ways, such as steaming, roasting, stir-frying, or adding it to soups and stews. The leaves are also edible and can be used like spinach. The flavor of purple kohlrabi is mild and slightly sweet, similar to a turnip or cabbage.
How do I store purple kohlrabi after harvesting?
After harvesting, remove the leaves from the bulb and store them separately. The bulb can be stored in the refrigerator for several weeks in a plastic bag. The leaves should be used within a few days. To keep the kohlrabi fresh, avoid washing it until you are ready to use it.
Is purple kohlrabi more nutritious than green kohlrabi?
While both purple and green kohlrabi are nutritious, purple kohlrabi contains anthocyanins, which are powerful antioxidants that give it its vibrant color. These antioxidants have been linked to various health benefits, including reducing the risk of heart disease and cancer. Both varieties are excellent sources of vitamin C, fiber, and potassium.
Can I save seeds from my purple kohlrabi plants?
Saving seeds from kohlrabi is possible, but it requires allowing the plant to bolt (flower and produce seeds) in its second year. Kohlrabi is a biennial, meaning it completes its life cycle over two years. However, kohlrabi readily cross-pollinates with other members of the Brassica family, such as cabbage, broccoli, and kale. To ensure true-to-type seeds, you would need to isolate your kohlrabi plants from other Brassicas or hand-pollinate them. This can be a complex process, so for beginners, it’s often easier to purchase seeds from a reputable source.
What are the benefits of growing my own purple kohlrabi?
Growing your own purple kohlrabi offers numerous benefits. You have complete control over the growing process, ensuring that your kohlrabi is free from harmful pesticides and chemicals. Homegrown kohlrabi often tastes better than store-bought varieties, as it’s harvested at peak ripeness. Gardening is a therapeutic activity that can reduce stress and improve your overall well-being. Plus, growing your own food is a sustainable practice that reduces your carbon footprint. Finally, you get the satisfaction of knowing exactly where your food comes from and how it was grown.

Leave a Comment