
Growing spinach in planters is easier than you might think, and I’m here to show you how! Forget those sad, wilted bags of spinach from the grocery store. Imagine stepping outside your door and harvesting fresh, vibrant, nutrient-packed spinach whenever you need it. Sounds amazing, right?
For centuries, spinach has been a culinary staple, enjoyed by cultures around the world. From its humble beginnings in ancient Persia to its starring role in Popeye’s cartoons, this leafy green has always been prized for its health benefits and versatility. But you don’t need a sprawling garden to enjoy the taste of homegrown spinach.
In today’s busy world, finding time for a traditional garden can be a challenge. That’s where the magic of container gardening comes in! Growing spinach in planters allows you to cultivate your own fresh produce, even if you only have a small balcony, patio, or sunny windowsill. Plus, it’s a fantastic way to reduce your carbon footprint and connect with nature. This DIY guide will provide you with simple, step-by-step instructions and insider tips to ensure a bountiful harvest. Get ready to enjoy the freshest, most delicious spinach you’ve ever tasted!
Growing Spinach in Planters: A Beginner’s Guide
Hey there, fellow gardening enthusiasts! I’m so excited to share my experience with growing spinach in planters. It’s surprisingly easy, even if you don’t have a huge backyard. Fresh, homegrown spinach is incredibly rewarding, and trust me, it tastes way better than the stuff you get at the grocery store. Let’s dive in!
Choosing the Right Planter and Location
Before we even think about seeds, we need to get the basics right. The planter and location are crucial for happy spinach plants.
* Planter Size: Spinach needs room to grow, so opt for a planter that’s at least 6-8 inches deep and wide. A rectangular planter works great, allowing you to plant several spinach plants in a row. I personally love using 12-inch deep containers.
* Drainage: This is non-negotiable! Make sure your planter has drainage holes. Spinach hates sitting in soggy soil, which can lead to root rot. If your planter doesn’t have holes, you can drill some yourself.
* Material: Plastic, terracotta, or even fabric pots will work. I’ve had success with all three. Terracotta pots dry out faster, so you’ll need to water more frequently.
* Location: Spinach thrives in cool weather and needs at least 3-4 hours of sunlight per day. Morning sun is ideal, as it helps prevent the leaves from getting scorched in the afternoon heat. If you live in a hot climate, choose a spot that gets partial shade. I usually place my planters on my balcony, where they get plenty of morning sun.
Preparing the Soil
Spinach loves nutrient-rich, well-draining soil. Here’s how I prepare mine:
* Potting Mix: Start with a high-quality potting mix. Don’t use garden soil, as it can be too heavy and compact for containers.
* Compost: Mix in some compost to add nutrients and improve drainage. I usually use about 1/3 compost to 2/3 potting mix. Worm castings are also a fantastic addition!
* Slow-Release Fertilizer: Incorporate a slow-release fertilizer to provide a steady supply of nutrients. Follow the instructions on the fertilizer package. I prefer organic options.
* pH Level: Spinach prefers a slightly acidic to neutral pH (around 6.5 to 7.0). You can test your soil’s pH with a soil testing kit, which you can find at most garden centers.
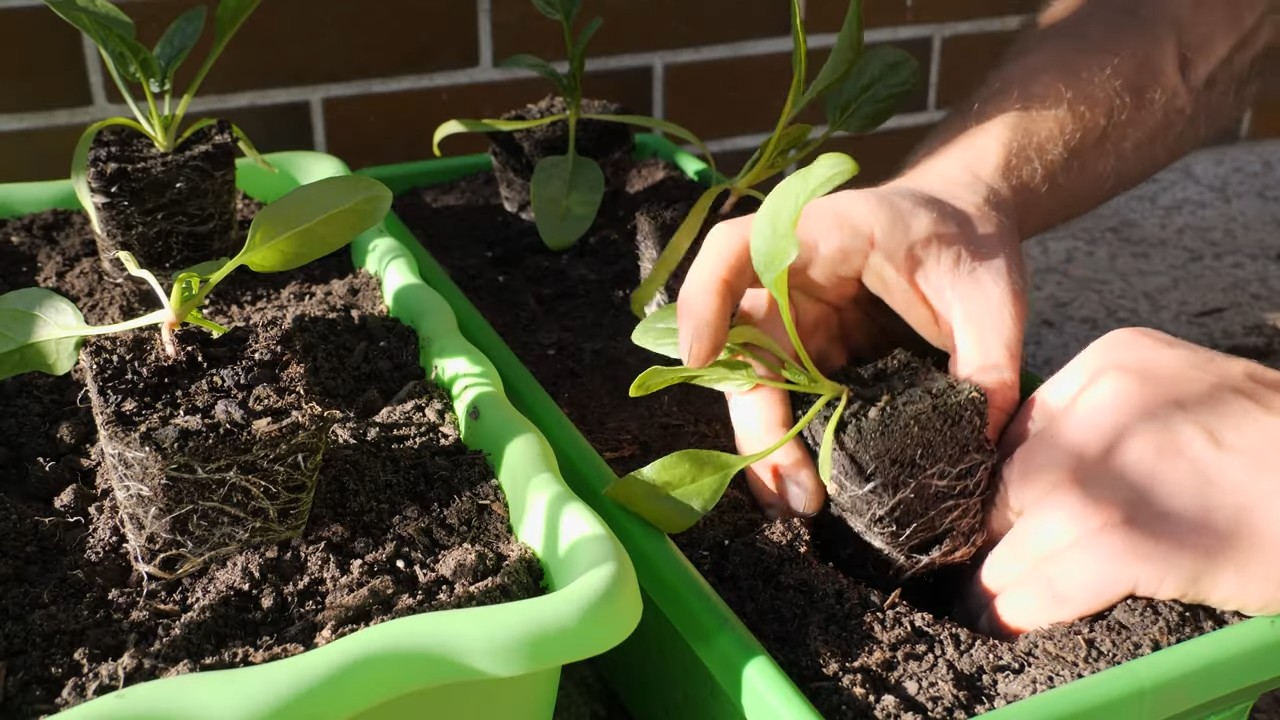
Planting the Spinach Seeds
Now for the fun part! Let’s get those seeds in the ground.
1. Moisten the Soil: Before planting, thoroughly moisten the potting mix. You want it to be damp, but not soggy.
2. Sow the Seeds: Sow the spinach seeds about ½ inch deep and 1-2 inches apart. You can plant them in rows or scatter them evenly across the planter. I usually plant a few extra seeds to account for any that don’t germinate.
3. Cover the Seeds: Gently cover the seeds with soil and lightly pat it down.
4. Water Gently: Water the soil gently to avoid disturbing the seeds. I use a watering can with a rose head to create a soft shower.
5. Label the Planter: Don’t forget to label your planter with the date and type of spinach you planted. This will help you keep track of your progress.
Caring for Your Spinach Plants
Consistent care is key to a bountiful spinach harvest.
* Watering: Keep the soil consistently moist, but not waterlogged. Water when the top inch of soil feels dry to the touch. Avoid overhead watering, as it can promote fungal diseases. I prefer to water at the base of the plants.
* Thinning: Once the seedlings emerge and have a few true leaves, thin them out so that they are about 3-4 inches apart. This will give them enough room to grow and prevent overcrowding. You can eat the thinned seedlings as microgreens!
* Fertilizing: Spinach is a heavy feeder, so fertilize it regularly. Use a liquid fertilizer diluted to half strength every 2-3 weeks. Fish emulsion and seaweed extract are excellent organic options.
* Weeding: Keep the planter free of weeds, as they can compete with the spinach for nutrients and water. Hand-pull any weeds that appear.
* Pest Control: Keep an eye out for pests like aphids, slugs, and snails. You can control aphids with a strong spray of water or insecticidal soap. Slugs and snails can be hand-picked or trapped with beer traps. I also like to use diatomaceous earth around my plants as a natural pest deterrent.
* Bolting: Spinach is prone to bolting (going to seed) in hot weather. To prevent bolting, keep the plants well-watered and provide shade during the hottest part of the day. You can also choose bolt-resistant varieties of spinach. If your spinach starts to bolt, harvest it immediately, as the leaves will become bitter.
Harvesting Your Spinach
The moment we’ve all been waiting for! Harvesting your own spinach is so satisfying.
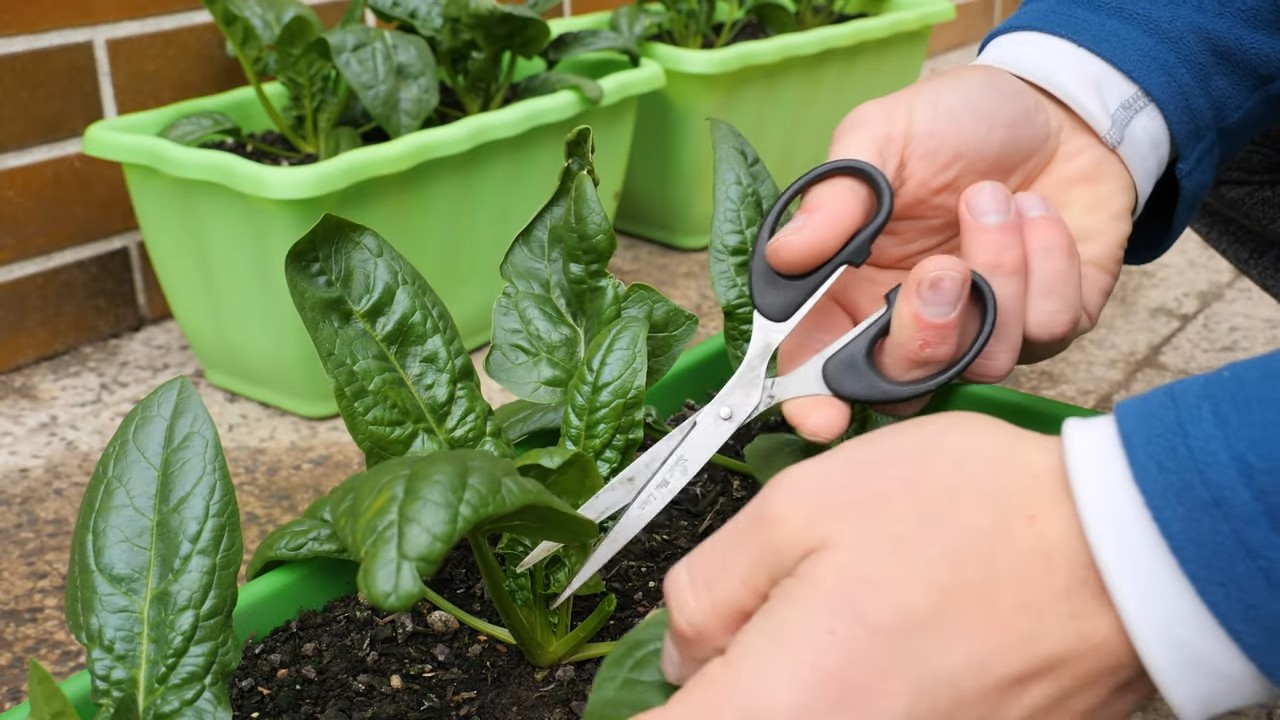
1. When to Harvest: You can start harvesting spinach leaves when they are about 4-6 inches long.
2. How to Harvest: Use scissors or a sharp knife to cut the outer leaves, leaving the inner leaves to continue growing. This is known as “cut and come again” harvesting.
3. Harvest Regularly: Harvest your spinach regularly to encourage continued growth.
4. Wash and Store: Wash the harvested spinach leaves thoroughly and store them in a plastic bag in the refrigerator. They will keep for several days.
Troubleshooting Common Problems
Even with the best care, you might encounter some problems. Here are a few common issues and how to address them:
* Yellowing Leaves: This could be a sign of nutrient deficiency, overwatering, or underwatering. Check the soil moisture and fertilize if necessary.
* Stunted Growth: This could be due to poor soil, lack of sunlight, or pest infestation. Make sure your spinach is getting enough sunlight and nutrients, and check for pests.
* Leaf Spots: This could be a sign of fungal disease. Remove any affected leaves and improve air circulation around the plants. Avoid overhead watering.
* Bolting: As mentioned earlier, bolting is common in hot weather. Keep the plants well-watered and provide shade.
Choosing the Right Spinach Variety
There are many different varieties of spinach to choose from, each with its own unique characteristics. Here are a few of my favorites:
* Bloomsdale Long Standing: This is a classic variety that is known for its large, crinkled leaves and good flavor. It’s also relatively bolt-resistant.
* Tyee: This is a smooth-leafed variety that is very productive and bolt-resistant.
* Space: This is another smooth-leafed variety that is known for its fast growth and good flavor.
* Malabar Spinach: While not a true spinach, Malabar spinach is a heat-tolerant alternative that can be grown in warm climates. It has a similar flavor and texture to spinach.
Extending Your Spinach Season
Spinach is a cool-season crop, but you can extend your growing season with a few simple tricks:
* Succession Planting: Sow new seeds every 2-3 weeks to ensure a continuous harvest.
* Cold Frames: Use a cold frame to protect your spinach plants from frost and extend the growing season into the winter.
* Shade Cloth: Use shade cloth to protect your spinach plants from the hot sun in the summer.
Spinach Recipes to Enjoy
Now that you have a bounty of fresh spinach, it’s time to get cooking! Here are a few of my favorite spinach recipes:
* Spinach Salad: A classic spinach salad with bacon, eggs, and a vinaigrette dressing.
* Spinach and Artichoke Dip: A creamy and delicious dip that is perfect for parties.
* Spinach Smoothie: A healthy and refreshing smoothie that is packed with nutrients.
* Spinach Quiche: A savory quiche with spinach, cheese, and eggs.
* Saag Paneer: An Indian dish made with spinach and cheese.
Final Thoughts
Growing spinach in planters is a rewarding and easy way to enjoy fresh, homegrown greens. With a little bit of care and attention, you can have a continuous harvest of delicious spinach throughout the growing season. So, grab your seeds, get your hands dirty, and start growing! Happy gardening!
Conclusion
So, there you have it! Mastering the art of growing spinach in planters is not only achievable but also incredibly rewarding. Imagine stepping out onto your balcony or patio and harvesting fresh, vibrant spinach leaves for your salad, smoothie, or sauté. No more trips to the grocery store for wilted, overpriced greens!
This DIY trick is a must-try for several compelling reasons. First and foremost, it grants you complete control over the quality of your spinach. You know exactly what goes into your plants – no harmful pesticides or herbicides, just pure, natural goodness. Secondly, it’s a fantastic way to reduce your carbon footprint. By growing your own food, you’re minimizing transportation and packaging waste. Thirdly, it’s a surprisingly therapeutic activity. Tending to your spinach plants can be a calming and grounding experience, a welcome respite from the stresses of daily life. Finally, and perhaps most importantly, it’s incredibly satisfying to nurture something from seed to harvest.
But don’t think you’re limited to just one type of spinach! Experiment with different varieties to discover your favorites. Try growing baby spinach for tender, delicate leaves, or opt for savoy spinach for a more robust flavor and texture. Consider adding companion plants like marigolds or basil to your planters to deter pests and enhance the overall health of your spinach. You can even interplant with radishes, which mature quickly and help break up the soil.
Growing spinach in planters is also a fantastic way to extend your growing season. By providing a sheltered environment, you can start your spinach earlier in the spring and continue harvesting well into the fall. If you live in a particularly cold climate, you can even bring your planters indoors during the winter months to enjoy fresh spinach year-round.
We’ve covered the basics, from choosing the right planter and soil to providing adequate sunlight and water. Now it’s your turn to put your green thumb to the test! Don’t be afraid to experiment and learn from your mistakes. Gardening is a journey, not a destination.
We are confident that with a little patience and care, you’ll be enjoying homegrown spinach in no time. So, grab your planters, seeds, and soil, and get ready to embark on this exciting gardening adventure.
We encourage you to try this DIY trick and share your experience with us! Let us know what varieties of spinach you’re growing, what challenges you’ve encountered, and what tips you’ve discovered along the way. Share your photos and stories on social media using #HomegrownSpinach and inspire others to join the movement. We can’t wait to see what you create! Happy gardening!
Frequently Asked Questions (FAQ)
What is the best size planter for growing spinach?
The ideal planter size for growing spinach in planters depends on the variety and how much spinach you want to harvest. Generally, a planter that is at least 6-8 inches deep and 6-8 inches wide is sufficient for a single spinach plant. For multiple plants, choose a larger container, such as a 12-inch pot or a long trough planter. Ensure the planter has adequate drainage holes to prevent waterlogging, which can lead to root rot. Remember, the more space you give your spinach, the better it will grow.
What type of soil is best for spinach in planters?
Spinach thrives in well-draining, fertile soil that is rich in organic matter. A good potting mix specifically formulated for vegetables is an excellent choice. You can also amend regular potting soil with compost, aged manure, or other organic materials to improve its nutrient content and drainage. The ideal soil pH for spinach is between 6.5 and 7.0. You can test your soil pH using a home testing kit and adjust it accordingly with lime (to raise pH) or sulfur (to lower pH).
How much sunlight does spinach need when grown in planters?
Spinach prefers full sun, which means at least 6 hours of direct sunlight per day. However, in hotter climates, spinach can benefit from some afternoon shade to prevent bolting (premature flowering). If you’re growing spinach indoors, place your planters near a sunny window or supplement with grow lights. Monitor your plants closely and adjust their position as needed to ensure they are receiving adequate sunlight.
How often should I water my spinach plants in planters?
Spinach needs consistent moisture to thrive, but it’s important to avoid overwatering, which can lead to root rot. Water your spinach plants when the top inch of soil feels dry to the touch. Water deeply, ensuring that the water drains out of the drainage holes. During hot, dry weather, you may need to water more frequently. Mulching around your spinach plants can help retain moisture in the soil.
How do I fertilize spinach growing in planters?
Spinach is a heavy feeder and benefits from regular fertilization. Use a balanced, water-soluble fertilizer specifically formulated for vegetables. Follow the instructions on the fertilizer package for application rates and frequency. You can also amend your soil with compost or aged manure to provide a slow-release source of nutrients. Avoid over-fertilizing, as this can lead to excessive leaf growth and reduced flavor.
How do I prevent pests and diseases from affecting my spinach plants?
Several pests and diseases can affect spinach, including aphids, spider mites, and downy mildew. To prevent these problems, start with healthy, disease-resistant seeds or seedlings. Inspect your plants regularly for signs of pests or diseases and take action promptly. You can use insecticidal soap or neem oil to control aphids and spider mites. Ensure good air circulation around your plants to prevent downy mildew. Remove any infected leaves immediately to prevent the disease from spreading. Companion planting with herbs like basil or marigolds can also help deter pests.
When is the best time to harvest spinach from planters?
You can start harvesting spinach leaves as soon as they are large enough to eat, typically when they are 4-6 inches long. Harvest the outer leaves first, leaving the inner leaves to continue growing. This will allow you to enjoy a continuous harvest over several weeks. Avoid harvesting during the hottest part of the day, as the leaves will be more prone to wilting.
Can I grow spinach in planters during the winter?
Yes, you can grow spinach in planters during the winter, especially in mild climates. In colder climates, you can protect your plants from frost by covering them with a cold frame, row cover, or bringing them indoors. Choose cold-hardy varieties of spinach for winter growing. Provide adequate sunlight and water, and avoid overwatering, as the soil will dry out more slowly in cooler temperatures.
What are some common problems when growing spinach in planters and how can I fix them?
Some common problems include bolting (premature flowering), yellowing leaves, and pest infestations. Bolting is often caused by hot weather or stress. To prevent bolting, provide shade during the hottest part of the day and ensure your plants are adequately watered. Yellowing leaves can be a sign of nutrient deficiency or overwatering. Adjust your watering and fertilizing practices accordingly. Pest infestations can be controlled with insecticidal soap or neem oil.
Can I grow different varieties of spinach in the same planter?
While it’s possible to grow different varieties of spinach in the same planter, it’s generally best to stick to one variety per planter. This will make it easier to manage their growth and ensure they all receive the same amount of sunlight, water, and nutrients. If you do choose to grow multiple varieties in the same planter, make sure they have similar growth requirements and provide them with ample space.


Leave a Comment