
Hanging bottle carrot gardening: Sounds a bit wacky, right? But trust me, it’s a game-changer! Forget back-breaking digging and battling soil pests – we’re taking carrot cultivation to new heights, literally! For centuries, humans have toiled in the earth to coax delicious carrots from the ground. From their humble beginnings in Afghanistan, these vibrant roots have become a staple in cuisines worldwide. But what if I told you there’s a simpler, more space-efficient way to enjoy homegrown carrots, even if you live in an apartment with a tiny balcony?
That’s where this DIY guide comes in. We’re diving deep into the world of upcycled gardening, transforming ordinary plastic bottles into miniature carrot paradises. Why is this so important? Well, for starters, it’s incredibly rewarding to grow your own food. Plus, hanging bottle carrot gardening is perfect for urban dwellers, those with limited mobility, or anyone looking for a fun and sustainable gardening project. Imagine plucking fresh, sweet carrots right from your hanging garden – it’s a taste of homegrown goodness without the hassle. So, grab your scissors, some soil, and let’s get started on this exciting adventure!
DIY Hänge-Karotten-Garten aus Plastikflaschen: Eine Schritt-für-Schritt-Anleitung
Hallo liebe Gartenfreunde! Habt ihr wenig Platz, aber trotzdem Lust auf frische, selbstangebaute Karotten? Dann habe ich hier genau das Richtige für euch: einen hängenden Karotten-Garten aus recycelten Plastikflaschen! Das ist nicht nur super platzsparend, sondern auch eine tolle Möglichkeit, Plastikmüll zu reduzieren und euren Balkon oder Garten zu verschönern. Lasst uns loslegen!
Was du brauchst:
* Mehrere leere Plastikflaschen (am besten 1,5- oder 2-Liter-Flaschen)
* Ein scharfes Messer oder eine Schere
* Einen Bohrer oder einen Nagel und Hammer
* Starke Schnur oder Draht
* Blumenerde
* Karottensamen
* Optional: Sprühfarbe (für die Dekoration der Flaschen)
* Optional: Vlies oder Jute (zum Auskleiden der Flaschen)
Vorbereitung der Plastikflaschen
Dieser Schritt ist entscheidend, um sicherzustellen, dass deine Karotten ein gemütliches Zuhause haben.
1. Reinigung der Flaschen: Zuerst müssen wir die Plastikflaschen gründlich reinigen. Entferne alle Etiketten und spüle die Flaschen innen und außen mit warmem Seifenwasser aus. Achte darauf, dass keine Seifenreste zurückbleiben. Lass die Flaschen anschließend gut trocknen.
2. Schneiden der Flaschen: Jetzt kommt der etwas kniffligere Teil. Wir müssen die Flaschen so zuschneiden, dass sie später als Pflanzgefäße dienen können.
* Variante 1 (Horizontale Anordnung): Schneide die Flasche horizontal in der Mitte durch. Du erhältst zwei Hälften. Die obere Hälfte wird später umgedreht in die untere Hälfte gesteckt.
* Variante 2 (Vertikale Anordnung): Schneide ein großes rechteckiges Fenster in die Seite der Flasche. Achte darauf, dass der Boden der Flasche intakt bleibt. Diese Variante eignet sich gut, wenn du die Flaschen übereinander aufhängen möchtest.
3. Löcher für die Aufhängung bohren: Damit wir die Flaschen später aufhängen können, müssen wir Löcher bohren.
* Variante 1 (Horizontale Anordnung): Bohre oder schlage mit Nagel und Hammer jeweils zwei Löcher an den Seiten der unteren Flaschenhälfte. Die Löcher sollten sich gegenüberliegen.
* Variante 2 (Vertikale Anordnung): Bohre oder schlage zwei Löcher in den oberen Rand der Flasche. Auch hier sollten sich die Löcher gegenüberliegen.
4. Drainagelöcher anbringen: Karotten mögen keine Staunässe. Daher ist es wichtig, dass wir für eine gute Drainage sorgen. Bohre oder schlage mehrere kleine Löcher in den Boden der Flaschen.
5. Optional: Auskleiden der Flaschen: Um die Erde vor dem Austrocknen zu schützen und die Wurzeln der Karotten vor direkter Sonneneinstrahlung zu bewahren, kannst du die Flaschen mit Vlies oder Jute auskleiden. Schneide das Material passend zu und klebe es mit etwas Kleber oder Heißkleber in die Flasche.
6. Optional: Dekoration der Flaschen: Jetzt kommt der kreative Teil! Wenn du möchtest, kannst du die Flaschen mit Sprühfarbe bemalen oder mit anderen Materialien dekorieren. Lass deiner Fantasie freien Lauf! Achte aber darauf, dass die Farbe ungiftig ist und keine schädlichen Stoffe an die Erde abgibt.
Befüllen der Flaschen und Aussaat der Karotten
Jetzt geht es ans Eingemachte! Wir befüllen die vorbereiteten Flaschen mit Erde und säen die Karottensamen aus.
1. Befüllen mit Erde: Fülle die Flaschen mit Blumenerde. Achte darauf, dass die Erde locker und luftig ist. Drücke die Erde nicht zu fest an. Lass oben einen Rand von etwa 2-3 cm frei.
2. Aussaat der Karottensamen: Verteile die Karottensamen gleichmäßig auf der Erde. Bedecke die Samen mit einer dünnen Schicht Erde (ca. 0,5 cm).
3. Angießen: Gieße die Erde vorsichtig an. Verwende am besten eine Sprühflasche, um die Samen nicht wegzuschwemmen. Die Erde sollte feucht, aber nicht nass sein.
Aufhängen der Flaschen
Nun hängen wir unsere bepflanzten Flaschen auf.
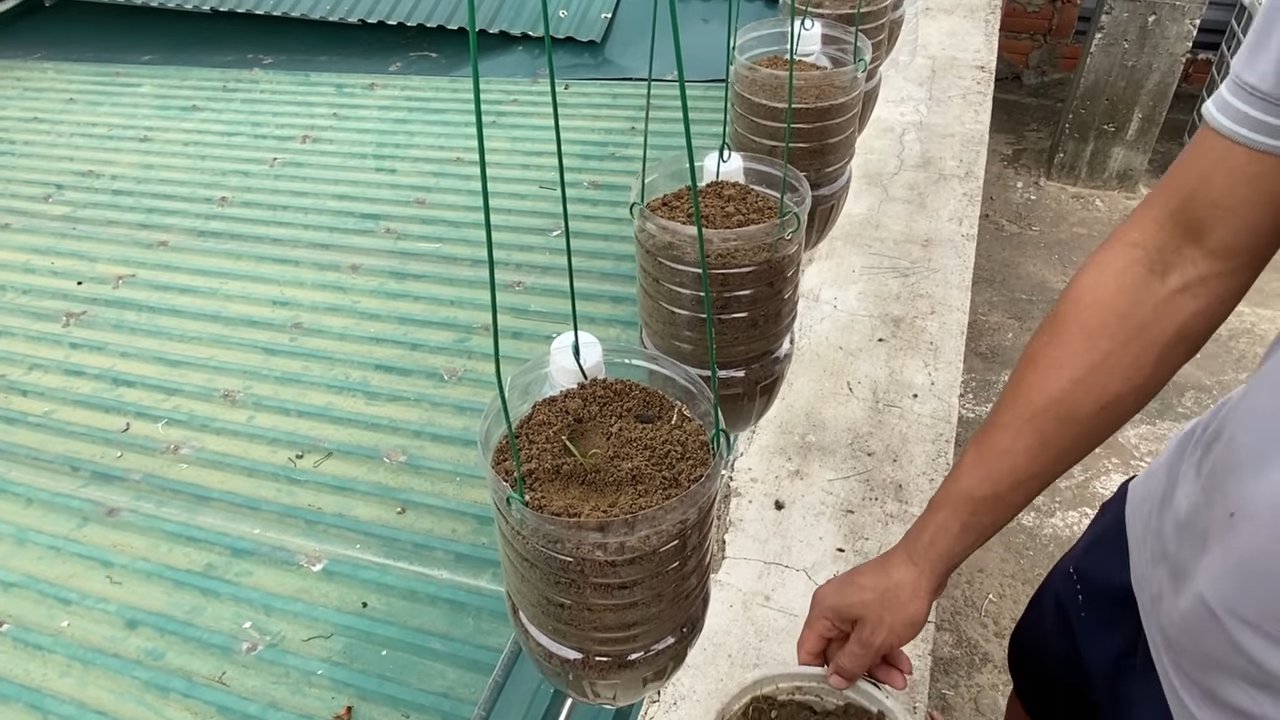
1. Anbringen der Schnur oder des Drahtes: Führe die Schnur oder den Draht durch die Löcher, die du zuvor gebohrt hast. Knote die Enden fest zusammen, sodass die Flasche sicher hängt.
2. Aufhängen der Flaschen: Suche dir einen geeigneten Platz zum Aufhängen der Flaschen. Der Platz sollte sonnig sein, aber die Karotten sollten nicht der prallen Mittagssonne ausgesetzt sein. Ein Balkon, eine Terrasse oder ein Garten mit einem überdachten Bereich sind ideal.
3. Optional: Kette bilden: Wenn du mehrere Flaschen hast, kannst du sie zu einer Kette verbinden. Hänge die Flaschen einfach untereinander auf. Achte darauf, dass die Kette nicht zu schwer wird und die Aufhängung stabil ist.
Pflege der Karotten
Damit deine Karotten gut wachsen und gedeihen, ist die richtige Pflege wichtig.
1. Gießen: Gieße die Karotten regelmäßig. Die Erde sollte immer leicht feucht sein. Vermeide Staunässe. An heißen Tagen musst du möglicherweise täglich gießen.
2. Düngen: Dünge die Karotten regelmäßig mit einem organischen Dünger. Karotten sind Starkzehrer und benötigen ausreichend Nährstoffe.
3. Ausdünnen: Wenn die Karottenpflanzen zu dicht stehen, musst du sie ausdünnen. Entferne die schwächsten Pflanzen, sodass die verbleibenden Pflanzen genügend Platz zum Wachsen haben.
4. Schutz vor Schädlingen: Kontrolliere die Karotten regelmäßig auf Schädlinge. Bei Bedarf kannst du natürliche Schädlingsbekämpfungsmittel einsetzen.
Ernte der Karotten
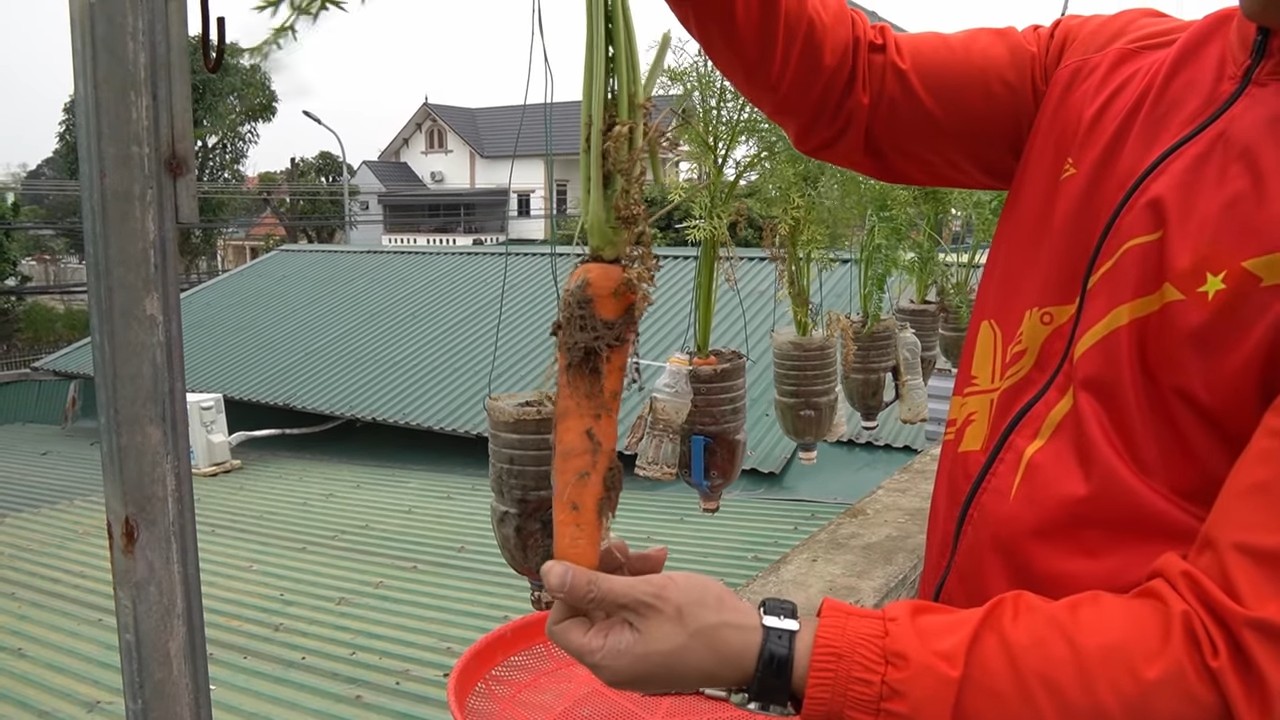
Nach etwa 2-3 Monaten kannst du deine selbstangebauten Karotten ernten.
1. Erntezeitpunkt: Die Karotten sind erntereif, wenn sie die gewünschte Größe erreicht haben. Du kannst eine Karotte vorsichtig aus der Erde ziehen, um zu überprüfen, ob sie reif ist.
2. Ernte: Ziehe die Karotten vorsichtig aus der Erde. Wenn die Erde zu trocken ist, kannst du sie vorher etwas anfeuchten.
3. Reinigung: Reinige die Karotten von Erde und genieße sie frisch aus dem Garten!
Zusätzliche Tipps und Tricks
* Wahl der Karottensorte: Es gibt viele verschiedene Karottensorten. Wähle eine Sorte, die für den Anbau in Töpfen geeignet ist. Kurze, runde Karotten sind ideal.
* Verwendung von Anzuchterde: Für die Aussaat kannst du spezielle Anzuchterde verwenden. Diese ist besonders nährstoffarm und fördert die Keimung der Samen.
* Schutz vor Vögeln: Vögel lieben Karottensamen. Schütze die Samen mit einem Netz oder Vlies, bis die Pflanzen gekeimt sind.
* Mulchen: Mulche die Erde mit Stroh oder Rasenschnitt. Das hält die Erde feucht und unterdrückt Unkraut.
* Rotation: Baue Karotten nicht jedes Jahr am selben Standort an. Wechsle die Pflanzen, um Krankheiten und Schädlingen vorzubeugen.
Ich hoffe, diese Anleitung hilft dir dabei, deinen eigenen hängenden Karotten-Garten zu gestalten. Viel Spaß beim Gärtnern und guten Appetit!
Conclusion
So, there you have it! Transforming discarded plastic bottles into a thriving vertical carrot garden is not just a quirky DIY project; it’s a sustainable, space-saving, and incredibly rewarding way to grow your own food. We’ve walked you through the simple steps, highlighting the benefits of this innovative approach to gardening. From maximizing yields in limited spaces to reducing plastic waste, this method offers a multitude of advantages for both seasoned gardeners and curious beginners.
Why is this hanging bottle carrot gardening trick a must-try? Because it’s more than just a gardening technique; it’s a statement. It’s a statement about resourcefulness, sustainability, and the power of creativity. It’s about taking something destined for the landfill and giving it a new life, a new purpose, and a new opportunity to contribute to your well-being. Imagine the satisfaction of harvesting sweet, crunchy carrots from a garden you built yourself, using materials you already had on hand. That’s the magic of this DIY project.
But the beauty of this method lies in its adaptability. Feel free to experiment with different bottle sizes to accommodate various carrot varieties. Consider painting the bottles to protect the roots from excessive sunlight and add a splash of color to your garden. You could even create a tiered system, hanging multiple rows of bottles to create a stunning vertical display.
Variations and Enhancements
* Herb Garden Hybrid: Interplant your carrots with herbs like basil or thyme. These companion plants can help deter pests and enhance the flavor of your carrots.
* Strawberry Surprise: While this article focuses on carrots, the hanging bottle method works wonderfully for strawberries too! Consider dedicating a few bottles to these sweet treats.
* Nutrient Boost: Add a slow-release fertilizer to your potting mix to provide your carrots with a steady supply of nutrients throughout their growth cycle.
* Watering System Upgrade: Consider installing a simple drip irrigation system to ensure consistent watering, especially during hot weather.
We wholeheartedly encourage you to give this hanging bottle carrot gardening method a try. It’s a fun, educational, and environmentally friendly project that will bring joy and fresh produce to your life. Don’t be afraid to get your hands dirty, experiment with different techniques, and personalize your garden to suit your own unique style.
Most importantly, we want to hear about your experiences! Share your photos, tips, and challenges in the comments section below. Let’s create a community of resourceful gardeners who are passionate about sustainable living. Together, we can transform our homes and communities, one recycled bottle at a time. So, grab those bottles, gather your supplies, and get ready to embark on a rewarding gardening adventure! Your delicious, homegrown carrots await!
Frequently Asked Questions (FAQ)
What type of plastic bottles are best for hanging bottle carrot gardening?
Ideally, you should use PET (polyethylene terephthalate) plastic bottles, which are commonly used for soda and water. These bottles are durable, lightweight, and readily available. Avoid using bottles that have contained harsh chemicals or cleaning products, as these could contaminate your soil and affect the growth of your carrots. Thoroughly wash and rinse the bottles before using them. The size of the bottle will depend on the variety of carrot you are growing. Shorter, rounder varieties will do well in smaller bottles, while longer varieties will need larger bottles.
How do I ensure proper drainage in the hanging bottles?
Proper drainage is crucial to prevent root rot and ensure healthy carrot growth. Before filling the bottles with soil, create several drainage holes in the bottom. You can use a drill, a nail, or even a hot skewer to make these holes. Make sure the holes are large enough to allow excess water to drain freely, but not so large that the soil washes out. Adding a layer of gravel or small stones to the bottom of the bottle before adding the soil can also improve drainage.
What type of soil is best for growing carrots in hanging bottles?
Carrots thrive in loose, well-draining soil that is rich in organic matter. A good potting mix specifically formulated for vegetables is ideal. You can also create your own mix by combining equal parts of compost, peat moss (or coconut coir), and perlite or vermiculite. Avoid using heavy clay soil, as it can compact and restrict root growth. Ensure the soil is free of rocks and debris, as these can hinder the development of straight, uniform carrots.
How often should I water my hanging bottle carrot garden?
The frequency of watering will depend on the weather conditions, the type of soil you are using, and the size of the bottles. Generally, you should water your carrots whenever the top inch of soil feels dry to the touch. Avoid overwatering, as this can lead to root rot. Water deeply and evenly, ensuring that the entire root zone is moistened. During hot, dry weather, you may need to water more frequently. Consider using a watering can with a gentle rose head to avoid disturbing the soil.
How much sunlight do carrots need when grown in hanging bottles?
Carrots need at least six hours of direct sunlight per day to thrive. Choose a location for your hanging bottle garden that receives ample sunlight throughout the day. If you live in a particularly hot climate, you may need to provide some afternoon shade to prevent the soil from drying out too quickly. You can also rotate the bottles periodically to ensure that all sides of the plants receive equal sunlight.
What are some common pests and diseases that affect carrots, and how can I prevent them?
Common pests that affect carrots include carrot rust flies, aphids, and nematodes. Diseases include leaf blight and root rot. To prevent these problems, practice good garden hygiene, such as removing weeds and debris regularly. Use companion planting to deter pests (e.g., planting marigolds near your carrots). Ensure proper drainage to prevent root rot. You can also use organic pest control methods, such as insecticidal soap or neem oil, to control infestations.
How long does it take for carrots to mature when grown in hanging bottles?
The time it takes for carrots to mature depends on the variety you are growing and the growing conditions. Generally, carrots take between 60 and 80 days to mature. Check the seed packet for specific information on the maturity time for your chosen variety. You can harvest carrots when they reach the desired size. Gently loosen the soil around the carrots and pull them out by the tops.
Can I reuse the soil from my hanging bottle carrot garden?
Yes, you can reuse the soil, but it’s important to amend it before planting new carrots. Remove any old plant debris and roots. Add compost or other organic matter to replenish nutrients that have been depleted. You may also want to sterilize the soil to kill any potential pests or diseases. You can do this by baking the soil in the oven at 200 degrees Fahrenheit for 30 minutes or by solarizing it in a black plastic bag for several weeks.
How do I support the weight of the bottles once they are filled with soil and plants?
The weight of the bottles can be significant, especially when they are filled with soil and mature plants. Use strong, durable materials for hanging the bottles, such as heavy-duty wire, rope, or chain. Ensure that the hanging points are securely attached to a sturdy structure, such as a fence, a wall, or a pergola. Distribute the weight evenly to prevent the bottles from falling or breaking.
What carrot varieties are best suited for growing in hanging bottles?
Shorter, rounder carrot varieties, such as ‘Thumbelina’ or ‘Parisian’, are well-suited for growing in hanging bottles, as they don’t require as much space for root development. However, you can also grow longer varieties, such as ‘Nantes’ or ‘Danvers’, in larger bottles. Choose varieties that are known for their good flavor and disease resistance.
Leave a Comment