
Hanging garden DIY projects are a fantastic way to bring lush greenery and vibrant blooms to even the smallest of spaces! Are you dreaming of a garden bursting with life, but lacking the sprawling backyard to make it a reality? Don’t despair! I’m here to tell you that you can cultivate your own little paradise, no matter how limited your square footage.
The concept of hanging gardens isn’t new; in fact, they evoke images of the legendary Hanging Gardens of Babylon, one of the Seven Wonders of the Ancient World! While we might not be building elaborate tiered structures, the spirit of bringing nature to elevated spaces remains the same. For centuries, cultures around the globe have utilized vertical gardening techniques to maximize yields and beautify their surroundings.
But why should *you* embrace a hanging garden DIY project? Well, beyond the sheer aesthetic appeal, these vertical wonders offer a multitude of benefits. They’re perfect for apartment dwellers, balcony gardeners, and anyone looking to add a touch of nature to their indoor or outdoor spaces. Plus, they can help deter pests, improve air quality, and even provide a sense of tranquility in our often-hectic lives. In this article, I’ll guide you through some simple and creative DIY hanging garden ideas that you can easily implement, transforming your space into a verdant oasis. Get ready to unleash your inner gardener and create something truly special!
DIY Hängegarten: Dein grünes Paradies für Zuhause
Hallo ihr Lieben! Habt ihr auch manchmal das Gefühl, dass euch ein bisschen Grün in euren vier Wänden fehlt? Oder vielleicht habt ihr nur wenig Platz, aber trotzdem Lust auf einen kleinen Garten? Dann habe ich heute genau das Richtige für euch: einen DIY Hängegarten! Das ist nicht nur super einfach zu machen, sondern sieht auch noch total stylisch aus und bringt frische Luft in euer Zuhause. Lasst uns loslegen!
Was du für deinen Hängegarten brauchst
Bevor wir starten, hier eine Liste mit allen Materialien und Werkzeugen, die du benötigst. Keine Sorge, das meiste davon hast du wahrscheinlich schon zu Hause!
* Töpfe: Wähle Töpfe in verschiedenen Größen und Materialien. Terrakotta, Plastik oder sogar recycelte Dosen – alles ist erlaubt! Achte nur darauf, dass sie Löcher im Boden haben, damit das Wasser ablaufen kann.
* Pflanzen: Hier kannst du deiner Kreativität freien Lauf lassen! Kräuter, Blumen, Sukkulenten, Hängepflanzen – such dir aus, was dir gefällt und was zu deinen Lichtverhältnissen passt.
* Seile oder Ketten: Stabile Seile oder Ketten sind wichtig, um die Töpfe aufzuhängen. Achte darauf, dass sie das Gewicht der bepflanzten Töpfe tragen können.
* Haken oder eine Stange: Um deinen Hängegarten aufzuhängen, brauchst du Haken, die du an der Decke oder Wand befestigen kannst, oder eine Stange, an der du die Töpfe aufhängen kannst.
* Erde: Verwende hochwertige Blumenerde, die zu deinen Pflanzen passt.
* Werkzeuge: Bohrmaschine (falls du Haken anbringen musst), Schere, Maßband, eventuell eine Zange.
* Optional: Farbe, Pinsel, Dekomaterial (z.B. Steine, Muscheln), um die Töpfe zu verschönern.
Die Vorbereitung: Alles für einen reibungslosen Start
Bevor wir mit dem eigentlichen Bau beginnen, ist es wichtig, alles vorzubereiten. Das spart Zeit und Nerven!
1. Töpfe vorbereiten: Reinige die Töpfe gründlich und bohre gegebenenfalls zusätzliche Löcher in den Boden, falls die vorhandenen nicht ausreichen. Das ist wichtig, damit das Wasser gut ablaufen kann und die Pflanzen nicht faulen.
2. Seile/Ketten zuschneiden: Miss die Länge der Seile oder Ketten ab, die du für jeden Topf benötigst. Bedenke dabei, wie tief die Töpfe hängen sollen und wie viel Platz du zwischen den einzelnen Töpfen haben möchtest. Schneide die Seile/Ketten entsprechend zu. Lieber etwas länger lassen, kürzen kannst du später immer noch!
3. Pflanzen auswählen: Überlege dir, welche Pflanzen du in deinen Hängegarten pflanzen möchtest. Informiere dich über ihre Bedürfnisse (Licht, Wasser, etc.) und stelle sicher, dass sie gut zusammenpassen.
4. Arbeitsbereich vorbereiten: Lege eine Plane oder Zeitungspapier aus, um deinen Arbeitsbereich sauber zu halten. Stelle alle Materialien und Werkzeuge bereit, damit du alles griffbereit hast.
Die Montage: Schritt für Schritt zum Hängegarten
Jetzt kommt der spannende Teil: Wir bauen unseren Hängegarten! Keine Sorge, es ist wirklich nicht schwer.
Hängegarten mit einzelnen Seilen/Ketten
Diese Variante ist ideal, wenn du die Töpfe einzeln aufhängen möchtest.
1. Löcher bohren (falls nötig): Wenn du Haken an der Decke oder Wand anbringen musst, markiere die Stellen, an denen du bohren möchtest, und bohre die Löcher. Achte darauf, dass die Löcher groß genug für die Dübel sind.
2. Haken anbringen: Setze die Dübel in die Löcher und schraube die Haken fest. Stelle sicher, dass die Haken stabil sind und das Gewicht der Töpfe tragen können.
3. Seile/Ketten befestigen: Führe die Seile/Ketten durch die Löcher im Boden der Töpfe. Mache einen Knoten unterhalb des Topfes, damit das Seil/die Kette nicht durchrutschen kann.
4. Töpfe aufhängen: Hänge die Töpfe an den Haken auf. Achte darauf, dass die Töpfe gleichmäßig verteilt sind und nicht zu eng aneinander hängen.
5. Pflanzen einsetzen: Fülle die Töpfe mit Erde und setze die Pflanzen ein. Gieße die Pflanzen vorsichtig an.
6. Dekorieren (optional): Verschönere die Töpfe mit Farbe, Steinen, Muscheln oder anderen Dekomaterialien.
Hängegarten mit einer Stange
Diese Variante ist ideal, wenn du die Töpfe an einer Stange aufhängen möchtest.
1. Stange vorbereiten: Wenn du eine Holzstange verwendest, kannst du sie vorher abschleifen und bemalen.
2. Haken an der Stange befestigen: Befestige Haken oder Ösen an der Stange, an denen du die Töpfe aufhängen kannst. Achte darauf, dass die Haken/Ösen stabil sind und das Gewicht der Töpfe tragen können.
3. Stange aufhängen: Befestige die Stange an der Decke oder Wand. Verwende dafür stabile Haken oder Halterungen.
4. Seile/Ketten an den Töpfen befestigen: Führe die Seile/Ketten durch die Löcher im Boden der Töpfe. Mache einen Knoten unterhalb des Topfes, damit das Seil/die Kette nicht durchrutschen kann.
5. Töpfe aufhängen: Hänge die Töpfe an den Haken/Ösen an der Stange auf. Achte darauf, dass die Töpfe gleichmäßig verteilt sind und nicht zu eng aneinander hängen.
6. Pflanzen einsetzen: Fülle die Töpfe mit Erde und setze die Pflanzen ein. Gieße die Pflanzen vorsichtig an.
7. Dekorieren (optional): Verschönere die Töpfe mit Farbe, Steinen, Muscheln oder anderen Dekomaterialien.
Pflegetipps für deinen Hängegarten
Damit dein Hängegarten lange schön bleibt, hier noch ein paar Pflegetipps:
* Gießen: Gieße die Pflanzen regelmäßig, aber nicht zu viel. Achte darauf, dass das Wasser gut ablaufen kann.
* Düngen: Dünge die Pflanzen regelmäßig, um sie mit Nährstoffen zu versorgen.
* Licht: Stelle sicher, dass die Pflanzen genügend Licht bekommen.
* Schneiden: Schneide verwelkte Blätter und Blüten regelmäßig ab.
* Kontrolle: Kontrolliere die Pflanzen regelmäßig auf Schädlinge und Krankheiten.
Pflanzenwahl: Was passt in deinen Hängegarten?
Die Wahl der richtigen Pflanzen ist entscheidend für den Erfolg deines Hängegartens. Hier sind ein paar Ideen, die gut geeignet sind:
* Hängepflanzen: Efeu, Efeutute, Leuchterblume, Erbsenpflanze
* Kräuter: Minze, Petersilie, Schnittlauch, Thymian
* Blumen: Petunien, Geranien, Fuchsien, Begonien
* Sukkulenten: Hauswurz, Fetthenne, Echeveria, Aloe Vera
Achte bei der Auswahl der Pflanzen auf ihre Bedürfnisse und wähle Pflanzen, die gut zusammenpassen.
Kreative Ideen für deinen Hängegarten
Dein Hängegarten muss nicht langweilig sein! Hier sind ein paar kreative Ideen, um ihn noch individueller zu gestalten:
* Verschiedene Topfgrößen und -formen: Verwende Töpfe in verschiedenen Größen und Formen, um einen interessanten Look zu erzeugen.
* Bemalte Töpfe: Bemale die Töpfe mit bunten Farben oder Mustern.
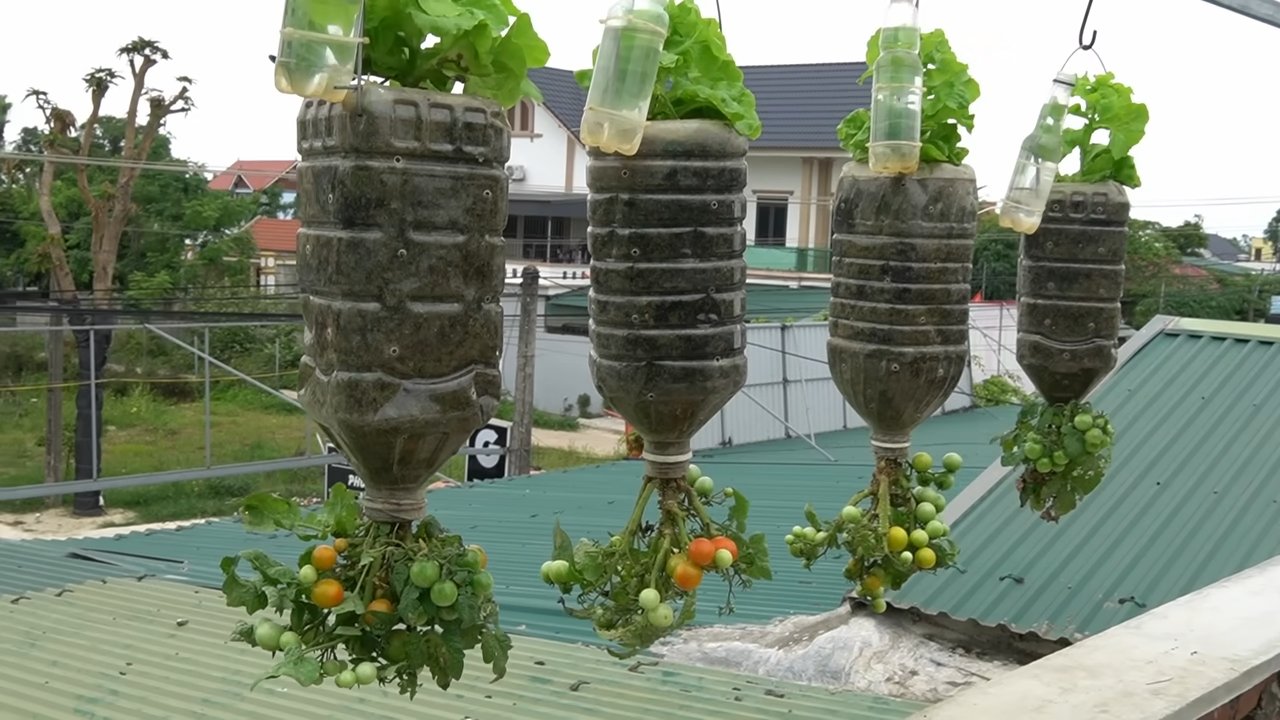
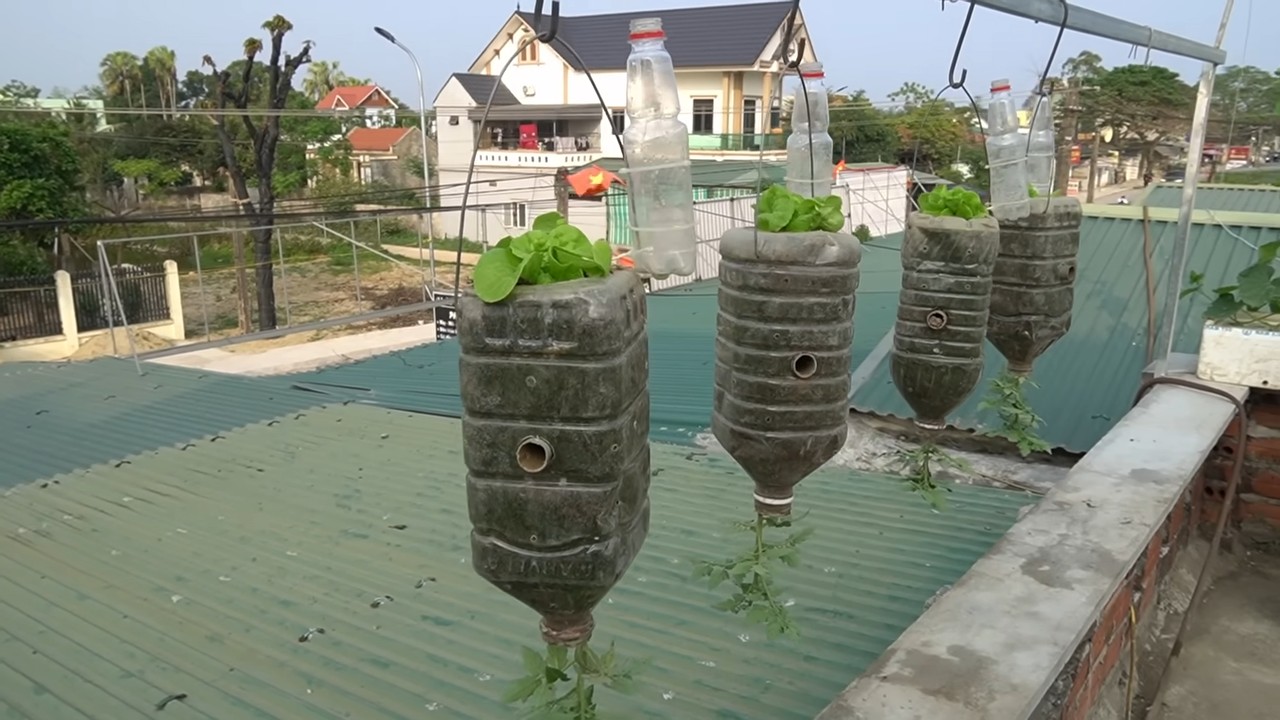
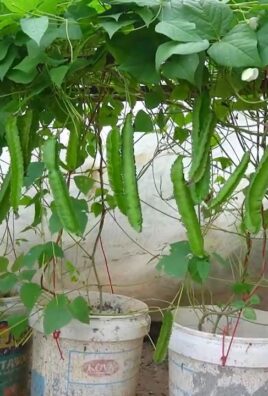
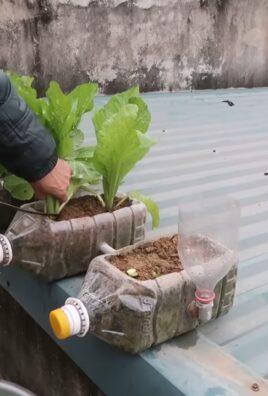
* Recycelte Materialien: Verwende recycelte Materialien wie Dosen, Flaschen oder alte Schuhe als Töpfe.
* Lichterketten: Wickle Lichterketten um die Töpfe, um eine gemütliche Atmosphäre zu schaffen.
* Mobile: Hänge ein Mobile zwischen die Töpfe, um einen verspielten Effekt zu erzielen.
Ich hoffe, diese Anleitung hat dir geholfen, deinen eigenen Hänge
Conclusion
So, there you have it! Creating your own hanging garden DIY project isn’t just a fun weekend activity; it’s a transformative experience that brings nature closer to your everyday life. We’ve walked you through the steps, highlighted the benefits, and hopefully, inspired you to embark on this green adventure. But why is this DIY trick a must-try?
Firstly, it’s incredibly rewarding. There’s a unique satisfaction in nurturing life and watching your plants thrive in a space you’ve personally crafted. Unlike store-bought decorations, a hanging garden is a living, breathing piece of art that evolves and changes with the seasons. It’s a constant reminder of your creativity and dedication.
Secondly, it’s a fantastic space-saver. Whether you live in a sprawling house or a cozy apartment, vertical gardening allows you to maximize your green space without sacrificing precious floor area. This is especially beneficial for urban dwellers who crave a connection to nature but are limited by their living environment.
Thirdly, it’s customizable to your heart’s content. The possibilities are endless! You can choose plants that match your aesthetic, create unique container designs, and even incorporate lighting to showcase your hanging garden at night.
Variations and Suggestions:
Don’t be afraid to experiment! Consider using recycled materials like old tin cans, plastic bottles, or even repurposed wooden pallets to create your planters. This not only adds a rustic charm to your hanging garden but also promotes sustainability.
For a touch of elegance, try using macrame plant hangers. These intricate designs can elevate the look of your hanging garden and add a bohemian flair to your space.
If you’re short on time, opt for low-maintenance plants like succulents, air plants, or pothos. These hardy varieties require minimal care and are perfect for beginners.
For those with a culinary inclination, consider creating a hanging herb garden. Imagine having fresh basil, mint, and rosemary readily available for your cooking needs!
And finally, don’t forget about lighting! Adding string lights or spotlights can transform your hanging garden into a magical oasis, especially during the evening hours.
We truly believe that this hanging garden DIY project is something everyone can enjoy. It’s a chance to connect with nature, express your creativity, and enhance your living space. So, gather your materials, unleash your inner gardener, and get ready to create a stunning hanging garden that will be the envy of all your friends.
We’re eager to see your creations! Share your hanging garden photos and experiences with us on social media using #HangingGardenDIY. Let’s inspire each other and spread the joy of vertical gardening! We can’t wait to see what you come up with. Happy gardening!
Frequently Asked Questions (FAQ)
Q1: What are the best plants to use for a hanging garden?
A1: The best plants for a hanging garden depend on several factors, including the amount of sunlight your space receives, your climate, and your personal preferences. However, some popular and reliable choices include:
* Trailing Plants: Pothos, spider plants, string of pearls, and creeping Jenny are excellent choices for creating a cascading effect.
* Succulents: Echeveria, sedum, and sempervivum are drought-tolerant and require minimal care, making them ideal for busy individuals.
* Herbs: Basil, mint, rosemary, and thyme are fragrant and useful additions to any hanging garden, especially for those who enjoy cooking.
* Flowers: Petunias, impatiens, and begonias add vibrant color and can brighten up any space.
* Air Plants (Tillandsia): These unique plants don’t require soil and can be easily attached to various surfaces, making them perfect for creative hanging garden designs.
Consider your local climate and the amount of sunlight your hanging garden will receive when making your plant selections. Research the specific needs of each plant to ensure they thrive in their new environment.
Q2: What kind of containers should I use for my hanging garden?
A2: The type of containers you use for your hanging garden is largely a matter of personal preference and aesthetic. However, there are a few factors to consider:
* Material: Plastic pots are lightweight and durable, while terracotta pots are porous and allow for better drainage. Metal containers can add a rustic touch, but they may heat up quickly in direct sunlight.
* Size: Choose containers that are appropriately sized for the plants you intend to grow. Smaller plants will do well in smaller pots, while larger plants will require larger containers.
* Drainage: Ensure that your containers have adequate drainage holes to prevent waterlogging, which can lead to root rot.
* Weight: Consider the weight of the filled containers when choosing your hanging hardware. You’ll need to ensure that your supports are strong enough to hold the weight of the plants, soil, and water.
Some popular container options include:
* Hanging Baskets: These are readily available at most garden centers and come in a variety of sizes and styles.
* Macrame Plant Hangers: These add a bohemian touch and can be used to hang a variety of pots.
* Repurposed Materials: Old tin cans, plastic bottles, and wooden pallets can be transformed into unique and eco-friendly planters.
Q3: How do I water my hanging garden?
A3: Watering your hanging garden can be a bit tricky, as it’s important to avoid overwatering and underwatering. Here are a few tips:
* Check the Soil Moisture: Before watering, stick your finger into the soil to check its moisture level. If the soil feels dry to the touch, it’s time to water.
* Water Thoroughly: When you do water, water thoroughly until water drains out of the drainage holes. This ensures that the roots are adequately hydrated.
* Water Early in the Morning: Watering early in the morning allows the plants to absorb the water before the heat of the day evaporates it.
* Use a Watering Can with a Long Spout: This will help you reach the plants without spilling water.
* Consider Self-Watering Containers: These containers have a reservoir that slowly releases water to the plants, reducing the need for frequent watering.
Be mindful of the specific watering needs of your plants. Some plants, like succulents, prefer to dry out completely between waterings, while others require more frequent watering.
Q4: How do I fertilize my hanging garden?
A4: Fertilizing your hanging garden is essential for providing your plants with the nutrients they need to thrive. Here are a few tips:
* Use a Balanced Fertilizer: Choose a fertilizer that contains equal amounts of nitrogen, phosphorus, and potassium (NPK).
* Follow the Instructions: Carefully follow the instructions on the fertilizer packaging to avoid over-fertilizing, which can damage your plants.
* Fertilize Regularly: Fertilize your hanging garden every 2-4 weeks during the growing season (spring and summer).
* Use a Liquid Fertilizer: Liquid fertilizers are easy to apply and are quickly absorbed by the plants.
* Consider Organic Fertilizers: Compost tea and worm castings are excellent organic options that can improve soil health and provide nutrients to your plants.
Q5: How do I protect my hanging garden from pests and diseases?
A5: Protecting your hanging garden from pests and diseases is crucial for maintaining its health and beauty. Here are a few preventative measures:
* Inspect Your Plants Regularly: Check your plants regularly for signs of pests or diseases, such as aphids, spider mites, or powdery mildew.
* Provide Good Air Circulation: Good air circulation can help prevent fungal diseases.
* Avoid Overwatering: Overwatering can create a breeding ground for pests and diseases.
* Use Organic Pest Control Methods: If you do find pests, try using organic pest control methods, such as insecticidal soap or neem oil.
* Remove Diseased Leaves: If you notice any diseased leaves, remove them immediately to prevent the spread of the disease.
By following these tips, you can create a thriving and beautiful hanging garden DIY project that will bring joy to your life for years to come.
Leave a Comment