
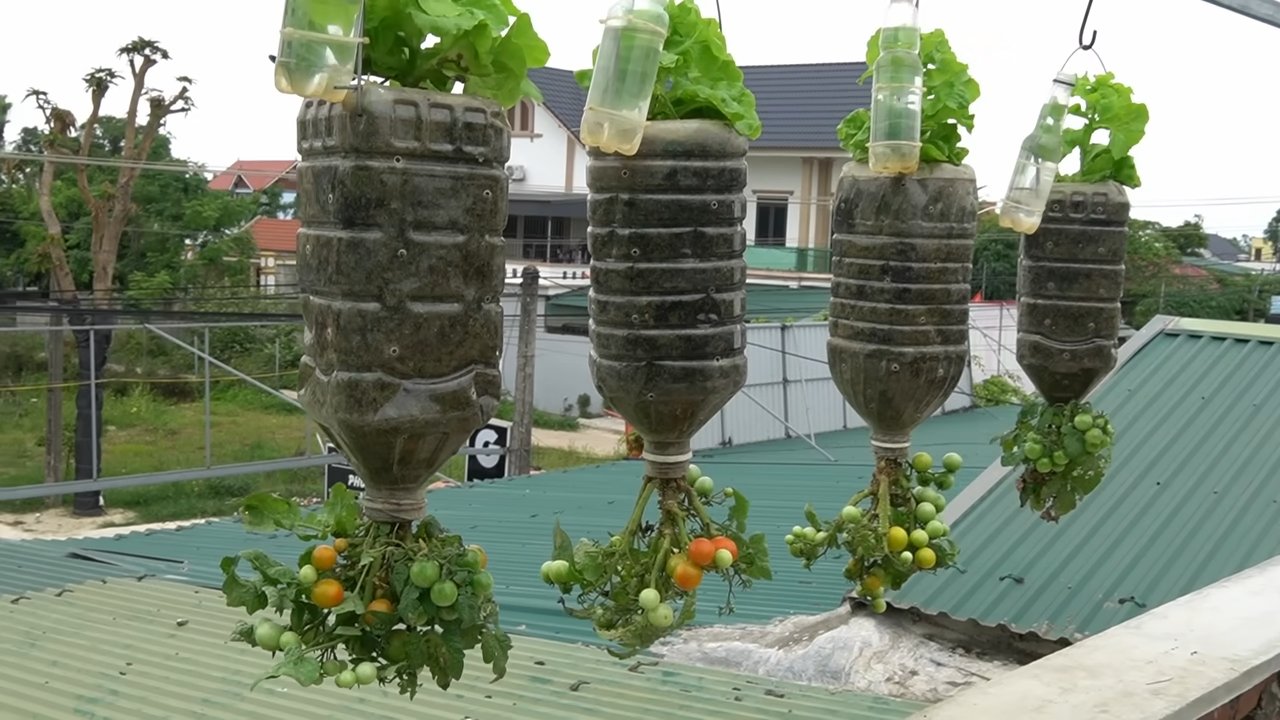
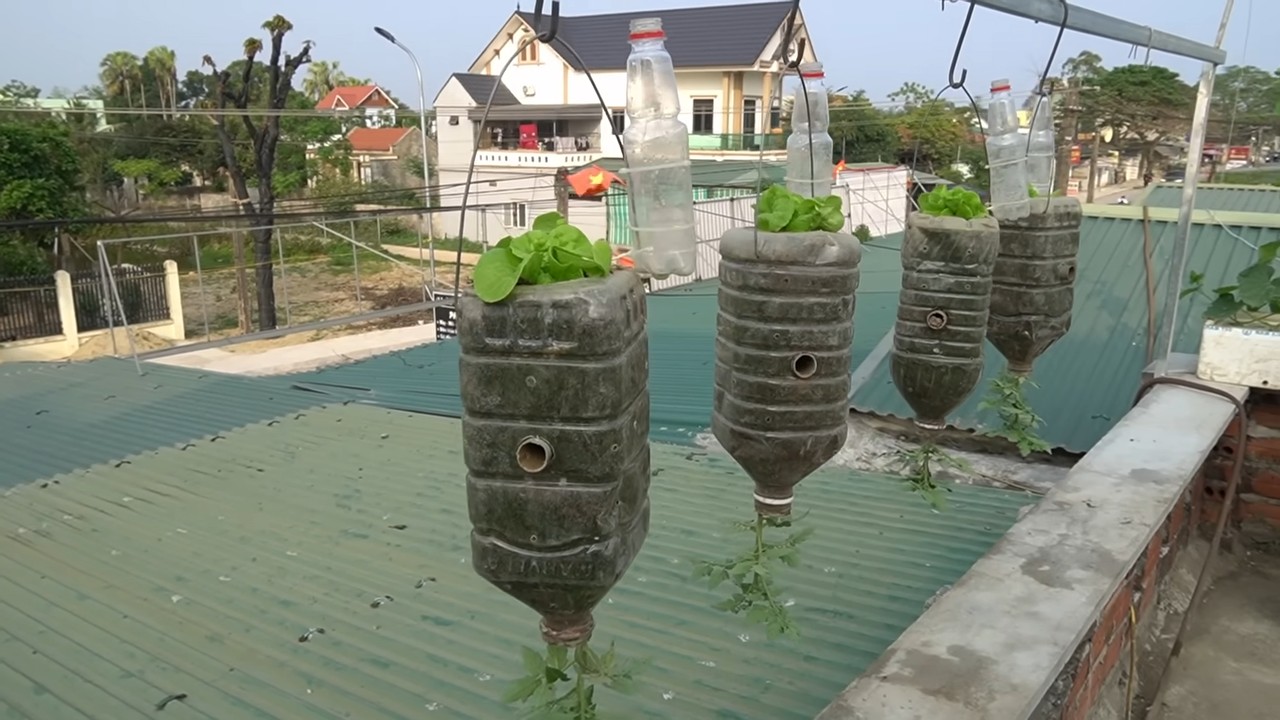
Hanging lettuce tomato garden: Imagine stepping outside your door and plucking fresh, juicy tomatoes and crisp lettuce for your salad, all grown effortlessly in a space-saving, beautiful display. Sounds like a dream, right? Well, it doesn’t have to be! For centuries, people have cultivated gardens in innovative ways, from the terraced hillsides of ancient civilizations to the window boxes of bustling city apartments. The desire to connect with nature and grow our own food is deeply ingrained in us.
But let’s face it, not everyone has a sprawling backyard. That’s where the magic of a hanging lettuce tomato garden comes in! This DIY project is perfect for apartment dwellers, balcony enthusiasts, or anyone looking to maximize their gardening space. I’m going to show you how to create your own vertical oasis, bringing the joy of fresh produce right to your fingertips.
Why do you need this DIY trick? Because store-bought produce can be expensive and often lacks the flavor of homegrown goodness. Plus, knowing exactly where your food comes from and how it’s grown is incredibly rewarding. Get ready to transform your space and enjoy the freshest salads you’ve ever tasted!
DIY Hängegarten für Salat und Tomaten: So geht’s!
Hallo liebe Gartenfreunde! Ich zeige euch heute, wie ihr einen platzsparenden und super coolen Hängegarten für Salat und Tomaten selber bauen könnt. Das ist nicht nur praktisch, wenn ihr wenig Platz habt, sondern sieht auch noch richtig schick aus! Keine Sorge, es ist einfacher als es aussieht. Los geht’s!
Was du brauchst:
* Mehrere stabile Eimer (am besten aus Kunststoff, ca. 10-15 Liter Fassungsvermögen)
* Bohrmaschine mit verschiedenen Bohrern (Holz- und Metallbohrer)
* Starkes Seil oder Kette (wetterfest!)
* Erde (am besten spezielle Gemüseerde)
* Salat- und Tomatenpflanzen (oder Samen, wenn du sie vorziehen möchtest)
* Evtl. Vlies oder Kokosmatte (um die Erde im Eimer zu halten)
* Messer oder Schere
* Maßband oder Zollstock
* Handschuhe (zum Schutz deiner Hände)
* Gießkanne oder Schlauch
* Evtl. Dünger (organisch, für Gemüse)
* Haken oder eine stabile Stange zum Aufhängen
Vorbereitung der Eimer:
Bevor wir mit dem eigentlichen Aufhängen beginnen, müssen wir die Eimer vorbereiten. Das ist wichtig, damit das Wasser gut ablaufen kann und die Pflanzen genügend Platz zum Wachsen haben.
1. Löcher bohren: Nimm deine Bohrmaschine und bohre mehrere Löcher in den Boden jedes Eimers. Ich empfehle mindestens 5-6 Löcher mit einem Durchmesser von ca. 1 cm. Diese Löcher sorgen dafür, dass überschüssiges Wasser ablaufen kann und Staunässe vermieden wird. Staunässe ist nämlich der Tod für die meisten Pflanzen!
2. Drainage vorbereiten: Um zu verhindern, dass die Erde durch die Löcher rieselt, kannst du eine Schicht Vlies oder Kokosmatte auf den Boden des Eimers legen. Schneide einfach ein passendes Stück zu und lege es hinein. Das Vlies lässt das Wasser durch, hält aber die Erde zurück. Alternativ kannst du auch eine Schicht Kies oder Tonscherben verwenden.
3. Löcher für die Aufhängung bohren: Jetzt kommen wir zum wichtigsten Teil: die Löcher für die Aufhängung. Du brauchst mindestens drei Löcher pro Eimer, am besten gleichmäßig verteilt am oberen Rand. Ich empfehle einen Abstand von ca. 5-7 cm vom oberen Rand. Achte darauf, dass die Löcher groß genug sind, damit dein Seil oder deine Kette hindurchpasst. Ich verwende meistens einen Bohrer, der etwas größer ist als der Durchmesser meines Seils.
4. Kanten glätten: Nach dem Bohren können die Kanten der Löcher scharf sein. Um zu verhindern, dass das Seil oder die Kette daran reibt und beschädigt wird, kannst du die Kanten mit einem Messer oder Schleifpapier glätten.
Die Aufhängung:
Jetzt wird es spannend! Wir bauen die Aufhängung für unsere Eimer. Hier gibt es verschiedene Möglichkeiten, je nachdem, was du zur Hand hast und wie du deinen Hängegarten gestalten möchtest.
1. Seil oder Kette zuschneiden: Schneide drei gleich lange Stücke Seil oder Kette für jeden Eimer zu. Die Länge hängt davon ab, wie tief du die Eimer hängen möchtest. Ich rechne immer großzügig und kürze sie später, wenn nötig. Denk daran, dass die Eimer nicht zu tief hängen sollten, damit du sie noch gut erreichen kannst.
2. Seil oder Kette befestigen: Führe jedes Seilstück durch eines der Löcher am Eimer und verknote es fest. Achte darauf, dass die Knoten stabil sind und sich nicht lösen können. Wenn du Kette verwendest, kannst du Karabinerhaken verwenden, um die Kette an den Löchern zu befestigen. Das ist besonders praktisch, wenn du die Höhe der Eimer später noch verändern möchtest.
3. Alle Seile/Ketten zusammenführen: Nimm die drei Enden der Seile oder Ketten und führe sie an einem Punkt zusammen. Hier kannst du entweder einen großen Knoten machen oder einen stabilen Ring verwenden, an dem du alle Enden befestigst. Der Ring ist besonders praktisch, wenn du die Eimer später noch abnehmen möchtest.
4. Haken oder Stange vorbereiten: Bevor du die Eimer aufhängst, musst du sicherstellen, dass du einen stabilen Haken oder eine Stange hast, an der du sie befestigen kannst. Achte darauf, dass der Haken oder die Stange das Gewicht der befüllten Eimer tragen kann. Ich habe meinen Hängegarten an einem stabilen Ast eines Baumes aufgehängt. Du kannst aber auch eine Stange an deiner Terrasse oder deinem Balkon befestigen.
Bepflanzung der Eimer:
Jetzt kommt der spaßigste Teil: das Bepflanzen!
1. Erde einfüllen: Fülle die Eimer mit Erde. Ich verwende am liebsten spezielle Gemüseerde, da sie die Pflanzen optimal mit Nährstoffen versorgt. Lass oben noch ein paar Zentimeter Platz, damit du beim Gießen nicht alles überschwemmst.
2. Pflanzen einsetzen: Setze die Salat- und Tomatenpflanzen in die Erde. Achte darauf, dass die Wurzeln genügend Platz haben und die Pflanzen nicht zu eng stehen. Wenn du Samen verwendest, befolge die Anweisungen auf der Samenpackung.
3. Angießen: Gieße die Pflanzen nach dem Einsetzen gründlich an. Das hilft ihnen, sich in der neuen Erde zu verwurzeln.
Aufhängen und Pflege:
Fast geschafft! Jetzt hängen wir die Eimer auf und kümmern uns um die Pflege unserer Pflanzen.
1. Eimer aufhängen: Hänge die Eimer an den vorbereiteten Haken oder die Stange. Achte darauf, dass sie genügend Sonnenlicht bekommen. Salat bevorzugt einen halbschattigen Standort, während Tomaten viel Sonne brauchen.
2. Gießen: Gieße die Pflanzen regelmäßig, besonders an heißen Tagen. Die Erde sollte immer leicht feucht sein, aber nicht nass.
3. Düngen: Dünge die Pflanzen regelmäßig mit einem organischen Dünger für Gemüse. Das sorgt für eine reiche Ernte.
4. Schädlinge kontrollieren: Kontrolliere die Pflanzen regelmäßig auf Schädlinge. Bei Bedarf kannst du natürliche Schädlingsbekämpfungsmittel verwenden.
5. Tomaten ausgeizen: Bei Tomaten solltest du regelmäßig die Seitentriebe (Geiztriebe) entfernen. Das fördert das Wachstum der Haupttriebe und sorgt für eine bessere Ernte.
Zusätzliche Tipps:
* Sortenwahl: Wähle Sorten, die für den Anbau in Töpfen geeignet sind. Es gibt spezielle Buschtomaten und Salatsorten, die nicht so groß werden.
* Windschutz: Wenn dein Hängegarten sehr windig ist, solltest du ihn an einem geschützten Ort aufhängen oder die Pflanzen mit einem Netz schützen.
* Gewicht beachten: Bedenke, dass die befüllten Eimer einiges wiegen. Achte darauf, dass deine Aufhängung stabil genug ist.
* Kreativität: Sei kreativ bei der Gestaltung deines Hängegartens! Du kannst die Eimer bemalen, mit Kräutern bepflanzen oder verschiedene Pflanzen kombinieren.
Ich hoffe, diese Anleitung hilft dir dabei, deinen eigenen Hängegarten für Salat und Tomaten zu bauen. Es ist wirklich ein tolles Projekt, das nicht nur Spaß macht, sondern auch frisches Gemüse direkt vor deine Haustür bringt. Viel Erfolg und viel Spaß beim Gärtnern!
Conclusion
So, there you have it! Transforming your gardening experience with a DIY hanging lettuce and tomato garden is not just a fun project; it’s a game-changer for fresh produce enthusiasts, space-conscious gardeners, and anyone looking to add a touch of green to their lives. We’ve explored the simplicity and efficiency of this method, highlighting how it maximizes space, minimizes pests, and delivers a bountiful harvest right at your fingertips.
But why is this DIY trick a must-try? Beyond the obvious benefits of fresh, homegrown lettuce and tomatoes, it’s about reclaiming control over your food source. You know exactly what goes into your plants – no hidden pesticides or questionable practices. Plus, the sheer joy of plucking a ripe tomato or crisp lettuce leaf from your own hanging garden is an unparalleled experience. It connects you to nature in a tangible way, fostering a sense of accomplishment and well-being.
Consider the possibilities! While we’ve focused on lettuce and tomatoes, the beauty of this DIY approach lies in its adaptability. Experiment with other compact vegetables and herbs like strawberries, peppers, spinach, or even cascading flowers for added visual appeal. You could even create a tiered system, with heavier tomato plants at the bottom and lighter lettuce varieties above, maximizing vertical space and creating a stunning green wall. Think about adding companion plants like basil near your tomatoes to naturally deter pests and enhance flavor.
Don’t be afraid to get creative with your container choices. While we’ve suggested specific materials, you can repurpose old buckets, baskets, or even sturdy fabric bags. Just ensure they have adequate drainage and are strong enough to support the weight of the plants and soil. Remember to choose a sunny location that receives at least six hours of direct sunlight per day for optimal growth.
This DIY hanging lettuce and tomato garden is more than just a gardening project; it’s an invitation to embrace sustainable living, connect with nature, and enjoy the freshest, most flavorful produce imaginable. It’s a testament to the fact that you don’t need acres of land to cultivate a thriving garden. All you need is a little ingenuity, some basic materials, and a passion for fresh, homegrown goodness.
We wholeheartedly encourage you to give this DIY trick a try. The initial setup might require a bit of effort, but the rewards are well worth it. Imagine stepping outside your door and harvesting a salad’s worth of fresh ingredients in minutes. It’s a convenience and a pleasure that’s hard to beat.
And most importantly, we want to hear about your experiences! Share your photos, tips, and variations on social media using #HangingGardenDIY. Let’s create a community of passionate gardeners who are transforming their spaces and enjoying the fruits (and vegetables!) of their labor. Your insights could inspire others to embark on their own gardening adventures. So, grab your tools, gather your materials, and get ready to elevate your gardening game with this incredible DIY hanging lettuce and tomato garden. Happy gardening!
Frequently Asked Questions (FAQ)
What type of lettuce and tomatoes are best for a hanging garden?
For lettuce, consider loose-leaf varieties like Black Seeded Simpson, Salad Bowl, or Oakleaf. These types are easy to harvest leaf by leaf, allowing for continuous production. For tomatoes, determinate or bush varieties like Roma, Patio, or Tiny Tim are ideal. These varieties are more compact and produce a manageable amount of fruit for a hanging container. Avoid indeterminate or vining tomatoes, as they can become too large and unwieldy for a hanging garden. Cherry tomatoes are also a great option, offering a sweet and prolific harvest.
How often should I water my hanging lettuce and tomato garden?
Watering frequency depends on several factors, including the weather, the type of container you’re using, and the size of your plants. Generally, you’ll need to water more frequently than you would with in-ground gardens, as hanging containers tend to dry out faster. Check the soil moisture daily by sticking your finger about an inch into the soil. If it feels dry, it’s time to water. Water thoroughly until water drains out of the bottom of the container. During hot, sunny weather, you may need to water twice a day. Consider using a self-watering container or adding water-retaining crystals to the soil to help maintain moisture levels.
What kind of soil should I use for my hanging garden?
Use a high-quality potting mix specifically formulated for containers. Avoid using garden soil, as it can be too heavy and compact, hindering drainage and root growth. A good potting mix will be lightweight, well-draining, and contain essential nutrients for healthy plant growth. You can also amend the potting mix with compost or other organic matter to improve its fertility and water-holding capacity. Consider adding a slow-release fertilizer to provide a steady supply of nutrients throughout the growing season.
How do I fertilize my hanging lettuce and tomato plants?
Lettuce and tomatoes are heavy feeders, so regular fertilization is essential for optimal growth and fruit production. Start with a slow-release fertilizer incorporated into the potting mix at planting time. Then, supplement with a liquid fertilizer every 2-3 weeks. Use a balanced fertilizer (e.g., 10-10-10) for lettuce and a fertilizer higher in phosphorus (the middle number) for tomatoes to promote flowering and fruit development. Follow the instructions on the fertilizer label carefully to avoid over-fertilizing, which can damage your plants.
How do I protect my hanging garden from pests and diseases?
Hanging gardens are naturally less susceptible to ground-dwelling pests, but they can still be affected by aphids, whiteflies, and other insects. Regularly inspect your plants for signs of pests or diseases. If you spot any problems, take action immediately. You can use insecticidal soap, neem oil, or other organic pest control methods to control infestations. To prevent diseases, ensure good air circulation around your plants and avoid overwatering. Remove any diseased leaves or stems promptly. Consider using companion planting to deter pests and attract beneficial insects. For example, planting basil near your tomatoes can help repel tomato hornworms.
How much sunlight do my hanging lettuce and tomato plants need?
Lettuce and tomatoes need at least six hours of direct sunlight per day to thrive. Choose a location for your hanging garden that receives ample sunlight. If you don’t have a sunny spot, you can supplement with grow lights. Rotate your containers regularly to ensure that all sides of the plants receive equal sunlight.
How do I harvest lettuce and tomatoes from a hanging garden?
Harvest lettuce by cutting individual leaves as needed, starting with the outer leaves. This allows the plant to continue producing new leaves. Harvest tomatoes when they are fully ripe and have reached their mature color. Gently twist the tomato off the vine, leaving the stem attached. Regular harvesting encourages the plants to produce more fruit.
Can I grow other vegetables and herbs in a hanging garden?
Absolutely! The possibilities are endless. Strawberries, peppers, spinach, herbs like basil, oregano, and thyme, and even small varieties of cucumbers can all thrive in a hanging garden. Just be sure to choose plants that are well-suited to container gardening and provide them with the appropriate growing conditions.
What if my hanging garden is too heavy?
Ensure your hanging structure is sturdy enough to support the weight of the containers, soil, and plants, especially after watering. If the garden is too heavy, consider using lighter-weight containers or reducing the amount of soil in each container. You can also reinforce the hanging structure with additional supports.
How do I overwinter my hanging garden?
Depending on your climate, you may be able to overwinter some of your plants. Lettuce can tolerate light frosts, but tomatoes are more sensitive to cold temperatures. If you live in a mild climate, you can bring your hanging garden indoors during the coldest months. Provide supplemental light and water as needed. In colder climates, it’s best to start fresh with new plants each spring.


Leave a Comment