
Hanging melon growing method – sounds intriguing, right? I know, the first time I heard about it, I was picturing watermelons dangling like Christmas ornaments! While the reality is a bit more grounded (pun intended!), this innovative technique is a game-changer for home gardeners, especially those with limited space or those looking to add a unique touch to their garden.
For centuries, gardeners have been finding creative ways to cultivate their favorite fruits and vegetables. From the ancient hanging gardens of Babylon (though probably not melons!) to modern vertical farming, the desire to maximize space and yield has always driven innovation. Now, with the hanging melon growing method, you can bring that spirit of ingenuity to your own backyard!
But why would you want to hang your melons, you ask? Well, imagine this: no more sprawling vines taking over your precious garden beds, no more melons rotting on the damp ground, and no more battling pests that thrive in soil contact. This method not only saves space but also improves air circulation, reduces disease, and even protects your precious melons from hungry critters. Plus, let’s be honest, it looks pretty darn cool! So, if you’re ready to elevate your gardening game and impress your neighbors, keep reading! I’m going to share my favorite DIY tricks and hacks for successfully growing melons in hanging baskets or supports. Get ready to harvest some sweet, juicy goodness from above!
DIY: Melonen hängend anbauen – So geht’s!
Ich liebe Melonen! Aber der Platz in meinem Garten ist begrenzt. Deshalb habe ich mich nach Alternativen umgesehen und bin auf die Idee gekommen, Melonen hängend anzubauen. Klingt verrückt? Ist es vielleicht ein bisschen, aber es funktioniert super und spart Platz! Hier zeige ich dir, wie du das auch hinbekommst.
Was du brauchst:
* Melonensamen oder Jungpflanzen (am besten kleinere Sorten wie Zuckermelonen oder Wassermelonen der Sorte “Sugar Baby”)
* Anzuchttöpfe und Anzuchterde (falls du mit Samen startest)
* Große Pflanzgefäße (Hängekörbe, große Töpfe mit Aufhängung oder selbstgebaute Hängevorrichtungen)
* Gute Blumenerde oder eine Mischung aus Gartenerde, Kompost und Sand
* Stabile Aufhängung (Ketten, Seile, Haken – je nach Gewicht der Melonen)
* Dünger (speziell für Gemüse oder Tomaten)
* Gießkanne oder Schlauch
* Schere oder Messer
* Alte Stoffreste, Jute oder Netze (für die Melonenhängematten)
* Geduld und Liebe!
Schritt-für-Schritt Anleitung:
Phase 1: Vorbereitung – Der Grundstein für deine hängenden Melonen
1. Samen vorziehen (optional): Wenn du mit Samen startest, fülle Anzuchttöpfe mit Anzuchterde und säe die Melonensamen gemäß den Anweisungen auf der Samenpackung. In der Regel bedeutet das, die Samen etwa 1-2 cm tief in die Erde zu stecken und leicht zu befeuchten. Stelle die Töpfe an einen warmen, hellen Ort (z.B. Fensterbank oder Gewächshaus). Halte die Erde feucht, aber nicht nass.
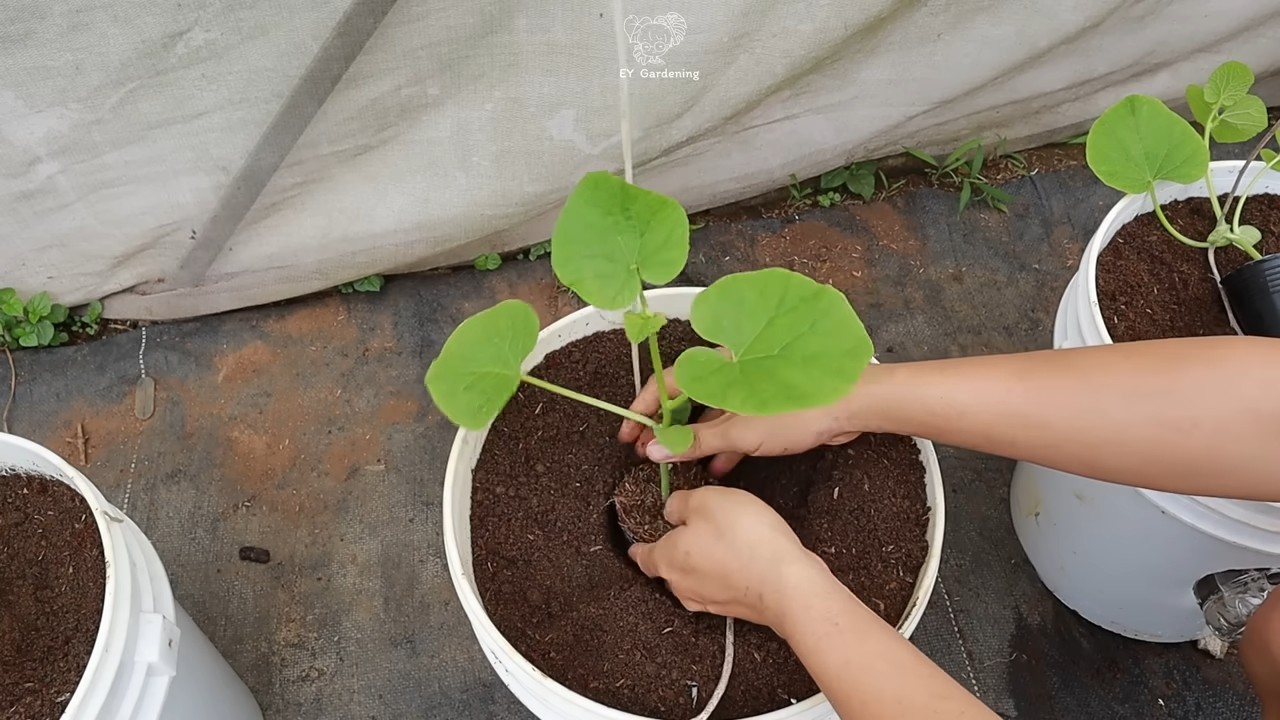
2. Pflanzgefäße vorbereiten: Wähle deine Pflanzgefäße aus. Hängekörbe sind ideal, aber auch große Töpfe mit Aufhängung funktionieren gut. Achte darauf, dass die Gefäße ausreichend groß sind (mindestens 20 Liter Volumen pro Pflanze), damit die Melonenwurzeln genügend Platz haben. Reinige die Gefäße gründlich, falls sie schon benutzt wurden.
3. Erde mischen: Fülle die Pflanzgefäße mit einer guten Blumenerde oder einer Mischung aus Gartenerde, Kompost und Sand. Die Erde sollte locker und gut durchlässig sein, damit das Wasser gut abfließen kann und die Wurzeln nicht faulen. Ich mische immer noch etwas Hornspäne unter, das ist ein guter Langzeitdünger.
4. Aufhängung anbringen: Befestige die Aufhängung an den Pflanzgefäßen. Achte darauf, dass die Aufhängung stabil ist und das Gewicht der ausgewachsenen Melonen tragen kann. Ich verwende gerne Ketten, da sie sehr robust sind. Überprüfe die Stabilität der Aufhängung, bevor du die Pflanzen einsetzt.
Phase 2: Einpflanzen und Aufhängen – Die Melonen bekommen ein neues Zuhause
1. Pflanzen einsetzen: Wenn du Jungpflanzen gekauft hast oder deine Samen aufgegangen sind und die Pflanzen groß genug sind (etwa 10-15 cm hoch), kannst du sie in die vorbereiteten Pflanzgefäße umtopfen. Hebe die Pflanzen vorsichtig aus den Anzuchttöpfen und setze sie in die Mitte der Pflanzgefäße. Fülle die Gefäße mit Erde auf und drücke die Erde leicht an.
2. Angießen: Gieße die Pflanzen nach dem Einsetzen gründlich an. Das hilft den Wurzeln, sich in der neuen Erde zu etablieren.
3. Aufhängen: Hänge die Pflanzgefäße an einem sonnigen und windgeschützten Ort auf. Melonen lieben die Sonne! Achte darauf, dass die Pflanzen genügend Platz haben, um sich auszubreiten. Der Standort sollte mindestens 6 Stunden Sonne pro Tag bekommen.
4. Rankhilfe anbringen (optional): Obwohl die Melonen hängen, kann es hilfreich sein, eine Rankhilfe anzubringen, an der sich die Triebe festhalten können. Das kann ein einfacher Bambusstab oder ein kleines Rankgitter sein.
Phase 3: Pflege – Damit deine Melonen prächtig gedeihen
1. Gießen: Melonen brauchen viel Wasser, besonders während der Fruchtbildung. Gieße die Pflanzen regelmäßig, am besten morgens oder abends, wenn die Sonne nicht so stark scheint. Vermeide es, die Blätter zu gießen, da dies Pilzkrankheiten fördern kann. Die Erde sollte immer leicht feucht sein, aber nicht nass.
2. Düngen: Dünge die Melonen regelmäßig mit einem speziellen Gemüsedünger oder Tomatendünger. Beginne etwa 2-3 Wochen nach dem Einsetzen und wiederhole die Düngung alle 2-3 Wochen. Achte auf die Dosierungsanleitung auf der Düngerpackung.
3. Ausgeizen: Entferne regelmäßig Seitentriebe, die keine Blüten oder Früchte tragen. Das fördert das Wachstum der Haupttriebe und die Fruchtbildung.
4. Bestäubung unterstützen: Melonen sind auf Bestäubung angewiesen, um Früchte zu bilden. Wenn du keine Bienen oder andere Bestäuber in deinem Garten hast, kannst du die Bestäubung selbst übernehmen. Nimm dazu einen kleinen Pinsel und übertrage den Pollen von den männlichen Blüten (die nur einen Stiel haben) auf die weiblichen Blüten (die einen kleinen Fruchtansatz haben).
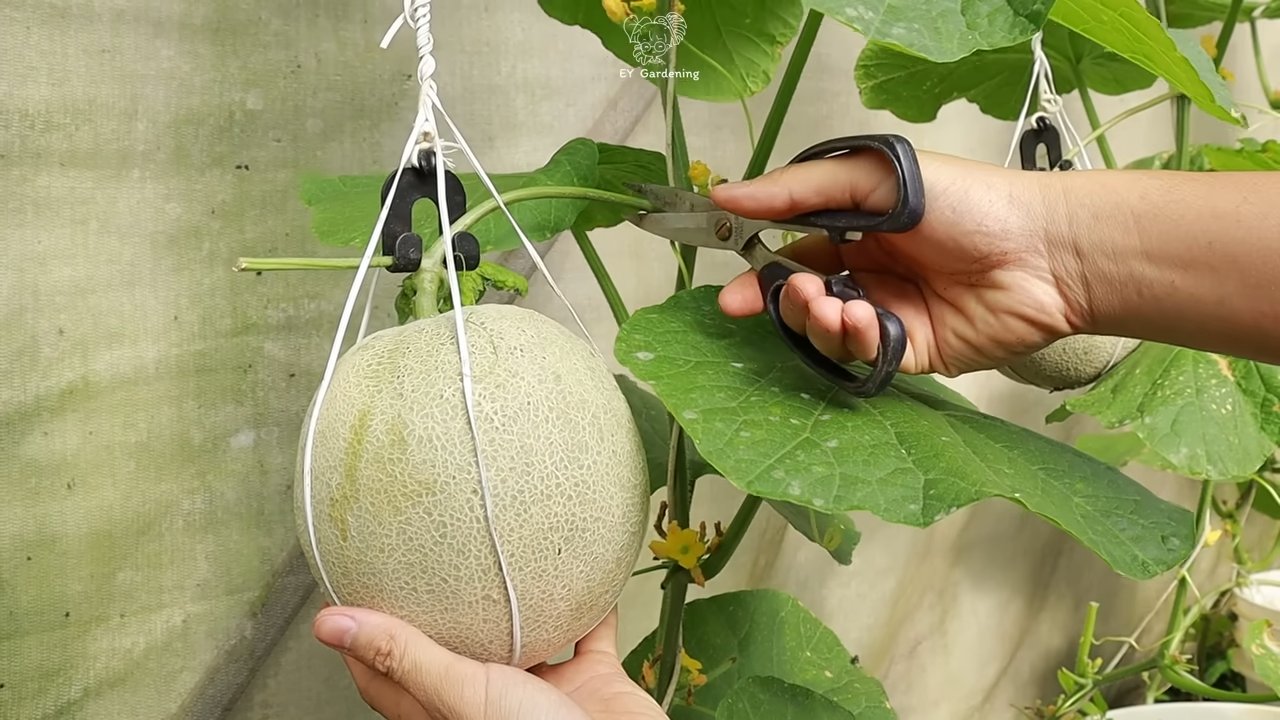
5. Melonenhängematten basteln: Wenn die Melonen größer werden, brauchen sie Unterstützung, damit die Triebe nicht abbrechen. Bastle kleine Hängematten aus alten Stoffresten, Jute oder Netzen und befestige sie unter den Melonen. Das verhindert, dass die Melonen durch ihr eigenes Gewicht herunterfallen. Ich habe dafür alte Geschirrtücher zerschnitten und mit Kordeln an der Aufhängung befestigt.
6. Schädlinge und Krankheiten kontrollieren: Achte auf Schädlinge wie Blattläuse oder Mehltau. Bei Bedarf kannst du biologische Schädlingsbekämpfungsmittel einsetzen. Regelmäßige Kontrolle hilft, Probleme frühzeitig zu erkennen und zu behandeln.
Phase 4: Ernte – Der Lohn deiner Mühe
1. Reife erkennen: Der Zeitpunkt der Ernte hängt von der Melonensorte ab. Achte auf die Farbe der Schale, den Duft und den Klang. Eine reife Melone klingt hohl, wenn man darauf klopft. Bei Wassermelonen verfärbt sich die Stelle, an der die Melone auf dem Boden liegt, von weiß nach gelblich.
2. Ernten: Schneide die Melone vorsichtig mit einem scharfen Messer oder einer Schere vom Trieb ab. Lasse einen kleinen Stiel an der Melone, damit sie länger haltbar ist.
3. Genießen: Jetzt kannst du deine selbstgezogenen Melonen genießen! Sie schmecken am besten, wenn sie gut gekühlt sind.
Zusätzliche Tipps und Tricks:
* Sortenwahl: Wähle Melonensorten, die für den Anbau in Töpfen geeignet sind. Kleinere Sorten wie Zuckermelonen oder Wassermelonen der Sorte “Sugar Baby” sind ideal.
* Drainage: Achte darauf, dass die Pflanzgefäße eine gute Drainage haben, damit das Wasser gut abfließen kann. Du kannst eine Schicht Kies oder Tonscherben auf den Boden der Gefäße legen.
* Windschutz: Schütze die Pflanzen vor starkem Wind, da dies die Triebe beschädigen kann.
* Sonnenschutz: An sehr heißen Tagen kann es sinnvoll sein, die Pflanzen vor direkter Sonneneinstrahlung zu schützen, um Verbrennungen zu vermeiden.
* Regelmäßige Kontrolle: Kontrolliere die Pflanzen regelmäßig auf Schädlinge und Krankheiten.
* Geduld: Melonen brauchen Zeit, um zu wachsen und zu reifen. Sei geduldig und gib nicht auf!
Warum hängend anbauen?
* Platzsparend: Ideal für kleine Gärten, Balkone oder Terrassen.
* Weniger Schädlinge: Die Pflanzen sind weniger anfällig für Schädlinge, da sie nicht direkt auf dem Boden liegen.
* Bessere Belüftung: Die Blätter trocknen schneller ab, was das Risiko von Pilzkrankheiten reduziert.
* Einfachere Ernte: Die Melonen sind leichter zu erreichen und zu
Conclusion
So, there you have it! The hanging melon growing method isn’t just a quirky gardening experiment; it’s a game-changer for anyone looking to maximize their yield, combat pests and diseases, and add a touch of whimsical charm to their garden. We’ve walked you through the process, highlighting the benefits and offering practical tips to ensure your success.
But why is this DIY trick a must-try? Simply put, it addresses several common challenges faced by melon growers. Ground rot, a frequent culprit behind disappointing harvests, becomes a non-issue when your melons are suspended in the air, enjoying ample airflow and sunshine. Pests like squash bugs and vine borers find it harder to access your precious fruits, reducing the need for harsh chemical treatments. And let’s not forget the space-saving aspect – hanging melons allow you to cultivate more in a smaller area, perfect for urban gardeners or those with limited land.
Beyond the practical advantages, there’s an undeniable aesthetic appeal to a garden adorned with hanging melons. Imagine the delight of your neighbors and the satisfaction of harvesting your own homegrown delicacies from these suspended treasures. It’s a conversation starter, a testament to your gardening ingenuity, and a source of fresh, delicious melons all season long.
Variations and Suggestions:
Don’t be afraid to experiment with different types of melons. While smaller varieties like cantaloupe and personal-sized watermelons are ideal for beginners, you can certainly try your hand at larger types with proper support. Consider using different materials for your slings – old t-shirts, burlap sacks, or even repurposed netting can work wonders. Just ensure the material is strong, breathable, and comfortable for the melon.
Another variation involves the type of support structure you use. While we’ve focused on using trellises and sturdy branches, you can also create custom frames or even utilize existing structures like pergolas or arbors. Get creative and adapt the method to suit your specific garden layout and resources.
For those in hotter climates, consider providing some shade for your hanging melons during the peak of the day. This can prevent sunburn and ensure optimal fruit development. A simple shade cloth draped over the support structure can make a significant difference.
Finally, remember to monitor your melons closely as they ripen. The weight of the fruit will increase significantly, so ensure your slings and support structure are up to the task. Gently support the melon with your hand as you harvest to prevent any accidental drops.
We wholeheartedly encourage you to give this DIY trick a try. It’s a rewarding and effective way to grow delicious, healthy melons while adding a unique touch to your garden. We are confident that the hanging melon growing method will be a success for you.
Share Your Experience!
We’d love to hear about your experiences with the hanging melon growing method! Share your photos, tips, and challenges in the comments below. Let’s create a community of melon enthusiasts and learn from each other’s successes and failures. Happy gardening!
FAQ
What types of melons are best suited for hanging?
Smaller melon varieties, such as cantaloupes, honeydews, and personal-sized watermelons (like Sugar Baby), are generally the best choices for hanging. These varieties are lighter and easier to support. Larger watermelon varieties can be grown using this method, but they require significantly stronger support structures and slings. Consider the mature weight of the melon when selecting your variety and designing your support system.
How do I create a sling for my melons?
You can create a sling from various materials, including old t-shirts, burlap sacks, pantyhose, or specialized netting. The key is to choose a material that is strong, breathable, and soft enough to avoid damaging the melon’s skin. Cut the material into a square or rectangular shape, then gather the corners and tie them together to form a pouch. Ensure the sling is large enough to comfortably cradle the melon as it grows. You can also purchase pre-made melon slings online or at your local garden center.
How high should I hang my melons?
The ideal height for hanging your melons depends on the variety and your personal preference. Generally, a height of 1-2 feet above the ground is sufficient. This allows for adequate airflow and prevents the melons from touching the soil. Consider the mature size of the melon and ensure there is enough clearance between the melon and the ground as it grows. You also want to be able to easily access the melons for harvesting.
How do I water and fertilize hanging melons?
Watering and fertilizing hanging melons is similar to growing them on the ground. Water regularly, especially during hot and dry periods, ensuring the soil remains consistently moist but not waterlogged. You can use a watering can or a hose with a gentle spray nozzle. Fertilize every 2-3 weeks with a balanced fertilizer, following the instructions on the product label. Consider using a liquid fertilizer that can be easily applied to the soil around the base of the plant.
How do I protect my hanging melons from pests and diseases?
Hanging melons can help reduce the risk of certain pests and diseases, but it’s still important to take preventative measures. Regularly inspect your plants for signs of pests or diseases. Use organic pest control methods, such as insecticidal soap or neem oil, to control common pests like aphids and squash bugs. Ensure good airflow around the plants to prevent fungal diseases. You can also prune away any diseased or damaged leaves.
How do I know when my hanging melons are ripe?
The signs of ripeness vary depending on the melon variety. Generally, look for the following indicators:
* **Color change:** The skin of the melon will typically change color as it ripens. For example, cantaloupes will turn from green to tan or yellow.
* **Aroma:** Ripe melons will often have a sweet, fragrant aroma.
* **Stem slip:** The stem of the melon will begin to separate from the vine when it’s ripe. You should be able to gently tug on the melon and it will easily detach from the vine.
* **Sound:** Some people tap on the melon to listen for a hollow sound, which indicates ripeness.
Can I grow hanging melons in containers?
Yes, you can grow hanging melons in containers, but you’ll need to choose a large, sturdy container with good drainage. The container should be at least 20 gallons in size. Use a high-quality potting mix and provide adequate support for the vines and melons. Container-grown melons may require more frequent watering and fertilizing than those grown in the ground.
What kind of support structure is best for hanging melons?
A sturdy trellis, arbor, or pergola are all excellent choices for supporting hanging melons. The support structure should be strong enough to bear the weight of the mature melons and vines. Ensure the structure is securely anchored to the ground to prevent it from tipping over. You can also use strong branches or even create a custom frame using wood or metal.
Is the hanging melon growing method suitable for all climates?
The hanging melon growing method is generally suitable for most climates, but it’s particularly beneficial in areas with high humidity or frequent rainfall. The improved airflow around the melons helps to prevent fungal diseases. In hotter climates, providing some shade during the hottest part of the day can help to prevent sunburn. In cooler climates, you may need to start your melons indoors and transplant them outdoors after the last frost.
What are the benefits of hanging melons compared to growing them on the ground?
The benefits of hanging melons include:
* **Reduced risk of ground rot:** Hanging melons are less likely to develop ground rot because they are not in direct contact with the soil.
* **Improved airflow:** The improved airflow around the melons helps to prevent fungal diseases.
* **Pest control:** Hanging melons are less accessible to ground-dwelling pests.
* **Space saving:** Hanging melons allow you to grow more melons in a smaller space.
* **Aesthetic appeal:** Hanging melons add a unique and attractive element to your garden.


Leave a Comment